STM32. Medical use. Tonometer. Introduction and hardware
One of the interesting profiles of the use of modern MK, of course, is medicine. The range of devices here is quite wide, ranging from simple thermometers, where you can use a simple STM8L with an LCD screen, ending with sophisticated cardio monitors, ECG meters, holters with the ability to remotely collect and send information via the eisernet or wirelessly from patients' beds directly to the head doctor’s office . Today we will talk about the possibility of using MK STM32 for non-invasive measurement of blood pressure by the oscillometric method. I ask all interested under cat.
Today, the "gold standard" for measuring blood pressure is considered to be the method of "N.S. Korotkova ”, recognized by the World Health Organization. However, one should not forget that this is an indirect method of measuring blood pressure. Of course, the measurement of blood pressure occurs with some error, determined by the elasticity of the walls of the artery and soft tissues, the amplitude and shape of the pulse wave, and other factors that are individual for each person. If we abandon rounding and accurately use the gauge division value, then we will see the difference between adjacent measurements when using a mechanical device. Reading the pressure gauge by ear is also performed with some error, depending on the individual characteristics of the person - speed of reaction, availability of skills, etc. As a result, the error of manual blood pressure monitors consists of three components: the method itself, the accuracy of the pressure gauge and the error in determining the moment of reading the readings. In reality, its value can be up to 15 mm Hg. Art.! The measurement results are also affected by the rate of injection of air into the cuff, the bleed rate and the magnitude of the pressure generated in the cuff. If we also add natural fluctuations in blood pressure, the difference between two adjacent measurements can be even greater.
An electronic blood pressure monitor, in principle, should have been devoid of all these shortcomings, because tones are measured using the same cuff, and processing is carried out using a number of patented algorithms and techniques. However, practice shows that in some cases the electronic blood pressure monitor gives a steady discrepancy with the readings of a manual blood pressure monitor. As a result - today, people have a strong opinion - “electronic tonometers are lying - no one will measure better than a doctor with a mercury pressure meter!” The experiments showed that a large measurement error was caused solely by the inability of the average layman to use this device, namely, to wear the cuff correctly . A properly dressed cuff is the key to obtaining a good envelope of Korotkov’s tones and successful finding of characteristic points on the envelope.
There are a lot of literature on the methodology for finding blood pressure by the envelope of tones on the Internet [1], [2], [3], [4], [5]. Freescale even has a good appnote, which popularly describes how to measure Korotkov’s tones in a cuff. But! How exactly to analyze the resulting envelope - there is practically no information anywhere. Each tonometer manufacturer sculpts in its own way, although the general technique is clearly visible. Just go to freepatentsonline.com and type in the search for non invasive blood pressure, and you will get enough information to write a tonometer blank. But! Further worse. Extrasystoles, artifacts, and other scary words get in the way of the exact results of oscillometry ...
If the desire to collect your blood pressure monitor still did not disappear, then proceed.
... We had two cuffs, a handful of operational amplifiers, several pressure sensors, a pair of valves and a microcontroller. The only thing that worried me was MEMS pressure sensors. I knew that sooner or later we’ll go over to this rubbish too ...
What will be needed for the BP meter:
1) Board with MK STM32F1xx (STM32 VL Discovery with STM32F100RBT6 on board will do);
2) MPXV5050GP pressure sensor (the model is taken from Freescale BPM Application Note, in your case there may be another model);
3) Integral OU LM358 (LM324) (it is better, of course, to take a rail-to-rail);
4) Some indicator - what to show pressure on (if there is no indicator - you can watch the results in watch during debugging);
5) A pump with a motor from a Chinese blood pressure monitor or a pear from a grandmother's blood pressure monitor;
6) If nevertheless you took a pump with a motor from a tonometer, you will also need a slow bleed valve from the same tonometer;
7) Emergency valve (to taste - needed for quick bleeding of air residues in the cuff after the measurement);
8) Tonometric cuff;
9) SD card with a card reader (or microSD with an adapter, which is not a pity to solder to).
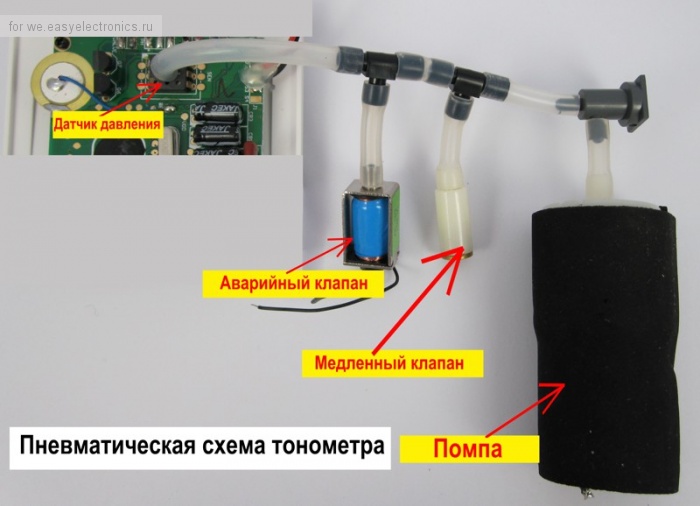
Figure 1 - Diagram of a pneumotract for measuring blood pressure
Let's try to figure out what we just collected. The pneumatic circuit is very simple. The pump is used to pump the cuff, after which the air begins to slowly bleed off an unregulated valve with a very small hole. It should be noted that the emergency valve must be closed - otherwise you will not pump anything! Upon completion of the pressure measurement, you can open the emergency valve and quickly release the residual pressure in the cuff.
Next, you need to assemble an electrical circuit to control our pneumatic path. The circuit consists of a Korotkov tone extraction unit, a pump control unit, and an emergency bleed valve control unit. The pump and valve control circuits are very simple and consist, in fact, of one NPN transistor (each), which are controlled by the logic level of the microcontroller (... any GPIO). Let us dwell in more detail on Korotkov’s tone allocation scheme. The circuit is implemented on the general-purpose op amp LM358, and is an amplifier with a bandpass filter. The task of this cascade is to isolate the constant component and isolate the so-called Korotkov tones - pulsations of blood in the artery during contraction of the heart muscle. T.O. The analog inputs of the microcontroller receive signals directly from the analog pressure sensor and the signal allocated by the op-amp. Summarize: the signal from the pressure sensor consists of a “beat” and a constant component of the pressure in the cuff. T.O. on the first channel of the ADC MK, we apply a slowly bleeding pressure in the cuff, using an operational amplifier we catch the variable component of Korotkov tones and feed them to another channel of the ADC MK.

Figure 2 - Electrical schematic diagram of the measuring part and control
Figures 3 and 4 show the oscillograms at the outputs directly from the pressure sensor (Fig. 3) and at the output of the op-amp emitting (Fig. 4). In Figure 4, the arrows indicate the “characteristic” points on the envelope of Korotkov’s tones. SBP - Systollic Blood Pressure - Systolic blood pressure (upper pressure), MBP - Mean Blood Pressure - mean arterial pressure, DBP - Dyastollic Blood Pressure - Diastolic blood pressure (lower pressure). How to find these points, which means determining blood pressure, will be discussed later.
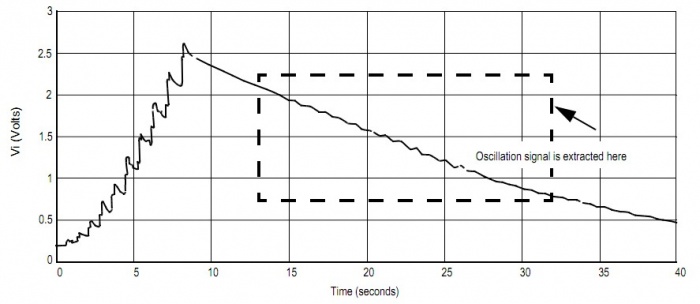
Figure 3 - Voltage at the output of the pressure sensor (air pump cycle, bleed cycle)
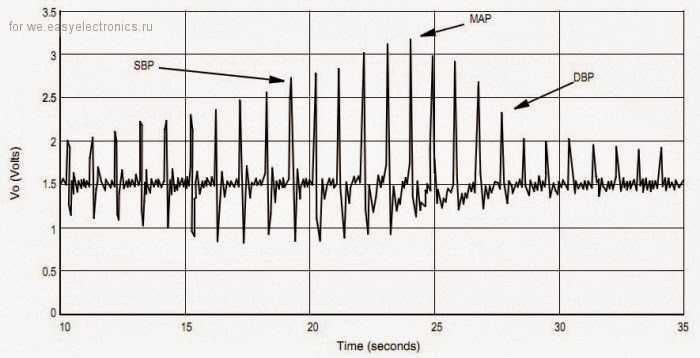
Figure 4 - Voltage at the output of the op-amp. Highlighted tones according to Korotkov
Summarize. We collected a pneumatic tract, made electronics for its maintenance. In the next part, we will talk about how to connect an MK with a display and an SD card to this whole thing and begin to “listen” to the forearm. The result should be data on the SD card, which we visualize in Excel and try to process using the simplest algorithms for calculating blood pressure.

Figure 5 - Data from the sensors recorded on the SD card during the measurement
. Figure 5 shows:
- in this embodiment, I have a stepped bleed;
- Korotkov tones (pressure pulsation in the cuff) are recorded completely.
- on the fly, the maximum amplitude of Korotkov tones is calculated.
Why step grazing? The fact is that with stepped bleeding we get a bunch of measurement bonuses. For example, we can measure two tones in one step of a cuff pressure value, i.e. filtering extra systole. Or, if the envelope obtained is problematic, upload to the area of interest to us and measure the tones on it again. This is a fitcha of cardiac monitors. It is possible to implement a measurement in the upstream section of the pressure in the cuff (pumping):
1) Close the valve;
2) Make a refill for 50 units;
3) Measure the tones of Korotkov;
4) To paragraph 2, until we measure the entire envelope, otherwise to paragraph 5;
5) Perform calculations SBP, DBP, based on the parameters of the envelope
6) Output the result.
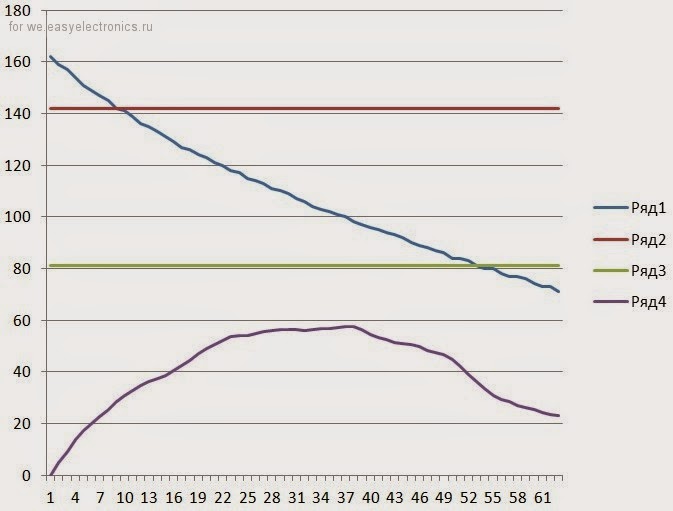
Figure 6 - The result of calculating the SBP and DBP values
Explanations for Figure 6:
1) Row 1 - signal directly from the pressure sensor - pressure level in the cuff (slow bleeding phase);
2) Row 2 - The calculated Systolic value of blood pressure;
3) Row 3 - The calculated Diastolic value of blood pressure;
4) Row 4 - Envelope of Korotkov tones (not the tones themselves, but the values of the amplitudes of the peaks).
In the course of numerous experiments (which continue to this day), it turned out that the calculation of the peak value of Korotkov’s tone is key in the entire measurement cycle of blood pressure. The better you measure the envelope, the more accurately you learn the value of blood pressure.
Here are some videos explaining the whole process. All the videos feature a device to which the developed tonometer is connected - “a human simulator with a given blood pressure”. Pressure can be selected from presets. Then the device imitates heartbeats (Korotkov tones), and the tonometer measures the envelope. In the second video (Part 2), I drove the tonometer through all the main modes of the simulator. In case of hypertension, the algorithm does an extra download, everything is as it should! The third video (Part 3) shows the measurement cycle on a real person (on me).
Video 1 - Patient simulator, Korotkov tones on an oscilloscope
Video 2 - Tonometer run over all blood pressure limits on the simulator
Video 3 - Measurement of blood pressure in humans
[1] Oscillometric blood pressure monitor and method employing non-uniform pressure decrementing steps. (US Patent No. US5170795);
[2] Determination of oscillometric blood pressure by linear approximation. (US Patent No. US5577508);
[3] Method and apparatus for measuring blood pressure by the oscillometric technique. (US Patent No. US6719703);
[4] Oscillometric determination of blood pressure. (US Patent No. US6893403);
[5] Oscillometric determination of blood pressure. (US Patent No. US7311669).
Introduction
Today, the "gold standard" for measuring blood pressure is considered to be the method of "N.S. Korotkova ”, recognized by the World Health Organization. However, one should not forget that this is an indirect method of measuring blood pressure. Of course, the measurement of blood pressure occurs with some error, determined by the elasticity of the walls of the artery and soft tissues, the amplitude and shape of the pulse wave, and other factors that are individual for each person. If we abandon rounding and accurately use the gauge division value, then we will see the difference between adjacent measurements when using a mechanical device. Reading the pressure gauge by ear is also performed with some error, depending on the individual characteristics of the person - speed of reaction, availability of skills, etc. As a result, the error of manual blood pressure monitors consists of three components: the method itself, the accuracy of the pressure gauge and the error in determining the moment of reading the readings. In reality, its value can be up to 15 mm Hg. Art.! The measurement results are also affected by the rate of injection of air into the cuff, the bleed rate and the magnitude of the pressure generated in the cuff. If we also add natural fluctuations in blood pressure, the difference between two adjacent measurements can be even greater.
An electronic blood pressure monitor, in principle, should have been devoid of all these shortcomings, because tones are measured using the same cuff, and processing is carried out using a number of patented algorithms and techniques. However, practice shows that in some cases the electronic blood pressure monitor gives a steady discrepancy with the readings of a manual blood pressure monitor. As a result - today, people have a strong opinion - “electronic tonometers are lying - no one will measure better than a doctor with a mercury pressure meter!” The experiments showed that a large measurement error was caused solely by the inability of the average layman to use this device, namely, to wear the cuff correctly . A properly dressed cuff is the key to obtaining a good envelope of Korotkov’s tones and successful finding of characteristic points on the envelope.
Where to dig
There are a lot of literature on the methodology for finding blood pressure by the envelope of tones on the Internet [1], [2], [3], [4], [5]. Freescale even has a good appnote, which popularly describes how to measure Korotkov’s tones in a cuff. But! How exactly to analyze the resulting envelope - there is practically no information anywhere. Each tonometer manufacturer sculpts in its own way, although the general technique is clearly visible. Just go to freepatentsonline.com and type in the search for non invasive blood pressure, and you will get enough information to write a tonometer blank. But! Further worse. Extrasystoles, artifacts, and other scary words get in the way of the exact results of oscillometry ...
Assembly of the measuring stand
If the desire to collect your blood pressure monitor still did not disappear, then proceed.
... We had two cuffs, a handful of operational amplifiers, several pressure sensors, a pair of valves and a microcontroller. The only thing that worried me was MEMS pressure sensors. I knew that sooner or later we’ll go over to this rubbish too ...
What will be needed for the BP meter:
1) Board with MK STM32F1xx (STM32 VL Discovery with STM32F100RBT6 on board will do);
2) MPXV5050GP pressure sensor (the model is taken from Freescale BPM Application Note, in your case there may be another model);
3) Integral OU LM358 (LM324) (it is better, of course, to take a rail-to-rail);
4) Some indicator - what to show pressure on (if there is no indicator - you can watch the results in watch during debugging);
5) A pump with a motor from a Chinese blood pressure monitor or a pear from a grandmother's blood pressure monitor;
6) If nevertheless you took a pump with a motor from a tonometer, you will also need a slow bleed valve from the same tonometer;
7) Emergency valve (to taste - needed for quick bleeding of air residues in the cuff after the measurement);
8) Tonometric cuff;
9) SD card with a card reader (or microSD with an adapter, which is not a pity to solder to).
Figure 1 - Diagram of a pneumotract for measuring blood pressure
Let's try to figure out what we just collected. The pneumatic circuit is very simple. The pump is used to pump the cuff, after which the air begins to slowly bleed off an unregulated valve with a very small hole. It should be noted that the emergency valve must be closed - otherwise you will not pump anything! Upon completion of the pressure measurement, you can open the emergency valve and quickly release the residual pressure in the cuff.
Next, you need to assemble an electrical circuit to control our pneumatic path. The circuit consists of a Korotkov tone extraction unit, a pump control unit, and an emergency bleed valve control unit. The pump and valve control circuits are very simple and consist, in fact, of one NPN transistor (each), which are controlled by the logic level of the microcontroller (... any GPIO). Let us dwell in more detail on Korotkov’s tone allocation scheme. The circuit is implemented on the general-purpose op amp LM358, and is an amplifier with a bandpass filter. The task of this cascade is to isolate the constant component and isolate the so-called Korotkov tones - pulsations of blood in the artery during contraction of the heart muscle. T.O. The analog inputs of the microcontroller receive signals directly from the analog pressure sensor and the signal allocated by the op-amp. Summarize: the signal from the pressure sensor consists of a “beat” and a constant component of the pressure in the cuff. T.O. on the first channel of the ADC MK, we apply a slowly bleeding pressure in the cuff, using an operational amplifier we catch the variable component of Korotkov tones and feed them to another channel of the ADC MK.
Figure 2 - Electrical schematic diagram of the measuring part and control
Figures 3 and 4 show the oscillograms at the outputs directly from the pressure sensor (Fig. 3) and at the output of the op-amp emitting (Fig. 4). In Figure 4, the arrows indicate the “characteristic” points on the envelope of Korotkov’s tones. SBP - Systollic Blood Pressure - Systolic blood pressure (upper pressure), MBP - Mean Blood Pressure - mean arterial pressure, DBP - Dyastollic Blood Pressure - Diastolic blood pressure (lower pressure). How to find these points, which means determining blood pressure, will be discussed later.
Figure 3 - Voltage at the output of the pressure sensor (air pump cycle, bleed cycle)
Figure 4 - Voltage at the output of the op-amp. Highlighted tones according to Korotkov
Summarize. We collected a pneumatic tract, made electronics for its maintenance. In the next part, we will talk about how to connect an MK with a display and an SD card to this whole thing and begin to “listen” to the forearm. The result should be data on the SD card, which we visualize in Excel and try to process using the simplest algorithms for calculating blood pressure.
Figure 5 - Data from the sensors recorded on the SD card during the measurement
. Figure 5 shows:
- in this embodiment, I have a stepped bleed;
- Korotkov tones (pressure pulsation in the cuff) are recorded completely.
- on the fly, the maximum amplitude of Korotkov tones is calculated.
Why step grazing? The fact is that with stepped bleeding we get a bunch of measurement bonuses. For example, we can measure two tones in one step of a cuff pressure value, i.e. filtering extra systole. Or, if the envelope obtained is problematic, upload to the area of interest to us and measure the tones on it again. This is a fitcha of cardiac monitors. It is possible to implement a measurement in the upstream section of the pressure in the cuff (pumping):
1) Close the valve;
2) Make a refill for 50 units;
3) Measure the tones of Korotkov;
4) To paragraph 2, until we measure the entire envelope, otherwise to paragraph 5;
5) Perform calculations SBP, DBP, based on the parameters of the envelope
6) Output the result.
Figure 6 - The result of calculating the SBP and DBP values
Explanations for Figure 6:
1) Row 1 - signal directly from the pressure sensor - pressure level in the cuff (slow bleeding phase);
2) Row 2 - The calculated Systolic value of blood pressure;
3) Row 3 - The calculated Diastolic value of blood pressure;
4) Row 4 - Envelope of Korotkov tones (not the tones themselves, but the values of the amplitudes of the peaks).
In the course of numerous experiments (which continue to this day), it turned out that the calculation of the peak value of Korotkov’s tone is key in the entire measurement cycle of blood pressure. The better you measure the envelope, the more accurately you learn the value of blood pressure.
Here are some videos explaining the whole process. All the videos feature a device to which the developed tonometer is connected - “a human simulator with a given blood pressure”. Pressure can be selected from presets. Then the device imitates heartbeats (Korotkov tones), and the tonometer measures the envelope. In the second video (Part 2), I drove the tonometer through all the main modes of the simulator. In case of hypertension, the algorithm does an extra download, everything is as it should! The third video (Part 3) shows the measurement cycle on a real person (on me).
Video 1 - Patient simulator, Korotkov tones on an oscilloscope
Video 2 - Tonometer run over all blood pressure limits on the simulator
Video 3 - Measurement of blood pressure in humans
Literature:
[1] Oscillometric blood pressure monitor and method employing non-uniform pressure decrementing steps. (US Patent No. US5170795);
[2] Determination of oscillometric blood pressure by linear approximation. (US Patent No. US5577508);
[3] Method and apparatus for measuring blood pressure by the oscillometric technique. (US Patent No. US6719703);
[4] Oscillometric determination of blood pressure. (US Patent No. US6893403);
[5] Oscillometric determination of blood pressure. (US Patent No. US7311669).