PLC100 + LabVIEW + Joystick v2.0
In my last article, I described the possibility of controlling the PLC with a joystick and promised to add a small change by connecting the PLC and LabVIEW not via the serial port, but via Ethernet (thanks to the PLC100 communication capabilities) and using the OPC server — in this case, Codesys OPC Server (By the way, in the same way any other controller can be connected with LabVIEW - through an OPC server that works with a specific controller). In this article, I, in fact, am going to describe how all this is done.
The bottom line is: LabVIEW handles joystick button presses; if a specific button is pressed, the variable (all variables are Boolean) of the OPC server corresponding to this button is assigned the value TRUE; the controller reads the values of the OPC server variables and reacts to their changes in accordance with the program loaded into it.
We declare eight Boolean global variables: in my case it is x, y, a, b for four buttons and up, down, right, left for the cross.
A program consists of function blocks and looks like this: The
“contents” of function blocks can be found here .
Then you need to configure the symbol file - a file containing a description of the data the OPC server is working with. To do this, go to Options, select the Symbol configuration there, put a checkmark on the Dump symbol entries, in the Set object attributes window that appears, select the necessary variables.

I skip the Codesys OPC Server setup: there is enough information on this topic on the Web. I will only add that when setting up the connection, you need to select the Ethernet connection. However, the PLC100 can also be connected using the programming cable, but this is fraught with a noticeable delay. It is also worth mentioning that I increased the frequency of the server update (Update Rate) to 1500 milliseconds: with a small value, the server sometimes skips short-term button presses.
First of all, you need the NI LabVIEW DSC Module (a trial version can be downloaded on the official website). This module makes it possible to work with OPC server data in LabVIEW.
Create a new VI, add 8 indicators on the Frontal Panel.
We write / draw such a program:
If you are interested in details about the program, see here .
Next, you need to bind the OPC variables to indicators corresponding to specific joystick buttons. To do this, open the indicator properties, go to the Data Binding tab; in the Data Binding Selection, select the DataSocket; in Access Type we set Write Only, since we need to write values to variables; in Path, select DSTP Server.
In the window that appears, we find the OPC server we need and select the appropriate variable.

We perform this manipulation with each indicator, after which we understand that everything is ready - you can connect the joystick and shoot video. And here it is, by the way.
I was quite pleased with the results: the connection is stable, no missing skips. But judging by the blinking indicators on the Front Panel, LabVIEW was somehow reluctant to respond to button presses. It seems to me that on a more powerful computer this would not have been observed.
The bottom line is: LabVIEW handles joystick button presses; if a specific button is pressed, the variable (all variables are Boolean) of the OPC server corresponding to this button is assigned the value TRUE; the controller reads the values of the OPC server variables and reacts to their changes in accordance with the program loaded into it.
Part of Codesys
We declare eight Boolean global variables: in my case it is x, y, a, b for four buttons and up, down, right, left for the cross.
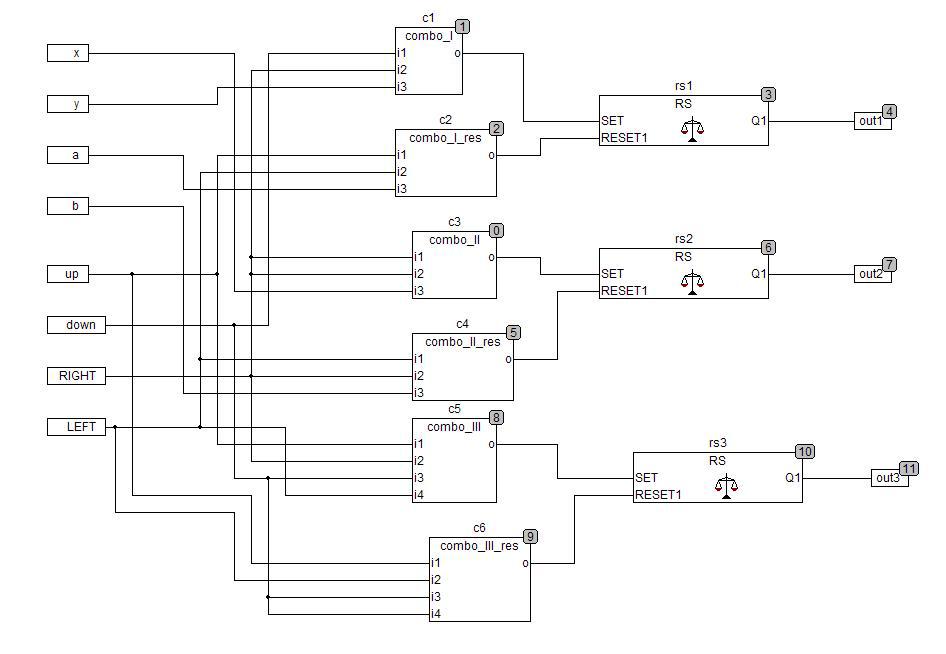
A program consists of function blocks and looks like this: The
“contents” of function blocks can be found here .
Then you need to configure the symbol file - a file containing a description of the data the OPC server is working with. To do this, go to Options, select the Symbol configuration there, put a checkmark on the Dump symbol entries, in the Set object attributes window that appears, select the necessary variables.
I skip the Codesys OPC Server setup: there is enough information on this topic on the Web. I will only add that when setting up the connection, you need to select the Ethernet connection. However, the PLC100 can also be connected using the programming cable, but this is fraught with a noticeable delay. It is also worth mentioning that I increased the frequency of the server update (Update Rate) to 1500 milliseconds: with a small value, the server sometimes skips short-term button presses.
LabVIEW Part
First of all, you need the NI LabVIEW DSC Module (a trial version can be downloaded on the official website). This module makes it possible to work with OPC server data in LabVIEW.
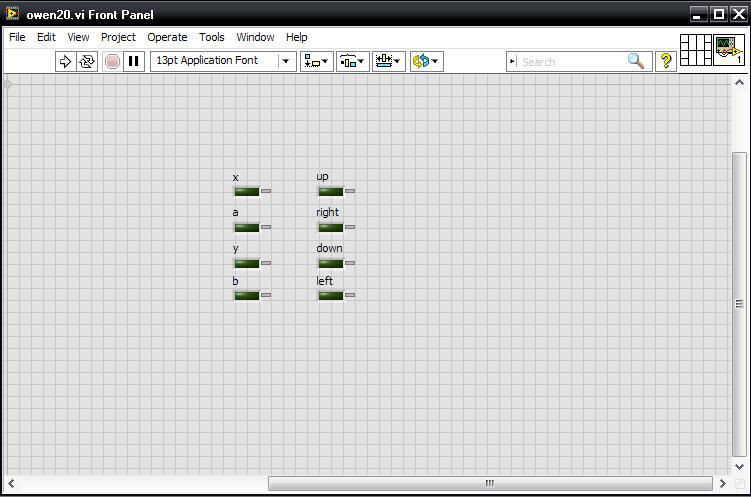
Create a new VI, add 8 indicators on the Frontal Panel.
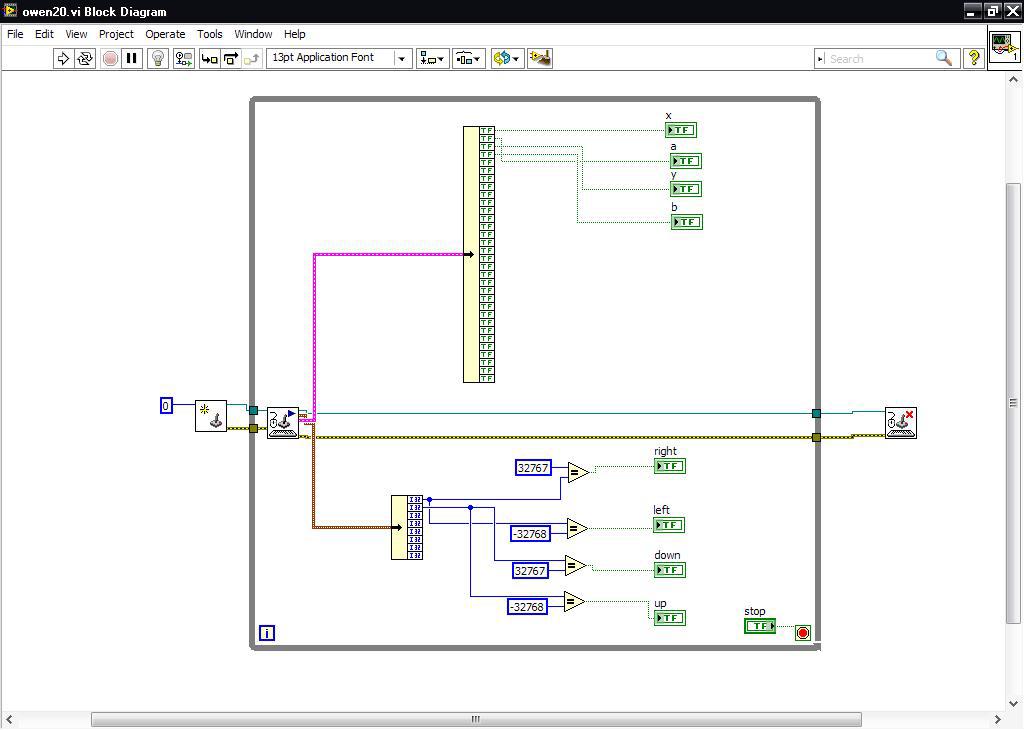
We write / draw such a program:
If you are interested in details about the program, see here .
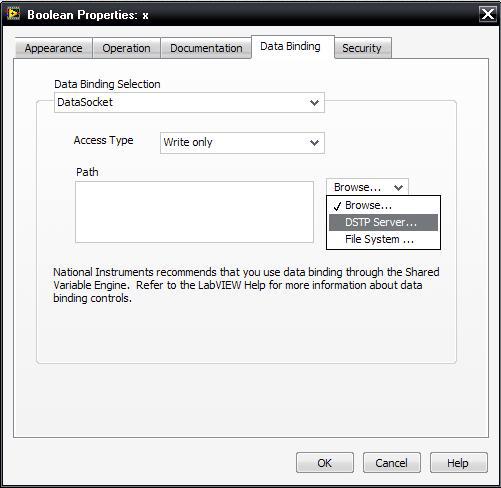
Next, you need to bind the OPC variables to indicators corresponding to specific joystick buttons. To do this, open the indicator properties, go to the Data Binding tab; in the Data Binding Selection, select the DataSocket; in Access Type we set Write Only, since we need to write values to variables; in Path, select DSTP Server.
In the window that appears, we find the OPC server we need and select the appropriate variable.
We perform this manipulation with each indicator, after which we understand that everything is ready - you can connect the joystick and shoot video. And here it is, by the way.
I was quite pleased with the results: the connection is stable, no missing skips. But judging by the blinking indicators on the Front Panel, LabVIEW was somehow reluctant to respond to button presses. It seems to me that on a more powerful computer this would not have been observed.