We remove images from cartridges for Dendy / Famicom / NES
It's no secret that now you can easily download the emulator of almost any 80x-90x game console and play classic games on your computer, phone and many other platforms. On the net you can easily find ROMs of these same games. Often people download them and do not even think about how someone once read them from a cartridge. In this article I’ll try to tell how it was done in the case of NES / Famicom, which was better known as “Dandy”, and I will show how you can do it yourself.
I must say right away that I was persuaded to star in a whole multi-series show on the topic of how game consoles are arranged and work. Therefore, the publication today in two versions at once: in the form of a video and in the old manner in the form of an article. As you like, the more the target audience for each option is clearly different. In the article I will try to reveal more technical details when the video is more entertaining in nature.
(Link: www.youtube.com/watch?v=gPSpk2gbAD4 )
So, how does the Famicom cartridge work? Many will immediately say that this is just a parallel access ROM, and there should be nothing complicated in reading it, but this is not entirely true. Firstly, there are two types of memory in the cartridge: with the game code, and with images from the game. Each of them is plugged directly into the console data bus. The first is in parallel with the RAM and the processor (CPU), and the second is in parallel with the video memory and the video chip (PPU). Thus, the cartridge is a bit of RAM where the game is already loaded.
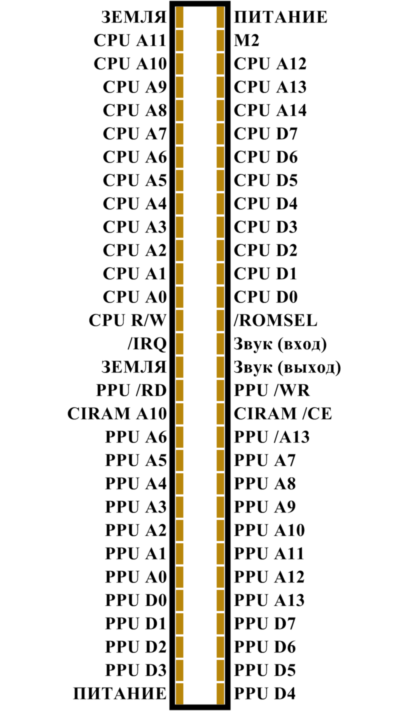
View of the console from above. On the left is the front.
→ CPU A0-A14 - contacts through which the address for reading the CPU memory is specified
CPU D0-D7 - contacts through which we transfer the data of the CPU memory
→ PPU A0-A13 - contacts through which the address for reading the PPU memory is
PPU D0-D7 - contacts through which we transfer PPU memory data
→ M2 - local clock signal, takes a high level when accessing the CPU memory
→ / ROMSEL - logical NAND between M2 and CPU A15, which is not directly accessible
→ CPU R / W - determines , type of operation: high - read, low - write
← / IRQ- allows the cartridge to generate an interrupt, inside the console it is pulled up to + 5V
→ PPU / RD - it takes a low level when the console reads PPU memory
→ PPU / WR - it takes a low level when the console writes PPU memory
→ PPU / A13 - it’s just an inverted signal from PPU A13
← CIRAM A10 - allows the cartridge to determine the principle of mirroring video memory in the console
← CIRAM / CE - at a low level it turns on the video memory inside the console
→ Sound (input) - here the sound from the audio chip goes to the cartridge
← Sound (input) - here from the cartridge goes sound in the form in which we already hear it they
* Land and food - without comment, a voltage of 5 volts
The console's CPU memory is between 0 and $ FFFF (16-bit addressing). Cartridge addresses typically include $ 8000- $ FFFF . Please note that at the same time, we do not have a CPU A15 contact that should respond to the most significant bit of the address. Instead, there is / ROMSEL , which takes a low level only when M2 and the theoretical CPU A15 simultaneously take a high level. Those. when the console reads or writes to the addresses $ 8000- $ FFFF . Therefore, it can usually be directly connected to the / CE foot of the ROM. Read or write selectable via CPU R / W. Why do I need to write to the cartridge? Yes, a lot of why, but more on that below.
PPU memory has addresses from 0 to $ 3FFF (14 bits of addressing), with a cartridge usually refers to 0- $ 1FFF . It is in this range that images are stored, and this can be both ROM and RAM, but the cartridge itself determines which addresses belong to it and which to the inside of the console, for this CIRAM / CE is used . Usually (almost always) it is closed directly on PPU / A13 , i.e. console memory is activated when A13 is equal to one - in the range from $ 2000 to $ 3FFF . Please note that inside Famicom and NES memory below $ 2000and not at all, she must be in the cartridge. PPU uses separate contacts for reading and writing: PPU / RD and PPU / WR . We should also say about CIRAM A10 - this contact determines how memory is mirrored in the range between $ 2000 and $ 2FFF inside the console. This is usually important to determine depending on how the game is moving - vertically or horizontally. In older games, this was hard-coded by a jumper on the board; in newer games, it can usually change programmatically during the game.
Yes, the original Famicom also had an audio input and an audio output, which allowed the cartridge to be an additional source of sound. This was rarely used, but it allowed making music in games much more pleasant due to additional sound synthesizers. These contacts were no longer in NES. In modern Chinese "Dandy" and other clones, they are not soldered either. Of course, the sound chip from the cartridge does not dump.
At NES, the principle of operation does not differ, although the cartridges already have 72 contacts: several go directly to the slot at the bottom of the console (it has never been used in any game), plus four go to the chip to protect against piracy.
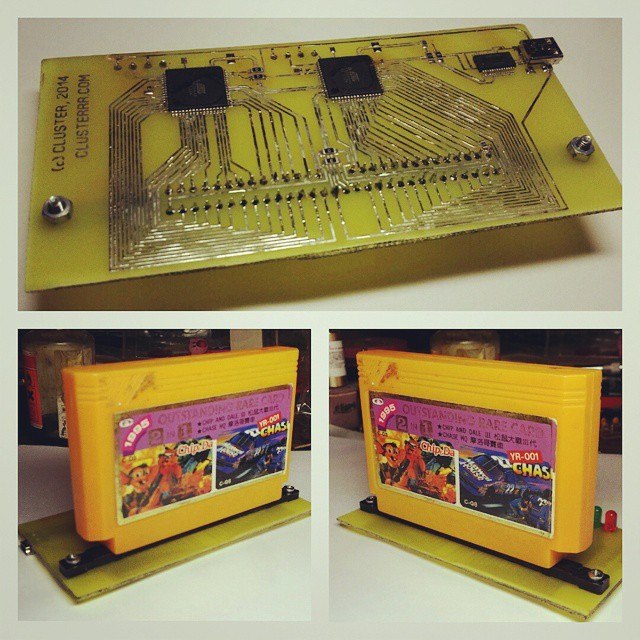
So, there seems to be nothing particularly complicated. You just need to somehow read all the data at all addresses and save them in an NES file. For this, I decided to take two ATMEGA64 microcontrollers. Yes, this is very redundant, but I just need a huge number of legs - the cartridge still has 60. Although the CPU and PPU memory do not need to be read at the same time, and they could be connected to the same legs, but for the first experiment I decided to isolate them. Moreover, it is much easier to breed a board, I did not want to make a two-way one.

You can buy a cartridge slot, it’s a standard 60-foot edge connector, but for some reason it was everywhere only on order, so I just dropped it from a cheap remodeled dandy.
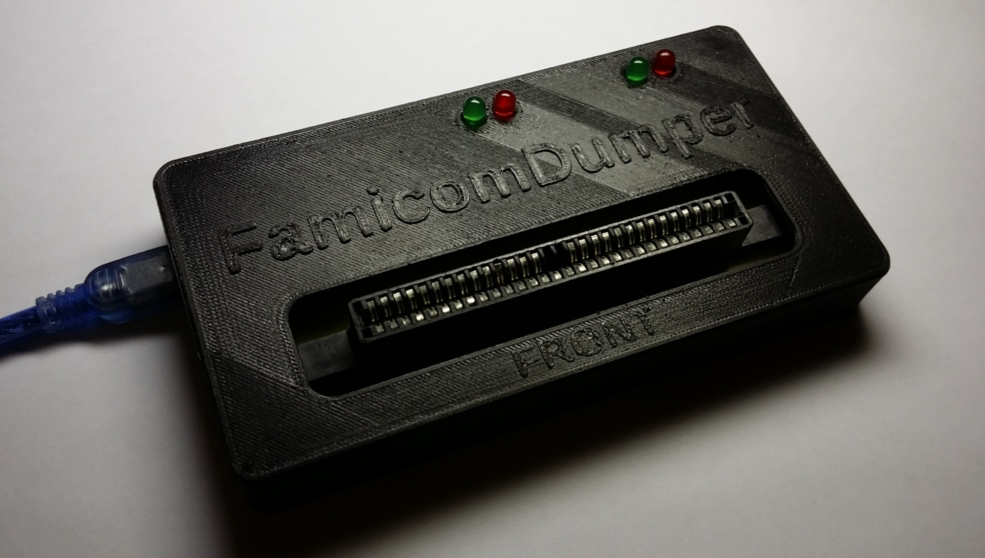
After assembling and printing the case, the device turned out like this:
I will not go into the details of the firmware, the principles of working with memory are already described above, and the source code will be at the end of the article.
Is it that simple? Alas, not really. The life span of NES and Famicom was quite long, and game developers very quickly (already in the 85th year) were faced with the fact that with this approach, very little information could be pushed into the cartridge. And not at all because of its small size, but because the address space for the code was limited by these very $ 8000- $ FFFF, and this is only 32 kilobytes. Only the simplest games such as “Battle City”, “Ice Climber”, “Duck Hunt”, “Tetris”, “Lode Runner” fit into this size. Simply put, everything that we are used to seeing on collections like “9999999 in 1” with repeated games.
So the cartridges began to put mappers.
These are the microcircuits that are responsible for switching memory banks, as a result of which there is an opportunity to significantly expand the address space. Imagine that at some address the code of the first level of the game is stored. You go through it, the mapper switches the memory bank, and as a result, the code of not the first but the second level is read to the exact same address. Similarly with video memory.
It turns out that in order to dump the cartridge, you need to know in advance which mapper is in it, and what commands you need to send to it to switch the memory banks. And all this all the same would be easy if all cartridges had the same mapper, well, or if there were only a few. But there are several hundred different mappers and how to connect them. Sometimes they managed with a simple logic circuit, and sometimes they put very sophisticated microcircuits with a bunch of registers and additional functions. At the same time, it was not uncommon that they took some popular mapper, but connected it in an unusual way, which radically changed the principles of interaction with it.
Pioneers had to dump the first memory bank, disassemble it, and do reverse engineering to figure out how to access the rest of the data. At the same time, the generally accepted number of the mapper is indicated in the header of the NES file, and a full-fledged emulator should emulate not only the console itself, but also this entire zoo of iron, which was put in cartridges. It turns out that, theoretically, a cartridge may appear that will not only be difficult to dump, but that will not be emulated by any existing emulator. You don’t have to go far: inside the popular pirate multi-game cartridges we just don’t need. And the Chinese are still releasing new games on their own hardware, which has become even more difficult to figure out.
By the way, there was nothing in the cartridges. In addition to ROM-memory and mappers, additional RAM was also placed there (sometimes with a battery for the possibility of being saved in the game), all kinds of time counters, the sound synthesizers described above, and much more up to the modem. Alas, in our country in the nineties it was impossible to find licensed cartridges with fire during the day, and the pirates did not bother much, and games with such bells and whistles were not for sale here.
I decided to implement at least reading games on the most popular mappers. I write the client part for the dumper in C #, so I just described the IMapper interface and the class that corresponds to each mapper:
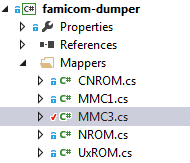
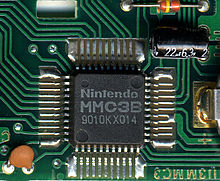
Each has methods for dumping data. Here is the method for reading the program memory of the game on the MMC3 mapper:
If you are interested, a description of this mapper can be found here: wiki.nesdev.com/w/index.php/MMC3
I decided to try to stay in the place of the pioneers and dump the cartridge with such an unusual menu:
For this, I read the cartridge first, as if if there was no mapper, launched it on the emulator and began to disassemble. Soon, I found the instruction I needed:

After that, I read the cartridge again, having previously written to the address $ B600, and got a fully functional ROM . Of course, games in it do not start, because for this you need to switch the memory banks again. And even if I trace what happens at the moment of choosing a game in the menu and read the entire cartridge, the emulator most likely will not be able to start it all.
I also got a license cartridge for one of the most iconic games of those times - “The Legend of Zelda”. It works without problems with the dumper, and with Famikom through a simple passive adapter. Dumping this game makes no sense, it interested me in others. This cartridge has additional RAM memory and a battery that allows you to save in the game. This memory lies in the range of $ 6000- $ 7FFF. I tried to read it and feed the emulator. He understood her without any problems. After that, for the sake of experiment, I decided to increase the number of hearts in it and write it back to the cartridge. It worked.
The result was a fun opportunity to transfer save between the emulator and the real console.
Many will probably ask why I even took it when almost any ROM can be found on the network. Yes, out of curiosity and self-education. It was interesting to see what was going on inside these cartridges and how it all worked. In addition, they can both read and write cartridges. But more about that next time.
Links to sources:
github.com/ClusterM/famicom-dumper - the dumper itself (C sources, wiring, 3D models of the case)
github.com/ClusterM/famicom-dumper-client - client in C #
I must say right away that I was persuaded to star in a whole multi-series show on the topic of how game consoles are arranged and work. Therefore, the publication today in two versions at once: in the form of a video and in the old manner in the form of an article. As you like, the more the target audience for each option is clearly different. In the article I will try to reveal more technical details when the video is more entertaining in nature.
Video:
(Link: www.youtube.com/watch?v=gPSpk2gbAD4 )
Article:
So, how does the Famicom cartridge work? Many will immediately say that this is just a parallel access ROM, and there should be nothing complicated in reading it, but this is not entirely true. Firstly, there are two types of memory in the cartridge: with the game code, and with images from the game. Each of them is plugged directly into the console data bus. The first is in parallel with the RAM and the processor (CPU), and the second is in parallel with the video memory and the video chip (PPU). Thus, the cartridge is a bit of RAM where the game is already loaded.
Consider the pinout of the cartridge slot, and how it works.
View of the console from above. On the left is the front.
→ CPU A0-A14 - contacts through which the address for reading the CPU memory is specified
CPU D0-D7 - contacts through which we transfer the data of the CPU memory
→ PPU A0-A13 - contacts through which the address for reading the PPU memory is
PPU D0-D7 - contacts through which we transfer PPU memory data
→ M2 - local clock signal, takes a high level when accessing the CPU memory
→ / ROMSEL - logical NAND between M2 and CPU A15, which is not directly accessible
→ CPU R / W - determines , type of operation: high - read, low - write
← / IRQ- allows the cartridge to generate an interrupt, inside the console it is pulled up to + 5V
→ PPU / RD - it takes a low level when the console reads PPU memory
→ PPU / WR - it takes a low level when the console writes PPU memory
→ PPU / A13 - it’s just an inverted signal from PPU A13
← CIRAM A10 - allows the cartridge to determine the principle of mirroring video memory in the console
← CIRAM / CE - at a low level it turns on the video memory inside the console
→ Sound (input) - here the sound from the audio chip goes to the cartridge
← Sound (input) - here from the cartridge goes sound in the form in which we already hear it they
* Land and food - without comment, a voltage of 5 volts
Now in more detail, some technical information.
The console's CPU memory is between 0 and $ FFFF (16-bit addressing). Cartridge addresses typically include $ 8000- $ FFFF . Please note that at the same time, we do not have a CPU A15 contact that should respond to the most significant bit of the address. Instead, there is / ROMSEL , which takes a low level only when M2 and the theoretical CPU A15 simultaneously take a high level. Those. when the console reads or writes to the addresses $ 8000- $ FFFF . Therefore, it can usually be directly connected to the / CE foot of the ROM. Read or write selectable via CPU R / W. Why do I need to write to the cartridge? Yes, a lot of why, but more on that below.
PPU memory has addresses from 0 to $ 3FFF (14 bits of addressing), with a cartridge usually refers to 0- $ 1FFF . It is in this range that images are stored, and this can be both ROM and RAM, but the cartridge itself determines which addresses belong to it and which to the inside of the console, for this CIRAM / CE is used . Usually (almost always) it is closed directly on PPU / A13 , i.e. console memory is activated when A13 is equal to one - in the range from $ 2000 to $ 3FFF . Please note that inside Famicom and NES memory below $ 2000and not at all, she must be in the cartridge. PPU uses separate contacts for reading and writing: PPU / RD and PPU / WR . We should also say about CIRAM A10 - this contact determines how memory is mirrored in the range between $ 2000 and $ 2FFF inside the console. This is usually important to determine depending on how the game is moving - vertically or horizontally. In older games, this was hard-coded by a jumper on the board; in newer games, it can usually change programmatically during the game.
Yes, the original Famicom also had an audio input and an audio output, which allowed the cartridge to be an additional source of sound. This was rarely used, but it allowed making music in games much more pleasant due to additional sound synthesizers. These contacts were no longer in NES. In modern Chinese "Dandy" and other clones, they are not soldered either. Of course, the sound chip from the cartridge does not dump.
At NES, the principle of operation does not differ, although the cartridges already have 72 contacts: several go directly to the slot at the bottom of the console (it has never been used in any game), plus four go to the chip to protect against piracy.
Let's move on to practice.
So, there seems to be nothing particularly complicated. You just need to somehow read all the data at all addresses and save them in an NES file. For this, I decided to take two ATMEGA64 microcontrollers. Yes, this is very redundant, but I just need a huge number of legs - the cartridge still has 60. Although the CPU and PPU memory do not need to be read at the same time, and they could be connected to the same legs, but for the first experiment I decided to isolate them. Moreover, it is much easier to breed a board, I did not want to make a two-way one.
You can buy a cartridge slot, it’s a standard 60-foot edge connector, but for some reason it was everywhere only on order, so I just dropped it from a cheap remodeled dandy.
After assembling and printing the case, the device turned out like this:
I will not go into the details of the firmware, the principles of working with memory are already described above, and the source code will be at the end of the article.
Is it that simple? Alas, not really. The life span of NES and Famicom was quite long, and game developers very quickly (already in the 85th year) were faced with the fact that with this approach, very little information could be pushed into the cartridge. And not at all because of its small size, but because the address space for the code was limited by these very $ 8000- $ FFFF, and this is only 32 kilobytes. Only the simplest games such as “Battle City”, “Ice Climber”, “Duck Hunt”, “Tetris”, “Lode Runner” fit into this size. Simply put, everything that we are used to seeing on collections like “9999999 in 1” with repeated games.
So the cartridges began to put mappers.
These are the microcircuits that are responsible for switching memory banks, as a result of which there is an opportunity to significantly expand the address space. Imagine that at some address the code of the first level of the game is stored. You go through it, the mapper switches the memory bank, and as a result, the code of not the first but the second level is read to the exact same address. Similarly with video memory.
It turns out that in order to dump the cartridge, you need to know in advance which mapper is in it, and what commands you need to send to it to switch the memory banks. And all this all the same would be easy if all cartridges had the same mapper, well, or if there were only a few. But there are several hundred different mappers and how to connect them. Sometimes they managed with a simple logic circuit, and sometimes they put very sophisticated microcircuits with a bunch of registers and additional functions. At the same time, it was not uncommon that they took some popular mapper, but connected it in an unusual way, which radically changed the principles of interaction with it.
Pioneers had to dump the first memory bank, disassemble it, and do reverse engineering to figure out how to access the rest of the data. At the same time, the generally accepted number of the mapper is indicated in the header of the NES file, and a full-fledged emulator should emulate not only the console itself, but also this entire zoo of iron, which was put in cartridges. It turns out that, theoretically, a cartridge may appear that will not only be difficult to dump, but that will not be emulated by any existing emulator. You don’t have to go far: inside the popular pirate multi-game cartridges we just don’t need. And the Chinese are still releasing new games on their own hardware, which has become even more difficult to figure out.
By the way, there was nothing in the cartridges. In addition to ROM-memory and mappers, additional RAM was also placed there (sometimes with a battery for the possibility of being saved in the game), all kinds of time counters, the sound synthesizers described above, and much more up to the modem. Alas, in our country in the nineties it was impossible to find licensed cartridges with fire during the day, and the pirates did not bother much, and games with such bells and whistles were not for sale here.
I decided to implement at least reading games on the most popular mappers. I write the client part for the dumper in C #, so I just described the IMapper interface and the class that corresponds to each mapper:
Each has methods for dumping data. Here is the method for reading the program memory of the game on the MMC3 mapper:
        public void DumpPrg(FamicomDumperConnection dumper, List data, int size)
        {
            dumper.WritePrg(0xA001, 0);
            byte banks = (byte)(size / 0x2000);
            for (byte bank = 0; bank < banks-2; bank += 2)
            {
                Console.Write("Reading PRG banks #{0} and #{1}... ", bank, bank+1);
                dumper.WritePrg(0x8000, 6);
                dumper.WritePrg(0x8001, bank);
                dumper.WritePrg(0x8000, 7);
                dumper.WritePrg(0x8001, (byte)(bank | 1));
                data.AddRange(dumper.ReadPrg(0x8000, 0x4000));
                Console.WriteLine("OK");
            }
            Console.Write("Reading PRG banks #{0} and #{1}... ", banks-2, banks-1);
            data.AddRange(dumper.ReadPrg(0xC000, 0x4000));
            Console.WriteLine("OK");
        }
If you are interested, a description of this mapper can be found here: wiki.nesdev.com/w/index.php/MMC3
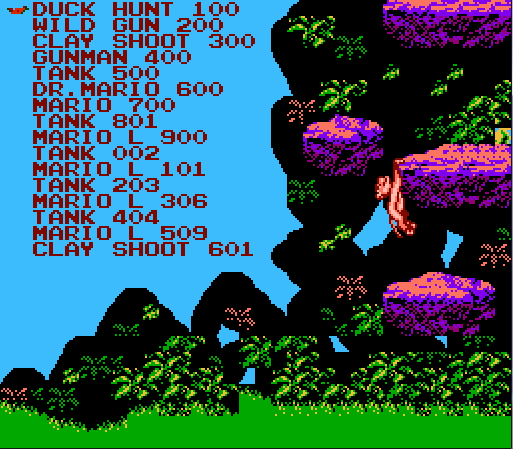
I decided to try to stay in the place of the pioneers and dump the cartridge with such an unusual menu:

For this, I read the cartridge first, as if if there was no mapper, launched it on the emulator and began to disassemble. Soon, I found the instruction I needed:

After that, I read the cartridge again, having previously written to the address $ B600, and got a fully functional ROM . Of course, games in it do not start, because for this you need to switch the memory banks again. And even if I trace what happens at the moment of choosing a game in the menu and read the entire cartridge, the emulator most likely will not be able to start it all.
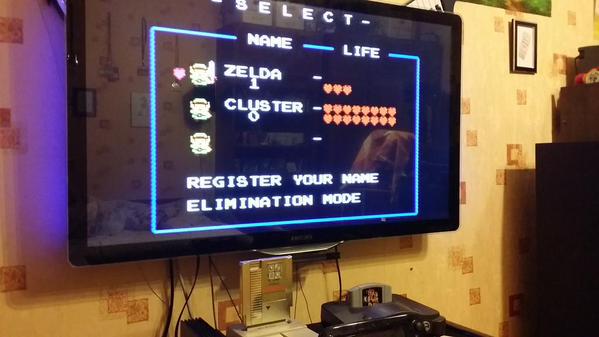
I also got a license cartridge for one of the most iconic games of those times - “The Legend of Zelda”. It works without problems with the dumper, and with Famikom through a simple passive adapter. Dumping this game makes no sense, it interested me in others. This cartridge has additional RAM memory and a battery that allows you to save in the game. This memory lies in the range of $ 6000- $ 7FFF. I tried to read it and feed the emulator. He understood her without any problems. After that, for the sake of experiment, I decided to increase the number of hearts in it and write it back to the cartridge. It worked.

The result was a fun opportunity to transfer save between the emulator and the real console.
Many will probably ask why I even took it when almost any ROM can be found on the network. Yes, out of curiosity and self-education. It was interesting to see what was going on inside these cartridges and how it all worked. In addition, they can both read and write cartridges. But more about that next time.
Links to sources:
github.com/ClusterM/famicom-dumper - the dumper itself (C sources, wiring, 3D models of the case)
github.com/ClusterM/famicom-dumper-client - client in C #