Fir-tree, light up! Part 3: web interface and Android application
With this text, Master Gams completes the description of his new Christmas tree garland. 2015 Moscow
Hello, Habr!
So, we got to the final stage: since we have a garland controlled by a Black Swift nanocomputer with built-in Wi-Fi, it’s logical to make a web interface for it and a smartphone application to blink an LED , if you know what I mean.
But first, at the request of readers, we publish a video of a working Christmas tree garland. I don’t think that someone did not see the Christmas tree garlands, I think that just not everyone believes that I really went on December 28-29 to get LEDs to decorate the tree ...
Behind the scenes, I sit and hold the camera with one hand, and switch the modes of its operation with the other, poking the mouse into the browser.
Now, when the last traces of mistrust have evaporated, we continue. In the previous series, we got a working garland controller that can receive commands through a UNIX socket - they specify the operation mode, as well as the speed and brightness of the garland. The easiest way to make a layer between the web and the socket in banal PHP is literally a few lines.
We already have a standard uhttpd web server in Black Swift serving the regular LuCI web interface. To work with PHP, we will put a second web server - lighttpd (I think you just need to enable it and php5 in the final firmware), as well as a convenient nano text editor:
The web server and PHP will pull their dependencies with themselves. The middle three commands, I think, are obvious, the first one will pull up an updated list of packages from the repository, and the last one will enable autostart for lighttpd when the system starts.
Now tweak the configs a bit:
In the first lines we look for the “list listen_http” directives, of which there are two pieces, and change the port in them: 80 to: 8080 (or some other). Then restart uhttpd with the command /etc/init.d/uhttpd restart.
Similarly, edit /etc/lighttpd/lighttpd.conf (it is long, use the Ctrl-W combination to find the text you need in nano):
The config has a long commented list of plug-ins, we only need mod_cgi, which will work with php_cgi.
Everything here is quite obvious to everyone who has ever seen a Linux web server: the root folder, the root files (add index.php to the list) and the binding to the * .php files of a specific handler.
Now open /etc/php.ini and edit one line:
And the final touch is /etc/init.d/lighttpd start
Now we have a web server running PHP 80 on port 80, so all that remains is to create the / www / tree directory and put the index.php file in it. Which, of course, must first be written.
The task is also extremely banal, frankly speaking.
Writing to a file socket from PHP is not easy, but very simple:
Where $ cmd is the command we want to transfer, for example, brightness, and $ val is the corresponding value, for example, 2.
Then everything is obvious: the user moves the slider (sliders appeared in HTML5, hooray), javascript pulls out its position and passes to the php file:
and
The first function, when moving the slider, immediately changes the numerical value next to it, the second transfers the command and this value to the PHP file as soon as the user releases the slider. NB: the first implementations of HTML5 suffered from the fact that onchange and oninput in range worked the same way, popping up with each shift of the slider, but now it’s not very important for us.
You probably already noticed two points: JS calls the same index.php in which it is written, only with parameters, and in HTML there are inserts in PHP that substitute a certain position of the slider defined earlier in the code generation.
The first was done because for simplicity of demonstration I did not use AJAX, and the second - so that when I open the page, it shows the current state of the garland, if any, was previously installed.
Processing the parameters passed with the file is simple:
Everything is just as trivial here: if the parameters are passed, then we first push them into the socket, and then show the web interface, if we did not pass them, we just show the web interface.
We do not have a lot of garland settings, so it’s logical to store them in a regular file. However, it is worth remembering that we wrote a C program without taking into account the saving of parameters, therefore, after restarting the system, PHP should also show default parameters, but not previously saved ones. It is very simple to do this in OpenWRT - save everything unnecessary in / tmp, it lives in RAM and disappears forever upon reboot.
Well, after setting the new garland parameters, of course, they must be written:
In general, that’s practically everything with the construction of the web interface - we add other buttons and half-buttons in the same way and get the result: https://github.com/olegart/treelights/blob/master/php/index.php
Now you can go to our Christmas tree log in from the browser.
Disclaimer: in general, I myself can write under Android in any way, so do not judge strictly. On the other hand, the fact that I did it and it works says a lot about the simplicity of implementing such applications of Black Swift, when prototypes of all the main parts of the system can be made in the literal sense of the word on the knee.
So, we have a web interface at some IP address. It would be a trivial way to show its contents on a smartphone in the WebView component, but we will go a little further and make auto-detection of this address (well, right word, you won’t dictate to your wife: “Honey, turn off the garland, it’s at 192.168.1.158, if DHCP tells her that I didn’t give something new ”) using the Network Service Discovery service. NSD has been working fine on Android since something like 4.1 or 4.2, but this is unlikely to stop us right now.
In the light of the disclaimer, I won’t tell you how to write for Android, but I’ll immediately give a link: the application that I made for my “smart home” interface . You need to download it, put it somewhere carefully, then install Android Studio , open the project in it and fix it a little.

Open Gradle Scripts → build.gradle (Module: app) and change the “lightcontrol” in the applicationId to something more appropriate for the New Year tree. Although you can leave “lightcontrol” in general, you probably will not have any confusion with the “smart home” software with the same name.

The same cosmetics: in Manifests → AndroidManifest.xml we change android: label to something about the tree (NB: com.example.lightcontrol.app here and in all other places except build.gradle, we don’t touch it!). Similarly, go to res → values → strings.xml and change the value of app_name to something about Christmas.

Finally, open the main application code and at the beginning we change the value of the TAG variable to something of our own. This word needs to be remembered, it will be useful to us at the next step - the fact is that by this name the application will search for the desired service on the local network. Let it be “Treelights,” for example.
Have you changed everything? You can still go through the messages displayed by the application (I did not bother with localization, everything is packed right into the code) and change the phrases in the spirit of “controlling the light in the house” to “controlling the garland on the Christmas tree” for beauty.
Now the final: Build → Generate signed APK, create your own key for signing the application and actually compile everything. From the point of view of responsiveness of the user interface, Android Studio is absolutely horrible, but building a project takes about ten seconds, no more, after which you either get an error in the log, or a proposal to open a folder with the finished APK in explorer.exe. Open, copy app-release.apk to the smartphone and install (in the Android settings, you must enable the installation from all sources in a row).
Now we return to the Christmas tree and configure the avahi service there, which will send out notifications received by the NSD component:
We change exactly one point: in the name tag we put down the name containing the word that we previously entered in the TAG variable in the mobile application (it was the word “Treelights”):

Save, open /etc/avahi/avahi-daemon.conf and enter in the first section enable-dbus = no line (we don’t have DBUS, therefore without it avahi will swear at start).
The final step:
Again, pick up the smartphone, launch our application and rejoice, seeing how, after a split second of searches, it opens the Christmas tree garland web interface.
The time remaining before the New Year can be spent on drawing a beautiful web interface with large buttons.
I immediately foresee two questions from the series “Why did you do this”: 1) why do you need a garland with Wi-Fi and 2) why do it on Black Swift, and not on the same Raspberry, since the dimensions do not matter here.
In fact, of course, the garland does not really need Wi-Fi, and replacing BSB with RPi will not change anything in this. But you know Akerlof’s work “Market for Lemons”, he showed in it how, with free competition, it can slide into the sale of cheap rubbish on its own, just like those Christmas garlands in stores? Akerlof received the Nobel Prize in economics for her, and the work itself became best known for illustrating the process with the example of the automobile market - although the introduction says that the example is neither important nor realistic, but was chosen simply because of the simplicity and clarity of the explanation.
So, in my case the situation is exactly the same, except that they haven’t called me from the Nobel Committee yet (Akerlof, however, was also waiting for 31 years for the call). I wanted to show how easy it is to use Black Swift, both in terms of connectivity and programming, in a rather complex project that has specialized hardware, a web interface, and a mobile application. In fact, this is a normal, suitable example of device automation within the framework of the currently popular concept of the “Internet of Things”.
At the same time, although I wrote three articles and a lot of letters in them, if you look at the volume of the final work, this is actually a “weekend project”, one evening in which will go to solder the lights, and the second to write all the software.
Next time I will show an example of a development in which Black Swift is critical and difficult to replace - because the dimensions of the same Raspberry Pi will be comparable to the external dimensions of the entire final device.
Hello, Habr!
So, we got to the final stage: since we have a garland controlled by a Black Swift nanocomputer with built-in Wi-Fi, it’s logical to make a web interface for it and a smartphone application to blink an LED , if you know what I mean.
- Garland, Black Swift connection and build environment for OpenWRT in C / C ++
- Software on C, work with GPIO and software PWM
- Web UI and Android App
But first, at the request of readers, we publish a video of a working Christmas tree garland. I don’t think that someone did not see the Christmas tree garlands, I think that just not everyone believes that I really went on December 28-29 to get LEDs to decorate the tree ...
Behind the scenes, I sit and hold the camera with one hand, and switch the modes of its operation with the other, poking the mouse into the browser.
Now, when the last traces of mistrust have evaporated, we continue. In the previous series, we got a working garland controller that can receive commands through a UNIX socket - they specify the operation mode, as well as the speed and brightness of the garland. The easiest way to make a layer between the web and the socket in banal PHP is literally a few lines.
Web server and PHP5 on a nanocomputer
We already have a standard uhttpd web server in Black Swift serving the regular LuCI web interface. To work with PHP, we will put a second web server - lighttpd (I think you just need to enable it and php5 in the final firmware), as well as a convenient nano text editor:
opkg update
opkg install nano
opkg install lighttpd lighttpd-mod-cgi
opkg install php5 php5-cgi
/etc/init.d/lighttpd enable
The web server and PHP will pull their dependencies with themselves. The middle three commands, I think, are obvious, the first one will pull up an updated list of packages from the repository, and the last one will enable autostart for lighttpd when the system starts.
Now tweak the configs a bit:
nano /etc/config/uhttpd
In the first lines we look for the “list listen_http” directives, of which there are two pieces, and change the port in them: 80 to: 8080 (or some other). Then restart uhttpd with the command /etc/init.d/uhttpd restart.
Similarly, edit /etc/lighttpd/lighttpd.conf (it is long, use the Ctrl-W combination to find the text you need in nano):
server.modules = (
        "mod_cgi"
)
The config has a long commented list of plug-ins, we only need mod_cgi, which will work with php_cgi.
server.document-root = "/www/tree"
index-file.names = ( "index.html", "default.html", "index.htm", "default.htm", "index.php" )
cgi.assign = ( ".php"  => "/usr/bin/php-cgi" )
Everything here is quite obvious to everyone who has ever seen a Linux web server: the root folder, the root files (add index.php to the list) and the binding to the * .php files of a specific handler.
Now open /etc/php.ini and edit one line:
doc_root = "/www/tree"
And the final touch is /etc/init.d/lighttpd start
Now we have a web server running PHP 80 on port 80, so all that remains is to create the / www / tree directory and put the index.php file in it. Which, of course, must first be written.
index.php
The task is also extremely banal, frankly speaking.
Writing to a file socket from PHP is not easy, but very simple:
$sockf = fsockopen("unix:///tmp/treelights.sock", 0, $errno, $errstr);
if ($sockf)
{
	$command = $cmd . " " . $val;
	fwrite($sockf, $command);
	fclose($sockf);
}
Where $ cmd is the command we want to transfer, for example, brightness, and $ val is the corresponding value, for example, 2.
Then everything is obvious: the user moves the slider (sliders appeared in HTML5, hooray), javascript pulls out its position and passes to the php file:
and
function displayBrightness(brightness) {
	document.querySelector('#bLevel').value = brightness;
}
function setBrightness(brightness) {
	url = 'index.php?cmd=brightness&val=';
	location.href = url.concat(brightness);
}
The first function, when moving the slider, immediately changes the numerical value next to it, the second transfers the command and this value to the PHP file as soon as the user releases the slider. NB: the first implementations of HTML5 suffered from the fact that onchange and oninput in range worked the same way, popping up with each shift of the slider, but now it’s not very important for us.
You probably already noticed two points: JS calls the same index.php in which it is written, only with parameters, and in HTML there are inserts in PHP that substitute a certain position of the slider defined earlier in the code generation.
The first was done because for simplicity of demonstration I did not use AJAX, and the second - so that when I open the page, it shows the current state of the garland, if any, was previously installed.
Processing the parameters passed with the file is simple:
$cmd=($_GET['cmd']);
$val=($_GET['val']);
if (!empty($cmd))
{
	$sockf = fsockopen("unix:///tmp/treelights.sock", 0, $errno, $errstr);
	/* дальше вы уже знаете */
}
Everything is just as trivial here: if the parameters are passed, then we first push them into the socket, and then show the web interface, if we did not pass them, we just show the web interface.
We do not have a lot of garland settings, so it’s logical to store them in a regular file. However, it is worth remembering that we wrote a C program without taking into account the saving of parameters, therefore, after restarting the system, PHP should also show default parameters, but not previously saved ones. It is very simple to do this in OpenWRT - save everything unnecessary in / tmp, it lives in RAM and disappears forever upon reboot.
if (file_exists("/tmp/tree.set"))
{
	$settings = file_get_contents("/tmp/tree.set");
	// Mode, Brightness, Speed
	$values = explode(",", $settings);
}
else
{
	$values[0] = "0";
	$values[1] = "1";
	$values[2] = "1";
}
Well, after setting the new garland parameters, of course, they must be written:
$settings = $values[0] . "," . $values[1] . "," . $values[2];
file_put_contents("/tmp/tree.set", $settings);
In general, that’s practically everything with the construction of the web interface - we add other buttons and half-buttons in the same way and get the result: https://github.com/olegart/treelights/blob/master/php/index.php
Now you can go to our Christmas tree log in from the browser.
Android App and Network Service Discovery
Disclaimer: in general, I myself can write under Android in any way, so do not judge strictly. On the other hand, the fact that I did it and it works says a lot about the simplicity of implementing such applications of Black Swift, when prototypes of all the main parts of the system can be made in the literal sense of the word on the knee.
So, we have a web interface at some IP address. It would be a trivial way to show its contents on a smartphone in the WebView component, but we will go a little further and make auto-detection of this address (well, right word, you won’t dictate to your wife: “Honey, turn off the garland, it’s at 192.168.1.158, if DHCP tells her that I didn’t give something new ”) using the Network Service Discovery service. NSD has been working fine on Android since something like 4.1 or 4.2, but this is unlikely to stop us right now.
In the light of the disclaimer, I won’t tell you how to write for Android, but I’ll immediately give a link: the application that I made for my “smart home” interface . You need to download it, put it somewhere carefully, then install Android Studio , open the project in it and fix it a little.

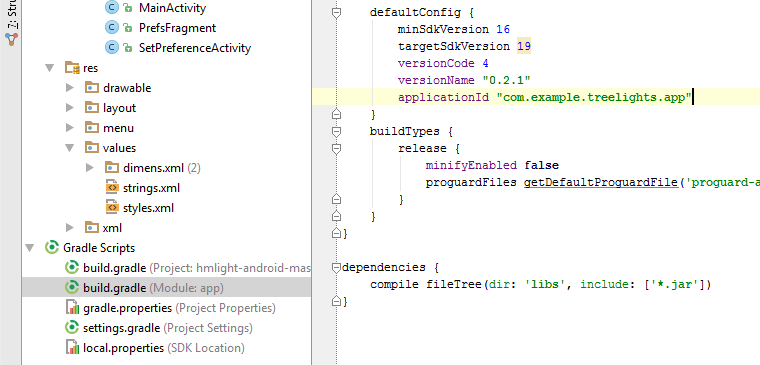
Open Gradle Scripts → build.gradle (Module: app) and change the “lightcontrol” in the applicationId to something more appropriate for the New Year tree. Although you can leave “lightcontrol” in general, you probably will not have any confusion with the “smart home” software with the same name.

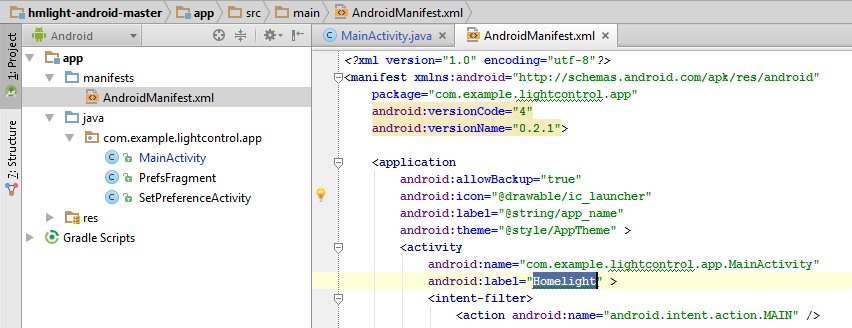
The same cosmetics: in Manifests → AndroidManifest.xml we change android: label to something about the tree (NB: com.example.lightcontrol.app here and in all other places except build.gradle, we don’t touch it!). Similarly, go to res → values → strings.xml and change the value of app_name to something about Christmas.

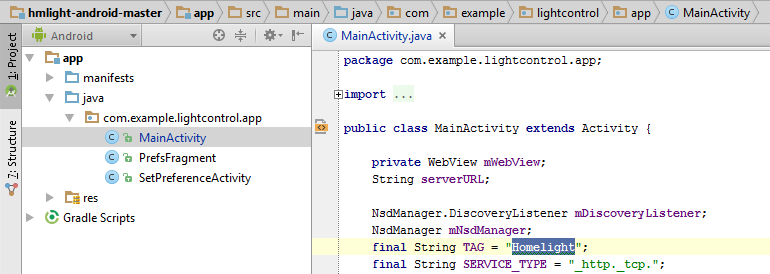
Finally, open the main application code and at the beginning we change the value of the TAG variable to something of our own. This word needs to be remembered, it will be useful to us at the next step - the fact is that by this name the application will search for the desired service on the local network. Let it be “Treelights,” for example.
Have you changed everything? You can still go through the messages displayed by the application (I did not bother with localization, everything is packed right into the code) and change the phrases in the spirit of “controlling the light in the house” to “controlling the garland on the Christmas tree” for beauty.
Now the final: Build → Generate signed APK, create your own key for signing the application and actually compile everything. From the point of view of responsiveness of the user interface, Android Studio is absolutely horrible, but building a project takes about ten seconds, no more, after which you either get an error in the log, or a proposal to open a folder with the finished APK in explorer.exe. Open, copy app-release.apk to the smartphone and install (in the Android settings, you must enable the installation from all sources in a row).
Now we return to the Christmas tree and configure the avahi service there, which will send out notifications received by the NSD component:
opkg update
opkg install avahi-daemon
nano /etc/avahi/services/http.service
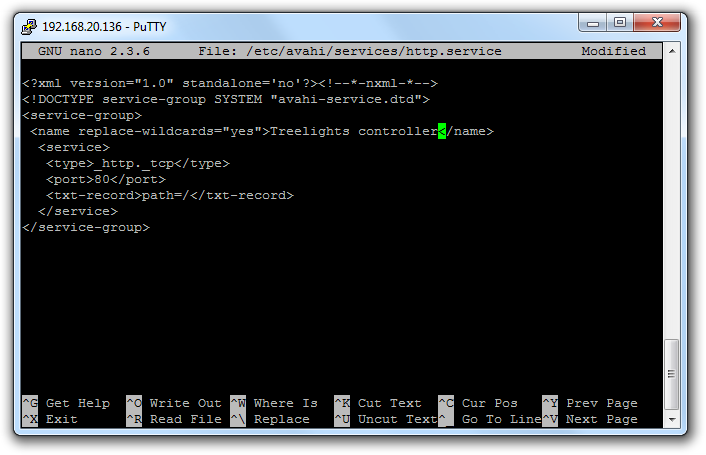
We change exactly one point: in the name tag we put down the name containing the word that we previously entered in the TAG variable in the mobile application (it was the word “Treelights”):

Save, open /etc/avahi/avahi-daemon.conf and enter in the first section enable-dbus = no line (we don’t have DBUS, therefore without it avahi will swear at start).
The final step:
/etc/init.d/avahi-daemon enable
/etc/init.d/avahi-daemon start
Again, pick up the smartphone, launch our application and rejoice, seeing how, after a split second of searches, it opens the Christmas tree garland web interface.
The time remaining before the New Year can be spent on drawing a beautiful web interface with large buttons.
Instead of a conclusion
I immediately foresee two questions from the series “Why did you do this”: 1) why do you need a garland with Wi-Fi and 2) why do it on Black Swift, and not on the same Raspberry, since the dimensions do not matter here.
In fact, of course, the garland does not really need Wi-Fi, and replacing BSB with RPi will not change anything in this. But you know Akerlof’s work “Market for Lemons”, he showed in it how, with free competition, it can slide into the sale of cheap rubbish on its own, just like those Christmas garlands in stores? Akerlof received the Nobel Prize in economics for her, and the work itself became best known for illustrating the process with the example of the automobile market - although the introduction says that the example is neither important nor realistic, but was chosen simply because of the simplicity and clarity of the explanation.
So, in my case the situation is exactly the same, except that they haven’t called me from the Nobel Committee yet (Akerlof, however, was also waiting for 31 years for the call). I wanted to show how easy it is to use Black Swift, both in terms of connectivity and programming, in a rather complex project that has specialized hardware, a web interface, and a mobile application. In fact, this is a normal, suitable example of device automation within the framework of the currently popular concept of the “Internet of Things”.
At the same time, although I wrote three articles and a lot of letters in them, if you look at the volume of the final work, this is actually a “weekend project”, one evening in which will go to solder the lights, and the second to write all the software.
Next time I will show an example of a development in which Black Swift is critical and difficult to replace - because the dimensions of the same Raspberry Pi will be comparable to the external dimensions of the entire final device.
