Understanding Flux, reactive architecture from facebook
- Transfer
- Tutorial

Introduction
Welcome to Part Three of Learning React. Today we will study how Facebook Flux architecture works and how to use it in our projects.
First of all, I advise you to read the first two articles of this series, Getting Started & Concepts and Building a Real Time Twitter Stream with Node and React . Reading them is optional, but it can certainly help you understand this article if you are not familiar with React.js.
What is Flux?
Flux is the architecture that the Facebook team uses when working with React. This is not a framework or library, it is a new architectural approach that complements React and the principle of unidirectional data flow.
However, Facebook does provide a repository that contains a Dispatcher implementation. The dispatcher plays the role of a global intermediary in the Publisher-Subscriber template (Pub / sub) and sends the payload to registered handlers.
A typical implementation of the Flux architecture can use this library in conjunction with the EventEmitter class from NodeJS to build an event-oriented system that can help control the state of the application.
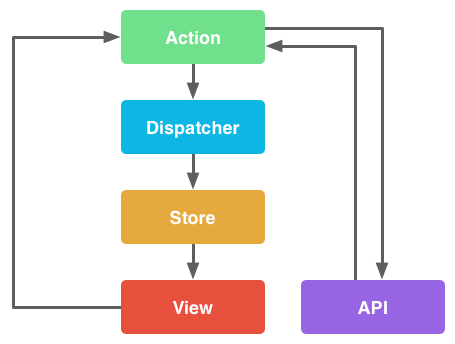
Flux is probably easiest to explain based on its constituent components:
- Actions - helpers simplifying data transfer to the Dispatcher
- Dispatcher - Accepts Actions and distributes the load to registered handlers
- Stores / Storage - containers for application status and business logic in handlers registered in the Manager
- Controller Views - React components that collect storage state and pass it to child components via properties
Let's see how this process looks like a diagram:
How does the API relate to this?
In my opinion, using Actions to transfer data to Warehouses through the Flux stream is the least painful way to work with data coming from outside your program or going outside.
Dispatcher
What is a dispatcher?
In essence, the Dispatcher is the manager of this whole process. This is the central hub of your application. The dispatcher receives actions and sends these actions (and related data) to registered handlers.
So is this really pub / sub?
Not really. The dispatcher sends data to ALL handlers registered in it and allows you to call handlers in a certain order, even wait for updates before continuing with work. There is only one Dispatcher, and it acts as the central hub of your entire application.
Here's how it might look:
var Dispatcher = require('flux').Dispatcher;
var AppDispatcher = new Dispatcher();
AppDispatcher.handleViewAction = function(action) {
  this.dispatch({
    source: 'VIEW_ACTION',
    action: action
  });
}
module.exports = AppDispatcher;
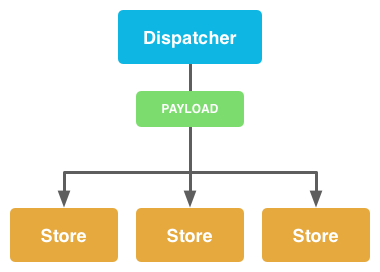
In the example above, we create the Manager instance and the handleViewAction method. This abstraction is useful if you intend to separate the actions created in the interface and the actions coming from the server / API.
Our method calls the dispatch method, which already sends action data to all the handlers registered in it. This action can then be processed by the Repositories, as a result of which the state of the application will be updated.
The following diagram illustrates this process:
Dependencies
One of the nice details of the described implementation of the Dispatcher is the ability to describe the dependencies and control the execution order of the handlers in the Warehouses. So, if for the correct display of the state one of the application components depends on the other, which should be updated before it, the waitFor Dispatcher method is useful.
To use this feature, you must save the value returned from the registration method in the Manager in the dispatcherIndex property of the Store, as shown below:
ShoeStore.dispatcherIndex = AppDispatcher.register(function(payload) {
});
Then, in the Storage, when processing the Action, we can use the dispatcher's waitFor method to make sure that by this moment ShoeStore has already managed to process the Action and update the data:
case 'BUY_SHOES':
  AppDispatcher.waitFor([
    ShoeStore.dispatcherIndex
  ], function() {
    CheckoutStore.purchaseShoes(ShoeStore.getSelectedShoes());
  });
  break;
Note trans .: Ken Wheeler, obviously, describes an outdated implementation of the Manager, because in the current version the waitFor method has a different signature .
Stores / Storage
Vaults in Flux control the state of certain parts of the subject area of your application. At a higher level, this means that the Warehouses store data, methods for obtaining this data and Action handlers registered in the Manager.
Let's take a look at a simple Repository:
var AppDispatcher = require('../dispatcher/AppDispatcher');
var ShoeConstants = require('../constants/ShoeConstants');
var EventEmitter = require('events').EventEmitter;
var merge = require('react/lib/merge');
// Внутренний объект для хранения shoes
var _shoes = {};
// Метод для загрузки shoes из данных Действия
function loadShoes(data) {
  _shoes = data.shoes;
}
// Добавить возможности Event Emitter из Node
var ShoeStore = merge(EventEmitter.prototype, {
  // Вернуть все shoes
  getShoes: function() {
    return _shoes;
  },
  emitChange: function() {
    this.emit('change');
  },
  addChangeListener: function(callback) {
    this.on('change', callback);
  },
  removeChangeListener: function(callback) {
    this.removeListener('change', callback);
  }
});
// Зарегистрировать обработчик в Диспетчере
AppDispatcher.register(function(payload) {
  var action = payload.action;
  var text;
  // Обработать Действие в зависимости от его типа
  switch(action.actionType) {
    case ShoeConstants.LOAD_SHOES:
      // Вызвать внутренний метод на основании полученного Действия
      loadShoes(action.data);
      break;
    default:
      return true;
  }
  // Если Действие было обработано, создать событие "change"
  ShoeStore.emitChange();
  return true;
});
module.exports = ShoeStore;
The most important thing that we did in the example above was to add EventEmitter capabilities from NodeJS to our repository. This allows the stores to listen and broadcast events, which, in turn, allows the components of the view to be updated, starting from these events. Since our view listens to the "change" event created by the Warehouses, it learns that the application state has changed, and it is time to get (and display) the current state.
We also registered the handler in our AppDispatcher using its register method. This means that now our Repository now listens for alerts from AppDispatcher. Based on the data received, the switch statement decides whether we can process the Action. If the action has been processed, the “change” event is generated, and the Views that subscribe to this event react to it by updating their state: The

view uses the getShoes method of the Storage interface in order to get all shoes from the _shoes internal object and pass this data to the components. This is a very simple example, but this architecture allows the components to remain fairly neat, even if more complex logic is used instead of Views.
Action Creators & Actions / Action Factory
An Action Factory is a set of methods that are called from Views (or from any other places) to send Actions to the Dispatcher. Actions are the payload that Dispatcher sends to subscribers.
In the Facebook implementation, Actions differ in type — a constant that is sent along with the action data. Depending on the type, Actions can be appropriately processed in registered handlers, while data from these Actions are used as arguments to internal methods.
Here's what const declarations look like:
var keyMirror = require('react/lib/keyMirror');
module.exports = keyMirror({
  LOAD_SHOES: null
});
Above, we used the React keyMirror library to, you guessed it, create an object with values identical to its keys. Just by looking at this file, we can say that our application can load shoes. Using constants allows you to streamline everything and helps you quickly evaluate the capabilities of the application.
Let's now look at the announcement of the corresponding Action Factory:
var AppDispatcher = require('../dispatcher/AppDispatcher');
var ShoeStoreConstants = require('../constants/ShoeStoreConstants');
var ShoeStoreActions = {
  loadShoes: function(data) {
    AppDispatcher.handleAction({
      actionType: ShoeStoreConstants.LOAD_SHOES,
      data: data
    })
  }
};
module.exports = ShoeStoreActions;
In the above example, we created a method in our ShoeStoreActions object that passes the specified data to our Dispatcher. Now we can download this file from our API (or, for example, Views) and call the ShoeStoreActions.loadShoes (ourData) method to transfer the payload to the Dispatcher, which will send it to subscribers. Thus, ShoeStore learns about this event and calls the boot method of some shoes.
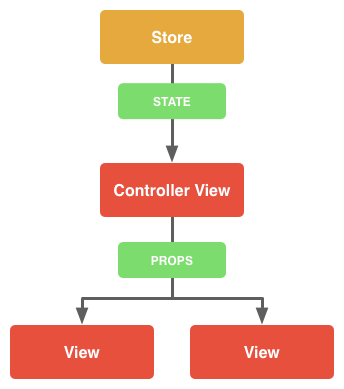
Controller Views
Views are just React components that subscribe to the change event and get the state of the application from the Repositories. They then pass this data to the child components through properties.
Here's what it looks like:
/** @jsx React.DOM */
var React = require('react');
var ShoesStore = require('../stores/ShoeStore');
// Метод для получения состояния приложения из хранилища
function getAppState() {
  return {
    shoes: ShoeStore.getShoes()
  };
}
// Создаем React-компонент
var ShoeStoreApp = React.createClass({
  // Используем метод getAppState, чтобы установить начальное состояние
  getInitialState: function() {
    return getAppState();
  },
  // Подписываемся на обновления
  componentDidMount: function() {
    ShoeStore.addChangeListener(this._onChange);
  },
  // Отписываемся от обновлений
  componentWillUnmount: function() {
    ShoesStore.removeChangeListener(this._onChange);
  },
  render: function() {
    return (

    );
  },
  // Обновляем состояние Представления в ответ на событие "change"
  _onChange: function() {
    this.setState(getAppState());
  }
});
module.exports = ShoeStoreApp;
Note Per .: In the current version of React, components are created in a slightly different way .
In the example above, we subscribe to Vault updates using addChangeListener and update our state when we receive the “change” event.
The application state is stored in our Repositories, so we use the Repositories interface to get this data, and then update the state of the components.
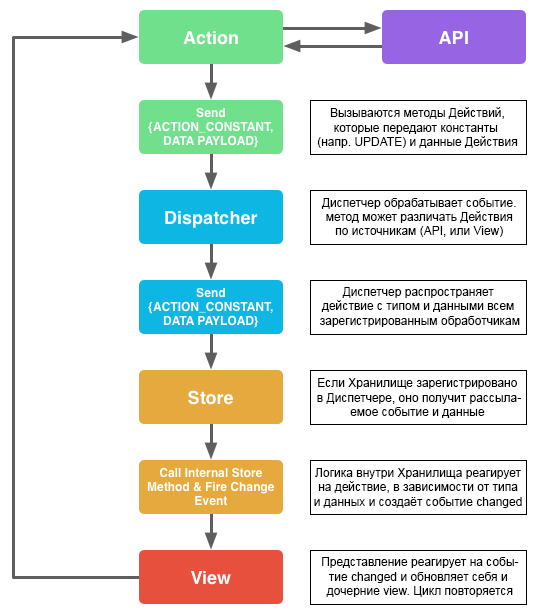
Putting it all together
Now that we have walked through all the basic parts of the Flux architecture, we better understand how this architecture actually works. Remember our process diagram from the beginning of the article? Let’s take a look at them in more detail, since we now understand the functions of each part of the stream:
Conclusion
I hope this article has helped you better understand Facebook’s Flux architecture. I did not even suspect how convenient React.js was until I tried it in action.
Using Flux once, you will feel that writing applications in React without Flux is like manipulating the DOM without jQuery. Yes, it is possible, but it looks less elegant and orderly.
If you want to stick with the Flux architecture but don't like React, try Delorean , a Flux framework that can be combined with Ractive.js or Flight. Another noteworthy library is Fluxxor , which takes a slightly different approach to the Flux architecture and suggests a tighter link between Flux components in a single instance.
I believe that in order to fully understand Flux, you need to experience it, so stay with us to read the fourth , final part of the React tutorial series, where we will create a simple online store using React.js and the Flux architecture .