Embedding electronic signatures in systems with a WEB interface using a browser plug-in and openssl
- Tutorial

Several years ago, our company released the Rutoken Plug-in product , which is designed to embed electronic signatures in systems with a web interface. Based on the experience gained in integrating the product into real projects, I want to note that often developers prefer to use openssl, which supports Russian cryptographic algorithms, to implement the server side.
This article will describe a typical scheme of such integration, based on the following scenarios for using the plugin:
- Registration on the portal (with the issuance of a certificate or with an existing certificate)
- Strong authentication on the portal
- Electronic signature of data and / or files in CMS format
- Encryption of data and / or files in CMS format
These scenarios involve client-server interaction, writing client scripts in JavaScript and the corresponding openssl server calls.
Details under the cut.
General operations
Device Operations
Search for connected devices
Any client scenario begins with a search for Rootoken USB devices connected to the computer. In the context of this article, the emphasis is on the Rutoken EDS device.
var devices = Array();
try
{
    devices = plugin.enumerateDevices();
}
catch (error)
{
    console.log(error);
}
This returns a list of identifiers for connected devices. An identifier is a number associated with the slot number to which the device is connected. When enumerated again, this number may differ for the same device.
Rutoken Plug-in defines all USB devices connected to the computer: Rutoken EDS, Rutoken PINPad, Rutoken WEB. Therefore, the next step is to determine the type of device.
Getting device information
To determine the type of device, use the getDeviceInfo function with the TOKEN_INFO_DEVICE_TYPE parameter. The value of this constant is contained in the plugin object.
var type;
try
{
  type = plugin.getDeviceInfo(deviceId, plugin.TOKEN_INFO_DEVICE_TYPE);
}
catch (error)
{
    console.log(error);
}
switch (type)
{
    case plugin.TOKEN_TYPE_UNKNOWN:
        message = "Неизвестное устройство";
        break;
    case plugin.TOKEN_TYPE_RUTOKEN_ECP:
        message = "Рутокен ЭЦП";
        break;
    case plugin.TOKEN_TYPE_RUTOKEN_WEB:
        message = "Рутокен Web";
        break;
    case plugin.TOKEN_TYPE_RUTOKEN_PINPAD_2:
        message = "Рутокен PINPad";
        break;
}
Also using the getDeviceInfo function you can get:
- device model
- device label
- device serial number
- information about whether the user is logged on to the device
Change PIN
Example of changing the PIN code on the device:
var options = {};
try
{
    plugin.changePin(deviceId, "12345678", "12345671", options);
}
catch (error)
{
    console.log(error);
}
Here, the first parameter is the old PIN, and the second is the new PIN.
Work with certificates
1. The token can store 3 categories of certificates:
- user-defined (constant in the CERT_CATEGORY_USER plugin)
These are certificates associated with the user's private key. They are used, for example, for signing CMS / PKCS # 7, user authentication in the TLS protocol.
If the certificate is imported as a user certificate, then the import will search for the corresponding private key in the device. If such a key is found, then the certificate will be “bound” to this key. If the key is not found, an error will be returned. - root (constant in the CERT_CATEGORY_CA plugin)
These are certificate publisher certificates used to verify the signature of certificates. Such a signature verification (building a chain of trust) allows you to determine whether the user trusts the signature of another user. For example, in the function of the verify plugin there is a certificate verification mode on which the message was signed. In this case, the token root certificate store created by importing root certificates for the token is used. - others (constant in the CERT_CATEGORY_OTHER plugin)
These are certificates that are not associated with the private key and are not root.
2. To read the certificates stored on the device, authorization on the device is not required.
An example of reading user certificates from a device:
var certs = Array();
try
{
    certs = plugin.enumerateCertificates(deviceId, plugin.CERT_CATEGORY_USER);
}
catch (error)
{
    console.log(error);
}
3. The certificate can be exported in PEM format:
var certpem;
try
{
    certpem = plugin.getCertificate(deviceId, certId);
}
catch (error)
{
    console.log(error);
}
You get something like this line:
-----BEGIN CERTIFICATE-----
MIIBmjCCAUegAwIBAgIBATAKBgYqhQMCAgMFADBUMQswCQYDVQQGEwJSVTEPMA0G
A1UEBxMGTW9zY293MSIwIAYDVQQKFBlPT08gIkdhcmFudC1QYXJrLVRlbGVjb20i
MRAwDgYDVQQDEwdUZXN0IENBMB4XDTE0MTIyMjE2NTEyNVoXDTE1MTIyMjE2NTEy
NVowEDEOMAwGA1UEAxMFZmZmZmYwYzAcBgYqhQMCAhMwEgYHKoUDAgIjAQYHKoUD
AgIeAQNDAARADKA/O1Zw50PzMpcNkWnW39mAJcTehAhkQ2Vg7bHkIwIdf7zPe2Px
HyAr6lH+stqdACK6sFYmkZ58cBjzL0WBwaNEMEIwJQYDVR0lBB4wHAYIKwYBBQUH
AwIGCCsGAQUFBwMEBgYpAQEBAQIwCwYDVR0PBAQDAgKkMAwGA1UdEwEB/wQCMAAw
CgYGKoUDAgIDBQADQQD5TY55KbwADGKJRK+bwCGZw24sdIyayIX5dn9hrKkNrZsW
detWY3KJFylSulykS/dfJ871IT+8dXPU5A7WqG4+
-----END CERTIFICATE-----
4. The certificate can be resolved by calling parseCertificate and get DN Subject, DN Issuer, extensions, public key value, signature, serial number, expiration date, etc. from it.
5. The certificate can be written to the device.
Example of writing a certificate to a device as a user certificate:
var certpem = "-----BEGIN CERTIFICATE-----
MIIBmjCCAUegAwIBAgIBATAKBgYqhQMCAgMFADBUMQswCQYDVQQGEwJSVTEPMA0G
A1UEBxMGTW9zY293MSIwIAYDVQQKFBlPT08gIkdhcmFudC1QYXJrLVRlbGVjb20i
MRAwDgYDVQQDEwdUZXN0IENBMB4XDTE0MTIyMjE2NTEyNVoXDTE1MTIyMjE2NTEy
NVowEDEOMAwGA1UEAxMFZmZmZmYwYzAcBgYqhQMCAhMwEgYHKoUDAgIjAQYHKoUD
AgIeAQNDAARADKA/O1Zw50PzMpcNkWnW39mAJcTehAhkQ2Vg7bHkIwIdf7zPe2Px
HyAr6lH+stqdACK6sFYmkZ58cBjzL0WBwaNEMEIwJQYDVR0lBB4wHAYIKwYBBQUH
AwIGCCsGAQUFBwMEBgYpAQEBAQIwCwYDVR0PBAQDAgKkMAwGA1UdEwEB/wQCMAAw
CgYGKoUDAgIDBQADQQD5TY55KbwADGKJRK+bwCGZw24sdIyayIX5dn9hrKkNrZsW
detWY3KJFylSulykS/dfJ871IT+8dXPU5A7WqG4+
-----END CERTIFICATE-----";
try
{
    plugin.importCertificate(deviceId, certpem, plugin.CERT_CATEGORY_USER);
}
catch (error)
{
    console.log(error);
}
6. By calling the deleteCertificate function, you can delete the certificate from the token.
Work with key pairs GOST R 34.10-2001
1. To receive the key pair decryptors stored on the device, you need to enter a PIN code. It should be understood that the value of the private key itself cannot be obtained, since the key is not recoverable.
var keys = Array();
try
{
    plugin.login(deviceId, "12345678");
    keys = plugin.enumerateKeys(deviceId, null);
}
catch (error)
{
    console.log(error);
}
2. To generate a key pair, a PIN code is required. When generating a key, parameters can be selected from the set:
- A: id-GostR3410-2001-CryptoPro-A-ParamSet
- B: id-GostR3410-2001-CryptoPro-B-ParamSet
- C: id-GostR3410-2001-CryptoPro-C-ParamSet
- XA: id-GostR3410-2001-CryptoPro-XchA-ParamSet
- XB: id-GostR3410-2001-CryptoPro-XchB-ParamSet
An example of generating a key pair GOST R 34.10-2001:
var options = {};
var keyId;
try
{
    keyId = plugin.generateKeyPair(deviceId, "A",  null, options);
}
catch (error)
{
    console.log(error);
}
3. Using the deleteKeyPair function , the key pair can be deleted from the token.
Openssl configuration
Openssl supports Russian cryptographic algorithms starting with version 1.0. In order to use them, openssl requires loading the engine gost. Most openssl distributions have this library. In order for the engine to load, you can write it in the openssl configuration file:
[openssl_def]
engines = engine_section
[engine_section]
gost  = gost_section
[gost_section]
engine_id  = gost
default_algorithms = ALL
If the openssl configuration file is not located in the standard location, then the path to it can be set via the environment variable OPENSSL_CONF.
Another option for loading engine gost is to pass it in the command line options of the openssl utility.
If the engine gost is not located in the standard place, then through the environment variable OPENSSL_ENGINES you can set the path to the directory in which openssl will look for it.
To obtain information on whether the call to the openssl utility was successful or not, with the possibility of clarifying the error, you need to parse stdout and stderror. At the end of the article is a link to a PHP script that uses this utility.
Now let's move on to the implementation of the completed user scripts.
Registration on the portal
The certificate is issued upon registration in the system
- We get a list of Rootoken EDS devices connected to the computer
- We generate a key pair GOST R 34.10-2001 at the selected Rutoken EDS
- Create a PKCS # 10 certificate request for the generated key pair
- We send a request to the server
- We create a certificate on the server, bind it to the account (the certificate itself or its descriptor). It should be noted that certificate descriptors obtained by calling the enumerateCertificates function are unique and immutable
- We send the certificate to the client
- On the client we visualize the received certificate
- We import the received certificate into Rutoken EDS
The sequence of calls in the client script will be as follows:

Next, the request is sent to the server, where a certificate is issued based on it.
To do this, openssl versions from 1.0 should be installed and correctly configured on the server and the CA functionality should be deployed.
1. Generation of the CA exemption:
openssl genpkey -engine gost -algorithm GOST2001 -pkeyopt paramset:A -out ca.key
After that, the private key
2 will be created in the ca.key file . 2. Creating a self-signed CA certificate:
openssl req -engine gost -x509 -new -key ca.key -out ca.crt
After entering the necessary information about the publisher in the ca.crt file, a CA certificate will be created.
The request received from the client is saved in the user.csr file and issue a certificate based on it (without modifying the data from the request):
openssl ca -engine gost -keyfile ca.key -cert ca.crt -in user.csr -out user.crt -outform PEM -batch
After that, a user certificate in PEM format is created in the user.crt file. It should be sent to the client.
Further sequence of calls on the client:
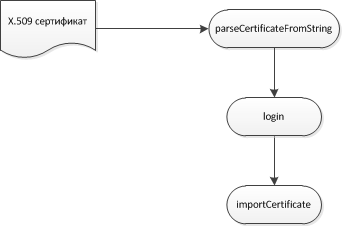
The certificate is already on the token, issued by an external CA
The key pair should be created in a format compatible with the rtPKCS11ECP library for Rootoken EDS.
- We get a list of Rootoken EDS devices connected to the computer
- We get a list of all available user certificates on the selected Rutoken EDS
- We visualize each certificate
- The user selects the desired certificate
- The server forms the initial sequence of random data (salt string) and sends it to the client
- We call authenticate on the client . When salt is passed to the authenticate plugin function, this sequence is supplemented with additional random data of 32 characters in size, and the final sequence is signed on the certificate selected by the user in the CMS attached format
- The signature is sent to the server
- The server checks the CMS attached signature using the root certificate
- The resulting random sequence is extracted from the CMS attached message, the salt is “disconnected” and a comparison is made
- If the comparison is successful, then register the user with the certificate contained in the CMS attached message
The sequence of calls on the client: The
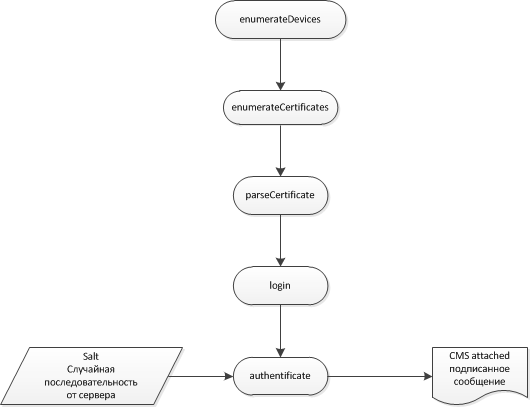
signature is obtained in base64 format. When checking it on the server using openssl, the signature should be framed with headers to make it PEM. A similar signature will look something like this:
-----BEGIN CMS-----
MIIDUQYJKoZIhvcNAQcCoIIDQjCCAz4CAQExDDAKBgYqhQMCAgkFADCBygYJKoZI
hvcNAQcBoIG8BIG5PCFQSU5QQURGSUxFIFVURjg+PFY+0JLRi9C/0L7Qu9C90LjR
gtGMINCw0YPRgtC10L3RgtC40YTQuNC60LDRhtC40Y4/PCE+c2VydmVyLXJhbmRv
bS1kYXRhZTI6ZGE6MmM6MDU6MGI6MzY6MjU6MzQ6YzM6NDk6Nzk6Mzk6YmI6MmY6
YzU6Mzc6ZGI6MzA6MTQ6NDQ6ODM6NjY6Njk6NmI6OWY6YTU6MDk6MzQ6YmY6YzQ6
NzY6YzmgggGeMIIBmjCCAUegAwIBAgIBATAKBgYqhQMCAgMFADBUMQswCQYDVQQG
EwJSVTEPMA0GA1UEBxMGTW9zY293MSIwIAYDVQQKFBlPT08gIkdhcmFudC1QYXJr
LVRlbGVjb20iMRAwDgYDVQQDEwdUZXN0IENBMB4XDTE0MTIyMjE2NTEyNVoXDTE1
MTIyMjE2NTEyNVowEDEOMAwGA1UEAxMFZmZmZmYwYzAcBgYqhQMCAhMwEgYHKoUD
AgIjAQYHKoUDAgIeAQNDAARADKA/O1Zw50PzMpcNkWnW39mAJcTehAhkQ2Vg7bHk
IwIdf7zPe2PxHyAr6lH+stqdACK6sFYmkZ58cBjzL0WBwaNEMEIwJQYDVR0lBB4w
HAYIKwYBBQUHAwIGCCsGAQUFBwMEBgYpAQEBAQIwCwYDVR0PBAQDAgKkMAwGA1Ud
EwEB/wQCMAAwCgYGKoUDAgIDBQADQQD5TY55KbwADGKJRK+bwCGZw24sdIyayIX5
dn9hrKkNrZsWdetWY3KJFylSulykS/dfJ871IT+8dXPU5A7WqG4+MYG7MIG4AgEB
MFkwVDELMAkGA1UEBhMCUlUxDzANBgNVBAcTBk1vc2NvdzEiMCAGA1UEChQZT09P
ICJHYXJhbnQtUGFyay1UZWxlY29tIjEQMA4GA1UEAxMHVGVzdCBDQQIBATAKBgYq
hQMCAgkFADAKBgYqhQMCAhMFAARAco5PumEfUYVcLMb1cnzETNOuWC8Goda8pdUL
W5ASK+tztCwM7wpXgAy+Y6/sLtClO9sh8dKnAaEY2Yavg3altQ==
-----END CMS-----
Verification of the signature on the server:
openssl cms -engine gost -verify -in sign.cms -inform PEM -CAfile ca.crt -out data.file -certsout user.crt
Here, sign.cms is the file where the signature is located, ca.crt is the file with root certificates, one of which should be lined up, data.file is the file where the signed data will be saved, user.crt is the file into which The user certificate will be saved. It is from data.file that you need to extract data, disconnect the last 32 characters and compare salt.
If you need to obtain information from the certificate on the server, then you can
parse it like this: Show the contents of the certificate in a text view:
openssl x509 -in cert.pem -noout -text
Show certificate serial number:
openssl x509 -in cert.pem -noout -serial
Show subject DN:
openssl x509 -in cert.pem -noout -subject
Show publisher DN:
openssl x509 -in cert.pem -noout -issuer
Show subject's mailing address:
openssl x509 -in cert.pem -noout -email
Show certificate start time:
openssl x509 -in cert.pem -noout -startdate
Show certificate expiration time:
openssl x509 -in cert.pem -noout -enddate
Strong authentication on the portal
The general authentication scheme used in the Rutoken plugin is as follows:
- the server forms the initial sequence of random data (salt string) and sends it to the client
- when salt is transferred to the authenticate plugin function, this sequence is supplemented with random data of 32 characters in size, and the final sequence is signed on the certificate selected by the user in the CMS attached format
- the signature is sent to the server
- the signature is being verified on the server
- the final random sequence is extracted from the CMS attached message, salt is “disconnected” and comparison is performed
- in case of successful verification, the user is authenticated based on the certificate extracted from the CMS message
The implementation of this scheme does not fundamentally differ from “Registration, a certificate is already available, issued by an external CA”.
Electronic signature of data and / or files in CMS format
- a text message is generated (string), message formation can occur both on the server and on the client
- if you want to sign a document of any format (for example, PDF), then you need to transcode it to base64 format
- a string containing data for signing is passed to the sign function
- если строка представляет собой закодированные в base64 данные, то параметр функции isBase64 должен быть установлен в true, при этом перед подписью произойдет декодирование данных из base64
- если требуется использовать аппаратное вычисление хэш-функции ГОСТ Р 34.11-94 (сертифицированная реализация, скорость 60-70 Кб/c), то в options нужно установить опцию useHardwareHash в true. Если данная опция установлена в false, то будет использована быстрая программная реализация хэш-функции ГОСТ Р 34.11-94
- если требуется сформировать “отсоединенную” (detached) подпись CMS, то нужно установить опцию detached в true, иначе будет сформирована “присоединенная” (attached) подпись
- для того, чтобы включить/не включить пользовательский сертификат в подписанное CMS-сообщение существует опция addUserCertificate
- Setting the addSignTime option to true will cause the system time to be added to the signed CMS message as a signed attribute
Verification of the signature on the server is described above.
Encryption / decryption of data and / or files in CMS format
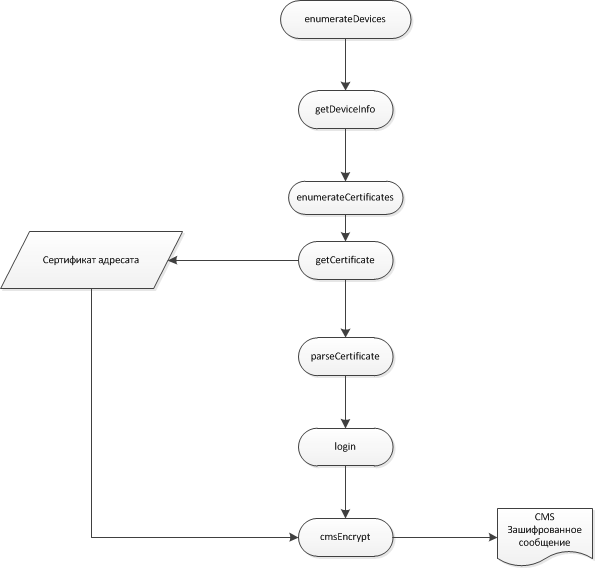
Client data encryption for server
In order to ensure the confidentiality of data exchange between the client and the server, the plug-in provides encryption / decryption of data. Data is encrypted in CMS format. In order to encrypt data in CMS format, a certificate of the public key of the “destination” is required. At the same time, only the owner of the private key can decrypt such a message. When encrypting data for the server, it is recommended to store the server certificate on the Rutoken EDS. This certificate can be written to the device during user registration on the portal. To do this, use the importCertificate function, passing CERT_CATEGORY_OTHER as the category parameter. To use the cmsEncrypt function, you need to get the certificate body by its descriptor using the functiongetCertificate . In this case, the descriptor is unique and unchanged and can be stored in the user account on the server when importing the server certificate. In order to use hardware encryption according to GOST 28147-89, you must set the useHardwareEncryption option to true. Otherwise, a quick software implementation of GOST 28147-89 will be used.
The sequence of calls is shown in the picture:
Data encryption on the client:
try
{
    var recipientCert = plugin.getCertificate(deviceId, certRecId);
}
catch (error)
{
    console.log(error);
}
var options = {};
options.useHardwareEncryption = true;
var cms;
try
{
    cms = plugin.cmsEncrypt(deviceId, certSenderId, recipientCert, data, options);
}
catch (error)
{
    console.log(error);
}
Decryption of data on the server, before decryption, the message must be framed with the PEM headers "----- BEGIN PKCS7 -----" and "----- END PKCS7 -----":
openssl smime -engine gost -decrypt -in message.cms -inform PEM -recip recipient.crt -inkey recipient.key
recipient.crt - certificate of the person for whom the message is encrypted, recipient.key - the key of the person for whom the message is encrypted.
Decryption of data received from the server on the client
To decrypt data received from the server, the cmsDecrypt function is intended . Since the server encrypts the client using its certificate, the client private key descriptor corresponding to the public key in the certificate must be passed as keyId. This descriptor is unique and immutable and therefore can be stored in the user account on the server. In addition, a user key descriptor can be obtained explicitly by calling the getKeyByCertificate function .
Server data encryption for the client:
openssl smime -encrypt -engine gost -gost89 -binary -outform PEM -in data.file -out message.enc user.crt
Decryption of data on the client:
var data;
var options = {};
try
{
    data = plugin.cmsDecrypt(deviceId, keyId, cms, options);
}
catch (error)
{
    console.log(error);
}
useful links
These links may be useful to developers of information systems with
digital signature support based on Rutoken Plugin and openssl: Demo system Rutoken Plugin
WEB service for generating keys, generating requests, managing certificates, generating templates for certificate requests
Documentation for Rutoken Plugin
Documentation on using openssl utility with Russian cryptographic algorithms
Example PHP script using openssl utility