Pixel Art Course 3
This is a translation of the publication Les Forges Pixel Art Course .
Part 1: The right tools
Part 2: Lines and curves
Part 3: Perspectives
Part 4: Shadow and light
Part 5: Color palettes
Part 6: Smoothing
Part 7: Textures and blurry
Part 8: World of tiles
The problem of perspective in 2D games is a question that arises often, and this is probably why so many amateur games have so many inconsistencies in this area. In particular, this part addresses typical perspectives in RPGs, so if you are looking for side or first-person information, you should look elsewhere. It is important to remember that perspective is “the art of representing three-dimensional objects on a flat surface (in this case, your screen) as an observer would see them.”
First of all, I would like to thank Lunn, without which this section would not be as it is now; this is actually a revised version of the conversation we had on this topic.
Because there are several different types! If you read books on drawing or took lessons, you probably know that there are one, two and three-point perspectives. This is not what we are talking about here, so you can forget about it.
In 2D video games, the simplest perspective used is called axonometric. What kind of beast is this? In the axonometric representation of space, the object is represented by three coordinates (X, Y and Z), each of which is constantly growing in a certain direction. In particular, this means that two parallel lines in reality will be parallel in an axonometric perspective, and the size of the object does not change, regardless of their distance from the observer. Finally, there is an infinite number of axonometric perspectives, since the artist is absolutely free to place the three directional axes of his choice. We will consider the three most commonly used axonometric projections (see picture).
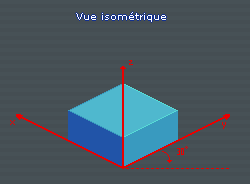
This is called an isometric perspective: the Y axis must be tilted 30 degrees to match the definition of an isometric view, but since this is not possible with simple pixel art, it is represented through a 1: 2 line (see the previous section) and the angle is only 26.5651 degrees (I will spare you from calculations leading to this conclusion). This view is particularly suited for tactical RPGs because it can provide compelling depth and height. But it is not suitable for cards in traditional RPG creation programs (for example RPG Maker) because of the shape of the tiles.
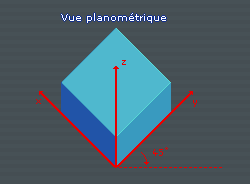
This is called a planimetric perspective. This time, the Y axis is tilted 45 degrees from the horizontal, and is straight 1: 1. Very few games use this (the most famous of them is Boktai), but it can still be interesting and rich in volume. This perspective could be more widespread, and it remains at your discretion whether to use it.
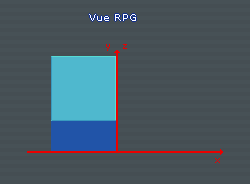
And finally, the last (and less attractive), this is the famous 3/4 perspective: the Y axis is tilted to the left, connecting with the Z axis. This is the view that most RPGs use, and we will discuss it in more detail.

Theoretically, I could stay here, but I will assume that you are not so smart, and I will show you some examples with comments.
Let me start with a simple example: a barrel (this is an element of any set of city / abandoned mine / house / etc.). What is interesting about her? ROUND COVER. Not an ellipse, as is often seen. This is true for two reasons:
- This is a circle in a real game (round cover)
- It is parallel to the ground, and thus visible from above.
There is no tilt. You must accept this in all horizontal planes that are visible from above if you want to do 3/4 in sequence.
We will continue with a more complete example generously provided by Ody. First of all, notice that the top of the tower is round. Also look at the door, walls and windows. They, they ... I will give you a second ... they? (No, they are not terrible). They are 1 to 1. Again the magic of our three axes in action: vertical planes are presented as they are visible from the front, the same with horizontal ones.

But then what happens when we want to represent a vertical plane and horizontal planes? Nothing special. Their interaction is not a particular problem. Take a look at the stone walls of Odi, or the steps (or cabinet, or walls) and the excellent Bahamut Lagoon screenshot on the left to see. In short: horizontal planes are visible from above, vertical planes are visible from the front.
3. Extension possible vanishing points underground

Well, I hope you still understand everything, because it will be a little more complicated here. I told you at the beginning of the part, do not take into account the perspective point. Now we will do this a little bit. One small reminder (see left) is probably enough for you to understand the idea of a one-point perspective. As you can see, somewhere there is a point (not in the picture) where all horizontal lines indicate (since the picture was taken on a plain, from the ground) - this is called a vanishing point. You do not need to know more to understand this article, but if the topic interests you, I advise you to take a course on drawing perspectives .
Let me return to our course - how do we use these vanishing points? To improve our prospects! Unlike the painting depicting the Palace of Versailles (did you recognize it?), Vanishing points will attract vertical lines. Ideally, we would like to fix the points and draw them on top of our map, but this is not compatible with the system used in tile-based RPGs. The solution is to assign an individual vanishing point to each object in our tile set. It's a little less elegant, but the result is good! Here are two screenshots of Golden Sun and Golden Sun 2, these are the only games that I know using this technique. Shin kindly highlighted some vanishing points of these images.
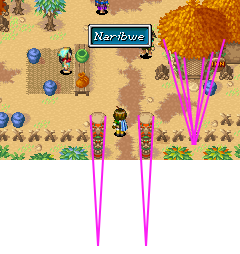
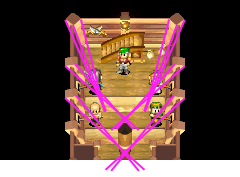
Note that all vanishing points are located below the objects (since the camera is directed from top to bottom) and everything is almost the same depth (so that everything looks uniform). The last brief comment: the lower your vanishing points, the closer you are to the standard 3/4 perspective, so placing your vanishing points in “infinity” will give you a result close to pure 3/4 (magic, right?).
Now you know a little about the prospect, and there is no forgiveness for your mistakes, especially since they are not so difficult to fix, and you can draw lines (and vanishing points if you try the Golden Sun method) to help you.
Part 1: The right tools
Part 2: Lines and curves
Part 3: Perspectives
Part 4: Shadow and light
Part 5: Color palettes
Part 6: Smoothing
Part 7: Textures and blurry
Part 8: World of tiles
Part 3: Prospects
The problem of perspective in 2D games is a question that arises often, and this is probably why so many amateur games have so many inconsistencies in this area. In particular, this part addresses typical perspectives in RPGs, so if you are looking for side or first-person information, you should look elsewhere. It is important to remember that perspective is “the art of representing three-dimensional objects on a flat surface (in this case, your screen) as an observer would see them.”
First of all, I would like to thank Lunn, without which this section would not be as it is now; this is actually a revised version of the conversation we had on this topic.
1. Prospects - and why the plural?
Because there are several different types! If you read books on drawing or took lessons, you probably know that there are one, two and three-point perspectives. This is not what we are talking about here, so you can forget about it.
In 2D video games, the simplest perspective used is called axonometric. What kind of beast is this? In the axonometric representation of space, the object is represented by three coordinates (X, Y and Z), each of which is constantly growing in a certain direction. In particular, this means that two parallel lines in reality will be parallel in an axonometric perspective, and the size of the object does not change, regardless of their distance from the observer. Finally, there is an infinite number of axonometric perspectives, since the artist is absolutely free to place the three directional axes of his choice. We will consider the three most commonly used axonometric projections (see picture).
This is called an isometric perspective: the Y axis must be tilted 30 degrees to match the definition of an isometric view, but since this is not possible with simple pixel art, it is represented through a 1: 2 line (see the previous section) and the angle is only 26.5651 degrees (I will spare you from calculations leading to this conclusion). This view is particularly suited for tactical RPGs because it can provide compelling depth and height. But it is not suitable for cards in traditional RPG creation programs (for example RPG Maker) because of the shape of the tiles.
This is called a planimetric perspective. This time, the Y axis is tilted 45 degrees from the horizontal, and is straight 1: 1. Very few games use this (the most famous of them is Boktai), but it can still be interesting and rich in volume. This perspective could be more widespread, and it remains at your discretion whether to use it.
And finally, the last (and less attractive), this is the famous 3/4 perspective: the Y axis is tilted to the left, connecting with the Z axis. This is the view that most RPGs use, and we will discuss it in more detail.
2. Everything about 3/4 view
Theoretically, I could stay here, but I will assume that you are not so smart, and I will show you some examples with comments.
Let me start with a simple example: a barrel (this is an element of any set of city / abandoned mine / house / etc.). What is interesting about her? ROUND COVER. Not an ellipse, as is often seen. This is true for two reasons:
- This is a circle in a real game (round cover)
- It is parallel to the ground, and thus visible from above.
There is no tilt. You must accept this in all horizontal planes that are visible from above if you want to do 3/4 in sequence.
We will continue with a more complete example generously provided by Ody. First of all, notice that the top of the tower is round. Also look at the door, walls and windows. They, they ... I will give you a second ... they? (No, they are not terrible). They are 1 to 1. Again the magic of our three axes in action: vertical planes are presented as they are visible from the front, the same with horizontal ones.
But then what happens when we want to represent a vertical plane and horizontal planes? Nothing special. Their interaction is not a particular problem. Take a look at the stone walls of Odi, or the steps (or cabinet, or walls) and the excellent Bahamut Lagoon screenshot on the left to see. In short: horizontal planes are visible from above, vertical planes are visible from the front.
3. Extension possible vanishing points underground
Well, I hope you still understand everything, because it will be a little more complicated here. I told you at the beginning of the part, do not take into account the perspective point. Now we will do this a little bit. One small reminder (see left) is probably enough for you to understand the idea of a one-point perspective. As you can see, somewhere there is a point (not in the picture) where all horizontal lines indicate (since the picture was taken on a plain, from the ground) - this is called a vanishing point. You do not need to know more to understand this article, but if the topic interests you, I advise you to take a course on drawing perspectives .
Let me return to our course - how do we use these vanishing points? To improve our prospects! Unlike the painting depicting the Palace of Versailles (did you recognize it?), Vanishing points will attract vertical lines. Ideally, we would like to fix the points and draw them on top of our map, but this is not compatible with the system used in tile-based RPGs. The solution is to assign an individual vanishing point to each object in our tile set. It's a little less elegant, but the result is good! Here are two screenshots of Golden Sun and Golden Sun 2, these are the only games that I know using this technique. Shin kindly highlighted some vanishing points of these images.
Note that all vanishing points are located below the objects (since the camera is directed from top to bottom) and everything is almost the same depth (so that everything looks uniform). The last brief comment: the lower your vanishing points, the closer you are to the standard 3/4 perspective, so placing your vanishing points in “infinity” will give you a result close to pure 3/4 (magic, right?).
Now you know a little about the prospect, and there is no forgiveness for your mistakes, especially since they are not so difficult to fix, and you can draw lines (and vanishing points if you try the Golden Sun method) to help you.