Securing HTTP Traffic with Citrix Netscaler
Today, any medium and large organization in its work relies on a number of infrastructure IT products and a set of business applications. The smooth operation of the infrastructure and business applications is a fundamentally important condition for the successful functioning of the organization. Accordingly, the main task of IT services is to ensure uninterrupted, safe and productive access in real time to this corporate platform.
At the same time, the solution must meet a number of high requirements: to ensure the continuity of the company's business processes, meet strict security standards, maintain high IT infrastructure performance and be easily scalable in order to further ensure the necessary expansion in accordance with the growth of the organization.
Over the past few years, this same enterprise platform of capacious and heavy applications running exclusively on certain types and even versions of operating systems has transformed into lightweight, scalable, and cross-platform web applications. I am not talking only about large web projects, forums and other highly visited resources. Modern business translates CRM, ERP and other SAP and 1C-like platforms on the web. The reasons, I hope, are clear to everyone. But there remains one small cornerstone that modern business often ignores, and it, in turn, reminds itself when, at best, the entire enterprise stops working, and at worst, there is a leak or loss of confidential information.
So in my case, the customer woke me up at one in the morning with a request to solve the problem, since their platform was subjected to a DDoS attack, paralyzing the work of the entire enterprise and the work of clients. There are no explanatory instructions and descriptions of how Netscaler works, which served as the main help to write an article.

The first thing that had to be done with the customer’s web platform was to close the external network interface. To somehow reduce the load, I had to register a pool of IP addresses for access and testing from the outside. Then a web server was configured to limit the number of simultaneous sessions and requests. Further, through GeoIP, countries began to gradually open. Then we had to recompile the web server to add some functionality to repel attacks. After failtoban was configured, dozens of lines of scripts for cron were written. It took 16-20 hours, but it was depressing that many “patches” clashed with each other and were “scattered” throughout the system. And the attack, nevertheless, continued: the system kept responding with a 503 error. No one had ever taken preventive measures; accordingly, there was no possibility to immediately react.
Netscaler is a multi-functional platform that solves most network problems or bottlenecks. This product can be compared with the Lego designer, from various parts of which you can configure a universal transformer - it will be compact and at the same time possess all the necessary tools for working with traffic. Netscaler can be used both as a virtual VPX device on all modern hypervisors and as a physical device.
First of all, we will need to register at citrix.com. If your company already uses Citrix, then you can download the product under an existing account. If not, then select Create Customer Account, fill out the required fields, select a username and password and you are already logged in under your account, even the email address does not need to be confirmed.
1. Go to the Downloads section .
2. Select NetScaler ADC, then Evaluations and Trial Software from the drop-down menu, and click the Find button.
3. Expand the section with the release that has View All NetScaler Customer Trials.
4. Choose Try it FREE.
5. Fill out the form and click Proceed to download.
6. On the download page, images for different hypervisors will be available: choose the one that suits you.
7. Install Netscaler in our hypervisor.
8. At the first start in the console there will be a settings wizard. We need to provide some data. Netscaler does not accept DHCP and logically has one interface, despite the fact that it can have several physical or virtual ones. You must specify the local IP address, which is available in the DMZ zone. I took 172.16.0.100
9. Open the page http://172.16.0.100 in the browser and log in with the username / password nsroot / nsroot
10. We will be asked to indicate the time zone, DNS and some other IP address. 172.16.0.100 is the address of Netscaler itself. Subnet IP - the address that will be used to work with other servers and services. That is, flies separately - cutlets, too: the controlling IP is one, for working with services - the other. Suddenly you have two DMZ zones or vlan networks or networks with different masks. Since in my case the network is one, I specified 172.16.0.101.
11. After a couple of clicks Next, you will be taken to the Configuration tab.
1. Now you need to download the license file. We go to the My Account page, select Activate and Allocate Licenses, click in the corner the link Don't see your product? and enter the license code that we received in the mail. We click Continue twice and now we see our product from the lists. From that moment, the countdown of the license began.
2. Copy to the Host Id buffer (this is the MAC address of our Netscaler) from the Configuration page of the Netscaler web interface, and return to the site where you need to download the license.
3. Insert the MAC address in the Host ID field, click Continue, then Confirm, then Ok and the file will start downloading with the LIC extension.
4. Done, this is our license for a period of 90 days.
5. We update the Netscaler interface page (hereinafter NS), log in, we will again be asked to indicate the license. We select the file, download it, and after the successful download it will be necessary to reboot the system, which the window will inform.
6. After the reboot, the licensing tab will list what we have available for 90 days.

1. You must immediately clarify that the previous version is always available for a free trial. Unfortunately, for full management and configuration via the GUI, Java version 7/45 x86 is required. In the new version of NS, you can work with the latest any version of the JRE. If you do not want to do a downgrade, then you can use the command line. All the necessary commands will be at the end of the section. To do this, open a terminal SSH session to the IP of our NS with the username / password nsroot / nsroot.
2. To begin with, you have a website that you want to protect. He has his own domain name and is assigned an IP address. His native IP address will remain, but we need to register a virtual server in NS. To do this, you need a free IP address, which will be called VIP, and through it will be accessed by users to your real web server. If the web service is external, then the IP is external, if the internal is, respectively. Take for example 172.16.0.102.
3. Go to Traffic Management, then in Virtual Servers and click the Add button.
We come up with a name, select the HTTP protocol, specify the VIP (virtual IP) and the port on which this virtual server will work, click Create and then Close.
4. Go to Servers, click Add and indicate the data of our web server. In fact, we need to give a name and indicate the IP address or name. The port is not needed, since the server may have other services on different ports.

5. Now we need to connect our virtual server with the real one in the form of a certain service. We go to Services, click Add again, give a name, select the protocol, service and port on which our server accepts connections.
6. It remains to add the created service to our virtual server. We go into Virtual Servers, click Open, put a check in the Active column and confirm OK. After that, your Virtual Server will become UP & RUNNING.

7. After all the changes, you need to click the icon in the form of a diskette to save the current configuration.
8. Open the page in the browserhttp://172.16.0.102 and voila, our site opens. From the first time it’s not entirely clear how this works, so let’s analyze what we did:
a) we created a virtual server that will work on a virtual IP address using the HTTP protocol through the 80th port.
b) added data about our real server;
c) indicated that our server has an HTTP service on port 80
; d) offered our virtual server to process data on a specific service;
e) saved the configuration.
9. Via the command line
Our virtual server is working. If the real server produces HTML content with conditional links, you can even get some surfing, otherwise you will have to change all full links to conditional or change the DNS server if the links point to a domain name. Suppose you have a website where full links are registered, for example, <a href='http://www.domain.com/page1'> link </a>, then you need to convert it into <a href='/page1'> link </a>.
If there is no way to quickly redo it, then in DNS, reassign A record to www and the head domain to the IP address of your virtual server, that is, to 172.16.0.102.
The first thing we can organize is GZIP compression. In this case, compression on a real server can be disabled. No, NS will not unpack and repack the traffic, but for the purpose of separating processor resources, let the web server do what it should do - give out the finished content, NS picks it up from the server as it is, and gives it to the end user already compressed according to the rules that we will tell him .
1. In the menu System> Settings> Configure basic features, check the HTTP Compression checkbox.
2. In the web interface, go to Traffic Management> Load Balancing> Services, select a service, click Open, go to the Advanced tab and tick off that we want to compress traffic. You can also specify other parameters, for example, the maximum number of clients and requests.

3. From now on, our traffic is compressed according to the standard NS settings. But not everything is compressed. Suppose some web servers in their MIME settings specify application / x-javascript for the js extension instead of text / javascript, respectively, compression does not occur. We can correct this situation by adding our policy.
Go to the menu Optimization> HTTP Compression> Policies, click Add, click Switch to Classic Syntax and add a new rule.

4. The rule was created, but so far it is not active and does not work. Right-click on the rule, select Policy Manager, select the Response tab, then Default Global, click Insert Policy and select our rule, setting the highest priority.
5. Such rules can also be set on pdf, json and other types. You can also specify which minimum size to compress, from which subnets, for which browsers, etc. etc. Rules can be made not global, but for a specific service.
6. Via the command line:
“So what?” You say. And you will be right. All that was described above can be done by a standard web server. As for protecting data from hacking, there is no way to train a standard server. You always have to rely on the correctness of the source code, which in most cases we ourselves did not write. And no one can ever give guarantees that there are no errors or shortcomings in the executable code.
At one time, developing a large Internet project in a small team, I was seriously puzzled by the protection against SQL injection and wrote an API for accessing the database. I was calm about the project until I began to check what the programmers from my team were doing. Instead of passing values by links, they “assembled” the SQL query out of habit, concatenating the query with string and numeric variables, not even worrying about escaping, but even banal checking the variables for the validity of their values. What can we say about the sites of some online banks, where in 10-15 minutes I found several SQL vulnerabilities. And besides this there is also cross-site scripting, cookie forgery, the formation of malicious JSON and XML requests, etc.
To our joy, Netscaler is struggling with this quite successfully.
1. In the menu System> Settings> Configure basic features, check the Application Firewall.
2. In the Security> Application Firewall menu, launch the Application Firewall Wizard
3. Select the name of our configuration and type Web 2.0
4. In the Specify rule, leave everything as it is and click Next
5. In the next dialog, mark what our web server is working on.
6. In Select signature action, leave everything as it is.
7. In Select deep protections, check the first 4 options. It is worth noting that HTML Cross-Site Scripting by default prohibits any HTML tags from being sent in GET and POST requests. This is not scary, since you can set filters and conditions for any rule.
8. In Select deep actions you need to check the options that you want to block. At the initial stage, it is recommended not to block, but to walk around your site, to stage all possible user behaviors, and when statistics gather, decide what to block and where to create additional rules. Everything except cross-site scripting can be blocked right away.
9. After creating the rule, you need to open it and make additional settings.
a) set the encoding
b) create a page where the user will be redirected if there was an attempt to hack. This is usually the home page, but you can create a separate one with information that your actions seemed suspicious and will be sent to the administration, and, if necessary, to the competent authorities.
c) a lot of other subtle settings, a description of which can be found in the documentation.
10. Now we go to our site, open the pages with dummy SQL injection http://172.16.0.102/?Search=00&q=CB506-67902 'UNION SELECT aaa FROM aaa and watch how we are thrown to the main page.
11. We put in the browser a plugin that allows you to edit the cookie, fix a couple and refresh the page. The cookie on your side does not change, but they will not be transmitted to the web server. NS caches all cookies that the original server passed for storage. If in the next REQ request, NS detects a mismatch of the previously set cookies, it will simply block them.
12. If you checked the Block in the Cross-Site Scripting section, then try using a GET or POST request to send HTML and you will also be redirected to the main page.
13. Isn't that great? If you delve into the settings, you will find a lot of interesting and useful things for yourself. A cookie can be encoded for greater security that the user will not be able to fake just like that, because NS will decode its keys before passing them to the web server. You can specify the data format in the form of regular expressions for types or field names for validation or escaping. You can make exceptions to specific pages or fields for checking HTML or SQL. With a properly configured NS, the security of your site will increase hundreds of times.
14. Via the command line
Finally, we came to the point for which it was all up to. In order not to delve into how protection works, you can read the article nginx module for combating DDoS . The principle is one to one, but I did not succeed in launching this module in the real situation as it should.
1. Go to the menu Security> Protection Features> HTTP DoS and out of habit click Add.
2. In addition to the name, there are two fields where you want to paste the values. Let's figure out how to count them.
The first Queue depth field is the quantitative value of users who are waiting in line for a server response.
Suppose you have 86400 unique users per day or 3500 per hour or 60 per minute or 1 every second.
Of course, there are none at night, during the day there are a lot of them. Multiply 10 times for greater importance and get 10 users per second. In general, you can see the statistics.
Let's say one user, on average, requests 5-10 requests per page (html, css, js, img, etc.) and looks at them for 5-10 seconds (that's why AJAX drives).
That is, the server approximately at the peak of its load fulfills up to 100 responses per second.
Imagine that your web server is capable of sending a maximum of 500 responses per second, but receives 10,000 requests per second, or 20 times more.
How many real users are currently experiencing the problem? That's right, the same 10, the rest is an attack. When should you start to panic? Immediately after 10? I would like to, but the minimum value is 21, so let's leave it as it is. That is, as soon as 21 or more sessions are in the queue for receiving data, automatic protection against attack will turn on.
Now with the second field Client detect rate. This is the percentage of users who will be checked for lice. If we put 1% for verification, with protection automatically turned on, the number of responses from the server will be only 5 (500 * 0.01), while 10,000 will wait in line. In other words, only 0.05% of real users will pass the test. Nevertheless, if the scan level is high (for example, at 10%, the value of 1000 requests will be checked), then this can clog all outgoing traffic with checks and is already overloaded with an attack if your channel is narrow. But I would put 30-35% to immediately start fighting off the attack, since the channel is very thick. The field can be left blank and depending on the width of the channel that NS can measure, the number of requests, responses and other indicators, it can vary the level of verification.
3. Next, go to the menu Traffic Management> Load Balancing> Services, open our service through the Open button, and in the Policies / HTTP DoS tab, insert the newly created policy.

4. Via the command line
Knows this thing a lot. From what may be needed for sites, these are:
1. Separation of static and dynamic content to relieve the load.
2. Proxying static content.
3. Caching dynamic content and flushing the cache according to certain conditions or time.
4. Proxying and caching of mySQL and other relational databases in order to reduce the number of samples.
5. Separation of traffic and content by network addresses, geo-location and many other parameters.
6. Traffic encryption.
7. Work as a DNS server.
8. By default, NS already has network protection, for example, from ICMP flood, etc.
Everything is configured quite easily, although not always intuitively. The instruction is available on the vendor's website . You can read in Russian about the main features on the website http://netscaler.kz .
The lack of information in Russian about this platform greatly affects its prevalence in the CIS countries. Apparently, therefore, our modern network administrators underestimated the capabilities of this product.
Indeed, it was not in vain that two years ago, Cisco officially announced that it was stopping the further development of its ACE balancer, and more recently, Netscaler has been part of some series of Cisco switches.
Thank!
At the same time, the solution must meet a number of high requirements: to ensure the continuity of the company's business processes, meet strict security standards, maintain high IT infrastructure performance and be easily scalable in order to further ensure the necessary expansion in accordance with the growth of the organization.
Over the past few years, this same enterprise platform of capacious and heavy applications running exclusively on certain types and even versions of operating systems has transformed into lightweight, scalable, and cross-platform web applications. I am not talking only about large web projects, forums and other highly visited resources. Modern business translates CRM, ERP and other SAP and 1C-like platforms on the web. The reasons, I hope, are clear to everyone. But there remains one small cornerstone that modern business often ignores, and it, in turn, reminds itself when, at best, the entire enterprise stops working, and at worst, there is a leak or loss of confidential information.
So in my case, the customer woke me up at one in the morning with a request to solve the problem, since their platform was subjected to a DDoS attack, paralyzing the work of the entire enterprise and the work of clients. There are no explanatory instructions and descriptions of how Netscaler works, which served as the main help to write an article.
How it all began
The first thing that had to be done with the customer’s web platform was to close the external network interface. To somehow reduce the load, I had to register a pool of IP addresses for access and testing from the outside. Then a web server was configured to limit the number of simultaneous sessions and requests. Further, through GeoIP, countries began to gradually open. Then we had to recompile the web server to add some functionality to repel attacks. After failtoban was configured, dozens of lines of scripts for cron were written. It took 16-20 hours, but it was depressing that many “patches” clashed with each other and were “scattered” throughout the system. And the attack, nevertheless, continued: the system kept responding with a 503 error. No one had ever taken preventive measures; accordingly, there was no possibility to immediately react.
Netscaler is a multi-functional platform that solves most network problems or bottlenecks. This product can be compared with the Lego designer, from various parts of which you can configure a universal transformer - it will be compact and at the same time possess all the necessary tools for working with traffic. Netscaler can be used both as a virtual VPX device on all modern hypervisors and as a physical device.
Install and configure virtual machines
First of all, we will need to register at citrix.com. If your company already uses Citrix, then you can download the product under an existing account. If not, then select Create Customer Account, fill out the required fields, select a username and password and you are already logged in under your account, even the email address does not need to be confirmed.
Download, install, and configure Netscaler
1. Go to the Downloads section .
2. Select NetScaler ADC, then Evaluations and Trial Software from the drop-down menu, and click the Find button.
3. Expand the section with the release that has View All NetScaler Customer Trials.
4. Choose Try it FREE.
5. Fill out the form and click Proceed to download.
6. On the download page, images for different hypervisors will be available: choose the one that suits you.
7. Install Netscaler in our hypervisor.
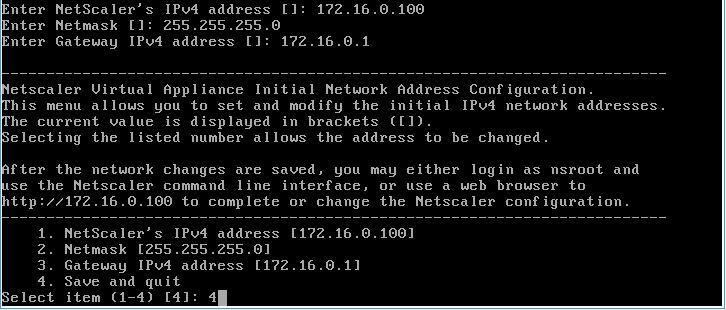
8. At the first start in the console there will be a settings wizard. We need to provide some data. Netscaler does not accept DHCP and logically has one interface, despite the fact that it can have several physical or virtual ones. You must specify the local IP address, which is available in the DMZ zone. I took 172.16.0.100
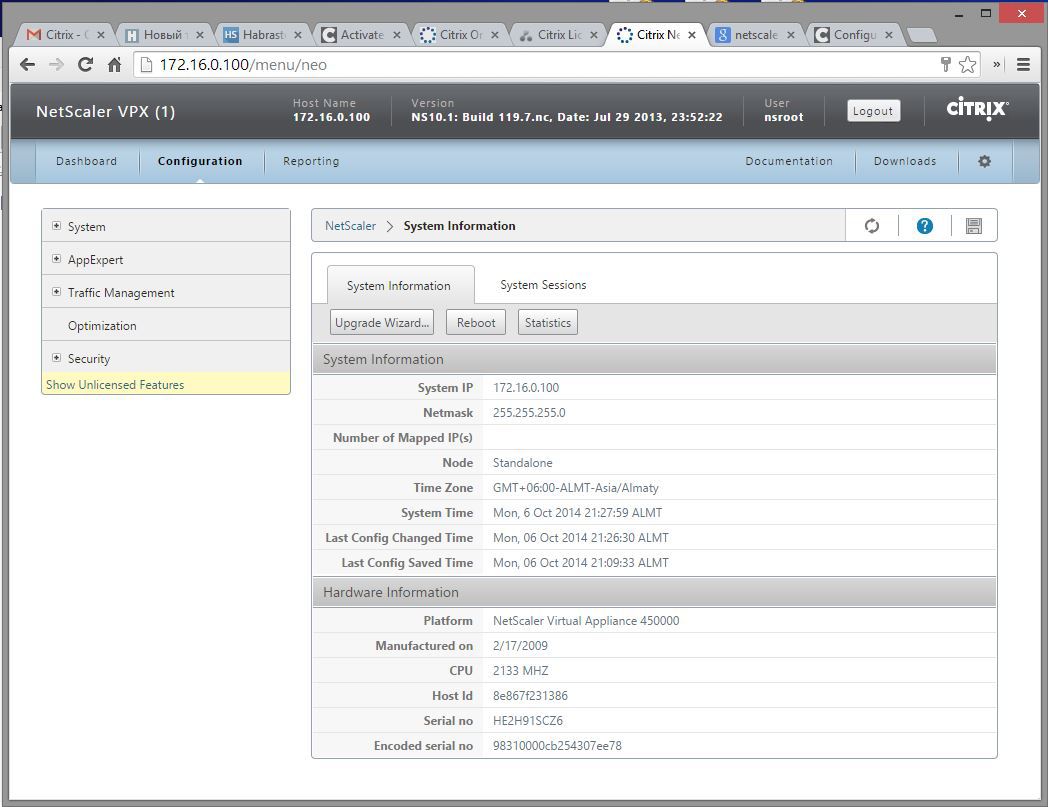
9. Open the page http://172.16.0.100 in the browser and log in with the username / password nsroot / nsroot
10. We will be asked to indicate the time zone, DNS and some other IP address. 172.16.0.100 is the address of Netscaler itself. Subnet IP - the address that will be used to work with other servers and services. That is, flies separately - cutlets, too: the controlling IP is one, for working with services - the other. Suddenly you have two DMZ zones or vlan networks or networks with different masks. Since in my case the network is one, I specified 172.16.0.101.
11. After a couple of clicks Next, you will be taken to the Configuration tab.
Registration and licensing
1. Now you need to download the license file. We go to the My Account page, select Activate and Allocate Licenses, click in the corner the link Don't see your product? and enter the license code that we received in the mail. We click Continue twice and now we see our product from the lists. From that moment, the countdown of the license began.
2. Copy to the Host Id buffer (this is the MAC address of our Netscaler) from the Configuration page of the Netscaler web interface, and return to the site where you need to download the license.
3. Insert the MAC address in the Host ID field, click Continue, then Confirm, then Ok and the file will start downloading with the LIC extension.
4. Done, this is our license for a period of 90 days.
5. We update the Netscaler interface page (hereinafter NS), log in, we will again be asked to indicate the license. We select the file, download it, and after the successful download it will be necessary to reboot the system, which the window will inform.
6. After the reboot, the licensing tab will list what we have available for 90 days.
Configuring servers, services, policies, policies and rules
1. You must immediately clarify that the previous version is always available for a free trial. Unfortunately, for full management and configuration via the GUI, Java version 7/45 x86 is required. In the new version of NS, you can work with the latest any version of the JRE. If you do not want to do a downgrade, then you can use the command line. All the necessary commands will be at the end of the section. To do this, open a terminal SSH session to the IP of our NS with the username / password nsroot / nsroot.
2. To begin with, you have a website that you want to protect. He has his own domain name and is assigned an IP address. His native IP address will remain, but we need to register a virtual server in NS. To do this, you need a free IP address, which will be called VIP, and through it will be accessed by users to your real web server. If the web service is external, then the IP is external, if the internal is, respectively. Take for example 172.16.0.102.
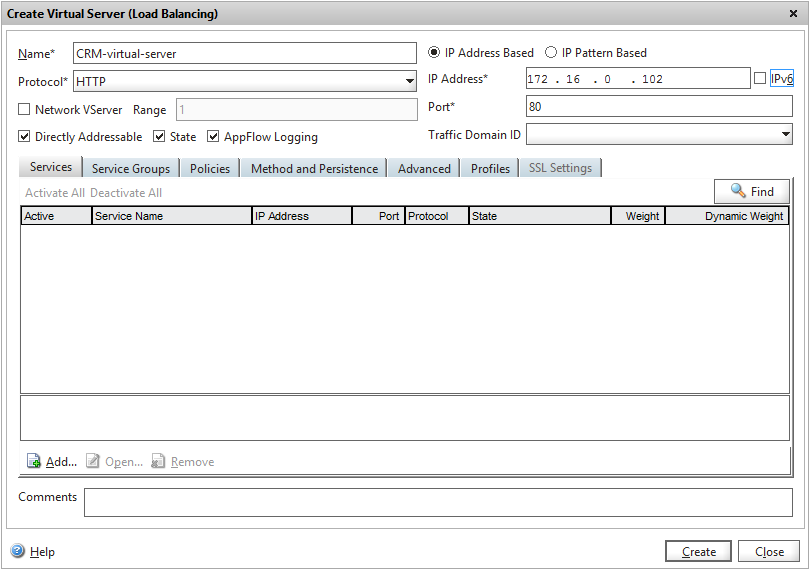
3. Go to Traffic Management, then in Virtual Servers and click the Add button.
We come up with a name, select the HTTP protocol, specify the VIP (virtual IP) and the port on which this virtual server will work, click Create and then Close.
4. Go to Servers, click Add and indicate the data of our web server. In fact, we need to give a name and indicate the IP address or name. The port is not needed, since the server may have other services on different ports.
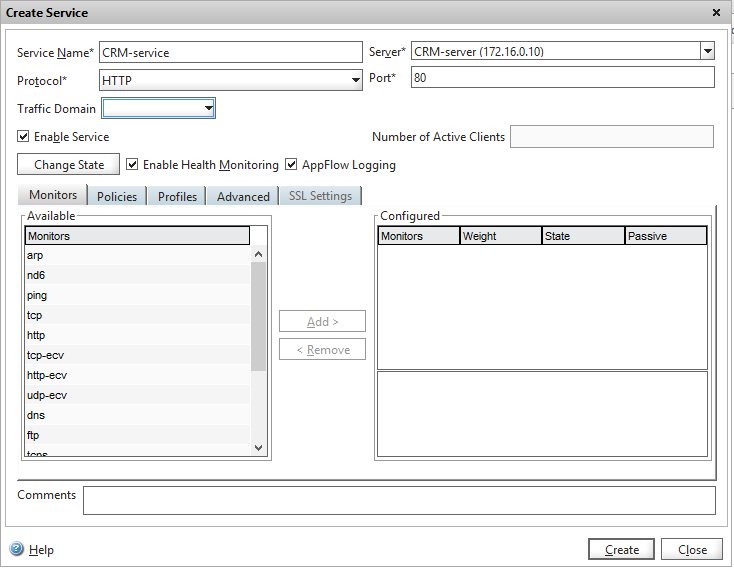
5. Now we need to connect our virtual server with the real one in the form of a certain service. We go to Services, click Add again, give a name, select the protocol, service and port on which our server accepts connections.
6. It remains to add the created service to our virtual server. We go into Virtual Servers, click Open, put a check in the Active column and confirm OK. After that, your Virtual Server will become UP & RUNNING.
7. After all the changes, you need to click the icon in the form of a diskette to save the current configuration.
8. Open the page in the browserhttp://172.16.0.102 and voila, our site opens. From the first time it’s not entirely clear how this works, so let’s analyze what we did:
a) we created a virtual server that will work on a virtual IP address using the HTTP protocol through the 80th port.
b) added data about our real server;
c) indicated that our server has an HTTP service on port 80
; d) offered our virtual server to process data on a specific service;
e) saved the configuration.
9. Via the command line
add lb vserver CRM-virtual-server HTTP 172.16.0.102 80
add server CRM-server 172.16.0.10
add service CRM-service CRM-server HTTP 80
bind lb vserver CRM-virtual-server CRM-service
save config
Compression and traffic compression
Our virtual server is working. If the real server produces HTML content with conditional links, you can even get some surfing, otherwise you will have to change all full links to conditional or change the DNS server if the links point to a domain name. Suppose you have a website where full links are registered, for example, <a href='http://www.domain.com/page1'> link </a>, then you need to convert it into <a href='/page1'> link </a>.
If there is no way to quickly redo it, then in DNS, reassign A record to www and the head domain to the IP address of your virtual server, that is, to 172.16.0.102.
The first thing we can organize is GZIP compression. In this case, compression on a real server can be disabled. No, NS will not unpack and repack the traffic, but for the purpose of separating processor resources, let the web server do what it should do - give out the finished content, NS picks it up from the server as it is, and gives it to the end user already compressed according to the rules that we will tell him .
1. In the menu System> Settings> Configure basic features, check the HTTP Compression checkbox.
2. In the web interface, go to Traffic Management> Load Balancing> Services, select a service, click Open, go to the Advanced tab and tick off that we want to compress traffic. You can also specify other parameters, for example, the maximum number of clients and requests.
3. From now on, our traffic is compressed according to the standard NS settings. But not everything is compressed. Suppose some web servers in their MIME settings specify application / x-javascript for the js extension instead of text / javascript, respectively, compression does not occur. We can correct this situation by adding our policy.
Go to the menu Optimization> HTTP Compression> Policies, click Add, click Switch to Classic Syntax and add a new rule.
4. The rule was created, but so far it is not active and does not work. Right-click on the rule, select Policy Manager, select the Response tab, then Default Global, click Insert Policy and select our rule, setting the highest priority.
5. Such rules can also be set on pdf, json and other types. You can also specify which minimum size to compress, from which subnets, for which browsers, etc. etc. Rules can be made not global, but for a specific service.
6. Via the command line:
enable ns feature cmp
set service CRM-service -CMP yes
add cmp policy ns_cmp_javascript -rule "RES.HTTP.HEADER Content-Type CONTAINS javascript" -resAction COMPRESS
add cmp policy ns_cmp_json -rule "RES.HTTP.HEADER Content-Type CONTAINS json" -resAction COMPRESS
add cmp policy ns_cmp_pdf -rule "RES.HTTP.HEADER Content-Type CONTAINS application/pdf" -resAction COMPRESS
bind cmp global ns_cmp_javascript -priority 10001 -state ENABLED
bind cmp global ns_cmp_json -priority 10002 -state ENABLED
bind cmp global ns_cmp_pdf -priority 10003 -state ENABLED
save config
Data protection
“So what?” You say. And you will be right. All that was described above can be done by a standard web server. As for protecting data from hacking, there is no way to train a standard server. You always have to rely on the correctness of the source code, which in most cases we ourselves did not write. And no one can ever give guarantees that there are no errors or shortcomings in the executable code.
At one time, developing a large Internet project in a small team, I was seriously puzzled by the protection against SQL injection and wrote an API for accessing the database. I was calm about the project until I began to check what the programmers from my team were doing. Instead of passing values by links, they “assembled” the SQL query out of habit, concatenating the query with string and numeric variables, not even worrying about escaping, but even banal checking the variables for the validity of their values. What can we say about the sites of some online banks, where in 10-15 minutes I found several SQL vulnerabilities. And besides this there is also cross-site scripting, cookie forgery, the formation of malicious JSON and XML requests, etc.
To our joy, Netscaler is struggling with this quite successfully.
1. In the menu System> Settings> Configure basic features, check the Application Firewall.
2. In the Security> Application Firewall menu, launch the Application Firewall Wizard
3. Select the name of our configuration and type Web 2.0
4. In the Specify rule, leave everything as it is and click Next
5. In the next dialog, mark what our web server is working on.
6. In Select signature action, leave everything as it is.
7. In Select deep protections, check the first 4 options. It is worth noting that HTML Cross-Site Scripting by default prohibits any HTML tags from being sent in GET and POST requests. This is not scary, since you can set filters and conditions for any rule.
8. In Select deep actions you need to check the options that you want to block. At the initial stage, it is recommended not to block, but to walk around your site, to stage all possible user behaviors, and when statistics gather, decide what to block and where to create additional rules. Everything except cross-site scripting can be blocked right away.
9. After creating the rule, you need to open it and make additional settings.
a) set the encoding
b) create a page where the user will be redirected if there was an attempt to hack. This is usually the home page, but you can create a separate one with information that your actions seemed suspicious and will be sent to the administration, and, if necessary, to the competent authorities.
c) a lot of other subtle settings, a description of which can be found in the documentation.
10. Now we go to our site, open the pages with dummy SQL injection http://172.16.0.102/?Search=00&q=CB506-67902 'UNION SELECT aaa FROM aaa and watch how we are thrown to the main page.
11. We put in the browser a plugin that allows you to edit the cookie, fix a couple and refresh the page. The cookie on your side does not change, but they will not be transmitted to the web server. NS caches all cookies that the original server passed for storage. If in the next REQ request, NS detects a mismatch of the previously set cookies, it will simply block them.
12. If you checked the Block in the Cross-Site Scripting section, then try using a GET or POST request to send HTML and you will also be redirected to the main page.
13. Isn't that great? If you delve into the settings, you will find a lot of interesting and useful things for yourself. A cookie can be encoded for greater security that the user will not be able to fake just like that, because NS will decode its keys before passing them to the web server. You can specify the data format in the form of regular expressions for types or field names for validation or escaping. You can make exceptions to specific pages or fields for checking HTML or SQL. With a properly configured NS, the security of your site will increase hundreds of times.
14. Via the command line
enable ns feature AppFW
add appfw profile crm-appfw-profile -type HTML XML
set appfw profile crm-appfw-profile -cookieConsistencyAction block log stats learn
set appfw profile crm-appfw-profile -bufferOverflowAction block log stats
set appfw profile crm-appfw-profile -crossSiteScriptingAction log stats learn
set appfw profile crm-appfw-profile -SQLInjectionAction block log stats learn
set appfw profile crm-appfw-profile -startURLAction log stats learn
set appfw profile crm-appfw-profile -defaultCharSet utf-8
add appfw policy crm-appfw-policy true crm-appfw-profile
bind appfw global crm-appfw-policy 10
save config
Reflect DDoD Attacks
Finally, we came to the point for which it was all up to. In order not to delve into how protection works, you can read the article nginx module for combating DDoS . The principle is one to one, but I did not succeed in launching this module in the real situation as it should.
1. Go to the menu Security> Protection Features> HTTP DoS and out of habit click Add.
2. In addition to the name, there are two fields where you want to paste the values. Let's figure out how to count them.
The first Queue depth field is the quantitative value of users who are waiting in line for a server response.
Suppose you have 86400 unique users per day or 3500 per hour or 60 per minute or 1 every second.
Of course, there are none at night, during the day there are a lot of them. Multiply 10 times for greater importance and get 10 users per second. In general, you can see the statistics.
Let's say one user, on average, requests 5-10 requests per page (html, css, js, img, etc.) and looks at them for 5-10 seconds (that's why AJAX drives).
That is, the server approximately at the peak of its load fulfills up to 100 responses per second.
Imagine that your web server is capable of sending a maximum of 500 responses per second, but receives 10,000 requests per second, or 20 times more.
How many real users are currently experiencing the problem? That's right, the same 10, the rest is an attack. When should you start to panic? Immediately after 10? I would like to, but the minimum value is 21, so let's leave it as it is. That is, as soon as 21 or more sessions are in the queue for receiving data, automatic protection against attack will turn on.
Now with the second field Client detect rate. This is the percentage of users who will be checked for lice. If we put 1% for verification, with protection automatically turned on, the number of responses from the server will be only 5 (500 * 0.01), while 10,000 will wait in line. In other words, only 0.05% of real users will pass the test. Nevertheless, if the scan level is high (for example, at 10%, the value of 1000 requests will be checked), then this can clog all outgoing traffic with checks and is already overloaded with an attack if your channel is narrow. But I would put 30-35% to immediately start fighting off the attack, since the channel is very thick. The field can be left blank and depending on the width of the channel that NS can measure, the number of requests, responses and other indicators, it can vary the level of verification.
3. Next, go to the menu Traffic Management> Load Balancing> Services, open our service through the Open button, and in the Policies / HTTP DoS tab, insert the newly created policy.
4. Via the command line
enable ns feature HttpDoSProtection
add dos policy crm-ddos-policy -qDepth 21 -cltDetectRate 33
bind service CRM-service -policyName crm-ddos-policy
save config
What else can Netscaler do
Knows this thing a lot. From what may be needed for sites, these are:
1. Separation of static and dynamic content to relieve the load.
2. Proxying static content.
3. Caching dynamic content and flushing the cache according to certain conditions or time.
4. Proxying and caching of mySQL and other relational databases in order to reduce the number of samples.
5. Separation of traffic and content by network addresses, geo-location and many other parameters.
6. Traffic encryption.
7. Work as a DNS server.
8. By default, NS already has network protection, for example, from ICMP flood, etc.
Conclusion
Everything is configured quite easily, although not always intuitively. The instruction is available on the vendor's website . You can read in Russian about the main features on the website http://netscaler.kz .
The lack of information in Russian about this platform greatly affects its prevalence in the CIS countries. Apparently, therefore, our modern network administrators underestimated the capabilities of this product.
Indeed, it was not in vain that two years ago, Cisco officially announced that it was stopping the further development of its ACE balancer, and more recently, Netscaler has been part of some series of Cisco switches.
Thank!