Using Rainmeter skin in the enterprise
 Good day, dear Khabravchians. Many people use Rainmeter for purely visual enhancements to the operating system desktop, but I came up with the idea of using it as an addition to the desktop for users in the enterprise. For example, system information for the user and administrator, access to administrative functions from the panel, launch shortcuts (RPD, URL, BAT) and more.
How did it all start?
Somehow, when Iconia Tab was released on the x86 platform, I used Windows 7, and this brainchild of Microsoft does not fit the touchscreen at all and had to come up with some tricks. Once I came across an article in which some smart person came up with a skin for Rainmeter in the form of several keys that served as CTRL + C, CTRL + V and others like them. So I first met with Rainmeter. But this acquaintance then was short-lived, as I soon sold the tablet and bought a more finger-oriented Android OS. But after a while I returned to the Rainmeter skins in the form of a clock and a sound card switch, since I had more than one thing in the system at that time, and it was necessary to transfer the sound output to headphones, speakers or a TV. Somewhere at the same time at work, there was a need to control shortcuts on users' computers, I naturally wanted to use crutches somehow, rather than raise the domain and push everything there. At first, it was decided to try using RocketDock, but it showed itself from the worst side, and then completely stopped working adequately. It was then that I remembered about Rainmeter, which could solve this problem, as well as replace widgets for the desktop with PING statistics to servers and remote objects.
 This is what the widget looked like with ping to servers, and there were about 5-10 of them. Of course, all this was inconvenient, it was necessary to configure the administrator separately on each computer, as well as all this ate a large amount of RAM. This was the beginning of my epic for programming a versatile widget for the organization in which I work.
General description of Rainmeter
The common description of the program slightly incorrectly reflects its essence, since in fact Rainmeter is a kind of scripting language for writing your own widgets for Windows. In no way are its capabilities limited to displaying statistics on the used CPU and RAM resources. For those who do not know what it is, look at the screenshots or, after scoring in Google “Rainmeter” we look at the pictures.
Rainmeter can be different:

Only flight of imagination or hardware of your computer can limit you. In fact, people write skins for the program, who is what much. Sometimes masterpieces are obtained, and sometimes dull watches or panels cannot be sad. I do not consider myself at least some kind of pro in writing skins for Rainmeter, but I can describe the general principles for you.
The program has a management console through which we can set the configuration of certain skins, as well as look at the logs, create themes.

The skins ourselves are stored in the user ’s folder “my documents \ Rainmeter \ Skins” , where folders with your skins are already stored. For example, I have IT-Solutions , and in it the index.ini file. So, the main code of the skin is stored just in such INI files. In simple terms, the code itself represents objects and dimensions. Measurements are objects that do not appear on their own in the skin of the skin, but collect some information, for example, about the CPU load. Objects - as such are elements of the skin interface, such as: images, text and so on. In general, the “programming” of the skin is built on this.
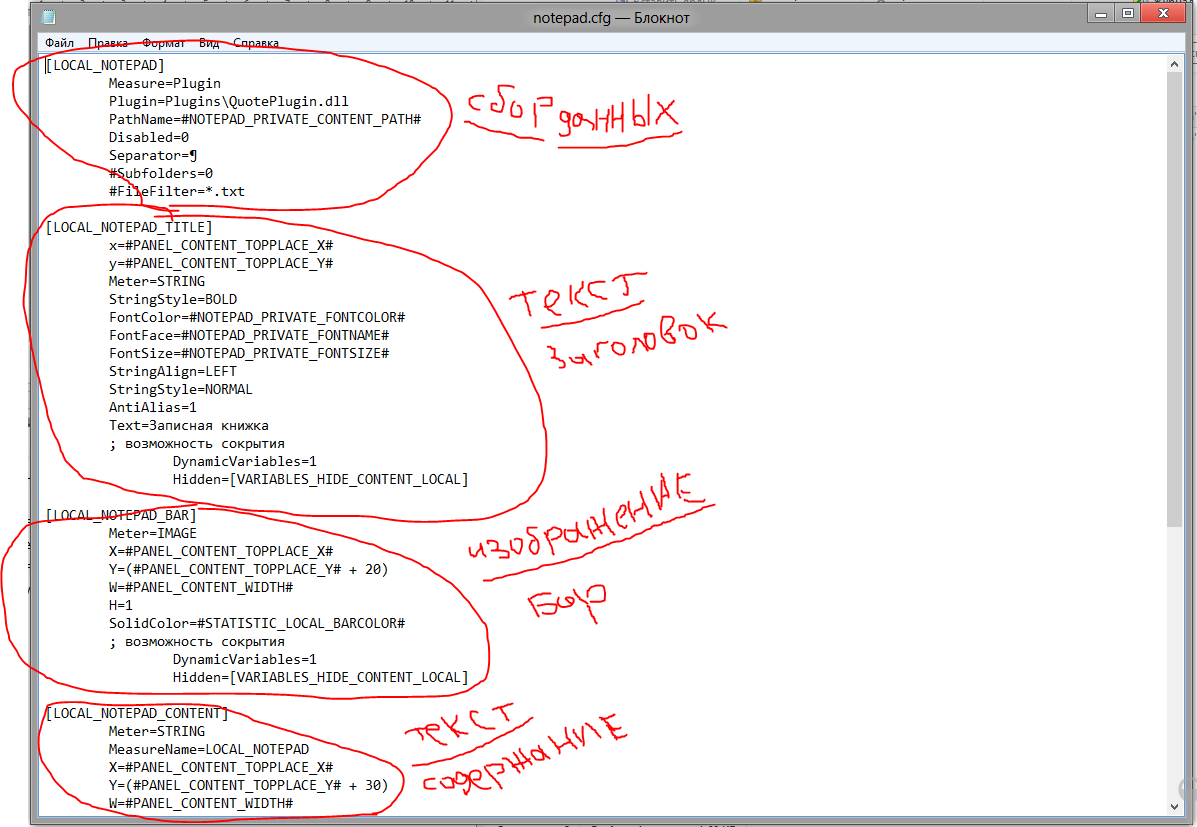
 And here is how this code looks to work.
In principle, nothing complicated, 1 data collection element (plug-in for Rainmeter), 2 text elements (title and content), 2 image elements (edit key and orange strip). Each object has its own parameters that can be modified in the code. All parameters indicate exactly how they are written, it is very difficult to get confused. The program also has the ability to work with LUA code, but everything is organized through special functions for inputting and outputting data from LUA to Rainmeter and vice versa.
What did you need to implement in the skin for the enterprise?
I want to immediately note that the creation of even a simple skin is some kind of development. The problem is that no one can help especially in this, you have to think for yourself about the need and their implementation in the code. I started with the fact that we need to receive data on the status (on the network, not on the network) of servers, remote objects and central switches, but we also needed to somehow display on the desktop all users keys to go to the URL or run RDP connectivity. Of course, I immediately thought that you could add some more features. It was decided to add quick access to administrative functions, a personal notebook (local), a beautiful watch, computer statistics (to make it easier to diagnose users by phone), and also in thoughts the general calendar of works for sites \ departments \ enterprises and notebooks for departments. Well, it would be nice to add your own Christmas tree to the desktop of users in the new year, otherwise they themselves begin to download the trees with viruses in the kit.
First try
It was also necessary not to forget that different users have different screen resolutions, as well as different preferences in the appearance of the desktop. For the first time, starting from the standard scheme for writing skins, I set to work. The code of one of the panels was quickly sawn, and a decent-looking watch was also found. I threw keys, mounted a clock, created a panel that adapts to the size of the screen, taking into account the panel. But after a couple of days of work, the fact was suddenly realized that when changing the address of the RDP server or changing the URL of a page, it will be very difficult to change the same values for each user. I decided to rewrite it all over again, but, already focusing on the network component, and as it turned out, I was right. Rainmeter has an Include function, which very well fulfills the connection of files stored on the Samba resource. I can give the following code as an example:
[CONFIG_LOADER]
@Include=#SERVER_SKIN_PATH#./configs/@config-loader.cfg
Variables in Rainmeter have the form # ololo # , and they must also be declared in a separate object [Variables] . By the way, the work of variables can cause very strong discomfort for those who are used to ordinary programming languages or even php. Sometimes the variables simply do not work, and you can’t understand what the reason is, since everything is fine by the logic, and all the more so in the other place the same approach works, it’s not here. But at your fingertips there is neither a compiler nor error output. Although it is possible in the logs it is, I have never looked into it.
[Variables]
	SERVER_SKIN_PATH=\\nas.ag\soft\IT-Solutions.v7
	PANEL_WIDTH=300
	PANEL_HEIGHT=#WORKAREAHEIGHT#
	PANEL_TOPPLACE_X=(#SCREENAREAWIDTH# - #PANEL_WIDTH#)
	PANEL_TOPPLACE_Y=0
	PANEL_SOLIDCOLOR=0,0,0,200
	PANEL_PADDING_SIZE=10
	PANEL_PADDING_SIDE=5
	PANEL_SPACING=5
And in objects, calling variables looks like this:
[PANEL]
		Meter=Image
		X=#PANEL_TOPPLACE_X#
		Y=#PANEL_TOPPLACE_Y#
		W=#PANEL_WIDTH#
		H=#PANEL_HEIGHT#
		SolidColor=#PANEL_SOLIDCOLOR#
		;RightMouseDownAction=!Execute [ ]
As I can see, variables are best declared at the beginning of a file and always in the correct sequence. If you use another in a variable, then do not forget to set the donor variable first. For example:
SCREENWIDTH=1024
PANELWIDTH=#SCREENWIDTH# - 700
Between mathematical operations and values, spaces are required, if you write a “formula”, then each mathematical expression must be enclosed in brackets:
PANELWIDTH=(#SCREENWIDTH# – 700) + 10
And that happened to me so that in the local folder there was only index.ini with a bunch of include and a config file with a local configuration, which included data such as username to request a configuration file from the samba resource on this variable. At that moment, I did not think much about the speed of such a skin, but I thought about the amount of memory that such a skin can start to use. The final solution seemed to me simple, increase the timing of updating the skin from 1 second to 10 or 30, and possibly minutes. Based on this position, I programmed the skin in the form of one integral project, how websites are programmed, the entry point as index.ini, and everything else is loaded depending on the conditions. Unfortunately, the conditions in Rainmeter cannot directly affect the loading of certain files, apart from some crutches via LUA or standard windows functions caused by conditions in the script. As a result, it turned out so that when the script was initialized, all elements were loaded at once and I gave them display parameters, whether or not it was visible.
DynamicVariables=1
Hidden=[VARIABLES_HIDE_CONTENT_LOCAL]
So, in the variable, I determined the layers of the skin that at one time or another should have been visible. At first, everything worked with a bang, but with the addition of all the new functionality, the skin began to take up too much memory space (although for our computers with 4GB of RAM on board this is not a problem), but at the same time it began to noticeably slow down. I had to figure out how to get around this problem. At first, I dug towards the connection conditions of certain components, but often rested on a small number of possibilities in Rainmeter. I had to return to the scheme, where each layer is a separate file (entry point) for Rainmeter. In general, I am initially a web programmer, in my work I often use php the most and I know firsthand about crutches. But doing something in Rainmeter is more complicated, than the conclusion of one image and a couple of lines of text is associated with powerful crutches and if you still want to bring the plan to life, you have to resort to the help of things that at first glance are not obvious. For example, LUA (I met him recently, purely because of Rainmeter) or use the Windows functions and scripting in cmd or powershell with him.
A little about file attachment in the skin. A folder is considered a skin in Rainmeter \ Skins with ini files attached to it. If there are several such files, then in one such folder only one of them can be active. When you turn on the next, the previous one is disabled. Of course, this problem can be circumvented by creating subfolders and placing new ini files there if necessary. It was this option that I adopted for the final implementation of the project. And what do we have at a given moment in time?
Project development plan
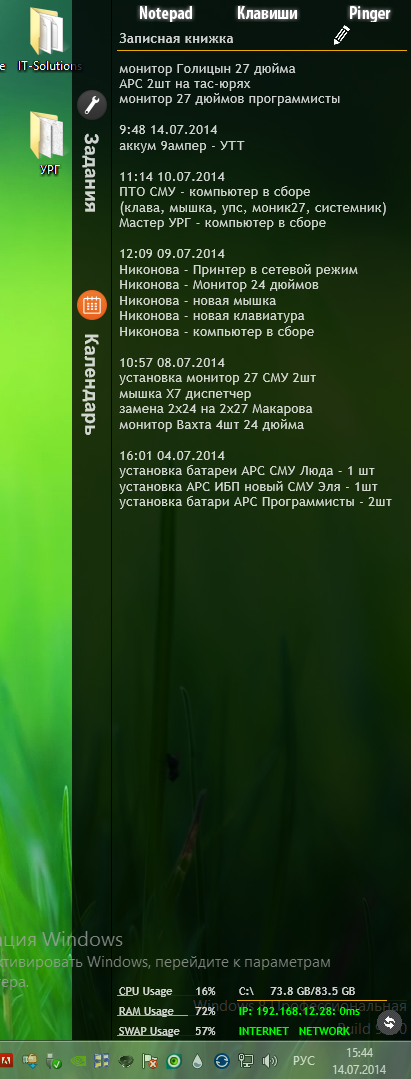
The final project is called “IT-Solutions”. I will use it complete with Windows 7 x86 installed on the computers of our office. For myself, I created a notation system. The skin consists of two “blocks”, the “block” is the main elements of the skin, in essence it is the skin panel and the workspace. I place the panel in the right corner with a width of 300 pixels, and the rest of the place, if necessary, can take up the workspace, or as I called this element "Content". And we get in the form of blocks 2 elements: “Panel” and “Content”. Each block is determined by its specific "grid" - this is the location of the functional elements of the block. For example, a panel has top, content, and footer. In the top we have the panel switch keys, in the content we have the main modules, and in the footer the non-replaceable statistics module. Modules are skin components, which contain some specific set of code, for example, a key module or a clock. There are also groups of elements, they are interconnected by reference to one variable, which determines the visibility of elements at a given time on the skin. Coordinates (grid) were calculated manually, hence a large number of configurations, since you have to specify the exact sizes and coordinates of absolutely all the elements. And you also need to consider the possibility of different screen resolutions. since you have to specify the exact dimensions and coordinates of absolutely all the elements. And you also need to consider the possibility of different screen resolutions. since you have to specify the exact dimensions and coordinates of absolutely all the elements. And you also need to consider the possibility of different screen resolutions.
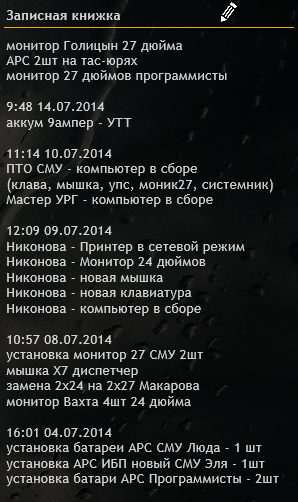
At the request of the guys, who very often travel on business trips, a local notebook was also included in the list. It is necessary that the skin does not stop working even without connecting to the network, which means that we need to store local content in it. Statistics in the footer and in the content notebook. These two modules are stored locally in the skin and can be used by the user without connecting to the enterprise network.
- notepad - a local module that takes data from a txt file using a special plug-in for Rainmeter
- statistic - a local module that collects and displays statistics about the computer: loading the CPU, RAM, hard disk, network address and delay to the server, the presence of the Internet and network connection
 If the local part of the skin is loaded first with us, then for those who are sitting on the enterprise network you need to load some additional functions and for this a layer system was invented. Each of the blocks is divided into several layers. For a panel, these are local, user, and pinger layers. It was at this point in the development that the decision was made to apply modularity. The division of the entire skin into its constituent parts, which can later be used in different places.
It goes without saying that the content in the skin is updated remotely and without the need for an individual update on each of the computers, from here I concluded that you need to load the rest of the giblets from the samba resource. So the rest of the code is mainly located at \\ nas.ag \ soft \ rainmeter \ on the production drive. Only the calling code is stored in local files, but sometimes we may need to finalize it, and in this case LUA comes to the rescue. I embedded a LUA file in the initializer file, which will check the relevance of the skin version, and if it does not match, it will transfer files from the server and then restart the skin. In the local part, located in the skin folder, we have the following files:
- Index.ini is the initializer for starting everything else. If we work locally, only the local skin components are loaded - this is the initializer index.ini, it also loads the LUA script for checking the skin update and the first layer @PANEL, which contains the local notebook
- CONTENT - it contains layers of the main window of the skin
- PANEL - contains skin panel layers here
- WINDOWS are tooltips for content and panel
Of course, all these conventions apply only in my skin. When switching to another layer, the first is turned off. It was this opportunity that allowed me to implement switching between layers without additional crutches. When all the layers were in one ini file, switching between them worked faster, but at the same time the initial loading of the skin took a very significant time (about 2-5 seconds).
We’ll also talk a little more about index.ini - this file is an initializer, it loads the general configuration into itself (for access to network components), after which it loads an initialization script from the LUA network, which includes version checking and updating the skin, if necessary . Next we have a LUA script that will switch the layer, since if there is a network, it needs to loadlayer2 containing special content for users.
Local files:
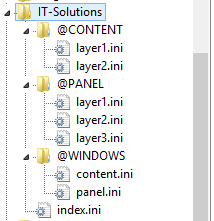
/ IT-Solutions
/@CONTENT
Layer1.ini
Layer2.ini
/@PANEL
Layer1.ini
Layer2.ini
Layer3.ini
/@WINDOWS
Content.ini
Panel.ini
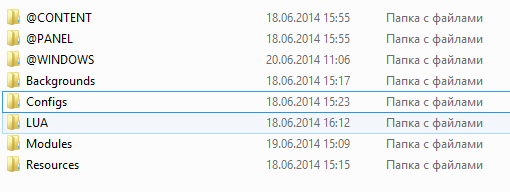
/backgrounds
CONTENT.cfg
PANEL.cfg
/configs
@config-loader.cfg
Config.cfg
Styles.cfg
User.cfg
Variables.cfg
/LUA
initialize.lua
/modules
Notepad.cfg
Statistic.cfg
/ Resources
/img
Edit.png
Refresh.png
Notepad.txt
As you can see, a lot of different files are used for decoration. Block layers, configuration for backgrounds, configurations of various kinds (@ config-loader - loading network configuration files, config - general configuration, sytles - text display styles, user - user configuration, variables - variables), LUA initialization script, a couple modules and some files for them.
From the network side, everything is a little more complicated, but, in general, everything is in the same vein. Each layer in the skin requests a corresponding file from the network and draws itself based on it.
For networking, the following modules were allocated.
- buttons - a module of keys including launching exe, bat, url, html. This is a small file that includes 15 image objects and activated links by clicking on them. Where to get pictures and where the link leads we will learn from a special configuration file separate for the module.
[PANEL_CONTENT_BUTTONS-FIRST-1-button]
		Meter=Image
		ImageName=#SERVER_SKIN_PATH#\images\buttons\#PANEL_CONTENT_BUTTONS-FIRST-1-button-icon#
		W=50
		H=50
		X=(#PANEL_CONTENT_TOPPLACE_X# + 10)
		Y=(#PANEL_CONTENT_TOPPLACE_Y# + 10)
		leftmouseupaction=!Execute ["#PANEL_CONTENT_BUTTONS-FIRST-1-button-url#"]
		; возможность сокрытия
			DynamicVariables=1
			Hidden=[VARIABLES_HIDE_CONTENT_USERS]
Fifteen of these Meters . Naturally, the coordinates are arranged for each picture, 3 rows of 5 pictures. The leftmouseupaction parameter shows us what we need to activate by clicking. And here is the configuration:; первая строка ; 1 клавиша PANEL_CONTENT_BUTTONS-FIRST-1-button-icon=windows 8.png ;PANEL_CONTENT_BUTTONS-FIRST-1-button-icon=default/simple_gray_comp.ico PANEL_CONTENT_BUTTONS-FIRST-1-button-url=::{20D04FE0-3AEA-1069-A2D8-08002B30309D} PANEL_CONTENT_BUTTONS-FIRST-1-button-text=Мой компьютер ; 2 клавиша PANEL_CONTENT_BUTTONS-FIRST-2-button-icon=office 2013.png PANEL_CONTENT_BUTTONS-FIRST-2-button-url=::{450D8FBA-AD25-11D0-98A8-0800361B1103} PANEL_CONTENT_BUTTONS-FIRST-2-button-text=Мои документы ; 3 клавиша PANEL_CONTENT_BUTTONS-FIRST-3-button-icon=skydrive.png PANEL_CONTENT_BUTTONS-FIRST-3-button-url=explorer" "\\nas.ag\public PANEL_CONTENT_BUTTONS-FIRST-3-button-text=Паблик ; 4 клавиша PANEL_CONTENT_BUTTONS-FIRST-4-button-icon=music.png PANEL_CONTENT_BUTTONS-FIRST-4-button-url=explorer" "\\nas.ag\media PANEL_CONTENT_BUTTONS-FIRST-4-button-text=Медиа ресурсы ; 5 клавиша PANEL_CONTENT_BUTTONS-FIRST-5-button-icon=phone.png PANEL_CONTENT_BUTTONS-FIRST-5-button-url=http://phones.ag/ PANEL_CONTENT_BUTTONS-FIRST-5-button-text=
As you can see, it can’t do without tricks. The first shortcuts send us to the addresses: “my computer” and “my documents”. The third and fourth keys send us to the samba resource, but we open it through explorer, giving it the corresponding address. The 5th key sends us the URL, but fortunately the default browser will open the page itself, but sometimes there are times when you need to specify a specific browser to open the necessary page. In this case, it is necessary to act by analogy with the samba ball. There was a situation in the work when it was necessary to open the site only through Internet Explorer, since the site of one of the government agencies was written in asp, specially for IE, and to top it all, you also need a hardware key to enter the site. But this situation is not new now, so I think I will not surprise anyone with this. - clock - beautiful watch
; Параметры модуля часов CLOCK
		PANEL_CONTENT_CLOCK_TOP_X=(#PANEL_FOOTER_TOPPLACE_X# + 70)
		PANEL_CONTENT_CLOCK_TOP_Y=(#PANEL_FOOTER_TOPPLACE_Y# - 150)
		PANEL_CONTENT_CLOCK_WIDTH=#PANEL_WIDTH#
		PANEL_CONTENT_CLOCK_HEIGHT=70
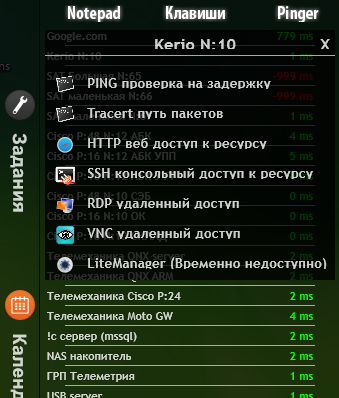
This is a clock configuration that determines the position of the upper left corner, as well as the width and height of the module. In the code itself, the remaining parts of the module are already adjusted to these coordinates, and are not specified rigidly with respect to the dimensions and coordinates of the panel or the entire skin. I will not give the watch code, since it can always be downloaded and used, the watch is used by “ Cowon Clock ”. - pinger - a special module with statistics on access to resources, as well as the ability to quickly connect via different protocols
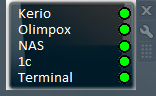
	; пераметры модуля PINGER
		PANEL_CONTENT_PINGER_UPDATE_RATE=15
		PANEL_CONTENT_PINGER_TIMEOUT=2000
		;PANEL_CONTENT_PINGER_PINGERPATH=123
		;PANEL_CONTENT_PINGER_PINGERPATH=#SERVER_SKIN_PATH#\modules\pinger.cfg
		; 1 строка
			PANEL_CONTENT_PINGER_1_TEXT=Google.com
			PANEL_CONTENT_PINGER_1_ADDRESS=8.8.8.8
		; 2 строка
			PANEL_CONTENT_PINGER_2_TEXT=Kerio N:10
			PANEL_CONTENT_PINGER_2_ADDRESS=192.168.10.1
This is the configuration of the module, there are 47 such lines in it, this is the maximum number that fits into FullHD resolution. Monitors with a lower resolution were not taken into account, since the module will work only on the computers of system administrators. The module code consists of 47 assemblies of objects and an additional assembly for the pop-up window.[PINGER_1_STATUS] Measure=Plugin Plugin=PingPlugin DestAddress=#PANEL_CONTENT_PINGER_1_ADDRESS# UpdateRate=#PANEL_CONTENT_PINGER_UPDATE_RATE# Timeout=#PANEL_CONTENT_PINGER_TIMEOUT# TimeoutValue = -999 IfBelowValue = 0 IfBelowAction = [!SetOption PINGER_1_VALUE FontColor 255,0,0,255][!UpdateMeter PINGER_1_VALUE][!redraw] IfAboveValue = -1 IfAboveAction = [!SetOption PINGER_1_VALUE FontColor 0,255,0,255][!UpdateMeter PINGER_1_VALUE][!redraw]
This is the first object in the assembly, which is a ping state collector through a special plugin. And also at the end of the object we see conditions that repaint the text color parameter of the value object. The values are repainted when the ping parameter falls within the required limits.[PINGER_1_LABEL] Meter=STRING MeterStyle=PANEL_FOOTER_STATISTIC_LEFTTEXT X=(#PANEL_CONTENT_TOPPLACE_X# + 0) Y=(#PANEL_CONTENT_TOPPLACE_Y# + 0) W=290 H=14 Text="#PANEL_CONTENT_PINGER_1_TEXT#" LeftMouseUpAction=[!SetOption PINGER_MENU_HIDE Formula 0][!SetOption PINGER_MENU_LABEL Text "#PANEL_CONTENT_PINGER_1_TEXT#"][!SetOption PINGER_MENU_TEXT_PING LeftMouseUpAction "!Execute[ping.exe #PANEL_CONTENT_PINGER_1_ADDRESS# -t][!SetOption PINGER_MENU_HIDE Formula 1]"][!SetOption PINGER_MENU_TEXT_TRACERT LeftMouseUpAction "!Execute[tracert.exe #PANEL_CONTENT_PINGER_1_ADDRESS#][!SetOption PINGER_MENU_HIDE Formula 1]"][!SetOption PINGER_MENU_TEXT_HTTP LeftMouseUpAction "!Execute[http://#PANEL_CONTENT_PINGER_1_ADDRESS#][!SetOption PINGER_MENU_HIDE Formula 1]"][!SetOption PINGER_MENU_TEXT_SSH LeftMouseUpAction "!Execute[#SERVER_SKIN_PATH#\inc\exe\putty.exe #PANEL_CONTENT_PINGER_1_ADDRESS#][!SetOption PINGER_MENU_HIDE Formula 1]"][!SetOption PINGER_MENU_TEXT_RDP LeftMouseUpAction "!Execute[mstsc.exe /v:#PANEL_CONTENT_PINGER_1_ADDRESS#][!SetOption PINGER_MENU_HIDE Formula 1]"][!SetOption PINGER_MENU_TEXT_VNC LeftMouseUpAction "!Execute[#SERVER_SKIN_PATH#\inc\exe\vnc.exe #PANEL_CONTENT_PINGER_1_ADDRESS#][!SetOption PINGER_MENU_HIDE Formula 1]"][!SetOption PINGER_MENU_TEXT_LM LeftMouseUpAction "!Execute[][!SetOption PINGER_MENU_HIDE Formula 1]"] ; возможность сокрытия DynamicVariables=1 Hidden=[VARIABLES_HIDE_CONTENT_ADMINS]
This object is a text with the name of the pingable address. The funny thing about it is that by clicking the left mouse button a window should appear in which we can choose how to connect to this address. Here, a little trick is hiding from me, even while I was programming this module as an integral structure, I introduced the Hidden parameter in every skin object. My popup is initially hidden. But when you click on the name, the window magically appears, since we change its Hidden parameterfrom 1 to 0. But here we are faced with another problem. Rainmeter does not contain the ability to create custom functions and add the necessary variables to them. Or create 47 identical pop-up window forms, but with their own parameters for each address. Or create one window and replace the necessary values in it. I went the second way and below is a screenshot of what happened. And in the code, all this looks like a long line, which is processed by pressing the left mouse button. Of course, it was possible to go the way of creating an additional ini file, but I do not know how to transfer variables from one skin to another without using crutches by the type of writing the necessary data to a file and subsequent reading from it. Of course, one could try to replace the data in variables, but my attempt to replace the variables was unsuccessful.[Variables] it is no longer possible to replace after launching the skin, but you can replace mathematical variables.[VARIABLES_HIDE_TOP] Measure=Calc Formula=0
But in such "variables" we can only store digital values, and they are not suitable for transmitting text or ip addresses. It is because of the problematic nature of these solutions that I immediately change the values in the pop-up window objects.[PINGER_1_VALUE] Meter=STRING MeterStyle=PANEL_FOOTER_STATISTIC_RIGHTTEXT MeasureName=PINGER_1_STATUS X=270r Y=0r W=290 H=14 Text=%1 ms ; возможность сокрытия DynamicVariables=1 Hidden=[VARIABLES_HIDE_CONTENT_ADMINS] [PINGER_1_BAR] Meter=IMAGE X=-250r Y=15r W=250 H=1 SolidColor=#STATISTIC_LOCAL_BARCOLOR# ; возможность сокрытия DynamicVariables=1 Hidden=[VARIABLES_HIDE_CONTENT_ADMINS]
Further, as we see, we have an object for outputting values and a bar that simply decorates our skin. It is possible that the bar will have to be removed when adapting the skin to weaker machines. And in the value object, we take the data from the questionnaire and the same questionnaire tints the value green or red, depending on whether ping received a rainmeter response.
I will not give an example of a pop-up window, since it mainly consists of a picture and text with a link to the necessary program to open the received address. - runner - access to the administrative functions of the computer. Just like the rest of the keys in the skin, it consists of a picture and text with a link to the application being opened. Represents a popup
- switcher - module in the TOP panel, for switching between layers. In fact, it is 3 images with links to switching between ini files @PANEL skin
In the end, everything looks as follows:


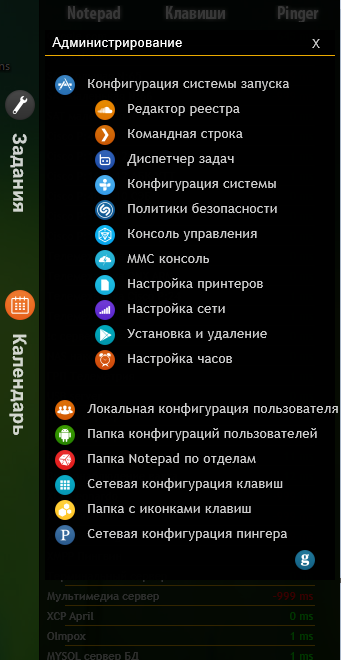
Things like the "calendar" and "tasks" have not yet been completed. Access to administrator functions is provided through the execas program . As one of the access keys, an HTML file with a JS code is used, which automatically authorizes each user on Yandex mail. The pop-up access window in “ pinger ” allows you to immediately access through various kinds of clients to the desired address. And all this disgrace eats no more than 30 mb of RAM, against 100 mb, at a time when all the code was loaded from one file.
This distribution, in addition to lower memory costs, allows us to work with the skin more adequately in speed, but it also gives us the opportunity to bypass one ugly place. If for any reason one of the skins caused an error, and this is possible due to the network operation of our skin, then after restarting Rainmeter it will be inactive. But as simple as 2 kopecks, index.ini cannot cause problems, and therefore it will be launched the next time the system starts, and after itself it will again ask you to include the necessary components. What none, but fault tolerance. At the expense of the images used and part of the module codes, yes, not everything is written from scratch with my hands, many things are borrowed, for example, the “ Cowon Clock ”.
Future plans
I apologize for the confusion of the story. As usual, it can’t do without crutches, but in essence it happened to redraw the original idea from time to time, for easier work with components. As soon as the project reaches release, I want to share it with the rest of the world (in local and network form), but this is still a long way off. But even in this form, you can already do something with the project, and as soon as the next wave of OS updates at the enterprise passes, Rainmeter and my skin will be installed on all computers. So far, as a test, we are rolling on the computers of the site. Everything works flawlessly, but it's only 10 users. In the future, it is planned to add modules for the calendar, which will include a personal, department calendar and general production. And also assignments, but here, of course, the leadership will issue assignments, and employees unsubscribe upon completion. Such a skin can’t be considered an analog of the workflow, and that's not the point. I want to make transparent and simple tools for workers, otherwise people will rot in the reluctance to work. But it seems to me that with good software you can achieve positive results from the most lazy member of the enterprise.
For happiness, there are not enough modules such as: a radio player under the keys, random pictures from the Internet in HD (set by clicking as wallpaper), a weather section and Christmas trees for the new year.
Afterword
Thanks for the tip. Indeed, the afterword should be in the narrative, what can already be achieved, and is the result consistent with the original goal? All this should be consecrated to one degree or another for a deeper understanding of the plot of the article.
The initial meaning in creating the skin was the need to create a widget with which you could monitor the status of switches, servers, remote objects, communication objects. Since our office is spread over a distance of more than 700 kilometers, the transitions from radio relay communication to DSL and then to wifi are completely complete. Such a communication system was originally created, and no one wants to go over half the world to remake, and even taking into account the fact that half of the communication channels do not belong to us, but are rented. Users do not care why the connection to the drive or servers does not work, they need everything to work. The meaning of the panel was to ensure that administrators were the first to know about network failures and server outages, and would not receive all the information from malicious users by phone. I can note that the result exceeded the original plan, as I also added the ability to connect directly to a remote system. The skin is far from perfect, due to the fact that it is still not a programming language and many things have to be reinvented, instead of just writing a single line of code.
It would seem, why not do the same in C # or Delphi, there are a lot of adequate development environments and languages to choose from, but the point is to test. When programming such a skin, one has to invent something for oneself all the time, to look for not logical ways to solve the problem. But you know, it works. Moreover, none of those who may come to work after me will be able to support the system, but if we leave behind instructions and software developed with a very low level of entry, then we can hope that former birdies can come to a little bit programming and love this thing.
I also recall the desire to put a big watch on the desktop, everything is without any problems, I downloaded, changed the coordinates and set it. The remaining modules are far from complete, but the dozen people who use the skin are pleased with its work. The notebook on the desktop allowed the lazy staff to keep notes anyway to begin to do so. With the transition from a personal notebook to the level of calendars and tasks in the departments, I think the work will become more productive, as the tasks of the leadership will always be in front of your eyes, and you just will not be able to forget.
The labels in the “Keys” section allow users to no longer remember boring addresses and connection instructions. It would seem that it is difficult to remember addresses such as: wiki.ag or phones.ag, but you will not believe it, almost no one remembers them. But services are created for a reason. The wiki engine is needed in the enterprise for documentation and not only for programmers or network administrators, but also for signalmen, accountants, lawyers and economists. Many instructions can be stored there and some data on those works that will have to be done again in the future. How often it happened that a burned-out hard drive, on the computer of the chief accountant, buried the work of all accounting for a week. There are a dozen programs and each of which requires a special approach. Somewhere a hardware key is required, somewhere a certificate, but somewhere you need to play a prank on the configuration, since the addresses of the bank’s servers have changed, and the bank doesn’t have the opportunity to update the client’s bank version, because the people who wrote the first version quit long ago. As everyone knows, there is no life beyond the Moscow Ring Road, and as it was correctly noticed, usually at enterprises one or several software engineers perform the work of both a communications specialist and an installer and a system administrator, and in their leisure time they also need to build a website for the office.
Well, having discussed the capabilities of Rainmeter with a couple of colleagues, we came to the conclusion that the statistics on the computer will be very useful for us. Diagnosing by phone will be easier. Indeed, when a user says that the Internet does not work for him, this does not mean that he really does not work. It is possible that someone made a mistake in entering the address in the browser. But asking to look at the color of the inscriptions at the bottom of the panel is still easier than asking to ping. Yes, we have the ability to connect remotely to user work sessions, but sometimes this is unnecessary, since the issue can be resolved in one phrase.
In the course of work on the skin, I used official documentation and articles on websites:
- docs.rainmeter.net
- furious.freedom-vrn.ru/articles/hardware/39-rainmeter-manual.html#spoiler_0
- www.nextwindows.ru/forum/topic_2425
In the course of preparing the article, I used images from Google search