DevBoy - how I created a project with an open source device and launched a project on Kickstarter
Hello friends!
My name is Nikolay, I have been reading Habr for a long time, but with the writing of articles somehow did not work out. It is time to correct this situation, especially since there is a reason - I just launched the company on Kickstarter to implement an open source device.
Who cares - I ask under the cat.
It so happened that since childhood I had access to the advanced technologies of my time ( Atari 65XE, ZX-Spectrum, EC1841, etc. ), which predetermined not only the choice of profession, but also instilled an excellent ( I think ) hobby - programming and developing something.
Later, fate brought me another surprise - the possibility of emigration to the United States three years ago. At the same time I was lucky twice - almost immediately I found a job in exactly the area I wanted: C ++ and microcontrollers.
From this point on my hobby received a new " push ". Firstly, I met the wonderful STM32 microcontrollers from ST Microelectronics ( before that, I had been playing with Atmel AVR). Secondly, from the first salary I bought a 3D printer. At its core, I am a perfectionist - on the one hand, this is good - you do things conscientiously, and on the other ... sometimes it fails to bring the project to the end only because it does not go " perfect ". Printing cases and the possibility of ordering printed circuit boards actually brought opportunities to create projects to a new level.
And then one day, going through different modules ordered to build a simple oscilloscope and trying to place them on a breadboard, I remembered a toy that I once bought when I went back to college: about GameBoy . Quickly having estimated the possible layout I decided: I will do it! And immediately in my head flashed the idea: "But not only buttons are used! Joysticks are sometimes used, twirls are sometimes used ... why not make removable modules? "And the work began to boil: soldering the prototype, programming, developing and printing the case, again programming ... as a result, holding the working prototype in the hands came the realization that the idea is not bad. Again, everything started spinning again, only the order of printed circuit boards was added , not only for the mainboard but also for all the modules, since we could not find suitable ones. Moreover, since the Chinese make boards of 10 pieces, it was immediately decided to make a small series. By the way, after making this series, I realized that to solder further into manual ( meaning small series more than 10 pieces ) is not an option.
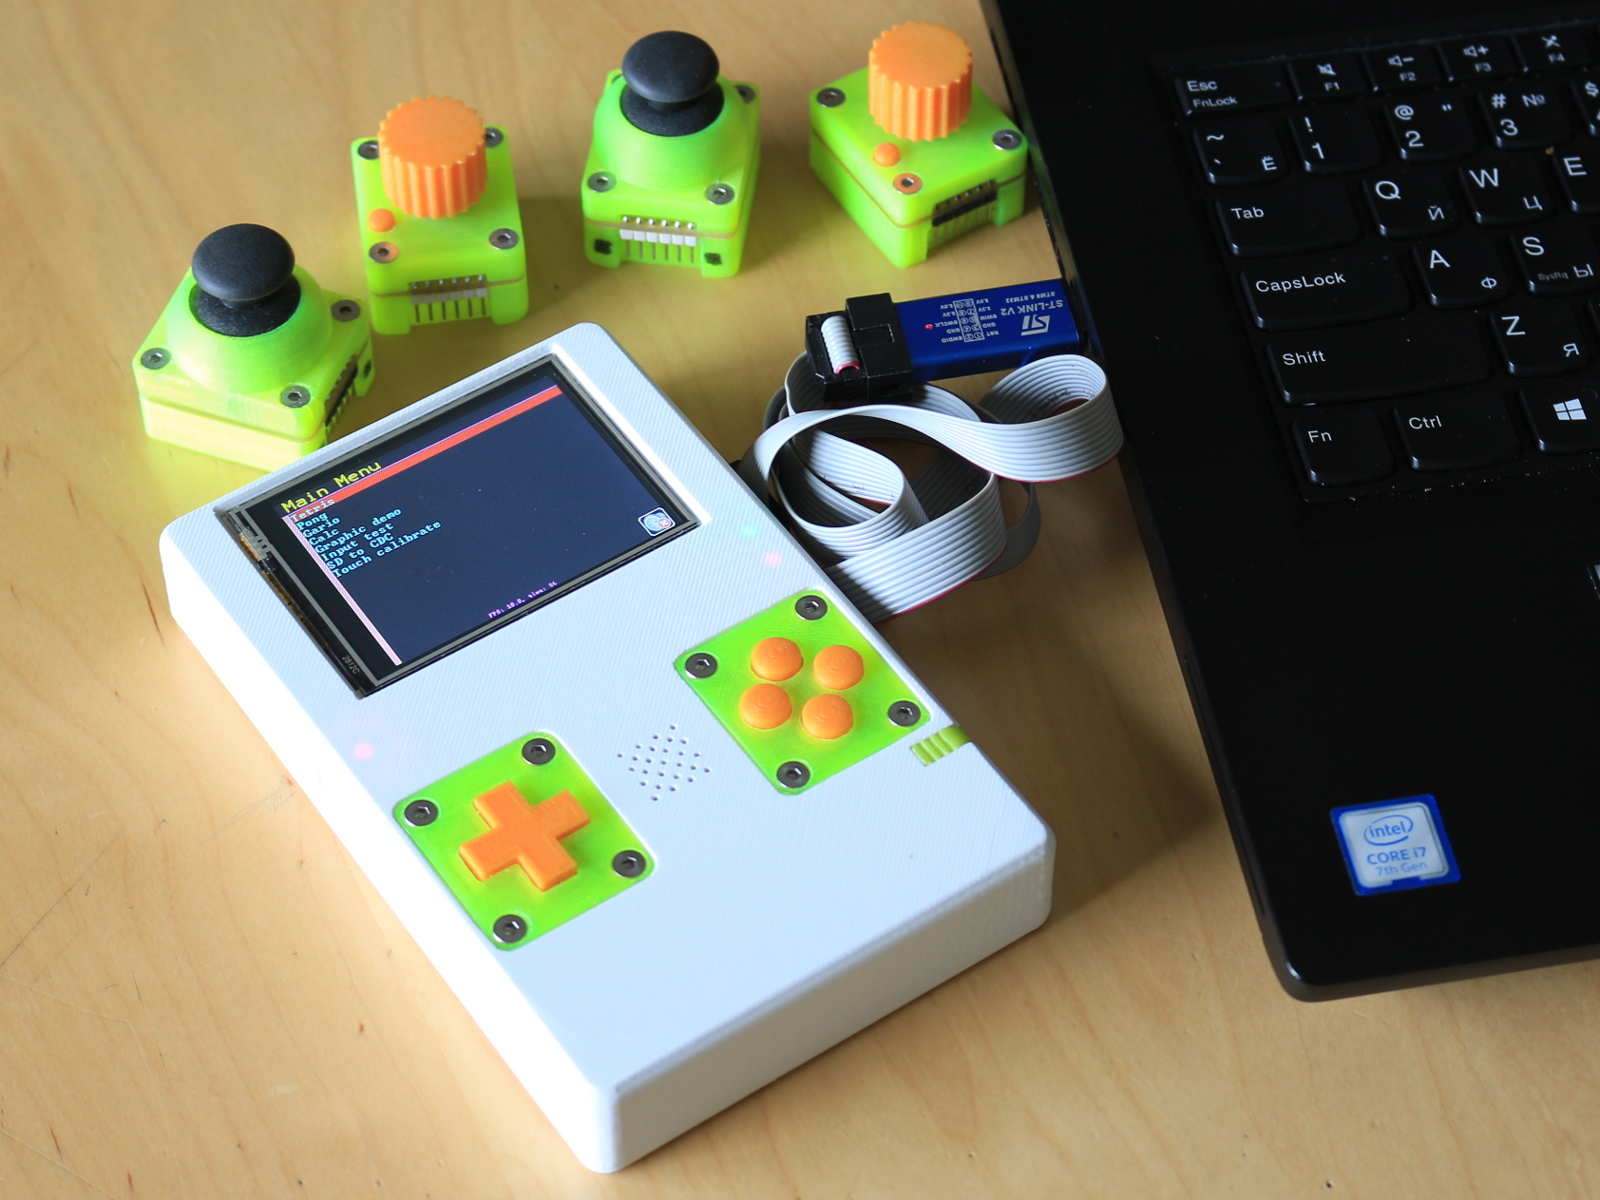
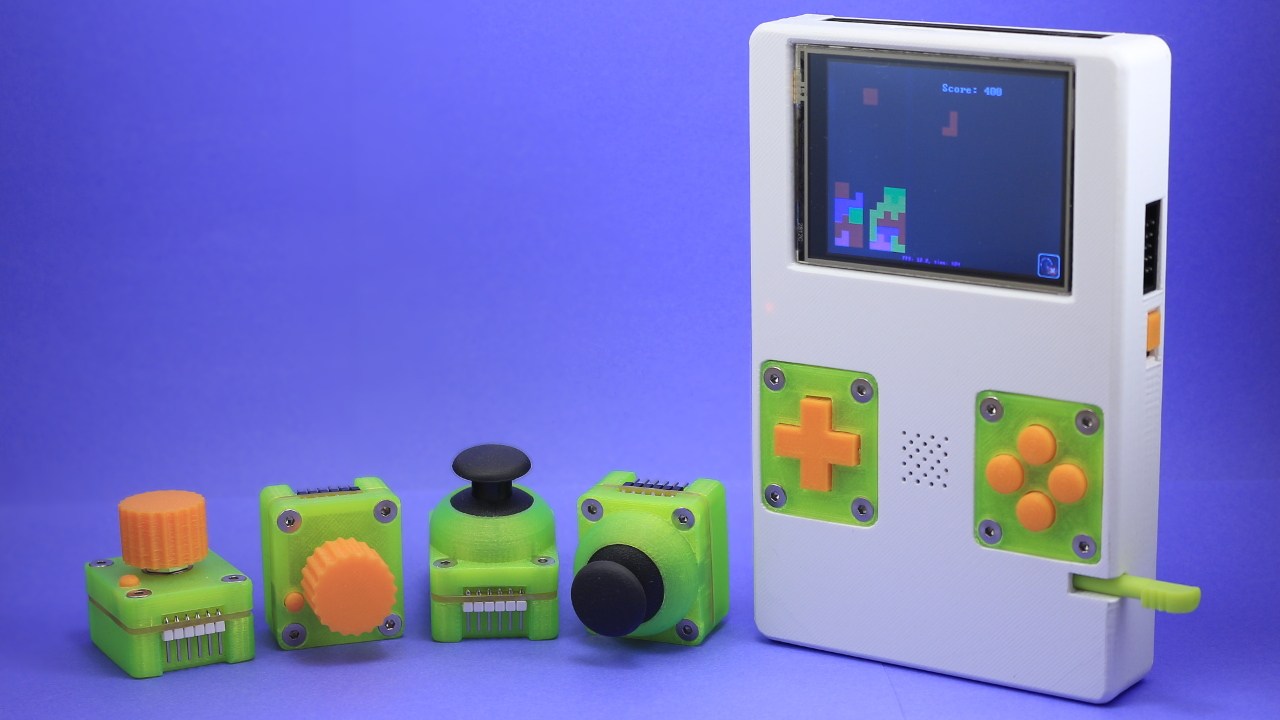
As a result, it turned out to be:
Final characteristics:
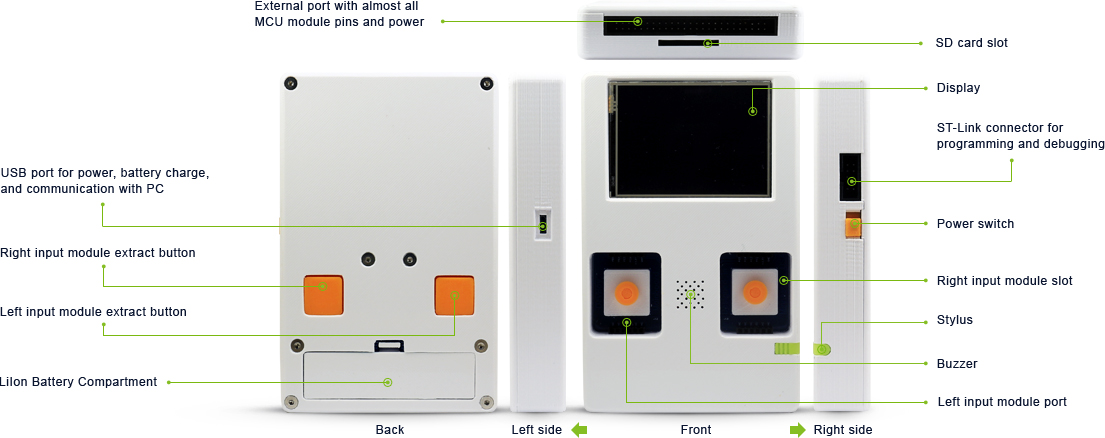
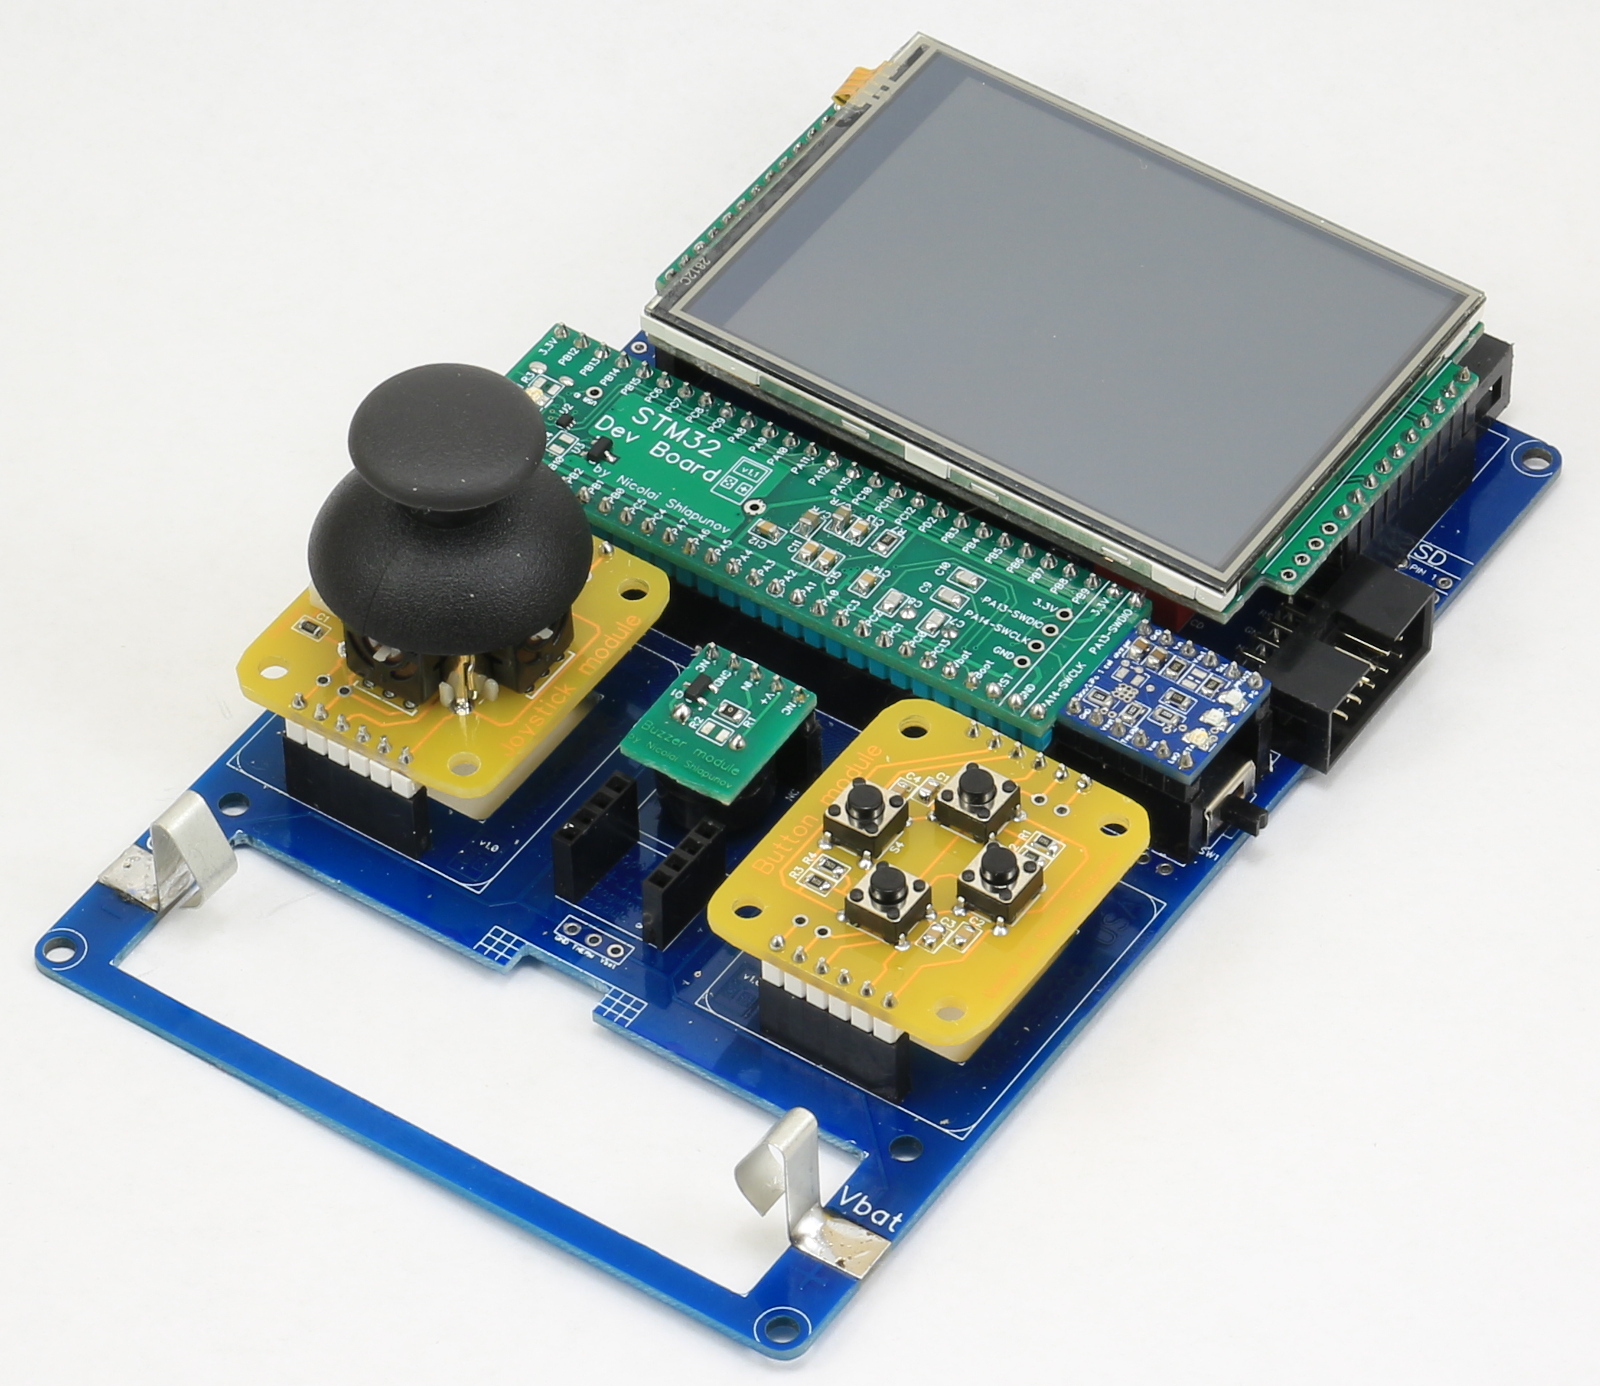
The device itself is on all sides:
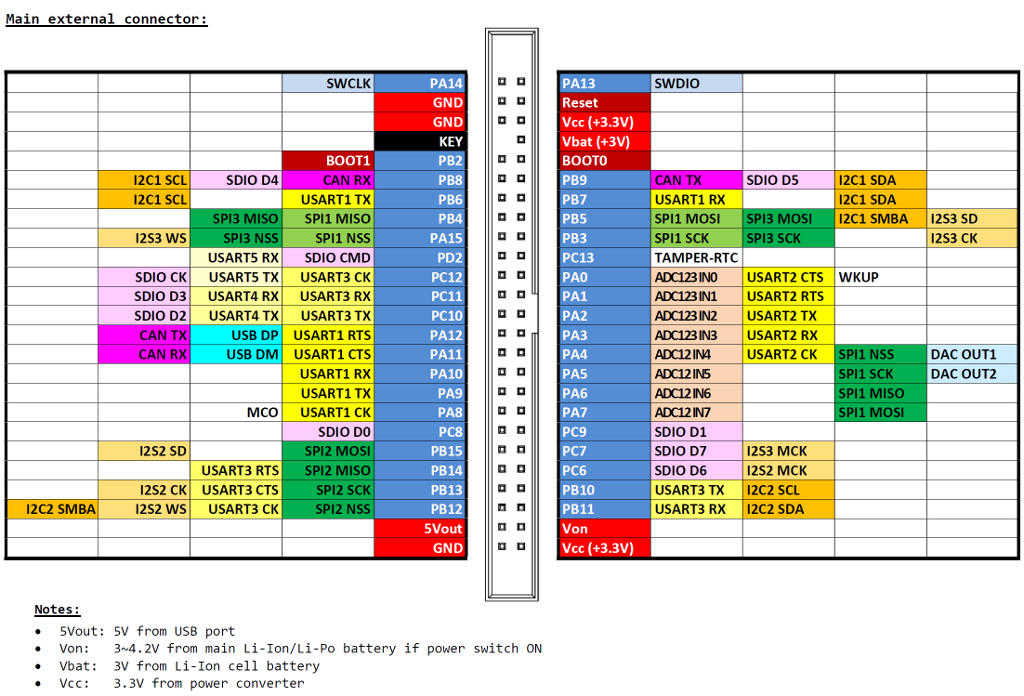
And this is how the pinout of the expansion connector looks like:
Inside, everything looks like this:
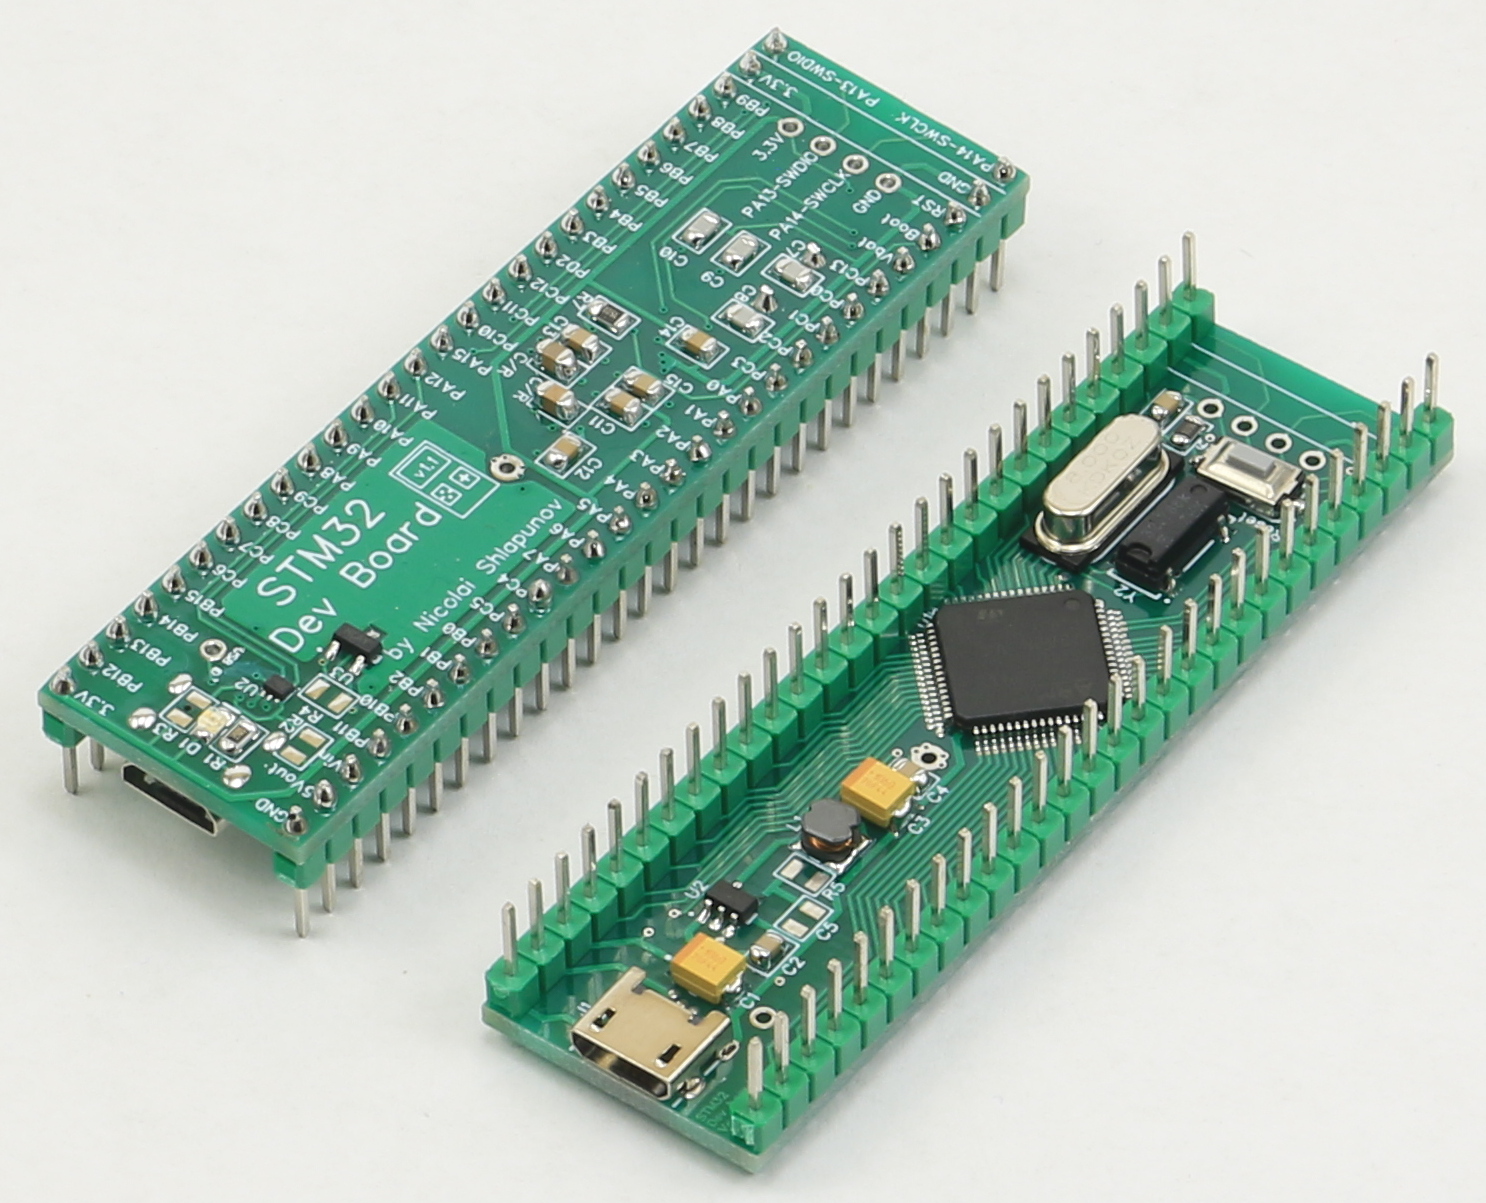
This is what a microcontroller module looks like:
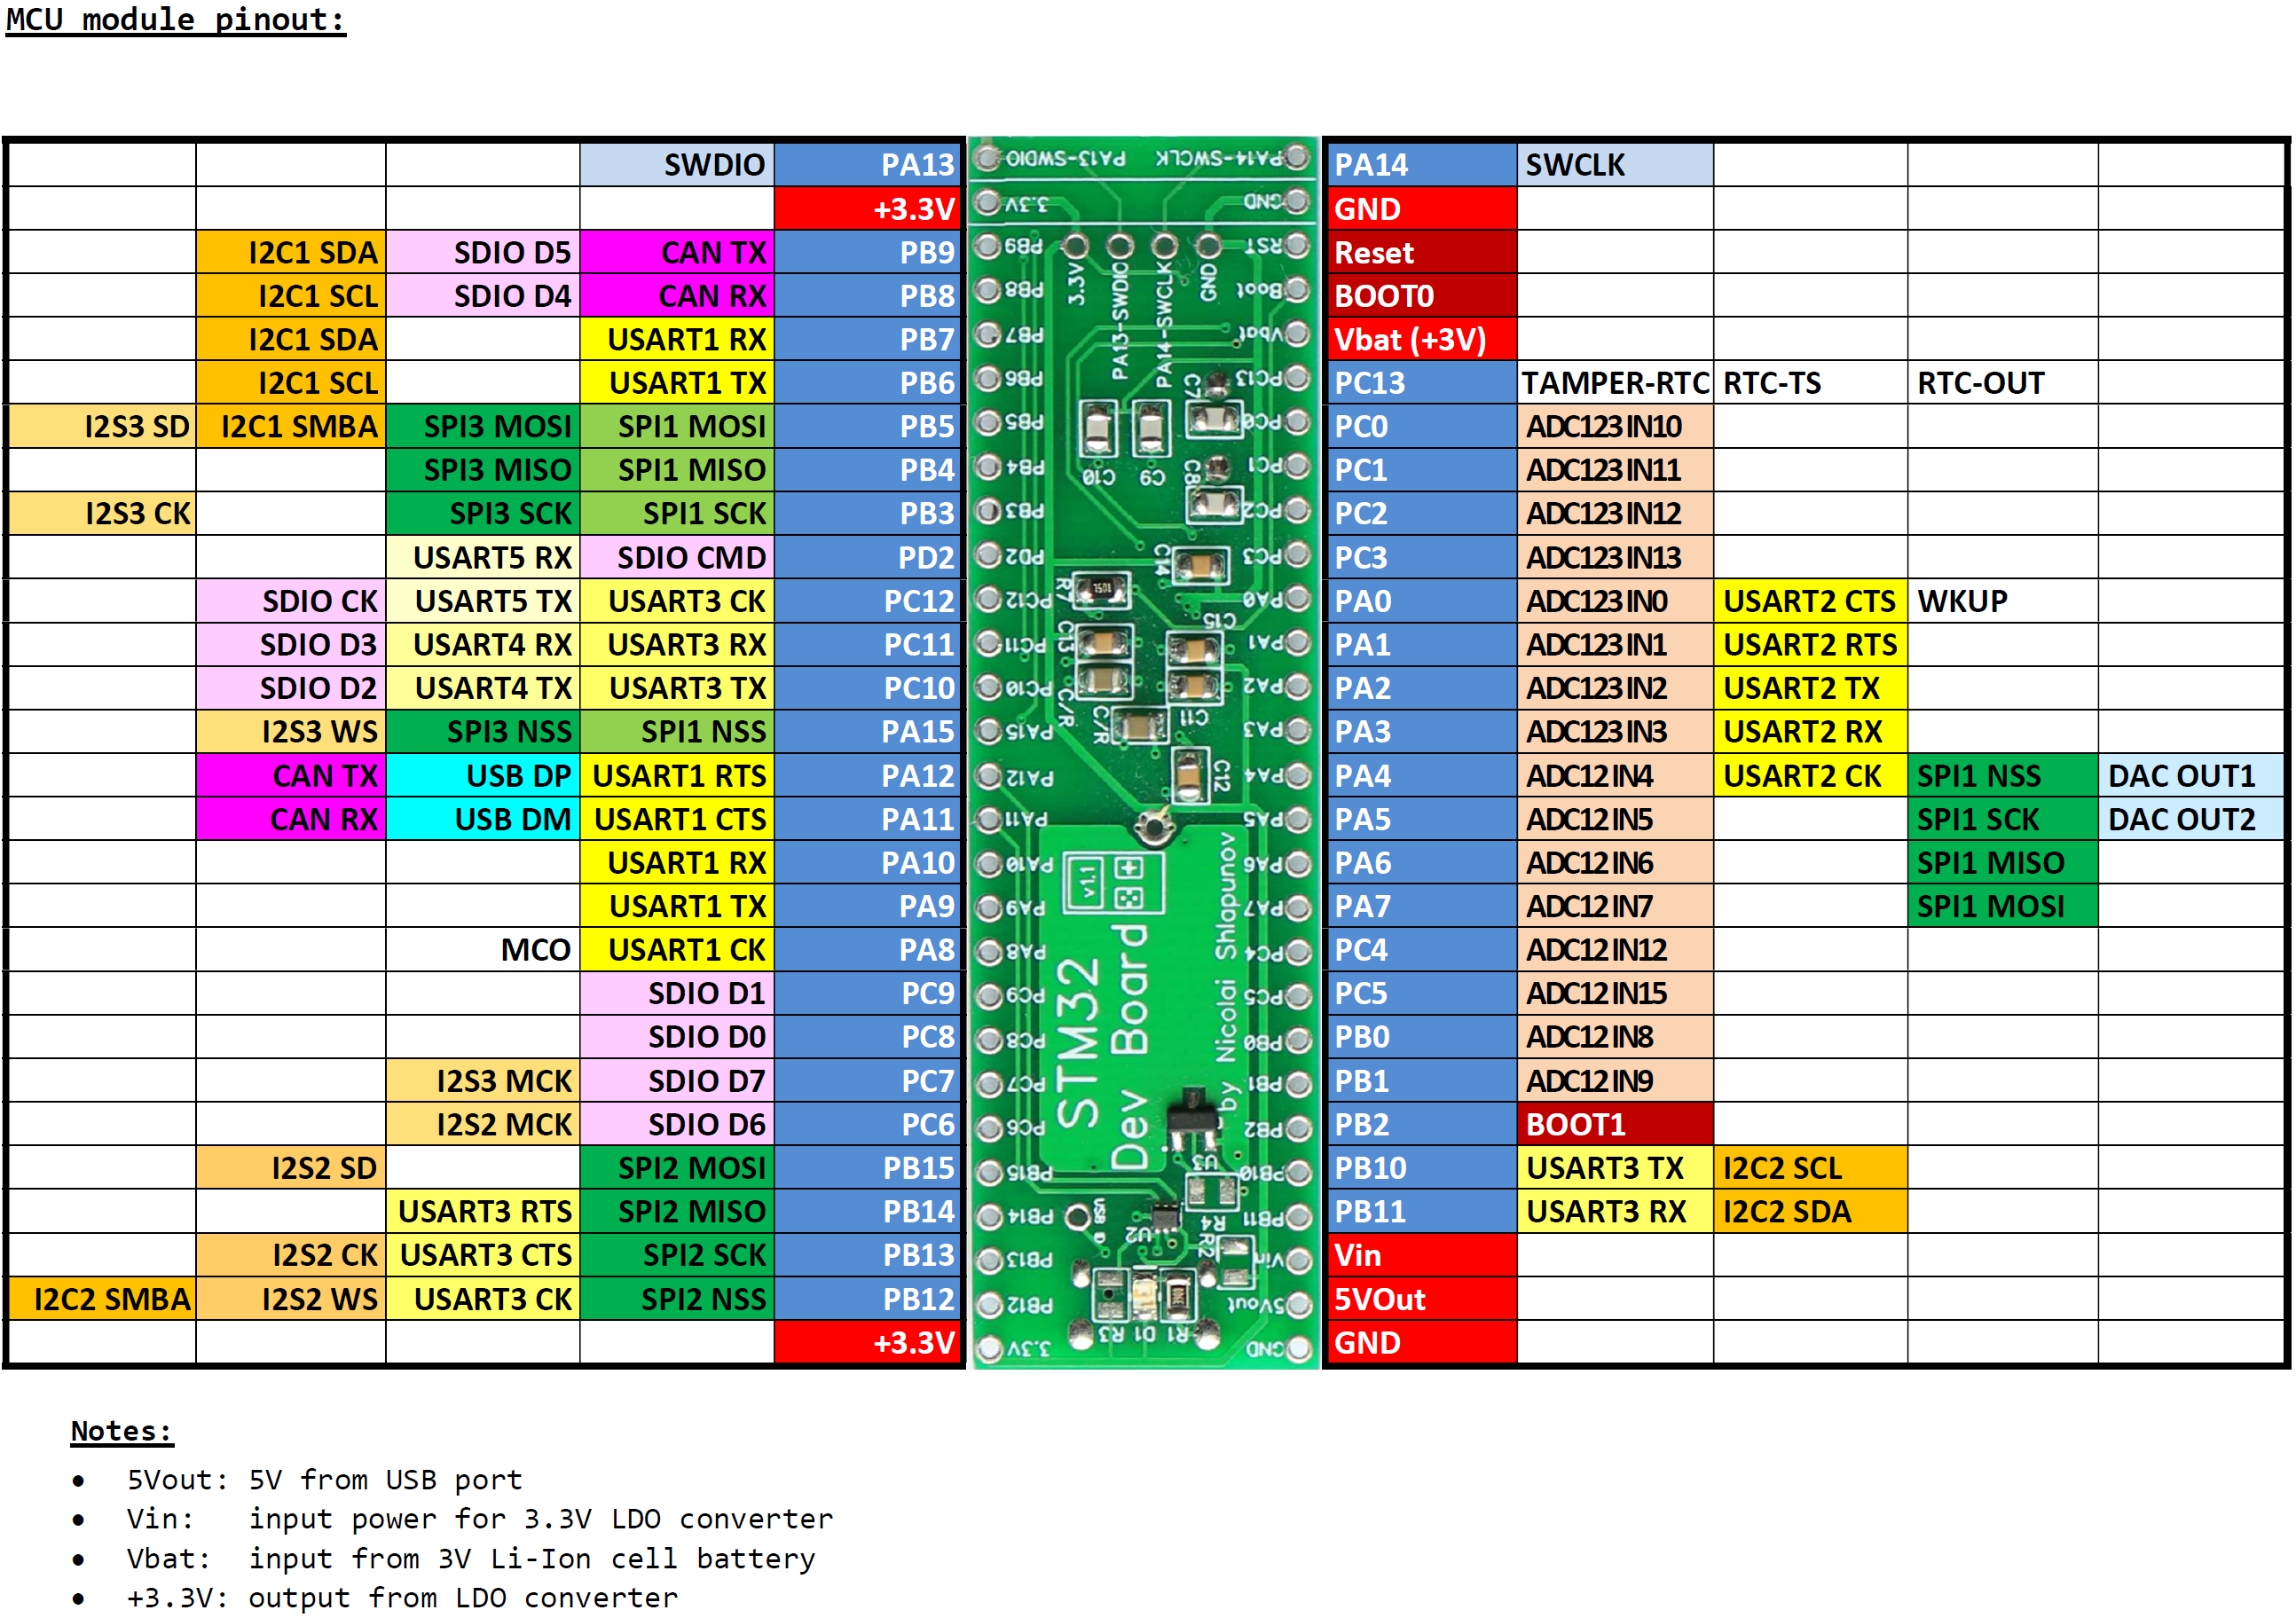
And this is its pinout:
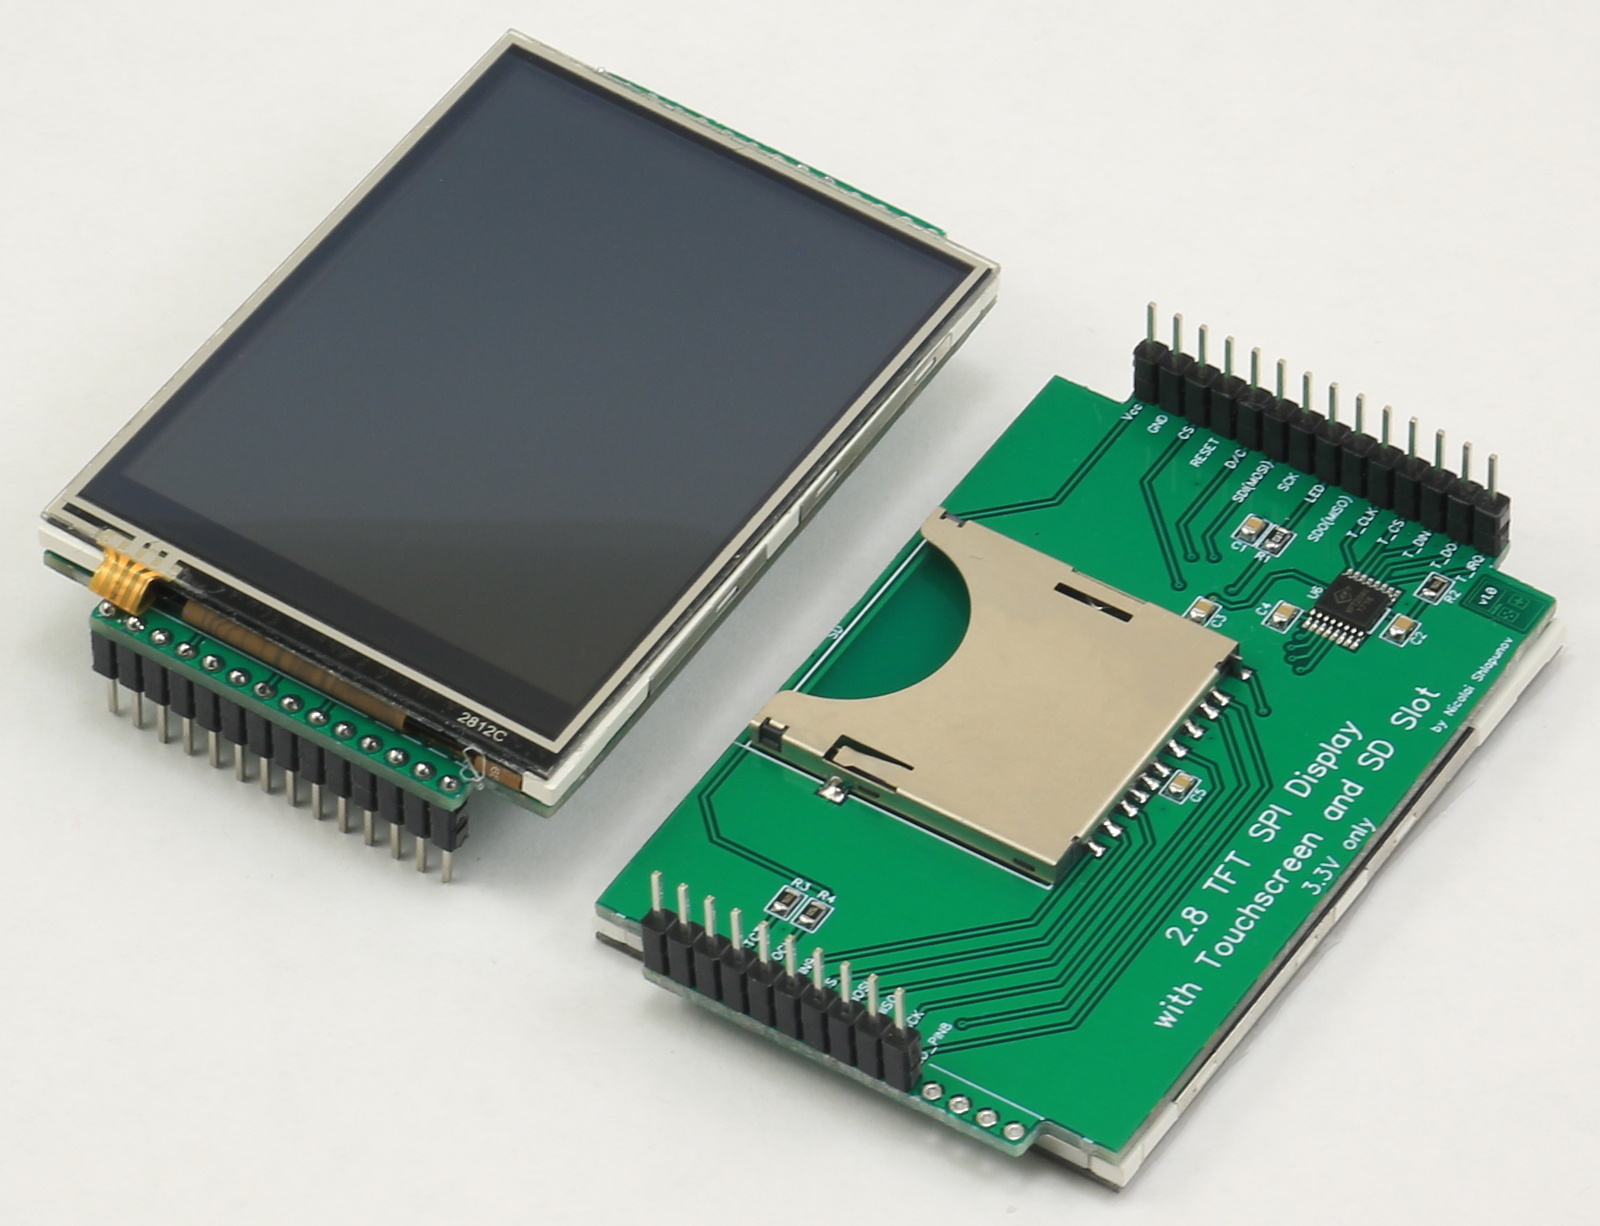
Screen module:
And a lithium battery charger:

And finally, the last part - the case:
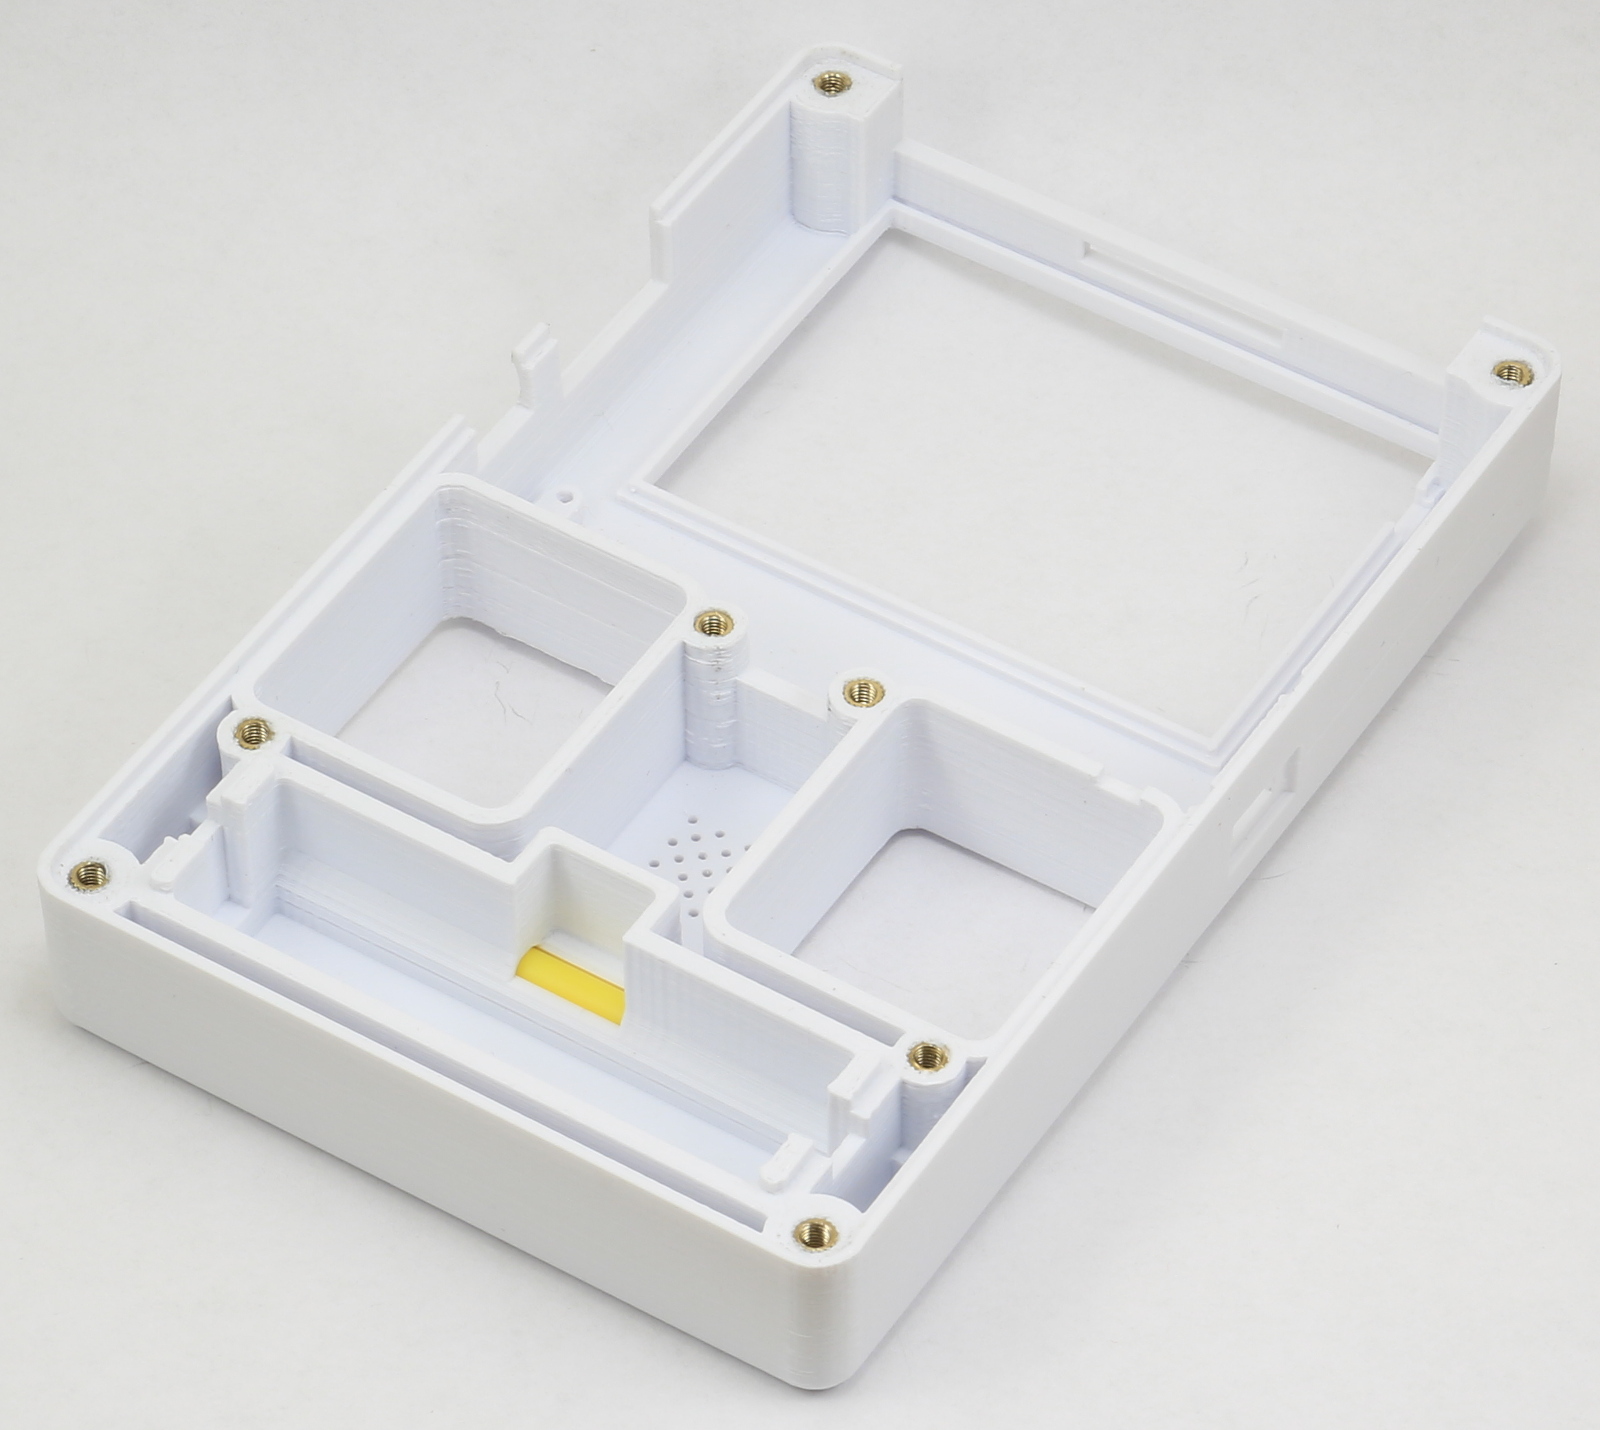
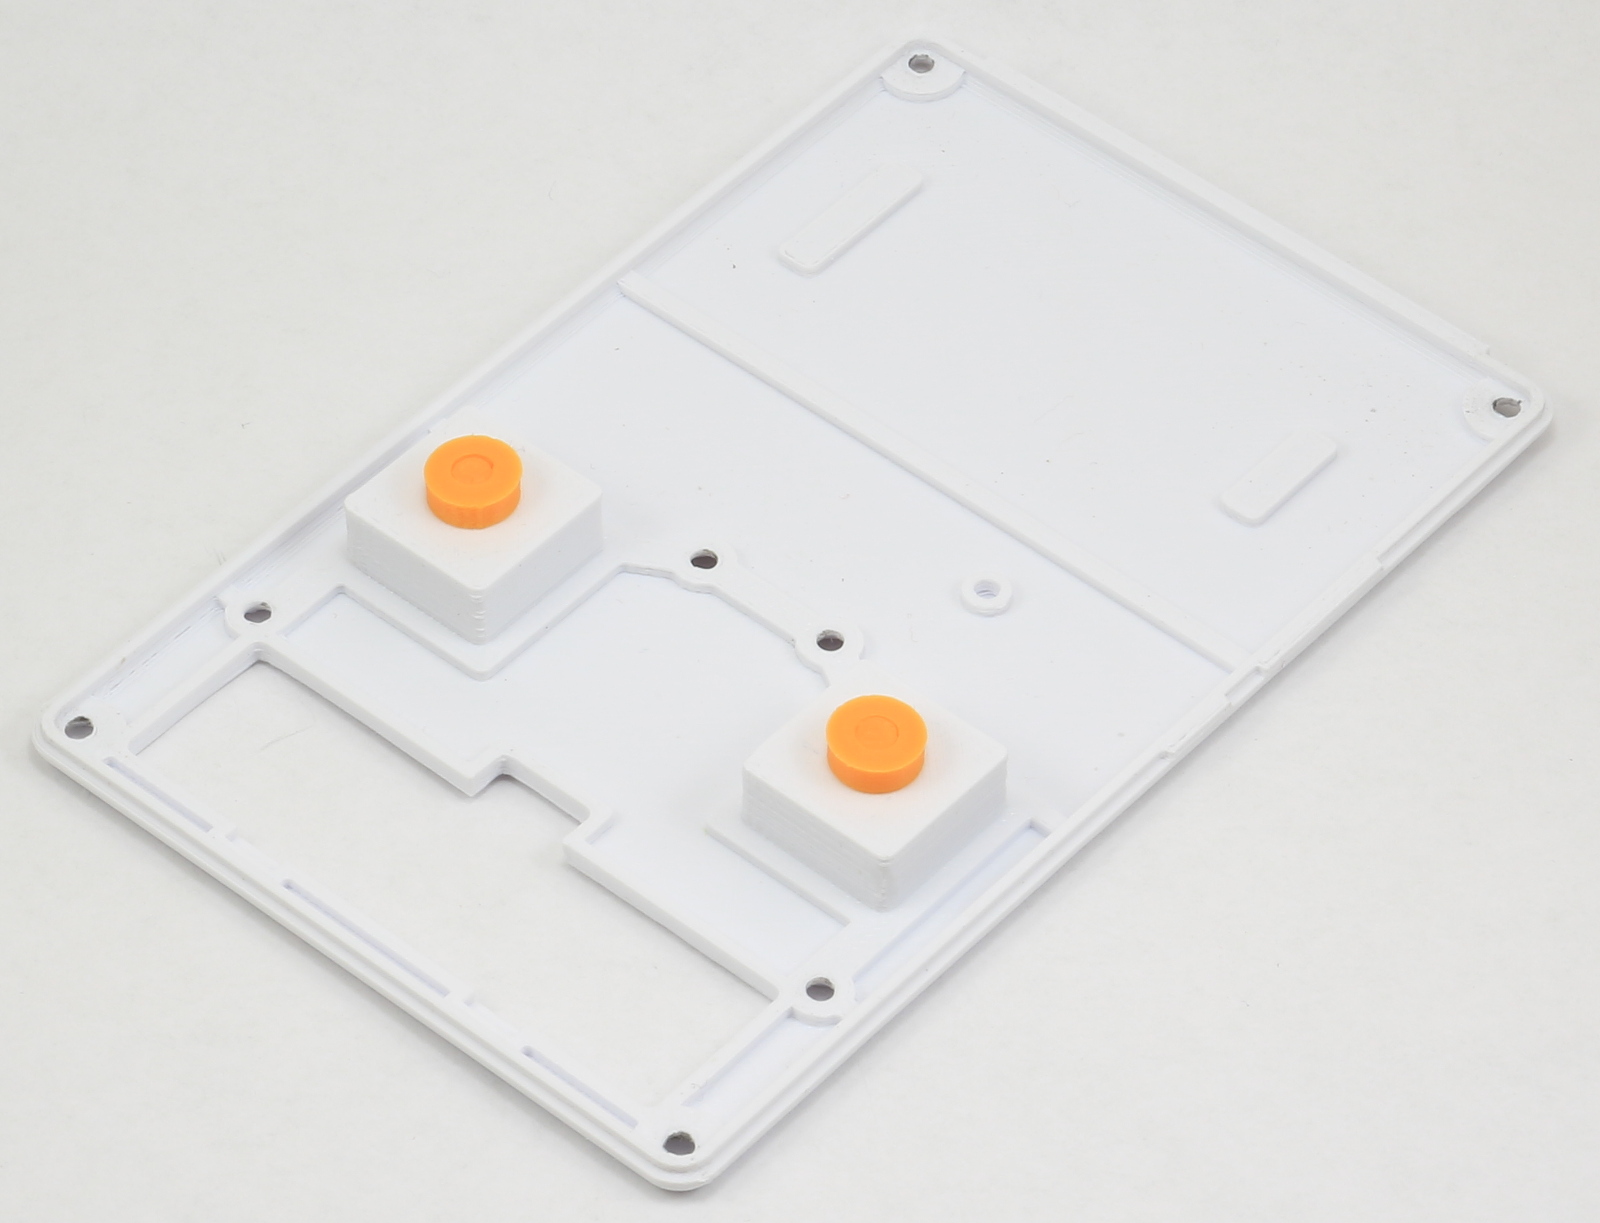
Orange things - these are pushers. Extract the module is still a little problem. As a result, these pushers were invented. When the module is inserted, it presses them down and the buttons at the back are flush with the case. If the module needs to be removed - we are making a pusher and it pushes the module upwards. Then you can easily and simply pull it out.
The source code deserves a separate article. Maybe I'll write it later. From third-party software using System Workbench for STM32, STM32CubeMX and FreeRTOS. These are all free projects. To this, C ++ FreeRTOS wrapper, screen maintenance, touchscreen, sound and input tasks are written.
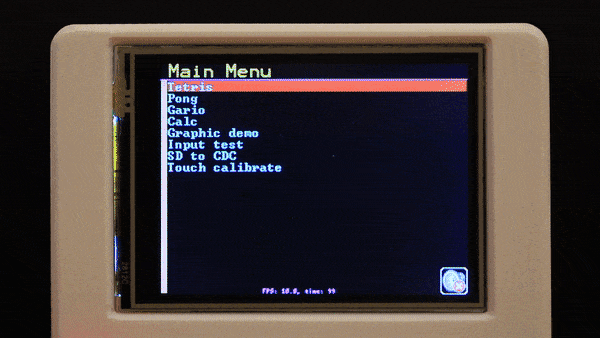
The graphics output is particularly interesting - a prototype with an STM32F103 microcontroller could display a Mario-type game at 15 frames per second at a resolution of 320x240 and having only 20 KB of RAM on board ( framebuffer is excluded ), while the limitation was most likely due to the SPI frequency . On the STM32F415 with an SPI frequency twice as high, 30 frames per second are released.
Well, in conclusion, leave links:
I would be grateful if you share a link to the project with your friends - the main thing now is to collect a critical mass of people in order to start a chain reaction - it is necessary that more interested people learn about the project.
If you ask me about long-term plans, what I want as a result, the answer will be simple: create a company with the open software and open hardware ideology, do your favorite business and help other people like Adafruit and Sparkfun .
If suddenly the text seems muddled - do not judge strictly, it is now almost one in the morning ... ask questions in the comments - I will try to answer.
My name is Nikolay, I have been reading Habr for a long time, but with the writing of articles somehow did not work out. It is time to correct this situation, especially since there is a reason - I just launched the company on Kickstarter to implement an open source device.
Who cares - I ask under the cat.
It so happened that since childhood I had access to the advanced technologies of my time ( Atari 65XE, ZX-Spectrum, EC1841, etc. ), which predetermined not only the choice of profession, but also instilled an excellent ( I think ) hobby - programming and developing something.
Later, fate brought me another surprise - the possibility of emigration to the United States three years ago. At the same time I was lucky twice - almost immediately I found a job in exactly the area I wanted: C ++ and microcontrollers.
From this point on my hobby received a new " push ". Firstly, I met the wonderful STM32 microcontrollers from ST Microelectronics ( before that, I had been playing with Atmel AVR). Secondly, from the first salary I bought a 3D printer. At its core, I am a perfectionist - on the one hand, this is good - you do things conscientiously, and on the other ... sometimes it fails to bring the project to the end only because it does not go " perfect ". Printing cases and the possibility of ordering printed circuit boards actually brought opportunities to create projects to a new level.
And then one day, going through different modules ordered to build a simple oscilloscope and trying to place them on a breadboard, I remembered a toy that I once bought when I went back to college: about GameBoy . Quickly having estimated the possible layout I decided: I will do it! And immediately in my head flashed the idea: "But not only buttons are used! Joysticks are sometimes used, twirls are sometimes used ... why not make removable modules? "And the work began to boil: soldering the prototype, programming, developing and printing the case, again programming ... as a result, holding the working prototype in the hands came the realization that the idea is not bad. Again, everything started spinning again, only the order of printed circuit boards was added , not only for the mainboard but also for all the modules, since we could not find suitable ones. Moreover, since the Chinese make boards of 10 pieces, it was immediately decided to make a small series. By the way, after making this series, I realized that to solder further into manual ( meaning small series more than 10 pieces ) is not an option.
As a result, it turned out to be:
Final characteristics:
- Based on the STM32F415RG microcontroller, Cortex-M4 core clocked at 168 MHz
- 1024 KB ROM and 192 KB RAM
- 2.8 "screen with a resolution of 320x240 pixels and 16-bit color
- Resistive touchscreen
- Two slots for input modules, 4 I / O ( 2 of them can digitize a signal using an ADC ) lines in each
- Expansion slot with I / O lines from almost all of the microcontroller pins
- SD card slot
- And of course open source
The device itself is on all sides:
And this is how the pinout of the expansion connector looks like:
Inside, everything looks like this:
This is what a microcontroller module looks like:
And this is its pinout:
Screen module:
And a lithium battery charger:
And finally, the last part - the case:
Orange things - these are pushers. Extract the module is still a little problem. As a result, these pushers were invented. When the module is inserted, it presses them down and the buttons at the back are flush with the case. If the module needs to be removed - we are making a pusher and it pushes the module upwards. Then you can easily and simply pull it out.
The source code deserves a separate article. Maybe I'll write it later. From third-party software using System Workbench for STM32, STM32CubeMX and FreeRTOS. These are all free projects. To this, C ++ FreeRTOS wrapper, screen maintenance, touchscreen, sound and input tasks are written.
The graphics output is particularly interesting - a prototype with an STM32F103 microcontroller could display a Mario-type game at 15 frames per second at a resolution of 320x240 and having only 20 KB of RAM on board ( framebuffer is excluded ), while the limitation was most likely due to the SPI frequency . On the STM32F415 with an SPI frequency twice as high, 30 frames per second are released.
Well, in conclusion, leave links:
- Source code can be found in the GitHub repository.
- 3D files together and source codes for OpenSCAD can be found on Thingiverse
- And, actually, the project page on Kickstarter
I would be grateful if you share a link to the project with your friends - the main thing now is to collect a critical mass of people in order to start a chain reaction - it is necessary that more interested people learn about the project.
If you ask me about long-term plans, what I want as a result, the answer will be simple: create a company with the open software and open hardware ideology, do your favorite business and help other people like Adafruit and Sparkfun .
If suddenly the text seems muddled - do not judge strictly, it is now almost one in the morning ... ask questions in the comments - I will try to answer.