Rare graphic station SGI Indy. 20 years later
The other day I celebrated my twentieth birthday Silicon Graphics Indy, a dusty station in my closet.
In 2006, she got me a bonus to some kind of purchase from a huckster. Then I got an 8 gigabyte screw for it, put Debian MIPS and put it in the server room as a file-wiper. And over time, the need for it disappeared and I mothballed this miracle of technology until better times.
And as a holiday gift for the anniversary, it was decided to bring the computer to a historical state. Under the cut review and the dramatic history of a computer that cost in the mid-90s from $ 10,000 (which is one and a half times more expensive than the top-end Macintosh Quadra at that time).

Main characteristics:
The standard SCSI hard drive and magneto-optical drive were stolen before me along with the basket, but the eight-gig Seagate Barracuda could easily accommodate both IRIX and a good collection of rare software (for example, Photoshop 3.0 took up some 30 megabytes).
It is said above that the machine has 64 megabytes of RAM, typed in four 16-megabyte SIMM-modules. Since the memory is in a double-parity machine, I had to find 4 more identical SIMMs for expanding the memory up to 128 megabytes; This is the minimum amount of memory to run the latest Indy IRIX version 6.5.22. I could not cope with this quest. All found memory modules were different and the machine refused to turn on.
Climbing up on torrent trackers, I found and downloaded (forgive me SGI inc.) A CD image for him with IRIX 5.3, for which there was enough available memory and started restoration.
First of all, we look under the hood of a personal supercomputer.
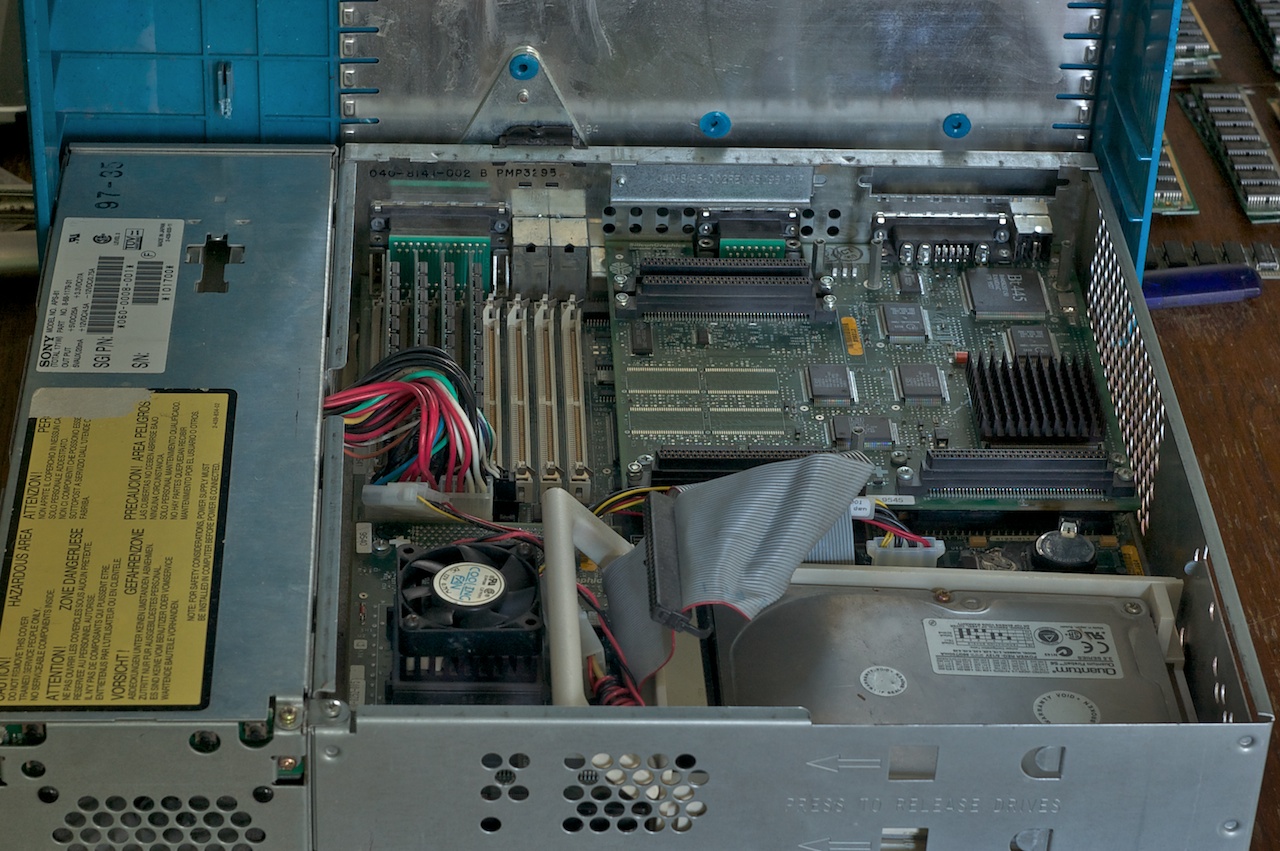
The motherboard occupies almost the entire area of the case. Next to it is a proprietary Sony 200W power supply with a very quiet cooler that dynamically changes speed (ATX? No, you haven’t heard!) . The second floor attaches to it:
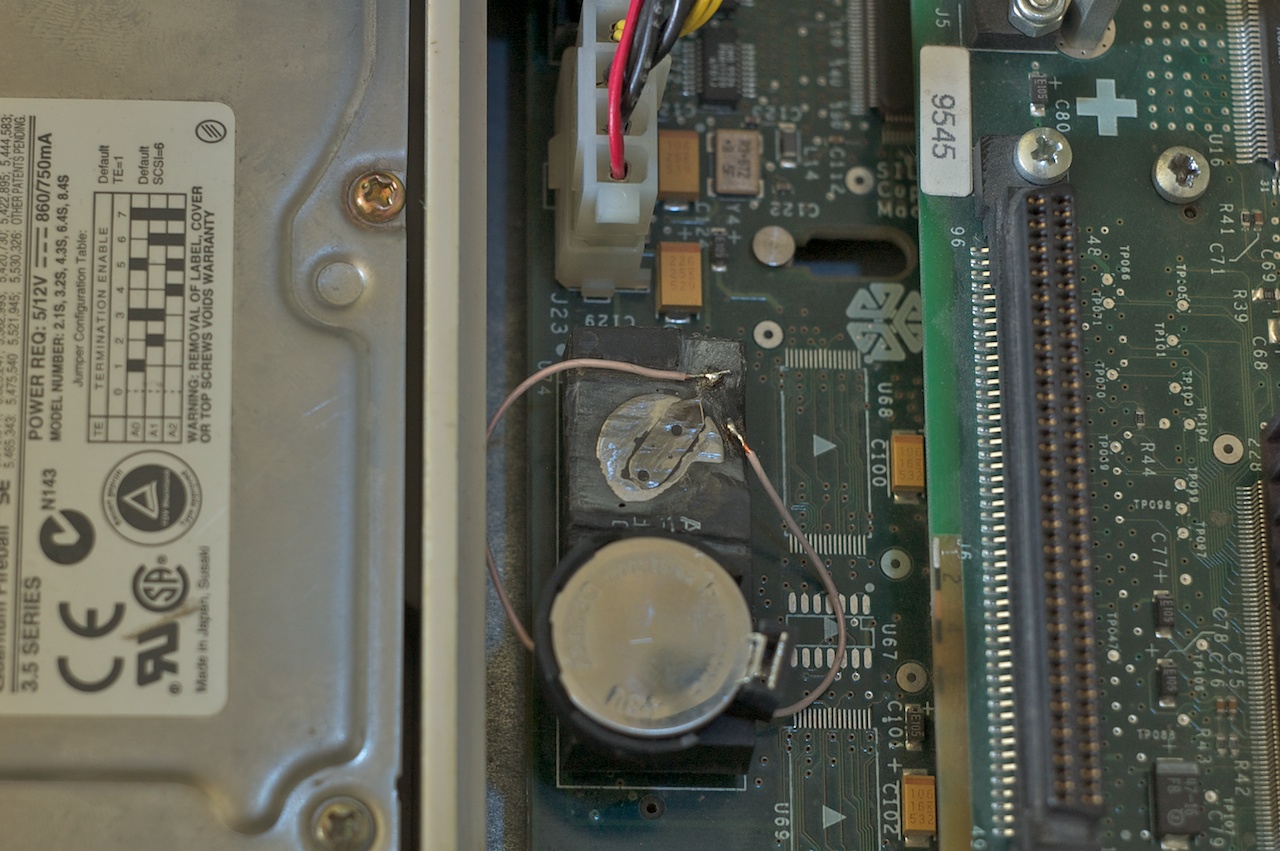
Attentive readers might notice a battery soldered to the Dallas-clock chip. The fact is that the battery soldered into the chip is responsible for preserving the parameters of Open Firmware PROM. In Silicon Graphics there, unlike PC CMOS, there are several dozens of parameters needed to run OC: the path and file name of the bootloader, console parameters, IP address, etc. And it’s
rather tedious to write lines of the form every time you boot. And in order not to suffer with the selection and ordering of a similar microcircuit, I just filed the chip body with a file and soldered the battery to the exposed contacts. Like this:
We close the case and wash it from the dust of centuries. By the way, the corporate blue color of the plastic is actually a very complex texture: translucent with white and purple splashes. On the front panel there are power and reset buttons, volume buttons, indicator LED.
An incredible number of connectors are located at the back:
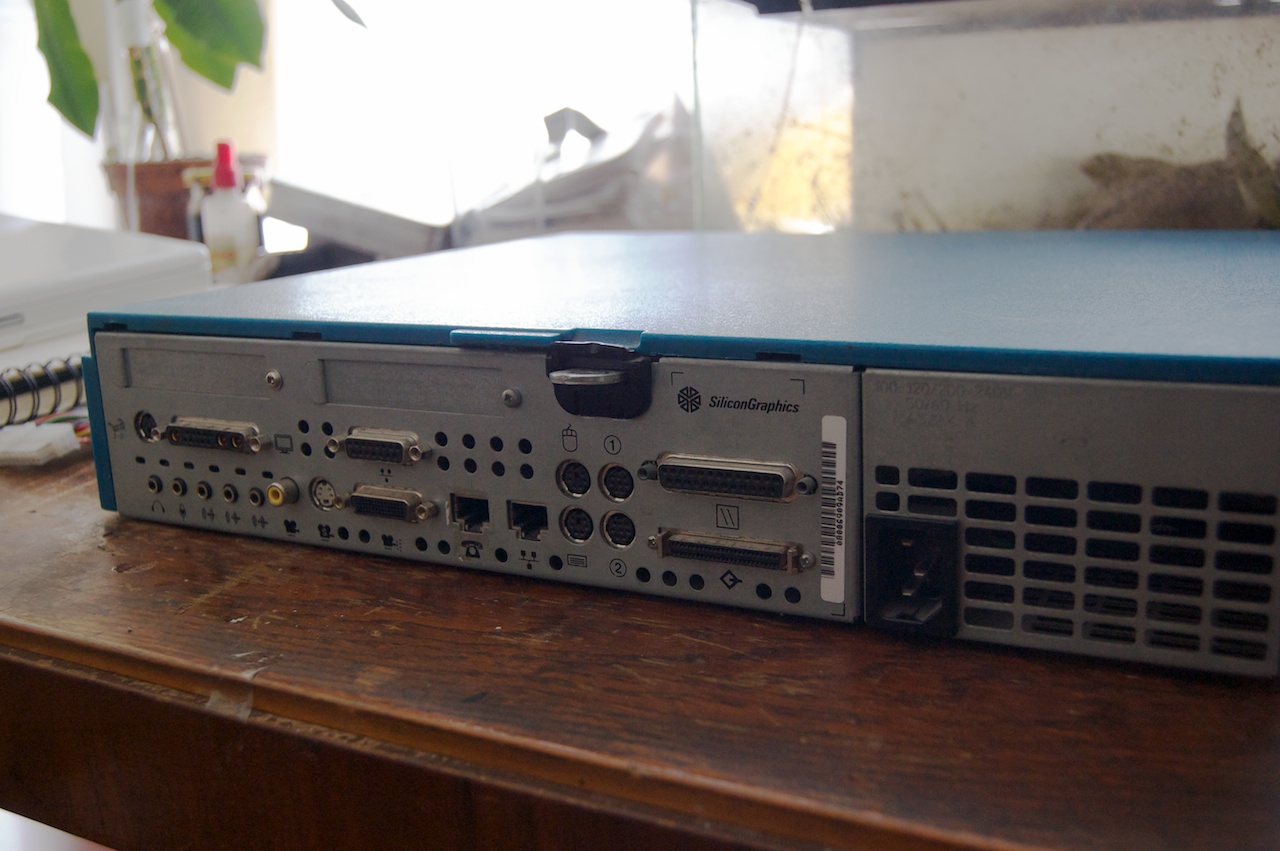
From left to right: stereo glasses connector, 13W3 display connector, audio connectors, video inputs, AUI Ethernet, SGI Cam, modem and 10 BaseT Ethernet, serial ports, 2 PS / 2, LPT and SCSI.
At the start, Indy, like the Macintosh, loses the corporate chord on the built-in speaker. After a few seconds, a dialog appears urging you to either continue booting the Linux kernel or enter PROM Monitor. Linux we no longer need. We enter the monitor.
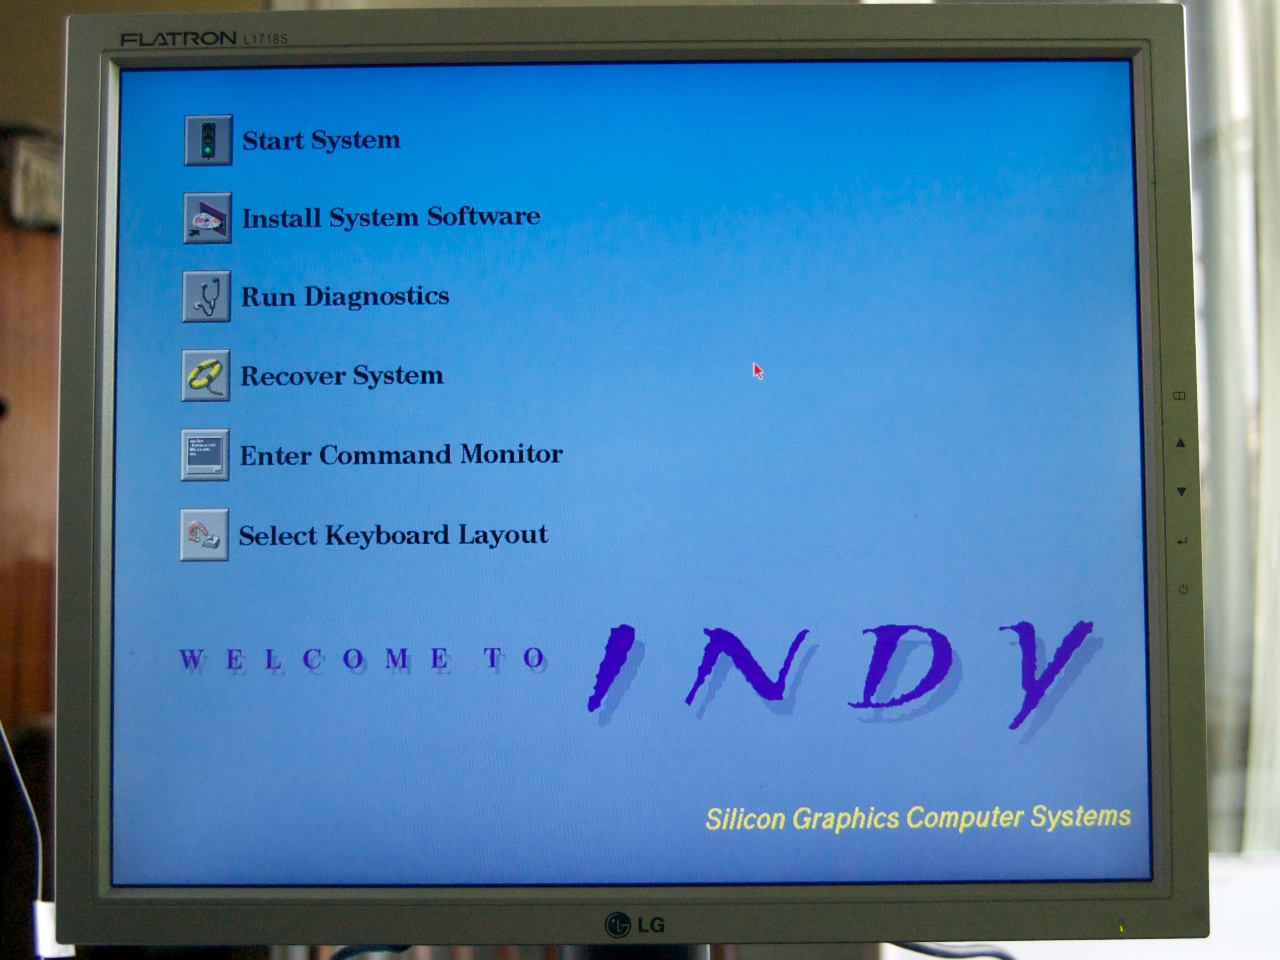
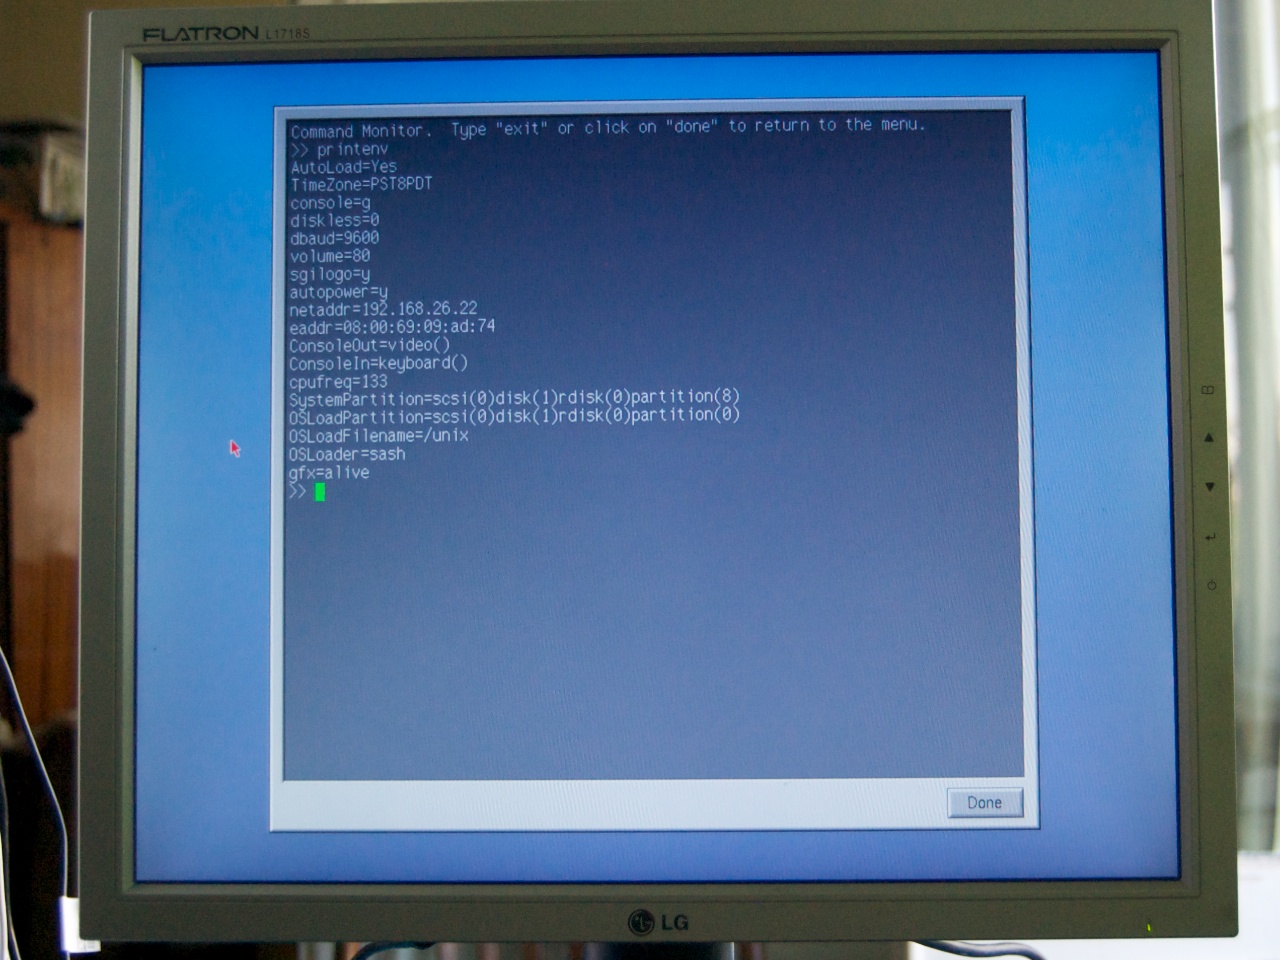
First of all, click on the last item (the mouse driver is already loaded). In the console, reset the Debian boot parameters with the Resetenv command. Printenv shows that everything is reset.
Now you can start partitioning the disk and installing IRIX. But more on that in the next post .
Materials from the forum nekochan.net helped me a lot to figure out what's what in Silicon Graphics computers .
In 2006, she got me a bonus to some kind of purchase from a huckster. Then I got an 8 gigabyte screw for it, put Debian MIPS and put it in the server room as a file-wiper. And over time, the need for it disappeared and I mothballed this miracle of technology until better times.
And as a holiday gift for the anniversary, it was decided to bring the computer to a historical state. Under the cut review and the dramatic history of a computer that cost in the mid-90s from $ 10,000 (which is one and a half times more expensive than the top-end Macintosh Quadra at that time).
Iron
Main characteristics:
- MIPS R4600 processor running at 133 MHz
- RAM 64 megabytes (4 x 16 EDO SIMM)
- Newport XL entry-level graphics subsystem (1280x1024x8 bit, no 3D acceleration).
The standard SCSI hard drive and magneto-optical drive were stolen before me along with the basket, but the eight-gig Seagate Barracuda could easily accommodate both IRIX and a good collection of rare software (for example, Photoshop 3.0 took up some 30 megabytes).
It is said above that the machine has 64 megabytes of RAM, typed in four 16-megabyte SIMM-modules. Since the memory is in a double-parity machine, I had to find 4 more identical SIMMs for expanding the memory up to 128 megabytes; This is the minimum amount of memory to run the latest Indy IRIX version 6.5.22. I could not cope with this quest. All found memory modules were different and the machine refused to turn on.
Climbing up on torrent trackers, I found and downloaded (forgive me SGI inc.) A CD image for him with IRIX 5.3, for which there was enough available memory and started restoration.
First of all, we look under the hood of a personal supercomputer.
The motherboard occupies almost the entire area of the case. Next to it is a proprietary Sony 200W power supply with a very quiet cooler that dynamically changes speed (ATX? No, you haven’t heard!) . The second floor attaches to it:
- Processor block bottom left.
- The budget Indy graphics card for 8 bit XL on the REX3 chipset. The maximum resolution of 1280x1024x8 at 76 Hz is enough to work with CAD and publishing packages. 3D performance is poor. On the edges of the video card there are GIO32 bus slots, in which you can install all kinds of upgrades for it (for example, the Jpeg and Mpeg compressors existing on the market at that time or the Video Out block).
Attentive readers might notice a battery soldered to the Dallas-clock chip. The fact is that the battery soldered into the chip is responsible for preserving the parameters of Open Firmware PROM. In Silicon Graphics there, unlike PC CMOS, there are several dozens of parameters needed to run OC: the path and file name of the bootloader, console parameters, IP address, etc. And it’s
SystemPartition=pci(0)scsi(0)disk(1)rdisk(0)partition(8)rather tedious to write lines of the form every time you boot. And in order not to suffer with the selection and ordering of a similar microcircuit, I just filed the chip body with a file and soldered the battery to the exposed contacts. Like this:
We close the case and wash it from the dust of centuries. By the way, the corporate blue color of the plastic is actually a very complex texture: translucent with white and purple splashes. On the front panel there are power and reset buttons, volume buttons, indicator LED.
An incredible number of connectors are located at the back:
From left to right: stereo glasses connector, 13W3 display connector, audio connectors, video inputs, AUI Ethernet, SGI Cam, modem and 10 BaseT Ethernet, serial ports, 2 PS / 2, LPT and SCSI.
Launch
At the start, Indy, like the Macintosh, loses the corporate chord on the built-in speaker. After a few seconds, a dialog appears urging you to either continue booting the Linux kernel or enter PROM Monitor. Linux we no longer need. We enter the monitor.
First of all, click on the last item (the mouse driver is already loaded). In the console, reset the Debian boot parameters with the Resetenv command. Printenv shows that everything is reset.
Now you can start partitioning the disk and installing IRIX. But more on that in the next post .
Materials from the forum nekochan.net helped me a lot to figure out what's what in Silicon Graphics computers .