Linux for professionals: video editing (and a little bit of compositing)
- Tutorial
Hello colleagues. I think it’s time to continue the once-started Linux for Professionals cycle. Today I would like to talk about editing a video using an example of a video that we shot last summer for our Prague venture with an electronic GPS audio guide.
Actually the video (to be precise, this is a demo mini-film).
The entire cycle of post-processing and installation is performed using software running Linux.
In truth, there is one caveat. To prepare the credits, I first used the AI running under Wine. This was partly due to the fact that I, being constrained by a vrenenny framework, did not pay due attention to the search for native alternatives. In fact, as it turned out, such an alternative, quite lying on the surface, exists. I’ll tell you more below.
So, in order.
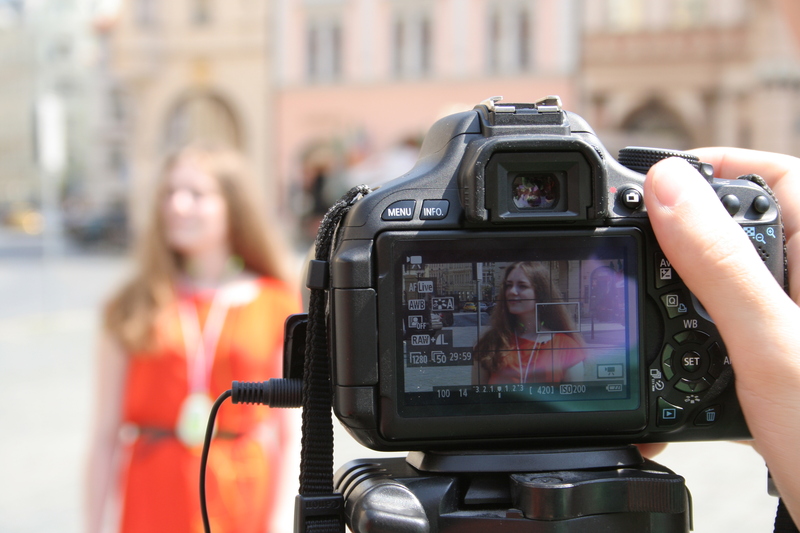
Going into the filming process, I think, does not make much sense. The only thing, probably, is to say that we shot on the Canon EOS 600D with standard firmware, for recording sound we used a wired microphone-buttonhole connected directly to the camera.
It should be noted that I was somewhat worried about the sound quality, because there is no visual monitor in the standard firmware, nor is there a direct output for the headphones. Moreover, when listening to the test sound on the site, it seemed to us, overloads were noticeable. Therefore, we decided to reduce the level a little. As it turned out later - in vain. In the files, the sound was noticeably below average. And the file that we recorded at the beginning showed a completely normal sound level without overloads.
Generally speaking, if you intend to shoot professional video on any Canon DSLR, I would recommend using Magic lantern . In our case, I frankly missed this point, partly being busy with graphic and organizational tasks and the desire to manage to take everything off in sunny weather.
As a result, after two days of shooting, we were burnt under the scorching sun, but, overall, satisfied with the result, we received 10GB HD materials in 1080p quality compressed by the H.264 codec.
If you have ever worked with the footage of HD 1080p, you must know how clumsy the installation is, unless the hardware can handle multiple H.264 streams at the same time. Therefore, in order to facilitate the process, it is worth first converting all the material into some more digestible codec and lowering the resolution so that you can later “replace” the files with the original ones and “count” the movie in the final version.
I decided that it would be best to convert to the good old DV50 widescreen, as long as this codec does not provide for interframe interpolation and has proven itself in working with Kdenlive . I have been using the latter for installation for a long time and consider it the best professional Open Source installation tool.
In general, without thinking twice, I charged the conversion:
Kdenlive does not have codecs specific to Adobe products. Everything for which codecs are installed in your system will be loaded and played. But in fairness, it should be noted that all kinds of encoding formats not intended for non-linear processing can lead to a drop in editing. What is a big plus - Kdenlive can independently save and restore the project after a fall. However, in any scenario, it is good practice to periodically press the save button after each key step. However, obviously, this is for granted advice.
So, the video is ready. It is necessary to mount.
As I wrote above, I use Kdenlive for editing. At one time, I tried many different tools, and I can say that, in my opinion, Kdenlive is by far the best. There is still claiming to a comparable level of OpenShot . But while it does not reach the Kdenlive even by the level of execution or by the interface. Kdenlive is a recognized standard. And, judging by the level of discussion on the forum of the project’s site, the guys do it “ate more than one dog” in the video production.
Since the task of teaching the use of tools is beyond the scope of this series of publications, I will not describe the entire installation process. It is simple and in general for any person who has the skills to work with any other installation product (FinalCut, Adobe Premiere, Avid), does not present any special difficulties. In my subjective opinion, Kdenlive's interface is most similar to Final Cut.
For sound processing, I use the well-established Audacity . There, in principle, everything that a sound engineer needs + a large number of additional filters written by third-party developers.
In our video there is a couple of "windy" frames. Accordingly, I decided to slightly correct the frequency response of the sound in these fragments, so as to possibly mask the noise of the wind and highlight the voice. + Slightly processed the entire sound with a compressor to achieve b / m acceptable sound on small speakers and speakers built into pocket smartphones.
After filming, it turned out that the sensitive skin of our actress in the sun turned completely orange and covered in places, sorry for the details, with very noticeable pimples, which I decided to retouch. This stage was the most painstaking.
Being an inquisitive character, I decided that I would not step back from the chosen paradigm and try to solve this problem using the tools available for Linux software. In general, having spent the day studying all possible new products and realizing that nothing had changed fundamentally since 2007, I decided that the only way I could do was to use the AE running under Wine.
It should be noted that Open Source compositing in Linux is still a stumbling block. Those. no there is of course nuke. Nuke, by the way, is such a great tool that many put it head and shoulders above all movie-video compositing software that exists today. And I unconditionally share this point of view. But! Nuke is a proprietary and commercial product. Alas. So I left this option for now as well.
There is also a composer built into Blender node. He is magnificent in everything. In addition to the tracking that was absent at that time. In the latest version, tracking has finally appeared . But last fall, he wasn’t there yet. It became clear that there was only one solution - AE under Wine .
After reviewing the Wine database, it turned out that version 6.5 behaves best. And I have just left a CD from Adobe AE 6 from ancient times. Rummaging the net, I found that Adobe hasopen FTP with old software instances, which I used.
How long, how short, but the matter was arguing.
AE launched in the environment of Mate (ex Gnome)
However, after some exercises it turned out that AE for some reason from time to time, however, crashes during rendering. The place of the failure was different all the time, which made me think that the point was not in the source code and not in the timeline. In general, after digging around on the Web, I found the reason and hastened to share winehq with visitors, and now I am sharing it with dear readers of this article:
The original, by the way, has already rested in "Einstein-Bose condensate." However, there was another proof on Creative Cow.
Further, everything was elementary. I "blew the dust" from the old software. Everything worked and surprisingly playfully. I drew the statics in InkSkape , and then exported everything to EPS. Drew in AE and made animation. I calculated the resulting video without compression in 32bit AVI with an alpha channel.
Here we must make a digression. The fact is that, as already mentioned above, I was in a hurry to put the video on the site, and did not bother to investigate the issue thoroughly enough. However, after some time, and to be precise, right before the new year, reading the DigiLinux news feed, I came across another note about Synfig. Since animated animation has always been somewhat on the periphery of my professional interests, I never really paid attention to this project. Those. I knew that it exists and, judging by the screenshots and the frequency of the appearance of notes about it here and there, this is some kind of quite popular product. But ... and then a thought dawned on me. But what if you try this thing as a composer for captions.
In general, without hesitation, I installed Synfig, and what do you think ... So it turned out. Synfig turned out to be quite acceptable for this kind of venture. Hurrah! the problem is solved. I just planned to upgrade the video, attach the final “packshot”, tweak the colors and finally put the video on the server directly in good quality, bypassing Vimeo recompression and for one get rid of Flash addiction and annoying logos on top of the picture. So the find was very welcome.
In general, I dig deeper, and did the same credits in Synfig.
Nevertheless, it should be noted that this task was not an easy one. After AE, the Synfig interface is quite unusual. And everything regarding working with key frames and non-linear timings, in my opinion, leaves much to be desired. But, nevertheless, within the framework of the task, a solution was found. As a result, I received the usual PNG sequence with an alpha channel, which I easily converted to the same 32-bit avi with ffmpeg.
After I “chopped” pimples and prepared new credits, it only remained to collect the final version.

Editing the Electronic Tour Guide at Kdenlive
At the beginning of the article, I mentioned that I used recounted fragments. So, I was already getting ready for some kind of malfunction after the replacement, but the reverse replacement procedure was surprisingly simple. Like many modern Open Source applications, Kdenlive saves editing in a structured XML file. That is, it is a trivial text file convenient for viewing, analysis and "parsing" by third-party applications. So I just opened the saved editing in the pluma text editor and, by the template, replaced all the paths with the ones leading to the HD sources.
After loading, I changed the frame format and the only thing I found was the resizing problem mentioned above. After correcting the size, all that was left was to “count” the video with different codecs and put the video on the server.

Filming an epic film about our Prague GPS audio guide
Prague GPS guide, continued filming
Julia Belenkova tourist storyteller
Yevgeny Epifantsev cameraman
Yuri Yakovlev assistant and photographer
Dmitry Shalnov copywriter, director and editor of the epic film :)
Special thanks to Mikhail Spivakov for editing the translation, as well as Alina Kazakevich for participating in the preliminary shootings.
PS The video added to the article is Vimeo, as long as Habr, alas, does not support the addition of html5 video directly. So the quality of compression here is noticeably worse. If you want to see the original, it is on the Electronic Tour Guide project website .
Actually the video (to be precise, this is a demo mini-film).
The entire cycle of post-processing and installation is performed using software running Linux.
In truth, there is one caveat. To prepare the credits, I first used the AI running under Wine. This was partly due to the fact that I, being constrained by a vrenenny framework, did not pay due attention to the search for native alternatives. In fact, as it turned out, such an alternative, quite lying on the surface, exists. I’ll tell you more below.
So, in order.
Going into the filming process, I think, does not make much sense. The only thing, probably, is to say that we shot on the Canon EOS 600D with standard firmware, for recording sound we used a wired microphone-buttonhole connected directly to the camera.
It should be noted that I was somewhat worried about the sound quality, because there is no visual monitor in the standard firmware, nor is there a direct output for the headphones. Moreover, when listening to the test sound on the site, it seemed to us, overloads were noticeable. Therefore, we decided to reduce the level a little. As it turned out later - in vain. In the files, the sound was noticeably below average. And the file that we recorded at the beginning showed a completely normal sound level without overloads.
Generally speaking, if you intend to shoot professional video on any Canon DSLR, I would recommend using Magic lantern . In our case, I frankly missed this point, partly being busy with graphic and organizational tasks and the desire to manage to take everything off in sunny weather.
As a result, after two days of shooting, we were burnt under the scorching sun, but, overall, satisfied with the result, we received 10GB HD materials in 1080p quality compressed by the H.264 codec.
Material preparation
If you have ever worked with the footage of HD 1080p, you must know how clumsy the installation is, unless the hardware can handle multiple H.264 streams at the same time. Therefore, in order to facilitate the process, it is worth first converting all the material into some more digestible codec and lowering the resolution so that you can later “replace” the files with the original ones and “count” the movie in the final version.
I decided that it would be best to convert to the good old DV50 widescreen, as long as this codec does not provide for interframe interpolation and has proven itself in working with Kdenlive . I have been using the latter for installation for a long time and consider it the best professional Open Source installation tool.
In general, without thinking twice, I charged the conversion:
# / bin / bash if [$ # -lt 2]; then echo "Video HD> PAL converter." echo "Usage: $ 0l " echo "c - convert, l - file list" else mkdir "$ 1 / PAL" ls "$ 1" | grep -E .MOV | while read file; do if ["$ 2" == "c"]; then avconv -i "$ 1 / $ file" -target pal-dv50 -aspect 16: 9 -threads 0 "PAL / $ file" fi if ["$ 2" == "l"]; then echo "$ 1 / PAL / $ file" fi done fi
Kdenlive does not have codecs specific to Adobe products. Everything for which codecs are installed in your system will be loaded and played. But in fairness, it should be noted that all kinds of encoding formats not intended for non-linear processing can lead to a drop in editing. What is a big plus - Kdenlive can independently save and restore the project after a fall. However, in any scenario, it is good practice to periodically press the save button after each key step. However, obviously, this is for granted advice.
A small digression, aimed at demonstrating how much more flexible the approach is using Open Source products made in accordance with POSIX standards.
Some time ago, in the community ru_filmmaker, a colleague asked a question: How to turn 720p 25 fps with half frames into 1080p 50 fps without half fields. Like, due to oversight, they removed a part in the wrong quality. What to do now is not very clear. The situation was further aggravated, as I understand it, by the need to process a certain amount of such material. According to the author himself, it turned out that there are no standard ways to do this using Adobe products. In any case, there was no straightforward way to do this. The reason for this is understandable, there are standard tasks. As part of standard tasks, the toolkit provides solutions built into the monolithic interface. This approach implies remarkable profitable skills among developers. Indeed, you need to assume all the ways to use your tools to "close" all the hypothetically possible nuances. Another thing is POSIX.
At first I decided to offer a simple bash script that breaks the video into frames, then using ImageMagic divides each frame into half-fields, saves and collects the final video. However, he quickly discovered that this problem was being solved in one line using ffmpeg , about which he informed the author of the question there.
Or one more thing. You, for example, are aware that Kdenlive stores the installation sheet in XML and allows you to "render" a movie from the command line? Any inquiring experimental mind immediately gives rise to a lot of ideas about how this can be used :)
So, the video is ready. It is necessary to mount.
Mounting
As I wrote above, I use Kdenlive for editing. At one time, I tried many different tools, and I can say that, in my opinion, Kdenlive is by far the best. There is still claiming to a comparable level of OpenShot . But while it does not reach the Kdenlive even by the level of execution or by the interface. Kdenlive is a recognized standard. And, judging by the level of discussion on the forum of the project’s site, the guys do it “ate more than one dog” in the video production.
Since the task of teaching the use of tools is beyond the scope of this series of publications, I will not describe the entire installation process. It is simple and in general for any person who has the skills to work with any other installation product (FinalCut, Adobe Premiere, Avid), does not present any special difficulties. In my subjective opinion, Kdenlive's interface is most similar to Final Cut.
Moments that I would like to draw attention to:
a) The new version of Kdenlive has the ability to load not only sequences with an alpha channel but also transparent (32 bit) AVIs that were saved without compression. What I successfully used to create captions (more on that below)
b) After replacing the clips with the original ones (this will also be described below), the fragments in which the playback speed was changed are compressed for some reason. This is solved by changing the parameters to the original and vice versa.
Sound
For sound processing, I use the well-established Audacity . There, in principle, everything that a sound engineer needs + a large number of additional filters written by third-party developers.
In our video there is a couple of "windy" frames. Accordingly, I decided to slightly correct the frequency response of the sound in these fragments, so as to possibly mask the noise of the wind and highlight the voice. + Slightly processed the entire sound with a compressor to achieve b / m acceptable sound on small speakers and speakers built into pocket smartphones.
Post-processing video
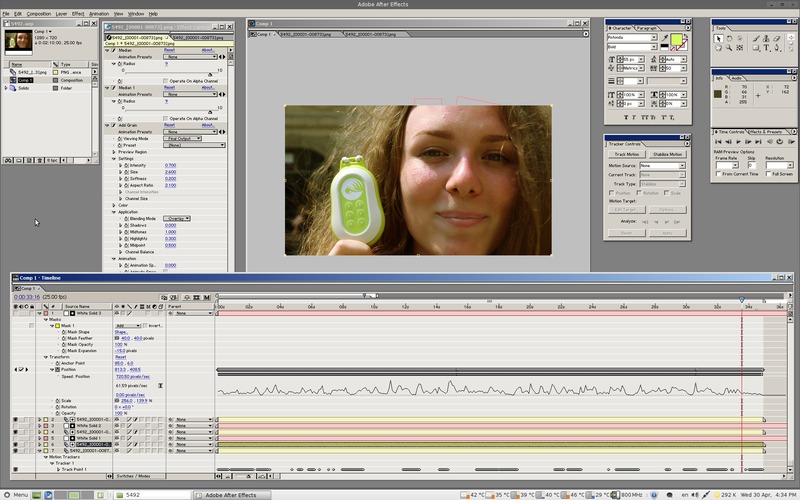
After filming, it turned out that the sensitive skin of our actress in the sun turned completely orange and covered in places, sorry for the details, with very noticeable pimples, which I decided to retouch. This stage was the most painstaking.
Being an inquisitive character, I decided that I would not step back from the chosen paradigm and try to solve this problem using the tools available for Linux software. In general, having spent the day studying all possible new products and realizing that nothing had changed fundamentally since 2007, I decided that the only way I could do was to use the AE running under Wine.
It should be noted that Open Source compositing in Linux is still a stumbling block. Those. no there is of course nuke. Nuke, by the way, is such a great tool that many put it head and shoulders above all movie-video compositing software that exists today. And I unconditionally share this point of view. But! Nuke is a proprietary and commercial product. Alas. So I left this option for now as well.
There is also a composer built into Blender node. He is magnificent in everything. In addition to the tracking that was absent at that time. In the latest version, tracking has finally appeared . But last fall, he wasn’t there yet. It became clear that there was only one solution - AE under Wine .
After reviewing the Wine database, it turned out that version 6.5 behaves best. And I have just left a CD from Adobe AE 6 from ancient times. Rummaging the net, I found that Adobe hasopen FTP with old software instances, which I used.
How long, how short, but the matter was arguing.
AE launched in the environment of Mate (ex Gnome)
However, after some exercises it turned out that AE for some reason from time to time, however, crashes during rendering. The place of the failure was different all the time, which made me think that the point was not in the source code and not in the timeline. In general, after digging around on the Web, I found the reason and hastened to share winehq with visitors, and now I am sharing it with dear readers of this article:
Tips:
1. in order to get rid of persistent crashes, you need to do the following: press Shift key + select Edit -> Preferences ... there will be a subsection "Secret". In the window that opens, enter the magic value "20" and close the window. After that, everything will work like a clock :)
2. By default, AE uses only 2GB (for any amount of memory installed), to allocate more, you need to write / PAE and / 3GB commands in boot.ini
The original, by the way, has already rested in "Einstein-Bose condensate." However, there was another proof on Creative Cow.
Further, everything was elementary. I "blew the dust" from the old software. Everything worked and surprisingly playfully. I drew the statics in InkSkape , and then exported everything to EPS. Drew in AE and made animation. I calculated the resulting video without compression in 32bit AVI with an alpha channel.
Here we must make a digression. The fact is that, as already mentioned above, I was in a hurry to put the video on the site, and did not bother to investigate the issue thoroughly enough. However, after some time, and to be precise, right before the new year, reading the DigiLinux news feed, I came across another note about Synfig. Since animated animation has always been somewhat on the periphery of my professional interests, I never really paid attention to this project. Those. I knew that it exists and, judging by the screenshots and the frequency of the appearance of notes about it here and there, this is some kind of quite popular product. But ... and then a thought dawned on me. But what if you try this thing as a composer for captions.
In general, without hesitation, I installed Synfig, and what do you think ... So it turned out. Synfig turned out to be quite acceptable for this kind of venture. Hurrah! the problem is solved. I just planned to upgrade the video, attach the final “packshot”, tweak the colors and finally put the video on the server directly in good quality, bypassing Vimeo recompression and for one get rid of Flash addiction and annoying logos on top of the picture. So the find was very welcome.
In general, I dig deeper, and did the same credits in Synfig.
Nevertheless, it should be noted that this task was not an easy one. After AE, the Synfig interface is quite unusual. And everything regarding working with key frames and non-linear timings, in my opinion, leaves much to be desired. But, nevertheless, within the framework of the task, a solution was found. As a result, I received the usual PNG sequence with an alpha channel, which I easily converted to the same 32-bit avi with ffmpeg.
Note:
If you are a Linux media designer, then surely, like me, I use InkScape for vector graphics. The new version of Synfig has the long-awaited import of SVG. However, as practice has shown, it works in a strange way. Those. all combined objects “fall apart” when exported to parts. Solution: Use the InkScape plugin instead . It saves to the original Synfig sif format.
After I “chopped” pimples and prepared new credits, it only remained to collect the final version.
Editing the Electronic Tour Guide at Kdenlive
At the beginning of the article, I mentioned that I used recounted fragments. So, I was already getting ready for some kind of malfunction after the replacement, but the reverse replacement procedure was surprisingly simple. Like many modern Open Source applications, Kdenlive saves editing in a structured XML file. That is, it is a trivial text file convenient for viewing, analysis and "parsing" by third-party applications. So I just opened the saved editing in the pluma text editor and, by the template, replaced all the paths with the ones leading to the HD sources.
After loading, I changed the frame format and the only thing I found was the resizing problem mentioned above. After correcting the size, all that was left was to “count” the video with different codecs and put the video on the server.
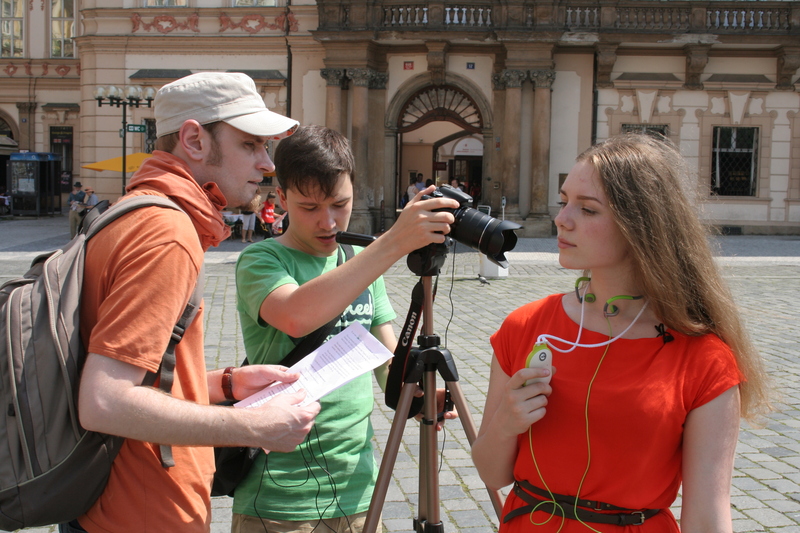
This is us in the process :)
Filming an epic film about our Prague GPS audio guide
Prague GPS guide, continued filming
Film crew
Julia Belenkova tourist storyteller
Yevgeny Epifantsev cameraman
Yuri Yakovlev assistant and photographer
Dmitry Shalnov copywriter, director and editor of the epic film :)
Special thanks to Mikhail Spivakov for editing the translation, as well as Alina Kazakevich for participating in the preliminary shootings.
List of used and mentioned Open Source software
- Kdenlive - video editing
- FFmpeg is a fully functional console video processing tool.
- Audacity - editing and processing sound
- Wine - Windows API translator and a set of libraries that allows you to run Win applications on POSIX compatible operating systems (such as Linux, Mac OSX, & BSD) in native mode.
- Blender - a professional tool for compositing and working with 3D graphics
- Synfig - a tool for creating two-dimensional vector animation
- InkScape - a vector graphics tool
- SIF exporter - plugin for saving SIF files from InkScape.
- Magic Lantern is an alternative firmware with an expanded set of video features and open source, designed to run on Canon EOS cameras.
useful links
- POSIX (Portable Operating System Interface for Unix) - Portable Unix operating system interface (wiki article)
- Page in Wine database regarding AE 6.5 health
- Useful tips, as it turned out, to configure the specified version of AE under Wine on creativecow.net
- DigiLinux is a Russian-language publication dedicated to tools for creating multimedia content on Linux.
PS The video added to the article is Vimeo, as long as Habr, alas, does not support the addition of html5 video directly. So the quality of compression here is noticeably worse. If you want to see the original, it is on the Electronic Tour Guide project website .