Using GPIO from Python on a Raspberry Pi
I share my experience gained in studying the task in the heading. The article discusses two work options that can be used in Python programs that access the GPIO ports of the Raspberry Pi.
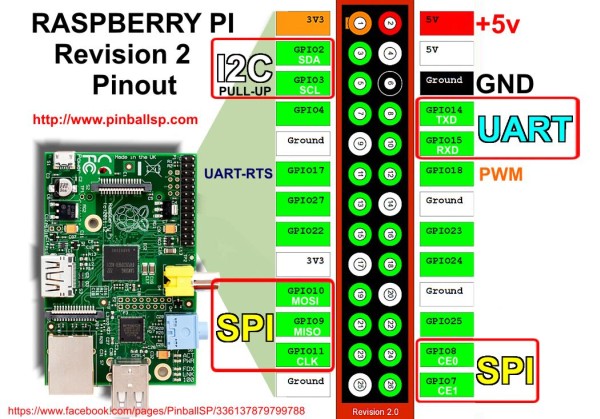
The Raspberry Pi's GPIO ports are as follows:
One of the options for working with GPIO is the Sysfs interface . Read more about the Sysfs GPIO here . In this case, the file read and write operations are used to access the GPIO ports. To use a specific output, you need to reserve it and set the direction to the input or output. After you finish working with the port, you need to release it so that other processes can use it.
Port Reservation (XX - number of the required port):
Upon successful backup, a new folder appears at the address
Or so:
Setting the high and low levels for the port configured for output is as follows:
Determining the status of the port configured for input is done as follows:
Release the port after the end of its use:
To simplify working with GPIO through the Sysfs interface, I came across two utilities. One of them is WiringPi GPIO utility , the other is quick2wire-gpio-admin .
The main task solved by these utilities is to provide the ability to work with GPIO on behalf of an unprivileged user. At the same time, WiringPi GPIO utility is more functional.
To work with GPIO, I settled on the RPIO package (at the time of writing, the latter was version 0.10.0). This package works with GPIO ports directly, accessing the BCM2708 registers through a special device
RPIO is positioned as an improved and extended version of another module, RPi.GPIO. The documentation directly on RPIO details only the capabilities that are not available in RPi.GPIO, so for a description of the functions common to these modules, you should refer to the RPi.GPIO documentation available here .
Install the package with the following command:
In addition to python modules, two programs are installed: rpio-curses and rpio. With their help, you can, for example, get the current mode and state of the GPIO and, if desired, change them. This is how it works with rpio-curses:

This is how you can get information about the system:
An example python program using RPIO:
The Raspberry Pi's GPIO ports are as follows:
One of the options for working with GPIO is the Sysfs interface . Read more about the Sysfs GPIO here . In this case, the file read and write operations are used to access the GPIO ports. To use a specific output, you need to reserve it and set the direction to the input or output. After you finish working with the port, you need to release it so that other processes can use it.
Port Reservation (XX - number of the required port):
$ echo XX > /sys/class/gpio/export
Upon successful backup, a new folder appears at the address
/sys/class/gpio/gpioXX/. Setting the direction is as follows:$ echo "out" > /sys/class/gpio/gpioXX/direction
Or so:
$ echo "in" > /sys/class/gpio/gpioXX/direction
Setting the high and low levels for the port configured for output is as follows:
$ echo 1 > /sys/class/gpio/gpioXX/value
$ echo 0 > /sys/class/gpio/gpioXX/value
Determining the status of the port configured for input is done as follows:
$ cat /sys/class/gpio/gpioXX/value
Release the port after the end of its use:
$ echo XX > /sys/class/gpio/unexport
To simplify working with GPIO through the Sysfs interface, I came across two utilities. One of them is WiringPi GPIO utility , the other is quick2wire-gpio-admin .
The main task solved by these utilities is to provide the ability to work with GPIO on behalf of an unprivileged user. At the same time, WiringPi GPIO utility is more functional.
To work with GPIO, I settled on the RPIO package (at the time of writing, the latter was version 0.10.0). This package works with GPIO ports directly, accessing the BCM2708 registers through a special device
/dev/mem. What is RPIO:Advanced GPIO for the Raspberry Pi. Extends RPi.GPIO with PWM, GPIO interrups, TCP socket interrupts, command line tools and more
RPIO is positioned as an improved and extended version of another module, RPi.GPIO. The documentation directly on RPIO details only the capabilities that are not available in RPi.GPIO, so for a description of the functions common to these modules, you should refer to the RPi.GPIO documentation available here .
Install the package with the following command:
$ sudo pip install RPIO
In addition to python modules, two programs are installed: rpio-curses and rpio. With their help, you can, for example, get the current mode and state of the GPIO and, if desired, change them. This is how it works with rpio-curses:
This is how you can get information about the system:
$ rpio --sysinfo
000f: Model B, Revision 2.0, RAM: 512 MB, Maker: Qisda
An example python program using RPIO:
import RPIO
import time
NRF_CE = 24
# set up output channel with an initial state
RPIO.setup(NRF_CE, RPIO.OUT, initial=RPIO.LOW)
for i in range(10):
    RPIO.output(NRF_CE, 1)
    time.sleep(1)
    RPIO.output(NRF_CE, 0)
    time.sleep(1)
# reset every channel that has been set up by this program,
# and unexport interrupt gpio interfaces
RPIO.cleanup()