History of Ruby on Windows Azure
Ruby developers could use Windows Azure from the very early stage of development of the platform, and every year the support for the Ruby platform increased both through the creation and development of Ruby development tools for Windows Azure, and indirectly - for example, with the release of virtual machines, the opportunity to develop Ruby- applications in the IaaS environment. For those who do not want to puzzle themselves with infrastructural realities, there is already a pre-configured image for Ruby in the VMDepot virtual machine storage. Below I will talk about several ways to develop Ruby in Windows Azure, which of these methods will be more convenient - you decide.
Having studied the milestones of the development of the platform towards development for Ruby, we can distinguish several stages, each of which is important in its own way:
• Creating the Windows Azure SDK for Ruby (Windows Azure SDK Ruby ), with which you can use various Windows Azure services from a Ruby application. This is a very important milestone, since without the efforts that the platform vendor puts into a specific direction, it will not work to say that this direction is a full-fledged “inhabitant” of the ecosystem. Like many other Microsoft tools, the Ruby SDK is Open Source, and is located on GitHub - github.com/WindowsAzure/azure-sdk-for-ruby
• IaaS is released as virtual machines. With this, everything is clear - you can make a virtual server for yourself.
• The release of the storage of images VMDepot . For those who want to get a ready-made image and start working right away.
Method 1: Windows Azure Linux Server, Ubuntu 12.04 LTS
We will manually deploy the Linux server and configure the working environment for ourselves. To do this, go to the Windows Azure management portal and click New => COMPUTE => VIRTUAL MACHINE => QUICK CREATE.
Enter the data:
• DNS NAME: the name under which the virtual machine will be accessible from outside
• IMAGE: the image from which the virtual machine will be deployed. Select Ubuntu Server 12.04 LTS.
• SIZE: one of the available VM sizes. Choose Medium.
• USER NAME: default is azureuser. The portal cannot be changed.
• NEW PASSWORD / CONFIRM: password.
• REGION / AFFINITY GROUP: the region where the VM will be located, or an affinity group (to ensure maximum proximity within the data center).
For more precise parameter settings, select FROM GALLERY - more settings will be available.

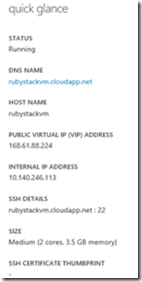
Connection data (for example, via Putty) is obtained after clicking on the VM name in the SSH Details section of the Dashboard tab.
Run the sudo apt-get update command. Do not forget to use sudo on VMs under Linux, this is additional security and confidence. Further, it is desirable to install a window manager for convenience:
Enable RDP access to the GUI. This is done on the Endpoints tab: you need to click Add and enter the data - the access point via TCP and port value 3389.
In the VM, install xrdp:
Now you can set the environment for Ruby On Rails:
We will also install Ruby Version Manager (RVM), which is useful for managing different versions of Ruby and other functions. Add RVM to the environment:
And check if everything is set to work correctly:
If everything is in order, you can install Ruby and specify it to use by default:
From VMDepot, you can install pre-configured community VM images, and they will be automatically deployed and run on Windows Azure in your account.
Let's go straight to the page of the necessary image.
Click DEPLOYMENT SCRIPT to get the deployment script. The script is designed for the Azure CLI, and if you do not have the CLI installed, you won’t be able to use it (you can download it from the link ).
Run the CLI. Next, execute the following commands to configure the environment for the CLI:
After executing all the commands, you can run the script copied from VMDepot ,. This will take some time, after which the new VM will appear in the list of VMs in the Windows Azure Management Portal. This VM is an excellent set of various development environments and environments, including PHP, Ruby, Python, Java and various frameworks, as well as DBMSs such as mysql, postgresql, and apache / nginx.
As a PaaS on Windows Azure, the Cloud Service concept is used - an application consisting of several traditional projects (frontend and backend, for example) and one new one - actually Cloud Service, which contains all the configuration used by the platform to deploy and configure the application in the cloud. Read more here .
Create a Cloud Service project in Visual Studio and add a Worker Role to it. In this role project, the environment and the Ruby application will be installed. Now we need to download the Ruby installer - we will put it in Worker Role, on the VM of which then the environment will be deployed. The installer can be downloaded from RubyInstaller.com. Add the installer to the Worker Role project and set the Copy to output directory attribute to Copy if newer so that it is included in the package. We also add the install.cmd file with the same Copy to output directory attribute value and the following contents:
All files must be saved with US-ASCII encoding, otherwise errors may occur.
Add the main.rb file to Worker Role with the value of the copy if newer attribute and the contents:
Add a start.cmd file with the same attribute value and the following contents:
However, everything will not start automatically, so you need to make adjustments to the configuration of the role itself in the Cloud Service project. Open the ServiceDefinition.csdef file and add the code highlighted below:
Thus, we made the configuration in such a way that when the VM starts, the install.cmd and start.cmd files are run with elevated privileges, and port 80 (for external clients) is opened, which will redirect traffic to internal port 8080.
Now, if you have the Windows Azure emulator installed, you can press F5 (during startup, pay attention to the files that run - these are the results of the install.cmd and start.cmd execution) and observe the result at localhost : 81 (the local emulator automatically remaps from port 80 to 81 during conflict avoidance).
The further development process can be divided into several stages:
1) Creation of program code and .rb files
2) Modifications and install.cmd start.cmd files, or the development of new executable files for automating changes, or creating an entirely new environment of development and editing of the corresponding section in ServiceDefinitions.csdef
3) Adding commands for program code management start.cmd
In In this post, I briefly looked at deploying the simplest Ruby development ecosystem. Further, the choice is yours - to develop locally or to have a constantly accessible development environment with which you can do anything, and which you can access from anywhere - according to the latest data, this is becoming increasingly important. :)
UPD: and in the comments they suggest that there is an add-on for automation. We take and use. :)
Having studied the milestones of the development of the platform towards development for Ruby, we can distinguish several stages, each of which is important in its own way:
• Creating the Windows Azure SDK for Ruby (Windows Azure SDK Ruby ), with which you can use various Windows Azure services from a Ruby application. This is a very important milestone, since without the efforts that the platform vendor puts into a specific direction, it will not work to say that this direction is a full-fledged “inhabitant” of the ecosystem. Like many other Microsoft tools, the Ruby SDK is Open Source, and is located on GitHub - github.com/WindowsAzure/azure-sdk-for-ruby
• IaaS is released as virtual machines. With this, everything is clear - you can make a virtual server for yourself.
• The release of the storage of images VMDepot . For those who want to get a ready-made image and start working right away.
Method 1: Windows Azure Linux Server, Ubuntu 12.04 LTS
We will manually deploy the Linux server and configure the working environment for ourselves. To do this, go to the Windows Azure management portal and click New => COMPUTE => VIRTUAL MACHINE => QUICK CREATE.
Enter the data:
• DNS NAME: the name under which the virtual machine will be accessible from outside
• IMAGE: the image from which the virtual machine will be deployed. Select Ubuntu Server 12.04 LTS.
• SIZE: one of the available VM sizes. Choose Medium.
• USER NAME: default is azureuser. The portal cannot be changed.
• NEW PASSWORD / CONFIRM: password.
• REGION / AFFINITY GROUP: the region where the VM will be located, or an affinity group (to ensure maximum proximity within the data center).
For more precise parameter settings, select FROM GALLERY - more settings will be available.
Connection data (for example, via Putty) is obtained after clicking on the VM name in the SSH Details section of the Dashboard tab.
Run the sudo apt-get update command. Do not forget to use sudo on VMs under Linux, this is additional security and confidence. Further, it is desirable to install a window manager for convenience:
sudo apt-get install ubuntu-desktop
Enable RDP access to the GUI. This is done on the Endpoints tab: you need to click Add and enter the data - the access point via TCP and port value 3389.
In the VM, install xrdp:
sudo apt-get install xrdp
Now you can set the environment for Ruby On Rails:
sudo apt-get upgrade
sudo apt-get install ruby1.9.1 ruby1.9.l-dev build-essential libsqlite3-dev nodejs -y
sudo gem install bundler –no-rdoc –no-ri
sudo apt-get -y install git-core curl
curl -L https://get.rvm.io | bash -s stable
We will also install Ruby Version Manager (RVM), which is useful for managing different versions of Ruby and other functions. Add RVM to the environment:
echo 'source ~/.rvm/scripts/rvm' >> ~/.bash_aliases && bash
And check if everything is set to work correctly:
rvm requirements
If everything is in order, you can install Ruby and specify it to use by default:
rvm install 1.9.3
rvm use 1.9.3 –default
Method 2: Install VM from VMDepot
From VMDepot, you can install pre-configured community VM images, and they will be automatically deployed and run on Windows Azure in your account.
Let's go straight to the page of the necessary image.
Click DEPLOYMENT SCRIPT to get the deployment script. The script is designed for the Azure CLI, and if you do not have the CLI installed, you won’t be able to use it (you can download it from the link ).
Run the CLI. Next, execute the following commands to configure the environment for the CLI:
azure account download (будет загружен файл с настройками подписки)
azure account import [путь_к_файлу_с_настройками]
azure storage account list (будет выведен список аккаунтов хранилища, если таковых нет, необходимо создать)
azure storage account set [имя_аккаунта_хранилища]
After executing all the commands, you can run the script copied from VMDepot ,. This will take some time, after which the new VM will appear in the list of VMs in the Windows Azure Management Portal. This VM is an excellent set of various development environments and environments, including PHP, Ruby, Python, Java and various frameworks, as well as DBMSs such as mysql, postgresql, and apache / nginx.
Method 3: PaaS, Ruby + Sinatra + Azure
As a PaaS on Windows Azure, the Cloud Service concept is used - an application consisting of several traditional projects (frontend and backend, for example) and one new one - actually Cloud Service, which contains all the configuration used by the platform to deploy and configure the application in the cloud. Read more here .
Create a Cloud Service project in Visual Studio and add a Worker Role to it. In this role project, the environment and the Ruby application will be installed. Now we need to download the Ruby installer - we will put it in Worker Role, on the VM of which then the environment will be deployed. The installer can be downloaded from RubyInstaller.com. Add the installer to the Worker Role project and set the Copy to output directory attribute to Copy if newer so that it is included in the package. We also add the install.cmd file with the same Copy to output directory attribute value and the following contents:
rubyinstaller-2.0.0-p0-x64.exe /silent
D:\Ruby200-x64\bin\gem.bat install sinatra --no-ri --no-rdoc
All files must be saved with US-ASCII encoding, otherwise errors may occur.
Add the main.rb file to Worker Role with the value of the copy if newer attribute and the contents:
require 'sinatra'
set :environment, :production
set :port, 8080
get '/' do
"Hello World!"
end
Add a start.cmd file with the same attribute value and the following contents:
D:\Ruby200-x64\bin\ruby.exe main.rb
However, everything will not start automatically, so you need to make adjustments to the configuration of the role itself in the Cloud Service project. Open the ServiceDefinition.csdef file and add the code highlighted below:
Thus, we made the configuration in such a way that when the VM starts, the install.cmd and start.cmd files are run with elevated privileges, and port 80 (for external clients) is opened, which will redirect traffic to internal port 8080.
Now, if you have the Windows Azure emulator installed, you can press F5 (during startup, pay attention to the files that run - these are the results of the install.cmd and start.cmd execution) and observe the result at localhost : 81 (the local emulator automatically remaps from port 80 to 81 during conflict avoidance).
The further development process can be divided into several stages:
1) Creation of program code and .rb files
2) Modifications and install.cmd start.cmd files, or the development of new executable files for automating changes, or creating an entirely new environment of development and editing of the corresponding section in ServiceDefinitions.csdef
3) Adding commands for program code management start.cmd
In In this post, I briefly looked at deploying the simplest Ruby development ecosystem. Further, the choice is yours - to develop locally or to have a constantly accessible development environment with which you can do anything, and which you can access from anywhere - according to the latest data, this is becoming increasingly important. :)
UPD: and in the comments they suggest that there is an add-on for automation. We take and use. :)