We connect to the PSP gamepad from the Xbox 360 using the Raspberry Pi
... or a tale about how a penguin made friends with America and Japan.
So, in ancient times, people played on the Sony Playstation and they were happy with everything. But progress did not stand still. The degree of integration of microcircuits increased. Engineering thought was constantly looking for new form factors, and marketing thought was looking for new markets. So in 2005 appearedon sale outside Japan is the Sony Playstation Portable. Her game line (as with any other console) was a specially compiled for PSP iron games. But she also had sufficient computing power to run games from the original PlayStation through the built-in emulator. Although, perhaps, the key role was played by the fact that both the PlayStation and the PSP had a processor of the same architecture - namely, MIPS. But the most remarkable thing in this system is that immediately, in the year of launch, they leaked into the networkPSP SDK libraries. As a result, almost 10 years after the launch, we have a huge library of games and a well-functioning homebrew. Also, now, in the not the largest city of Russia, a fully working PSP (of the most functional modification) can be bought for 3000 rubles. All this makes it currently a very attractive budget gaming system with just a huge installation base. The most functional modification has a component output for connecting to a TV. But the TV connector is not well positioned in terms of using PSP for a long time as a gamepad. In addition, with prolonged use, it becomes necessary to connect a second wire - from the charger. And the usability of such a chimera tends to zero. How to solve this problem relatively cheaply and at the same time geeky - this will be discussed in this article. Also briefly touched on are the topics of programming the USB client driver for PSP, the method of installing hook functions in PSP, working under Linux with USB devices and with joysticks via the API. We begin.
But before we begin, I’ll tell you about one interesting fact. Since the PSP was released almost 10 years ago, the next generation of Sony’s portable consoles, namely the Sony Playstation Vita, is currently relevant. And the fact is that in Japan there was a stationary version of a portable console. Sony PlayStation Vita TV.
As gamepads, it uses the usual Dualshock 3 from the Playstation 3. USB or Bluetooth connection is supported. Vita TV, like Vita, can play games from Vita, PSP and from the original Playstation. Thus, the idea of a “stationary portable” console is quite consistent and interesting.
Next, the question arose of how to connect an external gamepad to the PSP. It would seem that the PSP has a USB connector, through which enthusiasts taught the PSP to run games from the folder of the connected computer or transfer the entire picture with the game to the window of this same USB-connected computer. But, as it turned out , USB in PSP can only be a client. And even official accessories (such as a camera) work in host mode (by the way, Google recommends working with peripherals in androidput the smartphone also in client mode). Those. connecting a gamepad to a PSP directly is useless. Therefore, you need some kind of intermediate device. In a local electronic store, debug boards of varying degrees of steepness cost from 1 to 10 thousand rubles. While these are microcontrollers, you need to think about the USB host separately. Then Raspberry Pi caught my eye.
This machine has everything you need - 2 USB ports, as well as full Linux. In the not-so-largest city of Russia, the older model (with 512 MB of memory and Ethernet) costs 1,500 rubles through free private bulletin boards. The price is commensurate with the cheapest controller debug boards, and the functionality is not an example anymore. And also "Made in the UK".
If you simply connect the USB cable to the PSP, it will become visible as a USB flash drive. We need her to accept commands about external management. Those. some code should spin in the PSP, which will receive information via USB, and simulate the pressing of controls on the PSP itself. The very ability to run some code in addition to licensed games is possible only on pirated firmware. Technically, pirated firmware is a program that pretends to be an official program located on a memory card, and which, when launched, replaces the working firmware code in the RAM with a modified one that allows you to run games from .iso files from a PSP memory card. Thus, the firmware runs smoothly until the next reboot of the PSP. But what matters to us is not this, but the fact that it supports plugins. Plugins are object files linked in a specific format, which start in separate streams parallel to the launch of the main menu, PSP games or games of the original Playstation. The latest version of the original PSP firmware is already 6.60. Plugins sharpened for earlier versions of the firmware may not work under the latest firmware. This happened in this case.A plugin that can transfer via USB from a PSP to a Windows-based PC video of everything that happens on the PSP and receive data from a gamepad connected to a PC in the PSP, via USB, only half worked on firmware 6.60, i.e. data from the gamepad to the PSP reached, but the simulation of the control of the PSP controls did not work. I started looking for plugins that somehow work with the control on firmware 6.60. And found it. Another plugin is used to work with the PSP analog stick, and it works on the latest firmware. All PSP sources are compiled with this homebrew SDK.
For the basis of the plug-in project, which I will modify, I chose the one that already contained the working code of the USB client. But for the usual debugging and generally cozy atmosphere, I needed printf (). On the PSP. It was not in the selected plugin. But in the plug-in, from which I wanted to pull out the working code for intercepting PSP control events, it was executed by intercepting the function of drawing the next frame to the frame buffer and adding the debug lines I needed to the frame. The capture function itself (hook) of the rendering is implemented as follows:
After calling hook_function (), the PSP operating system, when calling its internal kernel function, sceDisplaySetFrameBuf () will actually call setframebuf_hook_func (). And to call the original sceDisplaySetFrameBuf () you now need to call g_setframebuf (). Anyone interested in the topic of hooks can be found in more detail here, for example .
Next, I added working hooks to the modified project sceCtrlReadBufferPositive (), sceCtrlPeekBufferPositive (), sceCtrlReadBufferNegative (), and sceCtrlPeekBufferNegative (), taking them from the same JoySens. I just made sure that the input data inside them was the last data sent to the PSP about the status of the gamepad connected to the PC host. Here is an archive with all the necessary binaries and source codes. Before starting the PC part of the program, you need to install the USB driver. First you need to run the plugin on the PSP (you can find out how to run the plugin by googling in Yandex). Then restart the PSP and connect it to the PC. A PSP Type B device should be detected. Next, download the drivers. Install the drivers through the wizard (bin \ inf-wizard.exe), pointing to our PSP Type B device and telling us to install the driver at the end.
Everything would be fine, but the network has source codes only for version 0.19 RemoteJoyLite. And it does not work correctly on some games (for example, K-On! Wildly slows down, and graphic artifacts appear in Dungeon Siege ). In version 0.20 this is said to have been fixed, but the source code for this version is not publicly available. Therefore, it was decided to modify the protocol of data transmitted via USB in order to transmit only a minimum of information about the state of the gamepad, as well as minimize the size of the source of the PSP part. All data transferred from the PSP to the PC was deleted from the protocol and only one structure was transferred from the PC to the PSP, as a result of which the brakes and artifacts disappeared into oblivion:
The analog data from the stick in the PSP itself is presented as a single-byte unsigned integer for each axis (127 is the center), and 4 bytes in the protocol are allocated because of the desire not to even think about the problems of packing and alignment of structures, because in RemoteJoyLite itself, data is packed as follows:
And in order not to even think about the corresponding problems (after all, RemoteJoyLite itself is compiled by MinGW GCC, and the next step is to create a project in Microsoft Visual Studio to work out a truncated protocol that does not know about __attribute __ ((packed))), I removed all alignments and packaging structures bringing them to a 32-bit representation. As a result, in thisThe archive contains source codes and binaries of the stripped-down project - both the PSP- and Windows-part. The Windows application is designed as a mfc project in C ++ for Microsoft Visual Studio 2010. For Windows programming, it will be useful to learn how the cursor keystrokes are handled (in mfc applications, it works only if it is in the window message filter of the entire application, and not in the dialog keystroke), and also due to what printf () works correctly on the form even from a separate stream. In the PSP part, it will be interesting to study the attached lightweight source, in which only USB, control and printf () are left. For example, USB data reception is asynchronous and implemented as follows. When connected to a USB host, after the correct procedure for obtaining the internal address on the USB bus (seeUSB description ) UsbAttach () is called, because this call was described in the driver structure registered during initialization:
Where module_start () is a function that is called in a separate thread when the plugin starts with pirated firmware. Also, when starting the driver, a flag variable of the int type (i.e. 32 flags) is created with access through the unique identifier of the object in the PSP operating system and the auxiliary stream is launched:
So, and the called UsbAttach () sets the flag USB_EVENT_ATTACH in the flag variable of the UsbMainEventFlag object:
At the same time, in the UsbMainThread () thread previously created when calling UsbStartFunc (), it says:
This means that the thread in an infinite loop waits for the USB_EVENT_ATTACH flag or USB_EVENT_ASYNC flag to be set in the flag variable of the UsbMainEventFlag object. Successful connection with the USB host caused the setting of the USB_EVENT_ATTACH flag, by which this thread performs an asynchronous request to receive a data packet via USB, while resetting the USB_EVENT_ASYNC flag:
In this request, the callback sets up a call to the UsbAsyncReqDone () function:
This function, as we see, upon completion of receiving the data packet from the USB host (processed by the PSP operating system kernel by interrupt from the PSP USB controller) sets the USB_EVENT_ASYNC flag in the UsbMainEventFlag object flag variable. On it, our endless loop sets up a new asynchronous data request. Such an event mechanism allows you not to waste CPU time wasting time on endlessly polling the data ready flag, because when you call sceKernelWaitEventFlag (), the time slots are not allocated to the thread until the necessary event occurs - this is ensured by the thread scheduler inside the PSP operating system, and indeed this The basic principle works in any multitasking operating system.
So, the PSP part is completed. Now is the time to develop an application, or rather a service that will start automatically when Raspberry Pi is turned on under Linux. In general, there are several adapted Linux distributions for the Raspberry Pi. But I settled on Fedora, because he draws his roots from Red Hat, with whom I had a trivial job to work with and got used to his package distribution RPM. Immediately after installing Fedora Remix 18 and, if necessary, setting up the network (in my case, I had to manually set the network address and gateway, because the DHCP server in the home network does not work correctly), which is done intuitively - by connecting the mouse and clicking on network connection icon in the upper right corner, an SSH server works directly from the box. But the SMB server could not be quickly configured (problems with smbpasswd), therefore, the source code was created and edited remotely via SSH through the midnight commander. The first thing I started with is connecting to the PSP. To do this, you needed to learn how to interact with USB in Linux. In this regard, there was a small unpleasant story, because of which, once again, the whole charm of Linux is crumbling before my eyes. The fact is that when you try to install the library and header for compilation through
the package manager had a fight and said that it is outdated, use libusbx. Ok team
downloaded the necessary files. But the fact is that libusbx on api calls is incompatible with libusb1, which is the same as the windows version of libusb, which, in turn, was used in the original RemoteJoyLite sources, and generally works fine under Windows. But okay. With usb sorted out, now let's move on to accessing the gamepad from under Linux. I have a wired Xbox 360 controller that feels great on Windows and, surprisingly, made money out of the box on Fedora Remix 18 on the Raspberry Pi, creating the device / dev / input / js0 . This worked out a regular xpad driver. There is an alternative xboxdrv driver - it is more flexible in configuration. But we have enough and full-time.
So, the final source code of the service has the following form:
Here is a link to the service binary. And here is the contents of the m.sh compilation script:
According to the source itself, I would like to note two points. First, the Xbox analog sticks have an accuracy of 16 bits, while the PSP stick has an accuracy of 8 bits. In this regard, I send the package to change the axis values reduced to 8 bits, and not to change the source data from the Xbox controller. Secondly, in PSP, the value of the diagonals corresponds to the full scale (i.e., the round PSP stick in terms of the scale is a square), and in the Xbox, as it should be, half of the scale:

Therefore, a linearly increasing (the greater the deviation from the center axis of the Xbox controller, the larger) coefficient was introduced with a maximum of 1.4 (although, as it turned out later, it would be correct to determine the angle value, and the closer the angle to the diagonal, the greater the coefficient). With these values, the Xbox gamepad is felt without any discomfort, although purely technically the sensitivity turned out to be rude. In Doom 0.05 it’s convenient to control, in Dungeon Siege all three movement speeds (depending on the stick deflection force) work and feel like on the PSP itself. Because, when confronted with a problem, at the beginning a simple coefficient was tested (both 1.5 and 1.4), without a linear increase depending on the deviation, and in these games there was a sharp discomfort - it was impossible to play.
Superficial googling about adding a program to autoload on Linux gives mainly recommendations on modifying the init rc script. But in our case, we need to do differently.
1. First you need to copy our service xbox2psp.o to / usr / local / bin and set the launch rights for it (all three bits).
2. Then create the file /lib/systemd/system/xbox2psp.service with the following contents:
3. Go to the / etc / systemd / system / folder and create a link with the command
4. Reload the startup daemon configuration:
5. Activate autostart of a new service
6. If necessary, you can immediately start the service with the command
As a result, we got a convenient opportunity to control the PSP using the Xbox 360 controller. If desired, this project can be modified to connect, for example, Dualshock 3 via Bluetooth.
So, in ancient times, people played on the Sony Playstation and they were happy with everything. But progress did not stand still. The degree of integration of microcircuits increased. Engineering thought was constantly looking for new form factors, and marketing thought was looking for new markets. So in 2005 appearedon sale outside Japan is the Sony Playstation Portable. Her game line (as with any other console) was a specially compiled for PSP iron games. But she also had sufficient computing power to run games from the original PlayStation through the built-in emulator. Although, perhaps, the key role was played by the fact that both the PlayStation and the PSP had a processor of the same architecture - namely, MIPS. But the most remarkable thing in this system is that immediately, in the year of launch, they leaked into the networkPSP SDK libraries. As a result, almost 10 years after the launch, we have a huge library of games and a well-functioning homebrew. Also, now, in the not the largest city of Russia, a fully working PSP (of the most functional modification) can be bought for 3000 rubles. All this makes it currently a very attractive budget gaming system with just a huge installation base. The most functional modification has a component output for connecting to a TV. But the TV connector is not well positioned in terms of using PSP for a long time as a gamepad. In addition, with prolonged use, it becomes necessary to connect a second wire - from the charger. And the usability of such a chimera tends to zero. How to solve this problem relatively cheaply and at the same time geeky - this will be discussed in this article. Also briefly touched on are the topics of programming the USB client driver for PSP, the method of installing hook functions in PSP, working under Linux with USB devices and with joysticks via the API. We begin.
The idea of connecting a portable console to a TV is not new
But before we begin, I’ll tell you about one interesting fact. Since the PSP was released almost 10 years ago, the next generation of Sony’s portable consoles, namely the Sony Playstation Vita, is currently relevant. And the fact is that in Japan there was a stationary version of a portable console. Sony PlayStation Vita TV.
PS Vita TV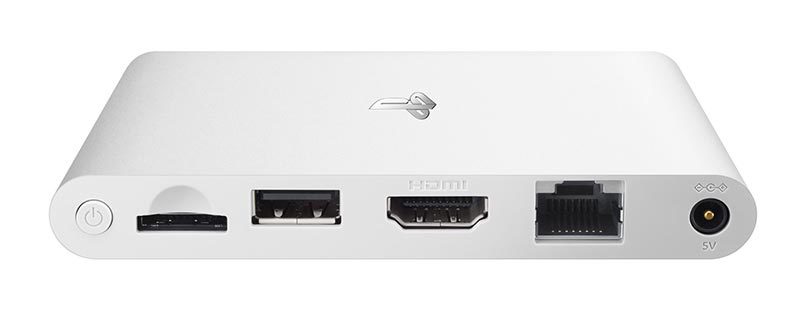
As gamepads, it uses the usual Dualshock 3 from the Playstation 3. USB or Bluetooth connection is supported. Vita TV, like Vita, can play games from Vita, PSP and from the original Playstation. Thus, the idea of a “stationary portable” console is quite consistent and interesting.
With what to make friends a gamepad and PSP?
Next, the question arose of how to connect an external gamepad to the PSP. It would seem that the PSP has a USB connector, through which enthusiasts taught the PSP to run games from the folder of the connected computer or transfer the entire picture with the game to the window of this same USB-connected computer. But, as it turned out , USB in PSP can only be a client. And even official accessories (such as a camera) work in host mode (by the way, Google recommends working with peripherals in androidput the smartphone also in client mode). Those. connecting a gamepad to a PSP directly is useless. Therefore, you need some kind of intermediate device. In a local electronic store, debug boards of varying degrees of steepness cost from 1 to 10 thousand rubles. While these are microcontrollers, you need to think about the USB host separately. Then Raspberry Pi caught my eye.
Raspberry pi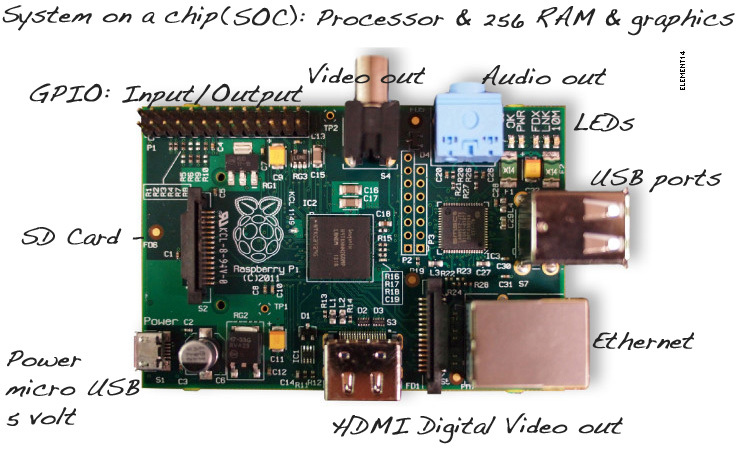
This machine has everything you need - 2 USB ports, as well as full Linux. In the not-so-largest city of Russia, the older model (with 512 MB of memory and Ethernet) costs 1,500 rubles through free private bulletin boards. The price is commensurate with the cheapest controller debug boards, and the functionality is not an example anymore. And also "Made in the UK".
Study start
If you simply connect the USB cable to the PSP, it will become visible as a USB flash drive. We need her to accept commands about external management. Those. some code should spin in the PSP, which will receive information via USB, and simulate the pressing of controls on the PSP itself. The very ability to run some code in addition to licensed games is possible only on pirated firmware. Technically, pirated firmware is a program that pretends to be an official program located on a memory card, and which, when launched, replaces the working firmware code in the RAM with a modified one that allows you to run games from .iso files from a PSP memory card. Thus, the firmware runs smoothly until the next reboot of the PSP. But what matters to us is not this, but the fact that it supports plugins. Plugins are object files linked in a specific format, which start in separate streams parallel to the launch of the main menu, PSP games or games of the original Playstation. The latest version of the original PSP firmware is already 6.60. Plugins sharpened for earlier versions of the firmware may not work under the latest firmware. This happened in this case.A plugin that can transfer via USB from a PSP to a Windows-based PC video of everything that happens on the PSP and receive data from a gamepad connected to a PC in the PSP, via USB, only half worked on firmware 6.60, i.e. data from the gamepad to the PSP reached, but the simulation of the control of the PSP controls did not work. I started looking for plugins that somehow work with the control on firmware 6.60. And found it. Another plugin is used to work with the PSP analog stick, and it works on the latest firmware. All PSP sources are compiled with this homebrew SDK.
Modification of the source code for PSP plugins. Hooks
For the basis of the plug-in project, which I will modify, I chose the one that already contained the working code of the USB client. But for the usual debugging and generally cozy atmosphere, I needed printf (). On the PSP. It was not in the selected plugin. But in the plug-in, from which I wanted to pull out the working code for intercepting PSP control events, it was executed by intercepting the function of drawing the next frame to the frame buffer and adding the debug lines I needed to the frame. The capture function itself (hook) of the rendering is implemented as follows:
#define GET_JUMP_TARGET_(x) (0x80000000 | (((x) & 0x03FFFFFF) << 2))
int (*g_setframebuf)(int unk, void* addr, int width, int psm, int sync);
int setframebuf_hook_func(int unk, void* addr, int width, int psm, int sync)
{
	if(g_info == 1)
	{
		dbgprint( debugmsg, addr, psm );
		if (!g_info) DEBUG_RESET()
	}
	return g_setframebuf(unk, addr, width, psm, sync);
}
int hook_function(unsigned int* jump, void* hook, unsigned int* result)
{
	unsigned int target;
	unsigned int func;
	int inst;
	target = GET_JUMP_TARGET_(*jump);
	while (((inst = _lw(target+4)) & ~0x03FFFFFF) != 0x0C000000)	// search next JAL instruction
		target += 4;
	if((inst & ~0x03FFFFFF) != 0x0C000000)
	{
		printf("invalid!\n");
		return 1;
	}
	*result = GET_JUMP_TARGET_(inst);
	func = (unsigned int) hook;
	func = (func & 0x0FFFFFFF) >> 2;
	_sw(0x0C000000 | func, target+4);
	return 0;
}
int module_start( SceSize args, void *argp )
{
	//...
	hook_function( (unsigned int*) sceDisplaySetFrameBuf, setframebuf_hook_func, (unsigned int*)&g_setframebuf );
	//...
}
After calling hook_function (), the PSP operating system, when calling its internal kernel function, sceDisplaySetFrameBuf () will actually call setframebuf_hook_func (). And to call the original sceDisplaySetFrameBuf () you now need to call g_setframebuf (). Anyone interested in the topic of hooks can be found in more detail here, for example .
Modification of the source code for PSP plugins. Control.
Next, I added working hooks to the modified project sceCtrlReadBufferPositive (), sceCtrlPeekBufferPositive (), sceCtrlReadBufferNegative (), and sceCtrlPeekBufferNegative (), taking them from the same JoySens. I just made sure that the input data inside them was the last data sent to the PSP about the status of the gamepad connected to the PC host. Here is an archive with all the necessary binaries and source codes. Before starting the PC part of the program, you need to install the USB driver. First you need to run the plugin on the PSP (you can find out how to run the plugin by googling in Yandex). Then restart the PSP and connect it to the PC. A PSP Type B device should be detected. Next, download the drivers. Install the drivers through the wizard (bin \ inf-wizard.exe), pointing to our PSP Type B device and telling us to install the driver at the end.
Preparing the minimum PSP version
Everything would be fine, but the network has source codes only for version 0.19 RemoteJoyLite. And it does not work correctly on some games (for example, K-On! Wildly slows down, and graphic artifacts appear in Dungeon Siege ). In version 0.20 this is said to have been fixed, but the source code for this version is not publicly available. Therefore, it was decided to modify the protocol of data transmitted via USB in order to transmit only a minimum of information about the state of the gamepad, as well as minimize the size of the source of the PSP part. All data transferred from the PSP to the PC was deleted from the protocol and only one structure was transferred from the PC to the PSP, as a result of which the brakes and artifacts disappeared into oblivion:
#define USBDATA_PATTERN 0x1234ABFE
struct
{
	unsigned int Pattern;
	unsigned int ButtonData;
	unsigned int AnalogX;
	unsigned int AnalogY;
} PSPUsbData;
The analog data from the stick in the PSP itself is presented as a single-byte unsigned integer for each axis (127 is the center), and 4 bytes in the protocol are allocated because of the desire not to even think about the problems of packing and alignment of structures, because in RemoteJoyLite itself, data is packed as follows:
struct HostFsCmd
{
	uint32_t magic;
	uint32_t command;
	uint32_t extralen;
} __attribute__((packed));
And in order not to even think about the corresponding problems (after all, RemoteJoyLite itself is compiled by MinGW GCC, and the next step is to create a project in Microsoft Visual Studio to work out a truncated protocol that does not know about __attribute __ ((packed))), I removed all alignments and packaging structures bringing them to a 32-bit representation. As a result, in thisThe archive contains source codes and binaries of the stripped-down project - both the PSP- and Windows-part. The Windows application is designed as a mfc project in C ++ for Microsoft Visual Studio 2010. For Windows programming, it will be useful to learn how the cursor keystrokes are handled (in mfc applications, it works only if it is in the window message filter of the entire application, and not in the dialog keystroke), and also due to what printf () works correctly on the form even from a separate stream. In the PSP part, it will be interesting to study the attached lightweight source, in which only USB, control and printf () are left. For example, USB data reception is asynchronous and implemented as follows. When connected to a USB host, after the correct procedure for obtaining the internal address on the USB bus (seeUSB description ) UsbAttach () is called, because this call was described in the driver structure registered during initialization:
#define RJLITE_DRIVERNAME "RJLiteDriver"
#define RJLITE_DRIVERPID  (0x1C9)
struct UsbDriver UsbDriver = {
	RJLITE_DRIVERNAME,
	4,
	UsbEndpoint,
	&UsbInterface,
	&UsbData[0].devdesc[0],
	&UsbData[0].config,
	&UsbData[1].devdesc[0],
	&UsbData[1].config,
	&StringDescriptor,
	UsbRequest,
	UsbUnknown,
	UsbAttach,
	UsbDetach,
	0,
	UsbStartFunc,
	UsbStopFunc,
	NULL
};
int module_start( SceSize args, void *argp )
{
	//...
	sceUsbbdRegister(&UsbDriver);
	if((sceUsbStart(PSP_USBBUS_DRIVERNAME, 0, 0) == 0) && (sceUsbStart(RJLITE_DRIVERNAME, 0, 0) == 0) && //...
	{
		//...
	}
	//...
}
Where module_start () is a function that is called in a separate thread when the plugin starts with pirated firmware. Also, when starting the driver, a flag variable of the int type (i.e. 32 flags) is created with access through the unique identifier of the object in the PSP operating system and the auxiliary stream is launched:
static SceUID UsbMainEventFlag = -1;
static int UsbStartFunc( int size, void *p )
{
	//...
	UsbMainEventFlag = sceKernelCreateEventFlag( "USBMainEvent", 0x200, 0, NULL );
	//...
	UsbMainThreadID = sceKernelCreateThread( "USBMainThread", UsbMainThread, 10, 0x10000, 0, NULL );
	//...
	sceKernelStartThread( UsbMainThreadID, 0, NULL );
	//...
}
So, and the called UsbAttach () sets the flag USB_EVENT_ATTACH in the flag variable of the UsbMainEventFlag object:
static int UsbAttach(int speed, void *arg2, void *arg3)
 {
	sceKernelSetEventFlag( UsbMainEventFlag, USB_EVENT_ATTACH);
	return 0;
}
At the same time, in the UsbMainThread () thread previously created when calling UsbStartFunc (), it says:
static int UsbMainThread(SceSize size, void *argp)
{
	int ret;
	u32 result;
	while(1)
	{
		ret = sceKernelWaitEventFlag(UsbMainEventFlag, USB_EVENT_ATTACH | USB_EVENT_ASYNC, PSP_EVENT_WAITOR | PSP_EVENT_WAITCLEAR, &result, NULL);
		if(ret < 0)
		{
			sceKernelExitDeleteThread(0);
		}
		if(result&USB_EVENT_ASYNC)
		{
			usb_async_events++;//nyashkoshkko: debug
			SetUsbAyncReq(&PSPUsbData, sizeof(PSPUsbData));
		}
		if(result&USB_EVENT_ATTACH)
		{
			usb_attach_events++;//nyashkoshkko: debug
			SetUsbAyncReq(&PSPUsbData, sizeof(PSPUsbData));
		}
	}
	return 0;
}
This means that the thread in an infinite loop waits for the USB_EVENT_ATTACH flag or USB_EVENT_ASYNC flag to be set in the flag variable of the UsbMainEventFlag object. Successful connection with the USB host caused the setting of the USB_EVENT_ATTACH flag, by which this thread performs an asynchronous request to receive a data packet via USB, while resetting the USB_EVENT_ASYNC flag:
static int SetUsbAyncReq( void *data, int size )
{
	//...
	UsbAsyncReq.data = data;
	UsbAsyncReq.size = size;
	UsbAsyncReq.func = UsbAsyncReqDone;
	sceKernelClearEventFlag( UsbMainEventFlag, ~USB_EVENT_ASYNC );
	return( sceUsbbdReqRecv( &UsbAsyncReq ) );
}
In this request, the callback sets up a call to the UsbAsyncReqDone () function:
static int UsbAsyncReqDone( struct UsbdDeviceReq *req, int arg2, int arg3 )
{
	sceKernelSetEventFlag( UsbMainEventFlag, USB_EVENT_ASYNC );
	return( 0 );
}
This function, as we see, upon completion of receiving the data packet from the USB host (processed by the PSP operating system kernel by interrupt from the PSP USB controller) sets the USB_EVENT_ASYNC flag in the UsbMainEventFlag object flag variable. On it, our endless loop sets up a new asynchronous data request. Such an event mechanism allows you not to waste CPU time wasting time on endlessly polling the data ready flag, because when you call sceKernelWaitEventFlag (), the time slots are not allocated to the thread until the necessary event occurs - this is ensured by the thread scheduler inside the PSP operating system, and indeed this The basic principle works in any multitasking operating system.
Writing a service for working with USB for Linux under Raspberry Pi
So, the PSP part is completed. Now is the time to develop an application, or rather a service that will start automatically when Raspberry Pi is turned on under Linux. In general, there are several adapted Linux distributions for the Raspberry Pi. But I settled on Fedora, because he draws his roots from Red Hat, with whom I had a trivial job to work with and got used to his package distribution RPM. Immediately after installing Fedora Remix 18 and, if necessary, setting up the network (in my case, I had to manually set the network address and gateway, because the DHCP server in the home network does not work correctly), which is done intuitively - by connecting the mouse and clicking on network connection icon in the upper right corner, an SSH server works directly from the box. But the SMB server could not be quickly configured (problems with smbpasswd), therefore, the source code was created and edited remotely via SSH through the midnight commander. The first thing I started with is connecting to the PSP. To do this, you needed to learn how to interact with USB in Linux. In this regard, there was a small unpleasant story, because of which, once again, the whole charm of Linux is crumbling before my eyes. The fact is that when you try to install the library and header for compilation through
> yum install libusb1-devel
the package manager had a fight and said that it is outdated, use libusbx. Ok team
> yum install libusbx-devel
downloaded the necessary files. But the fact is that libusbx on api calls is incompatible with libusb1, which is the same as the windows version of libusb, which, in turn, was used in the original RemoteJoyLite sources, and generally works fine under Windows. But okay. With usb sorted out, now let's move on to accessing the gamepad from under Linux. I have a wired Xbox 360 controller that feels great on Windows and, surprisingly, made money out of the box on Fedora Remix 18 on the Raspberry Pi, creating the device / dev / input / js0 . This worked out a regular xpad driver. There is an alternative xboxdrv driver - it is more flexible in configuration. But we have enough and full-time.
By the way, the android is exactly the same.
The xpad driver is part of the Linux kernel for the android:
And in the same way , the device / dev / input / js0 is created:
For example, consider how to get a list of input devices in android. The recommended api tells us to do this by calling getDeviceIds (), which says :
getInputDeviceIds () :
mIm.getInputDeviceIds () :
This is where the InputManager service comes in :
getId () brings us already to where we were (android is amazing):
In the native part of the android, an instance of InputDevice () is created here (thanks to the prompt response from the toaster ):
This function is called here :
The call to the notifyInputDevicesChanged () function is defined by the callback again in the already familiar InputManager service :
A call to the callback itself is initiated in the InputReader :
Also here we see that events from the input device are received by the EventHubInterface class:
And, in the end, in the implementation of this class EventHub.cpp, we are opening and working with the device from / dev / input, as in the usual Linux Fedora in Raspberry Pi:
In general, about this entire input system in android, it is briefly explained in the source code itself here :
#define DRIVER_DESC "X-Box pad driver"
And in the same way , the device / dev / input / js0 is created:
MODULE_SUPPORTED_DEVICE("input/js");
For example, consider how to get a list of input devices in android. The recommended api tells us to do this by calling getDeviceIds (), which says :
    /**
     * Gets the ids of all input devices in the system.
     * @return The input device ids.
     */
    public static int[] getDeviceIds() {
        return InputManager.getInstance().getInputDeviceIds();
    }
getInputDeviceIds () :
    private final IInputManager mIm;
    //...
    private SparseArray mInputDevices;
    //...
    /**
     * Gets the ids of all input devices in the system.
     * @return The input device ids.
     */
    public int[] getInputDeviceIds() {
        synchronized (mInputDevicesLock) {
            populateInputDevicesLocked();
            final int count = mInputDevices.size();
            final int[] ids = new int[count];
            for (int i = 0; i < count; i++) {
                ids[i] = mInputDevices.keyAt(i);
            }
            return ids;
        }
    }
    //...
    private void populateInputDevicesLocked() {
        if (mInputDevicesChangedListener == null) {
            final InputDevicesChangedListener listener = new InputDevicesChangedListener();
            try {
                mIm.registerInputDevicesChangedListener(listener);
            } catch (RemoteException ex) {
                throw new RuntimeException(
                        "Could not get register input device changed listener", ex);
            }
            mInputDevicesChangedListener = listener;
        }
        if (mInputDevices == null) {
            final int[] ids;
            try {
                ids = mIm.getInputDeviceIds();
            } catch (RemoteException ex) {
                throw new RuntimeException("Could not get input device ids.", ex);
            }
            mInputDevices = new SparseArray();
            for (int i = 0; i < ids.length; i++) {
                mInputDevices.put(ids[i], null);
            }
        }
    }
mIm.getInputDeviceIds () :
interface IInputManager {
    // Gets input device information.
    InputDevice getInputDevice(int deviceId);
    int[] getInputDeviceIds();
    //...
This is where the InputManager service comes in :
import android.view.InputDevice;
//...
/*
 * Wraps the C++ InputManager and provides its callbacks.
 */
public class InputManagerService extends IInputManager.Stub
        implements Watchdog.Monitor, DisplayManagerService.InputManagerFuncs {
    static final String TAG = "InputManager";
    static final boolean DEBUG = false;
    private static final String EXCLUDED_DEVICES_PATH = "etc/excluded-input-devices.xml";
    //...
    private InputDevice[] mInputDevices = new InputDevice[0];
    //...
    /**
     * Gets the ids of all input devices in the system.
     * @return The input device ids.
     */
    @Override // Binder call
    public int[] getInputDeviceIds() {
        synchronized (mInputDevicesLock) {
            final int count = mInputDevices.length;
            int[] ids = new int[count];
            for (int i = 0; i < count; i++) {
                ids[i] = mInputDevices[i].getId();
            }
            return ids;
        }
    }
getId () brings us already to where we were (android is amazing):
public final class InputDevice implements Parcelable {
    private final int mId;
    //...
    /**
     * Gets the input device id.
     *
     * Each input device receives a unique id when it is first configured
     * by the system.  The input device id may change when the system is restarted or if the
     * input device is disconnected, reconnected or reconfigured at any time.
     * If you require a stable identifier for a device that persists across
     * boots and reconfigurations, use {@link #getDescriptor()}.
     *
     *
     * @return The input device id.
     */
    public int getId() {
        return mId;
    }
    //...
    // Called by native code.
    private InputDevice(int id, int generation, int controllerNumber, String name, int vendorId,
            int productId, String descriptor, boolean isExternal, int sources, int keyboardType,
            KeyCharacterMap keyCharacterMap, boolean hasVibrator, boolean hasButtonUnderPad) {
        mId = id;
        mGeneration = generation;
        mControllerNumber = controllerNumber;
        mName = name;
        mVendorId = vendorId;
        mProductId = productId;
        mDescriptor = descriptor;
        mIsExternal = isExternal;
        mSources = sources;
        mKeyboardType = keyboardType;
        mKeyCharacterMap = keyCharacterMap;
        mHasVibrator = hasVibrator;
        mHasButtonUnderPad = hasButtonUnderPad;
    }
    private InputDevice(Parcel in) {
        mId = in.readInt();
        mGeneration = in.readInt();
        mControllerNumber = in.readInt();
        mName = in.readString();
        mVendorId = in.readInt();
        mProductId = in.readInt();
        mDescriptor = in.readString();
        mIsExternal = in.readInt() != 0;
        mSources = in.readInt();
        mKeyboardType = in.readInt();
        mKeyCharacterMap = KeyCharacterMap.CREATOR.createFromParcel(in);
        mHasVibrator = in.readInt() != 0;
        mHasButtonUnderPad = in.readInt() != 0;
        for (;;) {
            int axis = in.readInt();
            if (axis < 0) {
                break;
            }
            addMotionRange(axis, in.readInt(), in.readFloat(), in.readFloat(), in.readFloat(),
                    in.readFloat(), in.readFloat());
        }
    }
In the native part of the android, an instance of InputDevice () is created here (thanks to the prompt response from the toaster ):
jobject android_view_InputDevice_create(JNIEnv* env, const InputDeviceInfo& deviceInfo) {
    //...
    ScopedLocalRef inputDeviceObj(env, env->NewObject(gInputDeviceClassInfo.clazz,
                gInputDeviceClassInfo.ctor, deviceInfo.getId(), deviceInfo.getGeneration(),
                deviceInfo.getControllerNumber(), nameObj.get(),
                static_cast(ident.vendor), static_cast(ident.product),
                descriptorObj.get(), deviceInfo.isExternal(), deviceInfo.getSources(),
                deviceInfo.getKeyboardType(), kcmObj.get(), deviceInfo.hasVibrator(),
                deviceInfo.hasButtonUnderPad()));
This function is called here :
void NativeInputManager::notifyInputDevicesChanged(const Vector& inputDevices) {
    JNIEnv* env = jniEnv();
    //...
            jobject inputDeviceObj = android_view_InputDevice_create(env, inputDevices.itemAt(i));
The call to the notifyInputDevicesChanged () function is defined by the callback again in the already familiar InputManager service :
    // Native callback.
    private void notifyInputDevicesChanged(InputDevice[] inputDevices) {
        synchronized (mInputDevicesLock) {
            if (!mInputDevicesChangedPending) {
                mInputDevicesChangedPending = true;
                mHandler.obtainMessage(MSG_DELIVER_INPUT_DEVICES_CHANGED,
                        mInputDevices).sendToTarget();
            }
            mInputDevices = inputDevices;
        }
    }
A call to the callback itself is initiated in the InputReader :
void InputReader::loopOnce() {
    //...
    size_t count = mEventHub->getEvents(timeoutMillis, mEventBuffer, EVENT_BUFFER_SIZE);
    //...
    // Send out a message that the describes the changed input devices.
    if (inputDevicesChanged) {
        mPolicy->notifyInputDevicesChanged(inputDevices);
    }
Also here we see that events from the input device are received by the EventHubInterface class:
sp mEventHub;
And, in the end, in the implementation of this class EventHub.cpp, we are opening and working with the device from / dev / input, as in the usual Linux Fedora in Raspberry Pi:
    static const char *DEVICE_PATH = "/dev/input";
    //...
    char devname[PATH_MAX];
    char *filename;
    //...
    strcpy(devname, DEVICE_PATH);
    filename = devname + strlen(devname);
    *filename++ = '/';
    //...
    strcpy(filename, event->name);
    //...
    openDeviceLocked(devname);
    //...
status_t EventHub::openDeviceLocked(const char *devicePath) {
    char buffer[80];
    ALOGV("Opening device: %s", devicePath);
    int fd = open(devicePath, O_RDWR | O_CLOEXEC);
    if(fd < 0) {
        ALOGE("could not open %s, %s\n", devicePath, strerror(errno));
        return -1;
    }
In general, about this entire input system in android, it is briefly explained in the source code itself here :
/*
 * The input manager is the core of the system event processing.
 *
 * The input manager uses two threads.
 *
 * 1. The InputReaderThread (called "InputReader") reads and preprocesses raw input events,
 *    applies policy, and posts messages to a queue managed by the DispatcherThread.
 * 2. The InputDispatcherThread (called "InputDispatcher") thread waits for new events on the
 *    queue and asynchronously dispatches them to applications.
 *
 * By design, the InputReaderThread class and InputDispatcherThread class do not share any
 * internal state.  Moreover, all communication is done one way from the InputReaderThread
 * into the InputDispatcherThread and never the reverse.  Both classes may interact with the
 * InputDispatchPolicy, however.
 *
 * The InputManager class never makes any calls into Java itself.  Instead, the
 * InputDispatchPolicy is responsible for performing all external interactions with the
 * system, including calling DVM services.
 */
class InputManagerInterface : public virtual RefBase {
So, the final source code of the service has the following form:
#include
#include
#include
#include
#include
#include
#include
#include
#define SONY_VENDOR_ID	 0x054C
#define PSP_B_PRODUCT_ID 0x01C9
#define UP			0x00000010
#define DOWN			0x00000040
#define LEFT			0x00000080
#define RIGHT			0x00000020
#define B_X			0x00004000
#define B_O			0x00002000
#define B_KVADRAT	0x00008000
#define B_TREUGOLNIK	0x00001000
#define B_L			0x00000100
#define B_R			0x00000200
#define B_SELECT	0x00000001
#define B_START			0x00000008
#define B_NOTE			0x00800000
struct
{
    unsigned int Pattern;
    unsigned int Btn;
    unsigned int X;
    unsigned int Y;
} PS = {0x1234ABFE, 0, 127, 127};
struct js_event
{
    unsigned int time;
    short value;
    unsigned char type;
    unsigned char number;
};
int is_usbdevblock(libusb_device *dev)
{
	struct libusb_device_descriptor desc;
	int r = libusb_get_device_descriptor(dev, &desc);
	if((desc.idVendor == SONY_VENDOR_ID) && (desc.idProduct == PSP_B_PRODUCT_ID))
	{
		return 1;
	}
	return 0;
}
int main(int argc, char** argv)
{
	unsigned int real_x = 0, real_y = 0;
	int x, y;
	int fd = 0;
	while(1)
	{
		libusb_device **list;
		libusb_device *found = NULL;
		libusb_context *ctx = NULL;
		int attached = 0;
		libusb_init(&ctx);
		libusb_set_debug(ctx, 3);
		ssize_t cnt = libusb_get_device_list(ctx, &list);
		ssize_t i = 0;
		int err = 0;
		if(cnt < 0)
		{
			return -1;
		}
		for(i = 0; i < cnt; i++)
		{
			libusb_device *device = list[i];
			if(is_usbdevblock(device))
			{
				found = device;
				break;
			}
		}
		if(found)
		{
			libusb_device_handle *handle;
			err = libusb_open(found, &handle);
			if (err)
			{
				return -1;
			}
			if (libusb_kernel_driver_active(handle, 0))
			{
				libusb_detach_kernel_driver(handle, 0);
				attached = 1;
			}
			err = libusb_claim_interface(handle, 0);
			if (err)
			{
				return -1;
			}
			if(fd == 0)
			{
				fd = open("/dev/input/js0", O_RDONLY);
			}
			if(fd < 0)
			{
				goto clean;
			}
			int nEndpoint = 0x01;
			int nTimeout = 500; //in milliseconds
			int BytesWritten = 0;
			int ret;
			struct js_event e;
			int t;
			while(1)
			{
				read(fd, &e, sizeof(struct js_event));
				e.type &= ~0x80;
				t = 0; //transfer = 0;
				if(e.type == 1)
				{
					if(e.value == 1)
					{
						if(e.number == 0) {PS.Btn |= B_X; t = 1;}
						if(e.number == 1) {PS.Btn |= B_O; t = 1;}
						if(e.number == 2) {PS.Btn |= B_KVADRAT; t = 1;}
						if(e.number == 3) {PS.Btn |= B_TREUGOLNIK; t = 1;}
						if(e.number == 4) {PS.Btn |= B_L; t = 1;}
						if(e.number == 5) {PS.Btn |= B_R; t = 1;}
						if(e.number == 6) {PS.Btn |= B_SELECT; t = 1;}
						if(e.number == 7) {PS.Btn |= B_START; t = 1;}
						if(e.number == 8) {PS.Btn |= B_NOTE; t = 1;}//XBOX_HOME
						//if(e.number == 9) PS.Btn |= ;//L_STICK_PRESS
						//if(e.number == 10)PS.Btn |= ;//R_STICK_PRESS
					}
					if(e.value == 0)
					{
						if(e.number == 0) {PS.Btn &= ~B_X; t = 1;}
						if(e.number == 1) {PS.Btn &= ~B_O; t = 1;}
						if(e.number == 2) {PS.Btn &= ~B_KVADRAT; t = 1;}
						if(e.number == 3) {PS.Btn &= ~B_TREUGOLNIK; t = 1;}
						if(e.number == 4) {PS.Btn &= ~B_L; t = 1;}
						if(e.number == 5) {PS.Btn &= ~B_R; t = 1;}
						if(e.number == 6) {PS.Btn &= ~B_SELECT; t = 1;}
						if(e.number == 7) {PS.Btn &= ~B_START; t = 1;}
						if(e.number == 8) {PS.Btn &= ~B_NOTE; t = 1;}
					}
				}
				if(e.type == 2)
				{
					if(e.number == 6)
					{
						if(e.value == -32767) {PS.Btn |= LEFT; t = 1;}
						if(e.value ==  32767) {PS.Btn |= RIGHT; t = 1;}
						if(e.value ==	0) {PS.Btn &= ~(LEFT | RIGHT); t = 1;}
					}
					if(e.number == 7)
					{
						if(e.value == -32767) {PS.Btn |= UP; t = 1;}
						if(e.value ==  32767) {PS.Btn |= DOWN; t = 1;}
						if(e.value ==	0) {PS.Btn &= ~(UP | DOWN); t = 1;}
					}
					if(e.number == 0)
					{
						if(real_x != ((e.value + 32767) / 256)) {real_x = ((e.value + 32767) / 256); t = 1;}
					}
					if(e.number == 1)
					{
						if(real_y != ((e.value + 32767) / 256)) {real_y = ((e.value + 32767) / 256); t = 1;}
					}
				}
				if(t == 1)
				{
					#define KOEF 1.4
					//[-128..0..127]
					x = real_x - 128;
					y = real_y - 128;
					x = x * (1. + ((abs(x) * (KOEF-1.))/(127./KOEF))); if(x > 127) x = 127; if(x < -128) x = -128;
					y = y * (1. + ((abs(y) * (KOEF-1.))/(127./KOEF))); if(y > 127) y = 127; if(y < -128) y = -128;
					PS.X = 128 + x;
					PS.Y = 128 + y;
					ret = libusb_bulk_transfer(handle, nEndpoint, (unsigned char *)&PS, sizeof(PS), &BytesWritten, nTimeout);
					if(ret < 0)
					{
						break;
					}
				}
			}
			clean:
			if(fd)
			{
				close(fd);
				fd = 0;
			}
			if(attached == 1)
			{
				libusb_attach_kernel_driver(handle, 0);
			}
			libusb_close(handle);
		}
		libusb_free_device_list(list, 1);
		libusb_exit(ctx);
		sleep(1);
	}
	return 0;
}
Here is a link to the service binary. And here is the contents of the m.sh compilation script:
gcc xbox2psp.c -o xbox2psp.o -I/usr/local -L/usr/local -lusb-1.0
According to the source itself, I would like to note two points. First, the Xbox analog sticks have an accuracy of 16 bits, while the PSP stick has an accuracy of 8 bits. In this regard, I send the package to change the axis values reduced to 8 bits, and not to change the source data from the Xbox controller. Secondly, in PSP, the value of the diagonals corresponds to the full scale (i.e., the round PSP stick in terms of the scale is a square), and in the Xbox, as it should be, half of the scale:

Therefore, a linearly increasing (the greater the deviation from the center axis of the Xbox controller, the larger) coefficient was introduced with a maximum of 1.4 (although, as it turned out later, it would be correct to determine the angle value, and the closer the angle to the diagonal, the greater the coefficient). With these values, the Xbox gamepad is felt without any discomfort, although purely technically the sensitivity turned out to be rude. In Doom 0.05 it’s convenient to control, in Dungeon Siege all three movement speeds (depending on the stick deflection force) work and feel like on the PSP itself. Because, when confronted with a problem, at the beginning a simple coefficient was tested (both 1.5 and 1.4), without a linear increase depending on the deviation, and in these games there was a sharp discomfort - it was impossible to play.
Adding your own service to startup at Fedora Remix 18 for Raspberry Pi
Superficial googling about adding a program to autoload on Linux gives mainly recommendations on modifying the init rc script. But in our case, we need to do differently.
1. First you need to copy our service xbox2psp.o to / usr / local / bin and set the launch rights for it (all three bits).
2. Then create the file /lib/systemd/system/xbox2psp.service with the following contents:
[Unit]
Description=xbox2psp
After=syslog.target network.target
[Service]
Type=simple
ExecStart=/usr/local/bin/xbox2psp.o
[Install]
WantedBy=multi-user.target
3. Go to the / etc / systemd / system / folder and create a link with the command
> ln -s /lib/systemd/system/xbox2psp.service xbox2psp.service
4. Reload the startup daemon configuration:
> systemctl daemon-reload
5. Activate autostart of a new service
> systemctl enable xbox2psp.service
6. If necessary, you can immediately start the service with the command
> systemctl start xbox2psp.service
As a result, we got a convenient opportunity to control the PSP using the Xbox 360 controller. If desired, this project can be modified to connect, for example, Dualshock 3 via Bluetooth.