The basics of creating a 2D character in Godot. Part 2: compiling templates, a little about GDScript, movement and animation of the hero
- Tutorial
In a previous article, we covered the basics of creating a new project in Godot . And with this superficial knowledge, you can only look at the demo versions of games.
In the second part on the agenda we have:
1) Export of the finished project to binary files for the selected architecture.
2) New animations. Character options.
3) Management.
3) GDScript. Welcome to real coding!
4) Import simple tilesets.
5) Bonus: analysis of the device of the simplest backdrops.
Well, as usual, a lot of pictures!
In the last article, I mentioned that the authors did not provide binaries for linux x86. At the time of writing, the binaries were still not ready. But I already wanted to export finished projects, demo or just tests. But what if there are no Export Templates? Correctly! Compile them yourself!
Go to the directory with the source files and compile
Debugging Tools:
After successful compilation, rename the freshly received file to linux_x11_32_debug
The export template itself:
Rename it to linux_x11_32_release.
Pack it in a zip archive.
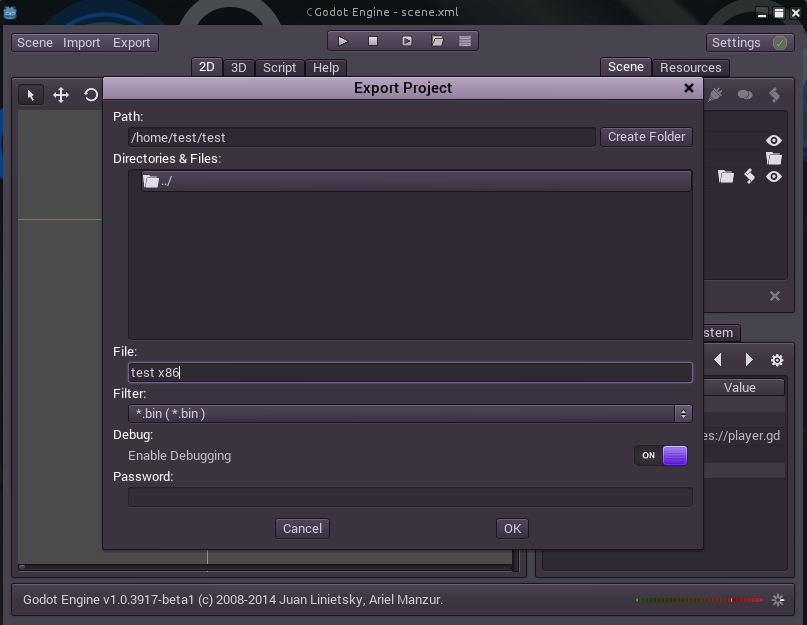
We feed Godot archive. Voila, now you can export a project for GNU / Linux OS of any capacity.
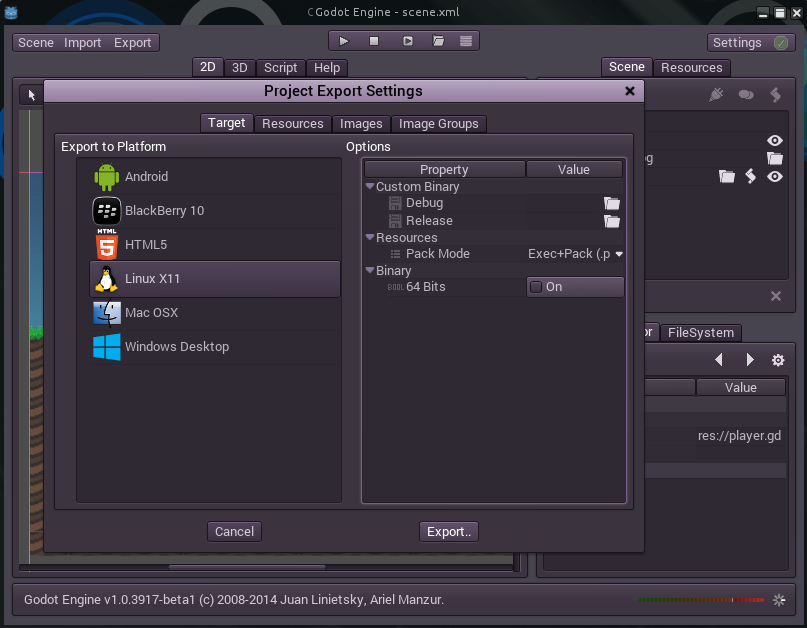
Yes, even under the OS and bit depths other than yours. I could get binaries for Windows into wine without problems, the main thing is not to forget to uncheck or check 64bits, and turn off debugging if you do not need it.
You can read more about export settings on the project website in English. If it is relevant and in demand, it will be possible to think about the Russian localization of articles and the creation of a Russian-language wiki by Godot.
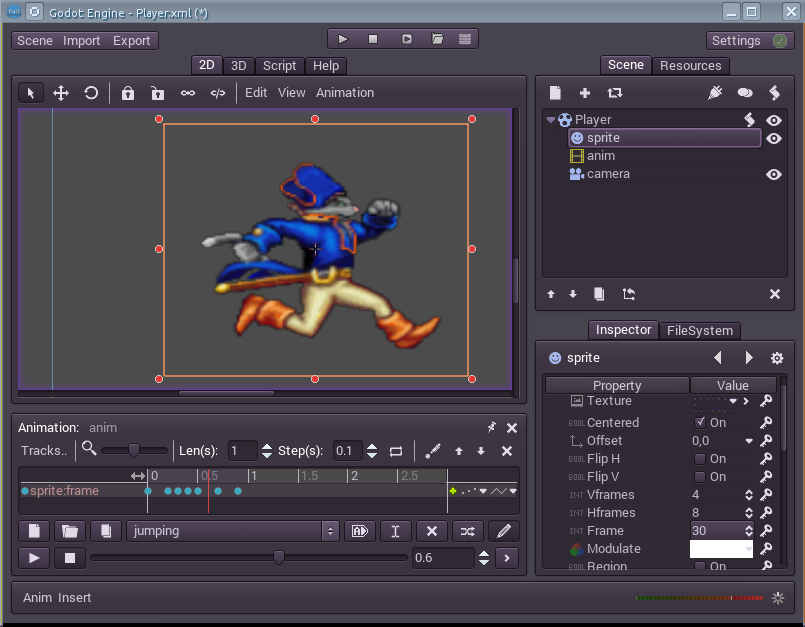
In the last lesson, I prepared a texture in advance with the sprites of our Captain's run and jump. Therefore, I think creating two animations jumping and run is not difficult. I think it will not be difficult to do. I will only say the parameters:
Yes, a jump is just a jump. So you need more fall animation.
Three points:
1) I remind you. Check if there is a checkmark on the Camera2D / Current parameter, which is responsible for binding the camera object to the player object.
2) Add Node CollisionShape2D. This "Noda" is responsible for the position of our Captain in 2D space.

In Inspector, select CollisionShape2D -> Shape -> New RayShape2D. At 2 millimeters to the right a small arrow will appear - click on it - the RayShape2D parameters will open.
We’ll leave the parameter RayShape2D / Lenght 20, but Custom Solver Bias set 0.5 (this will allow a slight shift)
Now in the game itself in the future, if the character “doesn’t get kicked on the floor”, his position can be adjusted with this arrow. It is she who checks whether the sprite is touching the floor.
3) With geometry more fun. First you need to add Node CollisionPolygon2D. Now we need to draw this same polygon, which gives the character "mass." That is, we need to draw what the hero will "beat against the walls" in a collision with them. Otherwise, it will simply pass through the walls.
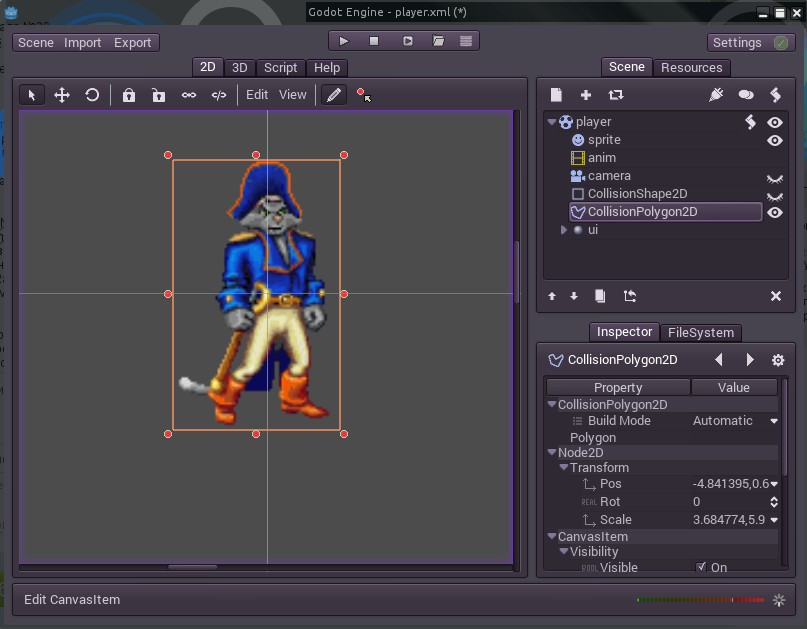
Choose a pencil. Now left-click “set” 3 vertices of the triangle. Two on each of the shoulders, and one in the abdomen. And right-click (just click on the work area) draw a triangle. It is desirable that in the end it turns out to be isosceles or equilateral. With the bottom vertex on the y axis. Now increase it. Little. Otherwise, the character will go through the ceiling for example.

Done, our character is a blockhead ready. Now the easiest thing is management.
Here I am a little stupid. The fact is that of me, a programmer is honestly not very honest. I don’t understand much myself. And I read books on Python to better understand the issue. Because GDScript is very similar to it.
A small request - if you know how to arrange it better - please write. I will be glad to take into account all the comments.
Let me remind you of the previous code for displaying the simplest animation:
Add and change the code:
We start the integrate_forces function. Here's what Help says:
Change the function to use your physics interactions. Well, that’s what we’ll do.
PS I do not know how to comment on the code further. So just leave it like this:
Damn, it was horror.
PS in order for gravity to work, you need to check the box Scene -> Project Settings -> Physics2D -> Default Gravity
I don’t have time to tell in detail about tileset. I can only offer my finished scene (from my project) or you can create your own from TileSet. You can download the set from the link below, and then add it to the Node TileMap project. In the settings, you need to add the finished TileSet to it (TileSet -> Load -> tileset.xml). You can draw the simplest floor / ground. How to draw levels, TileSets I will describe in detail in the next lesson.
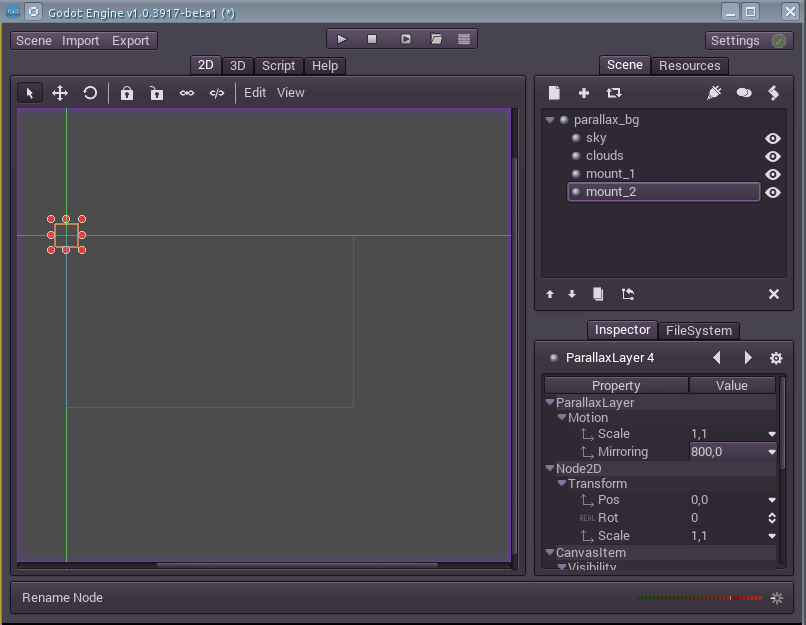
Create a new scene. Add a “Node” ParallaxBackground to it. Call it parallax_bg and save it as parallax_bg.xml.
We create 4 pieces of ParallaxLayer for it. Call them sky, clouds, mount_1, mount_2. Accordingly, the sky, clouds, and mountains.
The resolution of our game is 800x600 (Look in the Scene -> Project Settings -> Display settings). Therefore, we set each “Node” the Mirroring parameter 800.0 — mirroring along the Y axis. Change the Scale parameters of the “Node” clouds, mount_1, mount_2 to 0.1.1; 0.2.1 and 0.4.1, respectively.
Add a sky sprite to Node sky. I already drew my own in advance. And you can download everything from the links below.
At once, 2 strips appeared on the working area. Transfer to the working area of the image, scale. We see that changing the main sprite also changes its mirror image.
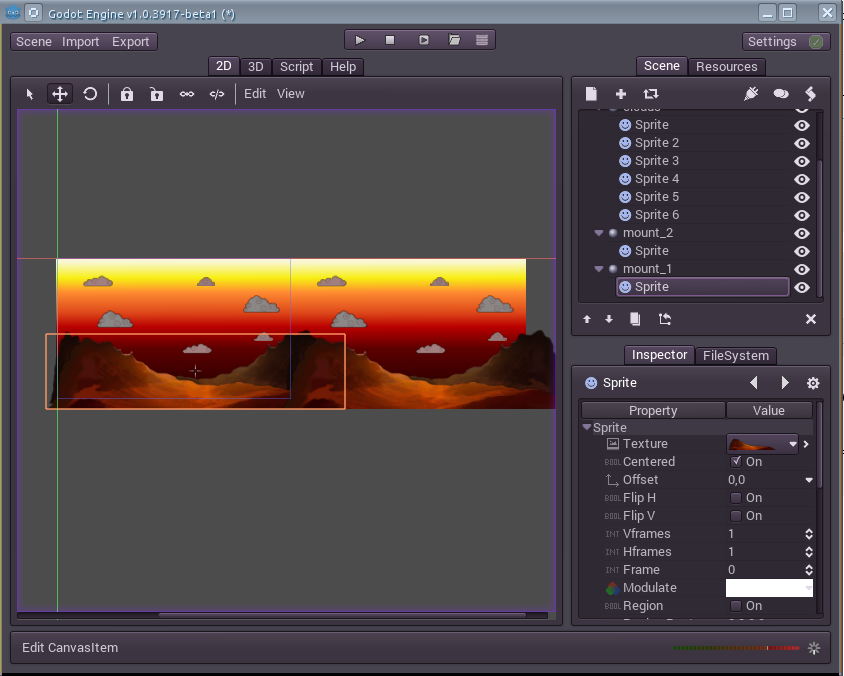
Add clouds to Node clouds. I think it will be possible to duplicate each of the 3 so that in the end there will be 6, the mirror will duplicate again, in total we will have 12 clouds!
Now we add mountains to Node mount_1 and mount_2. But let's raise the mount_2 layer above mount_1.
Save the scene. Open stage.xml. And to our Stage we add through the "plus sign" a scene with backdrops.
And as usual, a small video of the gameplay:
A small FAQ (Will be updated):
Download:
Thank you for mastering and reading to the end. In case of shortcomings write to the PM. Thanks, see you soon!
In the second part on the agenda we have:
1) Export of the finished project to binary files for the selected architecture.
2) New animations. Character options.
3) Management.
3) GDScript. Welcome to real coding!
4) Import simple tilesets.
5) Bonus: analysis of the device of the simplest backdrops.
Well, as usual, a lot of pictures!
Compilation....?
In the last article, I mentioned that the authors did not provide binaries for linux x86. At the time of writing, the binaries were still not ready. But I already wanted to export finished projects, demo or just tests. But what if there are no Export Templates? Correctly! Compile them yourself!
Go to the directory with the source files and compile
cd ./godotDebugging Tools:
scons bin/godot target=release_debug tools=noAfter successful compilation, rename the freshly received file to linux_x11_32_debug
The export template itself:
scons bin/godot_rel target=release tools=noRename it to linux_x11_32_release.
Pack it in a zip archive.
find ./* -name "linux_x11_32_*" -exec zip ./linux_x11_32_templates.zip "{}" +We feed Godot archive. Voila, now you can export a project for GNU / Linux OS of any capacity.
Yes, even under the OS and bit depths other than yours. I could get binaries for Windows into wine without problems, the main thing is not to forget to uncheck or check 64bits, and turn off debugging if you do not need it.
You can read more about export settings on the project website in English. If it is relevant and in demand, it will be possible to think about the Russian localization of articles and the creation of a Russian-language wiki by Godot.
Running and jumping animation
In the last lesson, I prepared a texture in advance with the sprites of our Captain's run and jump. Therefore, I think creating two animations jumping and run is not difficult. I think it will not be difficult to do. I will only say the parameters:
run:
Len(s): 0.9
Step(s): 0.1
Looping: yes
jumping:
Len(s): 1
Step(s): 0.1
Animation: ○х○○○○х○х○х , где кружки - последовательность кадров от 24 до 30, а крестики - их отсутствие.
Looping: no
Yes, a jump is just a jump. So you need more fall animation.
falling:
Len(s): 0.1
Step(s): 0.1
Animation: кадр №30
Looping: yes
Character Options
Three points:
- Camera
- Touching the ground
- Character geometry
1) I remind you. Check if there is a checkmark on the Camera2D / Current parameter, which is responsible for binding the camera object to the player object.
2) Add Node CollisionShape2D. This "Noda" is responsible for the position of our Captain in 2D space.
In Inspector, select CollisionShape2D -> Shape -> New RayShape2D. At 2 millimeters to the right a small arrow will appear - click on it - the RayShape2D parameters will open.
We’ll leave the parameter RayShape2D / Lenght 20, but Custom Solver Bias set 0.5 (this will allow a slight shift)
Now in the game itself in the future, if the character “doesn’t get kicked on the floor”, his position can be adjusted with this arrow. It is she who checks whether the sprite is touching the floor.
3) With geometry more fun. First you need to add Node CollisionPolygon2D. Now we need to draw this same polygon, which gives the character "mass." That is, we need to draw what the hero will "beat against the walls" in a collision with them. Otherwise, it will simply pass through the walls.
Choose a pencil. Now left-click “set” 3 vertices of the triangle. Two on each of the shoulders, and one in the abdomen. And right-click (just click on the work area) draw a triangle. It is desirable that in the end it turns out to be isosceles or equilateral. With the bottom vertex on the y axis. Now increase it. Little. Otherwise, the character will go through the ceiling for example.
Done, our character is a blockhead ready. Now the easiest thing is management.
Creating Control Keys
- Standard management.
Creating this is pretty easy. Go to Scene -> Project Settings -> Input Map.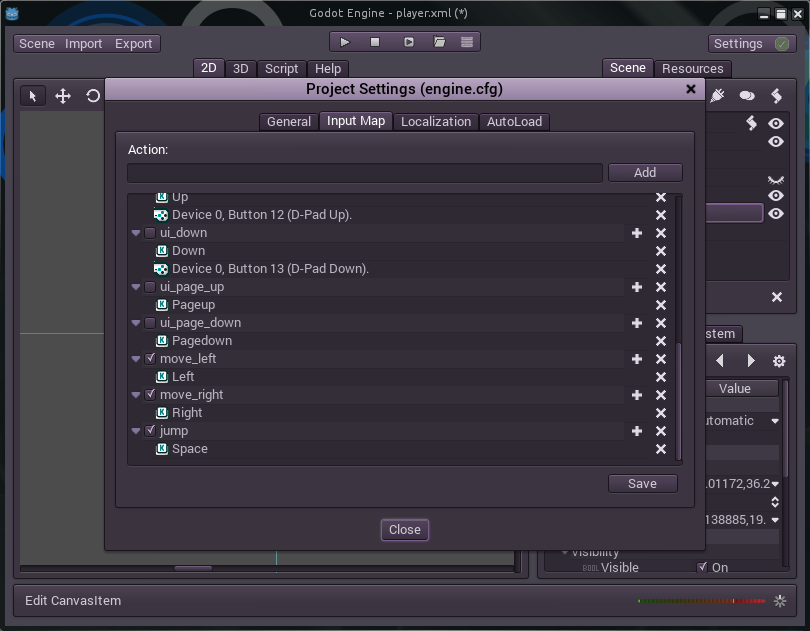
Create 3 control keys - move_left, move_right and jump. Assign them keys. Done!
As you can see, Godot can work with gamepads, though for everyone it will be necessary to set up its own control. But about this some other time. - Management with a touchscreen.
There is also nothing particularly complicated. Bind to our hero Node CanvasLayer with the name "ui". And to her, in turn - 3 copies of TouchScreenButton. Call them left, right and jump.
We attach a key image to each. They will immediately appear in the workspace of the program. We arrange it as it seems to us to be more convenient. Do not forget that the blue window is the “camera display area”.
In the Action sections, enter the parameters move_left, move_right and jump, respectively. Well, we set the Visibility Mode parameter in TouchScreen Only. Done!
Gdscript
Here I am a little stupid. The fact is that of me, a programmer is honestly not very honest. I don’t understand much myself. And I read books on Python to better understand the issue. Because GDScript is very similar to it.
Attention!
- The engine does not understand the Cyrillic alphabet. But if you accidentally write something on it, he just does not display it. It just marks the entire line with it as one big mistake.
- Indentation is very important. The indentation is not there - and the hero may fall to the floor, the wrong functions may be performed.
- Once again, I’m a noob in programming, but I’ll try to explain everything as simple as possible.
A small request - if you know how to arrange it better - please write. I will be glad to take into account all the comments.
Let me remind you of the previous code for displaying the simplest animation:
What happened
extends RigidBody2D
var anim=""
func _integrate_forces(s):
    var new_anim=anim
    new_anim=«idle»
    if (new_anim!=anim):
        anim=new_anim
        get_node(«anim»).play(anim)
Add and change the code:
Declare Variables
extends RigidBody2D
var anim=""    #переменная анимации
var siding_left=false    #переменная перемещения влево
var jumping=false    #переменная прыжка
var stopping_jump=false    #переменная завершения прыжка
var WALK_ACCEL = 800.0    #скорость перемещения по горизонтали
var WALK_DEACCEL= 800.0    #скорость торможения
var WALK_MAX_VELOCITY= 800.0    #максимальная скорость
var GRAVITY = 900.0    #гравитация
var AIR_ACCEL = 200.0    #скорость перемещения по горизонтали в прыжке
var AIR_DEACCEL= 200.0    #торможение прыжка (перемещения в обратном направлении) в прыжке. Значение, близкое к нулю будет делать игру похожую на Mario Bros'
var JUMP_VELOCITY=460    #скорость прыжка
var STOP_JUMP_FORCE=900.0    #сила торможения прыжка
var MAX_FLOOR_AIRBORNE_TIME = 0.15    #Время касания, после которого уже прыгнуть нельзя. То-есть время, в течении которого можно сделать второй прыжок. Не меняйте, если не хотите "двойных" или бесконечных прыжков.
var airborne_time=1e20  #время в воздухе
var floor_h_velocity=0.0
We start the integrate_forces function. Here's what Help says:
Change the function to use your physics interactions. Well, that’s what we’ll do.
PS I do not know how to comment on the code further. So just leave it like this:
We write the interaction function
func _integrate_forces(s):
	var lv = s.get_linear_velocity()
	var step = s.get_step()
	var new_anim=anim
	var new_siding_left=siding_left
We get control
	var move_left = Input.is_action_pressed("move_left")
	var move_right = Input.is_action_pressed("move_right")
	var jump = Input.is_action_pressed("jump")
#Замедление по оси x (торможение)
	lv.x-=floor_h_velocity
	floor_h_velocity=0.0
Earth search (check the texture contact with the floor)
	var found_floor=false
	var floor_index=-1
	for x in range(s.get_contact_count()):
		var ci = s.get_contact_local_normal(x)
		if (ci.dot(Vector2(0,-1))>0.6):
			found_floor=true
			floor_index=x
	if (found_floor):
		airborne_time=0.0
	else:
		airborne_time+=step #время, проведенное в воздухе
	var on_floor = airborne_time < MAX_FLOOR_AIRBORNE_TIME
Jump process
	if (jumping):
		if (lv.y>0):
#Завершаем прыжок если он закончен (достигли наивысшей точки прыжка)
			jumping=false
		elif (not jump):
			stopping_jump=true
		if (stopping_jump):
			lv.y+=STOP_JUMP_FORCE*step
Character movement on earth
	if (on_floor):
		if (move_left and not move_right):
			if (lv.x > -WALK_MAX_VELOCITY):
				lv.x-=WALK_ACCEL*step
		elif (move_right and not move_left):
			if (lv.x < WALK_MAX_VELOCITY):
				lv.x+=WALK_ACCEL*step
		else:
			var xv = abs(lv.x)
			xv-=WALK_DEACCEL*step
			if (xv<0):
				xv=0
			lv.x=sign(lv.x)*xv
		#Проверка прыжка
		if (not jumping and jump):
			lv.y=-JUMP_VELOCITY
			jumping=true
			stopping_jump=false
		#Проверка перемещения и смена анимации
		if (lv.x < 0 and move_left):
			new_siding_left=true
		elif (lv.x > 0 and move_right):
			new_siding_left=false
		if (jumping):
			new_anim="jumping"
		elif (abs(lv.x)<0.1):
			new_anim="idle"
		else:
			new_anim="run"
Character movement in the air
	else:
		if (move_left and not move_right):
			if (lv.x > -WALK_MAX_VELOCITY):
				lv.x-=AIR_ACCEL*step
		elif (move_right and not move_left):
			if (lv.x < WALK_MAX_VELOCITY):
				lv.x+=AIR_ACCEL*step
		else:
			var xv = abs(lv.x)
			xv-=AIR_DEACCEL*step
			if (xv<0):
				xv=0
			lv.x=sign(lv.x)*xv
		if (lv.y<0):
			new_anim="jumping"
		else:
			new_anim="falling"
Character movement
	if (new_siding_left!=siding_left):
		if (new_siding_left):
			get_node("sprite").set_scale( Vector2(-1,1) )
		else:
			get_node("sprite").set_scale( Vector2(1,1) )
		siding_left=new_siding_left
Change animation
	if (new_anim!=anim):
		anim=new_anim
		get_node("anim").play(anim)
Apply ground speed
	if (found_floor):
		floor_h_velocity=s.get_contact_collider_velocity_at_pos(floor_index).x
		lv.x+=floor_h_velocity
Applying gravity to all this mess
	lv+=s.get_total_gravity()*step
	s.set_linear_velocity(lv)
Damn, it was horror.
Now all together without comment:
extends RigidBody2D
var anim=""
var siding_left=false
var jumping=false
var stopping_jump=false
var WALK_ACCEL = 300.0
var WALK_DEACCEL= 300.0
var WALK_MAX_VELOCITY= 400.0
var GRAVITY = 900.0
var AIR_ACCEL = 300.0
var AIR_DEACCEL= 300.0
var JUMP_VELOCITY=460
var STOP_JUMP_FORCE=200.0
var MAX_FLOOR_AIRBORNE_TIME = 0.15
var airborne_time=1e20
var floor_h_velocity=0.0
func _integrate_forces(s):
	var lv = s.get_linear_velocity()
	var step = s.get_step()
	var new_anim=anim
	var new_siding_left=siding_left
	var move_left = Input.is_action_pressed("move_left")
	var move_right = Input.is_action_pressed("move_right")
	var jump = Input.is_action_pressed("jump")
	lv.x-=floor_h_velocity
	floor_h_velocity=0.0
	var found_floor=false
	var floor_index=-1
	for x in range(s.get_contact_count()):
		var ci = s.get_contact_local_normal(x)
		if (ci.dot(Vector2(0,-1))>0.6):
			found_floor=true
			floor_index=x
	if (found_floor):
		airborne_time=0.0
	else:
		airborne_time+=step
	var on_floor = airborne_time < MAX_FLOOR_AIRBORNE_TIME
	if (jumping):
		if (lv.y>0):
			jumping=false
		elif (not jump):
			stopping_jump=true
		if (stopping_jump):
			lv.y+=STOP_JUMP_FORCE*step
	if (on_floor):
		if (move_left and not move_right):
			if (lv.x > -WALK_MAX_VELOCITY):
				lv.x-=WALK_ACCEL*step
		elif (move_right and not move_left):
			if (lv.x < WALK_MAX_VELOCITY):
				lv.x+=WALK_ACCEL*step
		else:
			var xv = abs(lv.x)
			xv-=WALK_DEACCEL*step
			if (xv<0):
				xv=0
			lv.x=sign(lv.x)*xv
		if (not jumping and jump):
			lv.y=-JUMP_VELOCITY
			jumping=true
			stopping_jump=false
		if (lv.x < 0 and move_left):
			new_siding_left=true
		elif (lv.x > 0 and move_right):
			new_siding_left=false
		if (jumping):
			new_anim="jumping"
		elif (abs(lv.x)<0.1):
			new_anim="idle"
		else:
			new_anim="run"
	else:
		if (move_left and not move_right):
			if (lv.x > -WALK_MAX_VELOCITY):
				lv.x-=AIR_ACCEL*step
		elif (move_right and not move_left):
			if (lv.x < WALK_MAX_VELOCITY):
				lv.x+=AIR_ACCEL*step
		else:
			var xv = abs(lv.x)
			xv-=AIR_DEACCEL*step
			if (xv<0):
				xv=0
			lv.x=sign(lv.x)*xv
		if (lv.y<0):
			new_anim="jumping"
		else:
			new_anim="falling"
	if (new_siding_left!=siding_left):
		if (new_siding_left):
			get_node("sprite").set_scale( Vector2(-1,1) )
		else:
			get_node("sprite").set_scale( Vector2(1,1) )
		siding_left=new_siding_left
	if (new_anim!=anim):
		anim=new_anim
		get_node("anim").play(anim)
	if (found_floor):
		floor_h_velocity=s.get_contact_collider_velocity_at_pos(floor_index).x
		lv.x+=floor_h_velocity
	lv+=s.get_total_gravity()*step
	s.set_linear_velocity(lv)
PS in order for gravity to work, you need to check the box Scene -> Project Settings -> Physics2D -> Default Gravity
Import TileSets
I don’t have time to tell in detail about tileset. I can only offer my finished scene (from my project) or you can create your own from TileSet. You can download the set from the link below, and then add it to the Node TileMap project. In the settings, you need to add the finished TileSet to it (TileSet -> Load -> tileset.xml). You can draw the simplest floor / ground. How to draw levels, TileSets I will describe in detail in the next lesson.
Bonus! Adding backdrops!
Create a new scene. Add a “Node” ParallaxBackground to it. Call it parallax_bg and save it as parallax_bg.xml.
We create 4 pieces of ParallaxLayer for it. Call them sky, clouds, mount_1, mount_2. Accordingly, the sky, clouds, and mountains.
The resolution of our game is 800x600 (Look in the Scene -> Project Settings -> Display settings). Therefore, we set each “Node” the Mirroring parameter 800.0 — mirroring along the Y axis. Change the Scale parameters of the “Node” clouds, mount_1, mount_2 to 0.1.1; 0.2.1 and 0.4.1, respectively.
Add a sky sprite to Node sky. I already drew my own in advance. And you can download everything from the links below.
At once, 2 strips appeared on the working area. Transfer to the working area of the image, scale. We see that changing the main sprite also changes its mirror image.
Add clouds to Node clouds. I think it will be possible to duplicate each of the 3 so that in the end there will be 6, the mirror will duplicate again, in total we will have 12 clouds!
Now we add mountains to Node mount_1 and mount_2. But let's raise the mount_2 layer above mount_1.
Save the scene. Open stage.xml. And to our Stage we add through the "plus sign" a scene with backdrops.
And as usual, a small video of the gameplay:
A small FAQ (Will be updated):
- If the character does not move, check if the keys are added and correctly added
- Problems with the animation - whether the animation was added correctly. Check out the looping animations of idle, run and falling.
- The character falls into the floor / passes through walls, ceilings - increase the triangle CollisionPolygon2D.
- Character partially in textures / above them - work with the arrow CollisionShape2D
Download:
 Project Sources
 Backs (zip)
 Compiled export templates for Linux x86 (zip)
 Linux x86 Lesson Demo Binaries
- Linux amd64 lesson demo binaries
 Windows x86 Lesson Demo Binaries
- Windows Demo x86_64 Binaries
 MacOS x86 Lesson Demo Binaries
- MacOS amd64 lesson demo binaries
Thank you for mastering and reading to the end. In case of shortcomings write to the PM. Thanks, see you soon!