Get the image of RAM
- From the sandbox
- Tutorial
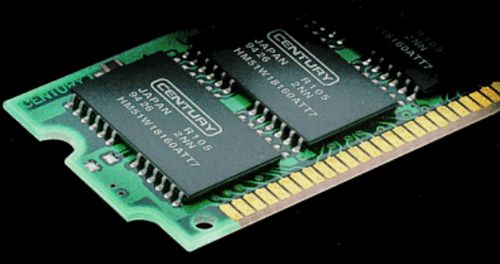
The contents of RAM is very important information in the study of previous operations with the machine. The RAM can contain both parts of the executable processes themselves, and parts of deleted files, user sessions, cryptographic keys. With the modern dissemination of complex information protection systems based on cryptography, the restoration of their keys becomes almost one of the main tasks for research. In secure systems, RAM is often the only place where security keys and other temporary, but very important information can be stored.
The process of obtaining information that is contained in the main memory consists of two stages: retrieving the contents of the main memory
and
analyzing the data obtained during the taking.
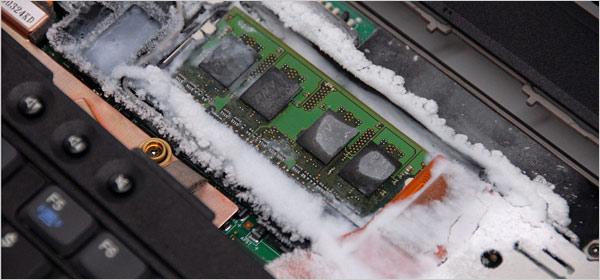
Paying attention to the first stage, it is worth noting that the removal of RAM can be performed using a number of means: direct access to memory using special expansion cards, a FireWire port, and even physical removal of the RAM storage device (it will require freezing the boards),
but in this material, we will consider software tools that allow you to remove the contents of the RAM of protected machines by the so-called "hot" reboot and start the machine in Live-mode.
To accomplish this task, we will use a special Ubuntu CyberPack (IRF) 1.0 distribution kit , consisting of a minimal set of components, namely, only those that are needed to remove data from memory. Accordingly, there is no graphical interface.
Using this approach to the removal of the contents of RAM has a number of advantages and disadvantages compared with the other tools listed above.
Pros:
- using the Live-distribution allows you to carry out the action no matter what operating system is installed on the machine under study;
- there are no costs for the purchase of expensive special devices, cables, boards, etc.
Disadvantage:
- the contents of the RAM will be incomplete - part of it will be overwritten with the data necessary to run the Live distribution (approximately 125 Mb).
Specially assembled distributions are available for use for machines with memory capacity of up to 3 GB (i386) and over 3 GB (amd64). With their help, you can create a bootable CD / DVD-ROM or bootable USB-drive.
Remarks:
- the system does not give us a second chance - we have only one attempt. i.e., when the computer under investigation is restarted again, there is a high probability that we will no longer find the necessary information. It follows that you do not need to restart it several times, experiment, take aim.
You need to prepare in advance and know how the computer will behave after a reboot.
Most modern computers allow you to specify at startup where to download, but if not, then you need to configure the BIOS of the machine to boot from a CD / DVD drive or USB drive / drive, and then download the Live distribution from the specified device.
So let's get started.
Reboot the computer.
IMPORTANT: the reboot must in no case be cold (by pressing the reset button or turning the power off / on), namely, the reboot must be carried out using the system itself (for example, by pressing the Ctrl-Alt-Del buttons or by selecting the " rebooting ”in the system)
After the distribution is loaded, the user can access the familiar Linux console line and brief information for starting the module.
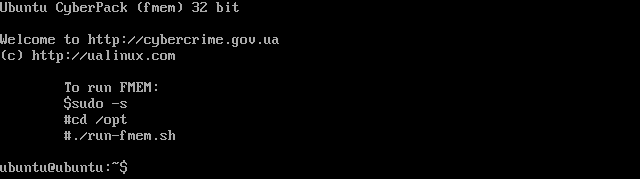
Preparation for the fmem program consists in executing the following commands:
$ sudo -s
# cd / opt (go to the folder where the program is located);
# ./run-fmem.sh (script to start the memory removal module);
Note: For further actions, you will need to mount a pre-prepared media (external hard drive, flash drive) with the ext2 / 3/4 file system, in which the file with the contents of the RAM will be saved.
In order to find out which identifier the system assigned to the attached medium, after connecting it to the computer, enter the following command:
# dmesg | tail (The command displays the kernel message buffer information. We will be interested in the last entry.)
Like for example this:
[16091.995428] sd 9: 0: 0: 0: Attached scsi generic sg2 type 0
[16091.995996] sd 9: 0: 0: 0: [sdb] 32096120 512-byte logical blocks: (16.4 GB / 15.3 GiB)
[16091.998192] sd 9: 0: 0: 0: [sdb] Write Protect is off
[16091.998205] sd 9: 0: 0: 0: [sdb] Mode Sense: 0b 00 00 08
[16091.999433] sd 9: 0: 0: 0: [sdb] No Caching mode page found
[16091.999447] sd 9: 0: 0: 0: [sdb] Assuming drive cache: write through
[16092.003486] sd 9: 0: 0: 0: [sdb] No Caching mode page found
[ 16092.003495] sd 9: 0: 0: 0: [sdb] Assuming drive cache: write through
[16092.004251] sdb: sdb1
(where "sdb" is the assigned designation of the physical drive, and "sdb1" is the assigned designation of the logical partition of the drive).
Next, mount the logical partition of the drive to the / tmp folder of the operating system loaded in Live mode:
# mount / dev / sdb1 / tmp
(where
“mount” is the device mount command
“/ dev / sdb1” is the address of the logical partition file of the attached drive
“/ tmp "- the folder in which you want to connect the drive).
All preparatory steps have been taken - you can proceed to the removal of the contents of RAM:
# dd if = / dev / fmem of = / tmp / ram-image.mem bs = 1K count = `head -1 / proc / meminfo | awk '{print $ 2}' '
(where
“dd” is the image creation command
“if = / dev / fmem” is the data source, namely the RAM
“of = / tmp / ram-image.mem” is the record in the file “ ram-image.mem "to the" / tmp "folder
“Bs = 1K” - information block size - 1 Kb
“count =` head -1 / proc / meminfo | awk '{print $ 2}' '”- the amount of RAM, information about which is extracted from the file / proc / meminfo).
And we are waiting ...
As a result of successful execution of the command, we will get a message similar to this:

521453568 bytes (521 MB) copied, 158.405 s, 3.3 MB / s
(where
“521453568 bytes (521 MB) copied” is the amount of copied information
“158.405 s” - the time during which the operation
"3.3 MB / s" was performed - the speed at which the operation was performed)
As a result, we got the contents of the machine’s RAM in the file “ram-image.mem” on the drive. Now it can be processed including extracting parts of executable processes, deleted files, information about user sessions, cryptographic keys and much more.
PS
It is also worth noting that all modern systems use swap memory (the so-called “swap file”) in their work
The swap file is a kind of addition to the RAM (which deals with the temporary storage of data for quick delivery to the processor) of your computer. Not even so much an addition as its broadening or, one might say, a continuation. The fact is that when there is not enough RAM, the system can transfer data from memory to disk (the so-called additional memory), which also stores data accordingly.
And for the full picture of memory analysis, you must also get them.
Different operating systems use different storage methods.
In the case of Windows, these are usually the files in the root of the C:
pagefile.sys system drive for Win XP and Win 7 and just copy the file.
For Linux, this is a separate section on the media.
For example:
The sudo fdisk -l / dev / sda command
will show us all the partitions in the system
/ dev / sda1 * 2048 78125055 39061504 83 Linux
/ dev / sda2 78125056 117186559 19530752 82 Linux swap / Solaris
/ dev / sda3 117186560 625141759 253977600 83 Linux
Based on what we see is that the swap partition is in / dev / sda2 You
can also copy it using the dd command.
For example:
dd if = / dev / sda2 of = / media / <path where to write> /linux-swap.dd
For MacOS, you need to copy all the files from the directory / private / var / vm / swapfile *
Processing and analysis of the results (both a RAM dump and a swap memory) can be carried out both manually using, for example, a HEX editor, and with the help of a number of programs that will be discussed next time.