A7 Data Server: online data management
Hi, Habr!
We are piloting publications with transcripts of reports sounded on PiterJS.
Since this is the first experience, we will be glad to hear constructive criticism and suggestions for improvement.
Watch the video and slides , and for decoding - welcome under cat.
The report and transcript prepared by Andrei Loginov , CTO at A7 Systems.
Let's start
Fast Big Data Server - server for large fast data. Initially, the A7 DS is designed for Digital Twin , managing roles and data patterns. But this is not all that he can.
What's inside.
Let's get a look:
- Object database
- Temporal (chronological) database
- Javascript virtual machine (to be honest, js-like language)
- Access level system
- Application server
The object database, in addition to typing and inheritance, has several features:
- tree support
- graph support
- mount and link
- Spaces
- binding support (reactivity)
Space
The most unusual thing here is Space.
Space is an instance of a typical workspace. 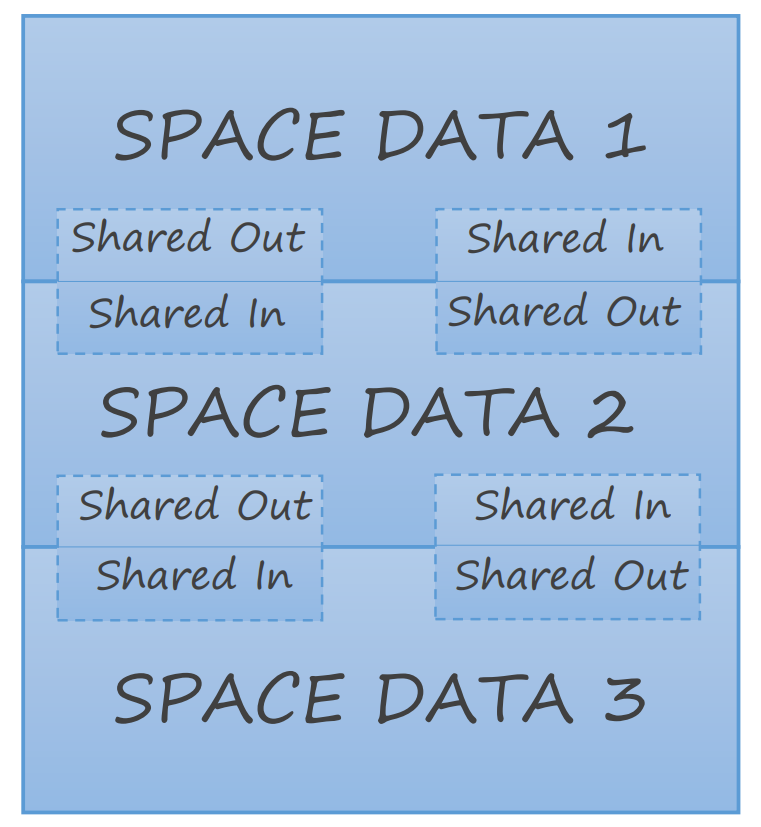
Space includes:
- data
- shared-data (shared data for several spaces. For example, weather or currency exchange rate)
- roles (owner, users, groups)
That is, Space is quite isolated from the A7 DS server and other Spaces space.
How to use
Now the question is: how to use it. This is probably the most important question.
Let's create a small ECMAScript mobile application.
We will need:
- Minimal knowledge of C ++. (possibly within the school curriculum)
- Knowledge of ECMAScript and QML (Qt)
- Android NDK (just to compile it)
In my opinion, the best examples are always associated with money, so we will try to create an online family wallet)).
Create objects in the object database. More precisely, we will create types. It is more convenient to use an editor for describing objects, but we are “not such”, and we will create a description of objects in JSON.
First, create a money object in which we have cash, a credit card, and the total amount:
{
  "name": "Money",
  "fields": [
    {"name": "card","fieldtype": "value","datatype": "double", "def": 0},
    {"name": "cash","fieldtype": "value","datatype": "double","def": 0},
    {"name": "sum","fieldtype": "formula","datatype": "double",
      "def": "card+credit"}
  ]
}
The card and cash fields are simple values (the default is 0), you can write a little shorter:
{"name": "card","value": 0.0},
{"name": "cash","value": 0.0}
The sum field is a formula (hello reactivity!) Can also be written a little shorter:
{"name": "sum","formula":"card+credit"}Now we will create a pair of boys and girls.
{
  "name": "Pair",
  "fields": [
    {"name": "boyfriend","fieldtype": "value","datatype": "Money", "def": "Money"},
    {"name": "girlfriend","fieldtype": "value","datatype": "Money","def": "Money"},
    {"name": "sum","fieldtype": "formula","datatype": "double",
      "def": "boyfriend.sum+girlfriend.sum"}
  ]
}
The sum field (hello again reactivity!), Has begun to include references to sub-objects:
{"name": "sum","formula":"boyfriend.sum+girlfriend.sum"}Now, with each change of any digit, we will automatically receive a recalculation of the current balance.
But it's useful for us to add some history.
{"name": "history","fieldtype": "list", "list":{"datatype": "History"}}In a short record
{"name": "history", "list":{"datatype": "History"}}Well, the very object of history. Who, what, and how much has changed.
{
  "name": "History",
  "fields": [
    {"name": "who","fieldtype": "value","datatype": "string", "def": “”},
    {"name": "which","fieldtype": "value","datatype": "string","def": “”},
    {"name": "delta","fieldtype": "value","datatype": "double","def": 0}
  ]
}
Add triggers to Pair:
"functions": [{"functiontype": "before",
      "arguments": [boyfriend.cash],
      "code": "..."
   }
]
And the trigger code itself:
{
  var historyItem= history.add(new History());
  historyItem.who=”boyfriend”;
  historyItem.which=”cash”;
  history.delta=value-boyfriend.cash;
  returntrue;
}
By analogy we add triggers boyfriend.card, girlfriend.card, girlfriend.cash.
Since we want to make our application a lot of pairs, we create a sample space SpacePairand make it the root element Pair.
Add two default usersGirlBoy
Actually everything, a generator of spaces for controlling wallets is ready.
Add some spaces. When adding space, a data area is automatically created (and the data itself with default values). Pre-defined users and groups are also created (for space).
Each space has its users and its own groups.
We start to make the client:
Add to library project
android {
    debug{
        LIBS+= ../A7DS/Libs/android/libA17EDboClientBaseBind.a
        LIBS+= ../A7DS/Libs/android/libA17ClientLibBind.a
    }
    release{
        LIBS+= ../A7DS/Libs/android/libA17EDboClientBaseBin.a
        LIBS+= ../A7DS/Libs/android/libA17ClientLibBin.a
    }
}
Fix the main.cpp file a bit
#include<QApplication>#include<QQmlApplicationEngine>#include<QVariant>#include<QQmlEngine>// Добавим ссылку на *.h файлы#include"../A7DS/A17EBase/A17EDboClientBaseBin/a17edboclientbasebin.h"intmain(int argc, char *argv[]){
   QApplication app(argc, argv);
   QQmlApplicationEngine engine;
   // Создаем клиент для A7DS
   A17EDboClientBaseBin*client=new A17EDboClientBaseBin(engine,&app);
   // Инициализируем клиент для A7DS
   client->init(engine);
   // Дальше стандартный код
   engine.load(QUrl(QLatin1String(QString("qrc:/main.qml").toLatin1())));
   return app.exec();
}
On this C ++ part is complete, and we can proceed to QML.
First create a couple of components.
Add a component to display data
MyLabelView.qml
import QtQuick 2.7import Astra.Dbo 17.0
Item {id: viewItem
   property alias field: field
   property string label: "что и кто"
   width: parent.width
   height: 100
   DboField{
       id: field
   }
   Text {
       id: labelItem
       text: viewItem.label
       anchors.left: parent.left
       anchors.right: parent.horizontalCenter
       anchors.top: parent.top
       anchors.bottom: parent.bottom
   }
   Text {
       id: valueItem
       text: field.value
       anchors.right: parent.right
       anchors.left: parent.horizontalCenter
       anchors.top: parent.top
       anchors.bottom: parent.bottom
   }
}
MyLabelEdit.qml
import QtQuick 2.7import Astra.Dbo 17.0
Item {id: viewItem
   property alias field: field
   property string label: "что и кто"
   width: parent.width
   height: 100
   DboField{
       id: field
   }
   Text {
       id: labelItem
       text: viewItem.label
       anchors.left: parent.left
       anchors.right: parent.horizontalCenter
       anchors.top: parent.top
       anchors.bottom: parent.bottom
   }
   TextInput {
       id: valueItem
       text: field.value
       anchors.right: parent.right
       anchors.left: parent.horizontalCenter
       anchors.top: parent.top
       anchors.bottom: parent.bottom
       onEditingFinished:{
           field.value=text;
       }
   }
}
Now we will
build the main window MyLabelEdit.qml
import QtQuick 2.7import Astra.Dbo 17.0import QtQuick.Controls 1.5
{id:appWindow
    visible: true
    width: 640
    height: 480
    property var component;
    property var sprite;
ApplicationWindow {id: viewItem
property alias field: field
property string label: "что и кто"
property string host: "127.0.0.1"//// адрес A7 DS
property int port: 8989// порт A7 DS
property string isBoy: (dboconnection.login=="Boy")
property var myselfMoney: (isBoy)?boyfriend:girlfriend
property var myfriendMoney: (!isBoy)?boyfriend:girlfriend
/*
Данные, которые начнут автоматическую синхронизацию с сервером после соединения
*/
DboObject{id:boyfriend
parentObject: rootData
        parentFieldName:  "boyfriend"
}
DboObject{id:girlfriend
       parentObject: rootData
       parentFieldName:  "girlfriend"
}
DboModel{id:history
       parentObject: rootData
       parentFieldName:  "history"
}
/*
То, что мы отображаем, если нет соединения с сервером A7 DS
*/
Column{
     z: 10
     visible: (! dboconnection.isConnect)
     anchors.fill: parent
     TextInput{id:login
width: parent.width
            height: 100
     }
     TextInput{id:password
width: parent.width
height: 100
     }
     Button{id:btn
width: parent.width
height: 100
text: ”Подключиться”
onClicked: dboconnection.connectToDbo(
login.text,
password..text,
           viewItem.host,
           viewItem.port);
}
   }
   SwipeView{
        anchors.fill: parent
        currentIndex: 1/// Здесь таблица отражающая историю изменений
        Page{
                  ListView{
        model: history
        delegate: Text{
        text: model.who+” ”+model.which+” ”+model.delta
}
      }
            }
     /// Здесь список дающий текущую картину
            Page{
                Column{
            anchors.fill: parent
                    MyLabelEdit{id:myCash; label: “мои наличные”
                field.name: “cash”; field.parentObject: myselfMoney
        }
                    MyLabelEdit{id:myCard; label: “моя карта”
                field.name: “card”; field.parentObject: myselfMoney
        }
                   MyLabelView{id:mySum; label: “все мои деньги”
                field.name: “sum”; field.parentObject: myselfMoney
        }
                   MyLabelView{id:myfriendCash; label: “наличные друга”
                field.name: “cash”; field.parentObject: myfriendMoney
        }
                    MyLabelView{id:myfriendCard; label: “карта друга”
                field.name: “card”; field.parentObject: myfriendMoney
        }
                   MyLabelView{id:myfriendSum; label: “все деньги друга”
                field.name: “sum”; field.parentObject: myfriendMoney
        }
                   MyLabelView{id:mypairSum; label: “все наши деньги”
                field.name: “sum”; field.parentObject: mypairMoney
        }
     }
            }
        }
    }
   Text {
       id: labelItem
       text: viewItem.label
       anchors.left: parent.left
       anchors.right: parent.horizontalCenter
       anchors.top: parent.top
       anchors.bottom: parent.bottom
   }
   TextInput {
       id: valueItem
       text: field.value
       anchors.right: parent.right
       anchors.left: parent.horizontalCenter
       anchors.top: parent.top
       anchors.bottom: parent.bottom
       onEditingFinished:{
           field.value=text;
       }
   }
}
Um "But what about the promised Digital Twin, and other nishtyaki?" - Asks the attentive reader.
“Binding is nice, but where are the mounts and graphs?” He adds.
These are fair questions, and answers to them will be given in the following articles;).