DIY clicker
One of these days, a friend asked me to help with one task: control a computer with an audio player installed on a Windows laptop using a small hardware tool. I asked not to offer any IR remotes. And to make AVR-e, of which he has left some considerable amount, it is necessary to attach on the sly.
Formulation of the problem
The task is obviously divided into two parts:
- Microcontroller-based hardware, and
- Software running on a computer and managing what is on it.
Since we are working with AVR, why not Arduino?
We set the task.
Hardware platform:
HW1. The control is carried out by buttons without fixing;
HW2. We serve 3 buttons (in general, how many do not mind);
HW3. Pressing is considered to hold the button for at least 100 milliseconds;
HW4. Longer presses are ignored. Processing more than 1 button at a time is not performed;
HW5. When you click a button, some action on the computer starts;
HW6. Provide a communication interface with a computer through the built-in Serial / USB-converter;
Software platform:
SW1. Provide a communication interface with a computer through a selectable serial port;
SW2. Convert incoming communication commands to operating system events delivered to the desired audio player.
SW3. Pause command processing. Including the command from the remote.
Well, an additional requirement: if it does not make a serious investment of time, make decisions as universal as possible.
Design and solution
HW1
Button buttons are in the "pressed" position for a short time. In addition, the buttons may rattle (i.e., form a multitude of positives in a short period of time due to unstable contact).
It makes no sense to connect them to interruptions - not those response times are needed to bother with this. We will read their states from digital pins. To ensure a stable reading of the button in the non-pressed state, it is necessary to connect the input pin to the ground (pull-down) or to the power supply (pull-up) via a pull-up resistor. Using the built-in pull-up resistor, we will not make an additional discrete element in the circuit. On the one hand, we will connect the button to our entrance, the other - to the ground. Here's what happens: 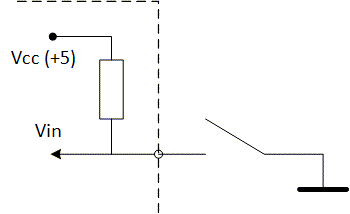
And so - for each button.
HW2
There are several buttons, so we need a certain number of homogeneous entries about how to interrogate buttons and what to do if it is pressed. We look in the direction of encapsulation and make the button class Button, which contains the pin number from which the survey is being conducted (and initializes it itself), and the command that should be sent to the port. We will deal with what the team is about later.
The button class will look something like this:
classButton
{public:
    Button(uint8_t pin, ::Command command)
        : pin(pin), command(command)
    {}
    voidBegin(){
        pinMode(pin, INPUT);
        digitalWrite(pin, 1);
    }
    boolIsPressed(){
        return !digitalRead(pin);
    }
    ::Command Command()const{
        return command;
    }
private:
    uint8_t pin;
    ::Command command;
};
After this step, our buttons became universal and faceless, but you can work with them uniformly.
Putting the buttons together and assign them pins:
Button buttons[] =
{
    Button(A0, Command::Previous),
    Button(A1, Command::PauseResume),
    Button(A2, Command::Next),
};
Initialization of all buttons is done by calling the method Begin()for each button:
for (auto &button : buttons)
{
    button.Begin();
}
In order to determine which button is pressed, we will go through the buttons and check if something is pressed. We return the index of the button, or one of the special values: "nothing is pressed" and "more than one button is pressed". Special values, of course, can not intersect with the valid values of the numbers of buttons.
intGetPressed(){
    int index = PressedNothing;
    for (byte i = 0; i < ButtonsCount; ++i)
    {
        if (buttons[i].IsPressed())
        {
            if (index == PressedNothing)
            {
                index = i;
            }
            else
            {
                return PressedMultiple;
            }
        }
    }
    return index;
}
HW3
The buttons will be polled with a certain period (say, 10 ms), and we will assume that the click occurred if the same button (and exactly one) was held for the specified number of polling cycles. We divide the fixation time (100 ms) by the polling period (10 ms), we get 10.
We start the decrement counter, in which we record 10 when we press the first time, and decrement each time period. As soon as it goes from 1 to 0, we start processing (see HW5)
HW4
If the counter is already 0, no action is taken.
HW5
As mentioned above, each button is associated with the command being executed. It must be transmitted via the communication interface.
At this stage, you can implement the strategy of the keyboard.
voidHandleButtons(){
    staticint CurrentButton = PressedNothing;
    static byte counter;
    int button = GetPressed();
    if (button == PressedMultiple || button == PressedNothing)
    {
        CurrentButton = button;
        counter = -1;
        return;
    }
    if (button == CurrentButton)
    {
        if (counter > 0)
        {
            if (--counter == 0)
            {
                InvokeCommand(buttons[button]);
                return;
            }
        }
    }
    else
    {
        CurrentButton = button;
        counter = PressInterval / TickPeriod;
    }
}
voidloop(){
    HandleButtons();
    delay(TickPeriod);
}
Hw6
The communication interface should be clear to both the sender and the recipient. Since the serial interface has a data transfer unit of 1 byte and has byte synchronization, there is no point in cramming something complicated and we will limit ourselves to sending one byte per command. For the convenience of debugging, we will send one ASCII character per command.
Implementation on Arduino
Now we collect. The full implementation code is shown below under the spoiler. To expand it, simply specify the ASCII code of the new command and attach a button to it.
Of course, it would be simple for each button to clearly indicate the symbol code, but we will not do that: we will need the command naming when implementing the client for the PC.
constint TickPeriod = 10; //msconstint PressInterval = 100; //msenumclassCommand :char
{
    None = 0,
    Previous = 'P',
    Next = 'N',
    PauseResume = 'C',
    SuspendResumeCommands = '/',
};
classButton
{public:
    Button(uint8_t pin, Command command)
        : pin(pin), command(command)
    {}
    voidBegin(){
        pinMode(pin, INPUT);
        digitalWrite(pin, 1);
    }
    boolIsPressed(){
        return !digitalRead(pin);
    }
    Command GetCommand()const{
        return command;
    }
private:
    uint8_t pin;
    Command command;
};
Button buttons[] =
{
    Button(A0, Command::Previous),
    Button(A1, Command::PauseResume),
    Button(A2, Command::Next),
    Button(12, Command::SuspendResumeCommands),
};
const byte ButtonsCount = sizeof(buttons) / sizeof(buttons[0]);
voidsetup(){
    for (auto &button : buttons)
    {
        button.Begin();
    }
    Serial.begin(9600);
}
enum {
    PressedNothing = -1,
    PressedMultiple = -2,
};
intGetPressed(){
    int index = PressedNothing;
    for (byte i = 0; i < ButtonsCount; ++i)
    {
        if (buttons[i].IsPressed())
        {
            if (index == PressedNothing)
            {
                index = i;
            }
            else
            {
                return PressedMultiple;
            }
        }
    }
    return index;
}
voidInvokeCommand(const class Button& button){
    Serial.write((char)button.GetCommand());
}
voidHandleButtons(){
    staticint CurrentButton = PressedNothing;
    static byte counter;
    int button = GetPressed();
    if (button == PressedMultiple || button == PressedNothing)
    {
        CurrentButton = button;
        counter = -1;
        return;
    }
    if (button == CurrentButton)
    {
        if (counter > 0)
        {
            if (--counter == 0)
            {
                InvokeCommand(buttons[button]);
                return;
            }
        }
    }
    else
    {
        CurrentButton = button;
        counter = PressInterval / TickPeriod;
    }
}
voidloop(){
    HandleButtons();
    delay(TickPeriod);
}
And yes, I made another button to be able to pause the transfer of commands to the client.
PC Client
We turn to the second part.
Since we do not need a complex interface, and bind to Windows, we can go in different ways, as you like: WinAPI, MFC, Delphi, .NET (Windows Forms, WPF, etc.), or console on the same platforms ( well, except for MFC).
SW1
This requirement is closed through communication with the serial port on the selected software platform: connect to the port, read the bytes, process the bytes.
SW2
Perhaps everyone has seen a keyboard with multimedia keys. Each key on the keyboard, including multimedia, has its own code. The simplest solution to our problem is to imitate key presses on the multimedia keys. Key codes can be found in the source - MSDN . It remains to learn how to send them to the system. This is also not difficult: there is a SendInput function in WinAPI .
Each keystroke is two events: press and release.
If we use C / C ++, you can simply include header files. In other languages it is necessary to make call forwarding. For example, when developing in .NET, you will have to import the specified function and describe the arguments. I chose .NET for the convenience of interface development.
I singled out the project only a substantial part of which is reduced to a single class: Internals.
Here is his code:
internalclassInternals
    {
        [StructLayout(LayoutKind.Sequential)]
        [DebuggerDisplay("{Type} {Data}")]
        privatestruct INPUT
        {
            publicuint Type;
            public KEYBDINPUT Data;
            publicconstuint Keyboard = 1;
            publicstaticreadonlyint Size = Marshal.SizeOf(typeof(INPUT));
        }
        [StructLayout(LayoutKind.Sequential)]
        [DebuggerDisplay("Vk={Vk} Scan={Scan} Flags={Flags} Time={Time} ExtraInfo={ExtraInfo}")]
        privatestruct KEYBDINPUT
        {
            publicushort Vk;
            publicushort Scan;
            publicuint Flags;
            publicuint Time;
            public IntPtr ExtraInfo;
            privatelong spare;
        }
        [DllImport("user32.dll", SetLastError = true)]
        privatestaticexternuintSendInput(uint numberOfInputs, INPUT[] inputs, int sizeOfInputStructure);
        privatestatic INPUT[] inputs =
        {
            new INPUT
            {
                Type = INPUT.Keyboard,
                Data =
                {
                    Flags = 0// Push
                }
            },
            new INPUT
            {
                Type = INPUT.Keyboard,
                Data =
                {
                    Flags = 2// Release
                }
            }
        };
        publicstaticvoidSendKey(Keys key)
        {
            inputs[0].Data.Vk = (ushort) key;
            inputs[1].Data.Vk = (ushort) key;
            SendInput(2, inputs, INPUT.Size);
        }
    }
It first contains a description of the data structures (only what concerns keyboard input, since we imitate it), and the import itself SendInput.
The field inputsis an array of two elements that will be used to generate keyboard events. It makes no sense to allocate it dynamically if the application architecture assumes that calls SendKeyin several threads will not be executed.
Actually, the next thing is technology: we fill in the appropriate fields of the structures with a virtual key code and send it to the input queue of the operating system.
SW3
The requirement is closed very simply. A flag is set up and another command that is processed in a special way: the flag switches to the opposite logical state. If it is installed, the remaining commands are ignored.
Instead of conclusion
Improving can be done endlessly, but that's another story. I do not cite a Windows client project here, because it provides a wide flight of fancy.
To control the media player, we send one set of keystrokes, if you need to manage presentations, another one. You can make the control modules, assemble them either statically or in the form of plug-ins. In general, a lot of things can be. The main desire.
Thanks for attention.