Ws-security in SoapUI Pro
In the field of developing various payment gateways and in solving other integration problems (I don’t think that the scope of this technology is limited by this, but I came across it in this area) there may be authentication in the system according to the Ws-security specification (for a detailed description see docs.oasis- open.org/wss/2004/01/oasis-200401-wss-soap-message-security-1.0.pdf ). In this article, we will consider the case of access to web services in which client authentication is performed according to this specification.
Suppose you exchanged with the system (the system means a payment system or another organization that provides access to web services) with two certificates (one for two-way ssl, the other for signing messages). For this, the system will require two certificate requests from you. You will need to create two pairs of “request for certificate-private key”. This can be done, for example, using the openssl utility (download link slproweb.com/products/Win32OpenSSL.html ). In it, you need to run the command two times:
(second time privkey2.key and request2.csr respectively). You end up with two request-key pairs (privkey1.key & request1.csr, privkey2.key & request2.csr). Two certificate requests must be sent to system analysts, who, in turn, by signing these requests and adding to their stores, will send back certificates in * .crt format to access their system. Let the ssl.crt certificate, which will be used to provide two-way ssl, correspond to the first request-private key pair, trust.crt to the second pair, this certificate will be used to sign messages.
When we received these certificates, we can check whether the web service is available to us and whether everything is correct with the certificates even from the browser. To do this, we need to add a “private key-certificate” pair to the keystore. In the browser we will use the pkcs12 format storage. It can be created with the same openssl. The command is as follows:
Naturally, the command must be executed in the directory in which the certificate and private key files are located (or register their full path). So, we got a file of * .p12 format, which contains a pair of “private key-certificate” (from the first pair ssl.p12, from the second - trust.p12). In order to see what elements are present in the repository, you can use the standard openssl commands, but it is better to use the Keystore Explorer program (http://keystore-explorer.sourceforge.net/). In it, you can specify the necessary aliases for identifying certificate-private key pairs, if there are several of them in the store.
The development of a client in a programming language (we implemented in Java and C #) that exchanges messages with web services and implements authentication of clients in the system is not considered in this article. At this point, it would be good to check with some tool before the development begins that there is any catch in the certificates and whether signing will work properly.
To verify authentication and signing, we will use SoapUI Pro version 4.5.1. First, we need to add an SSL certificate to SoapUI settings to provide a secure channel with a web service. In this version of the program, this is done as follows: File -> Preferences -> SSL Settings. I have an English version, so all the terms are in English. In the KeyStore field, specify the path to the ssl.p12 repository. In the KeyStore Password field, specify the password that we set when creating the store. Creating a repository without a password will fail and this cannot be done, because it contains a private key. Click OK, this completes the SSL configuration.
After that, we need to configure the so-called usernametoken, its signature and the signature of the message body. The signing and availability of a usernametoken is determined on the server by the security requirements and the availability of authentication by token. Signing up in SoapUI is described in sufficient detail on the website of SoapUI itself: www.soapui.org/SOAP-and-WSDL/applying-ws-security.html . Somewhere repeating, somewhere adding my own, I will continue my article.
I) Add storage to our key-certificate pair to create signatures:
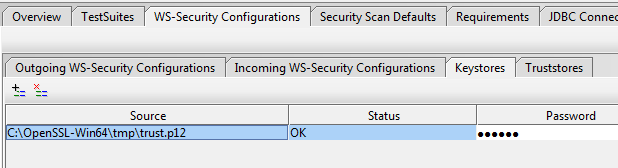
If we are not going to check for the correct signature of the messages that come to us, then nothing needs to be added to Truststores. Here we added the trust.p12 repository, as it was created specifically for signing messages. It is also permissible to use repositories of other formats, for example, * .jks (java keystore).
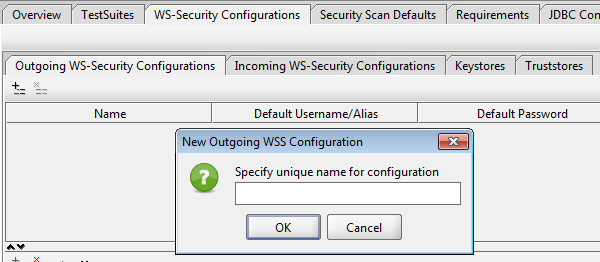
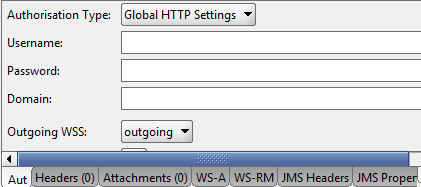
II) Create a configuration to apply to SOAP requests when sending to a web service. To do this, in the Outgoing WS-Security Configurations tab, click add a new WSS configuration. Call it outgoing.
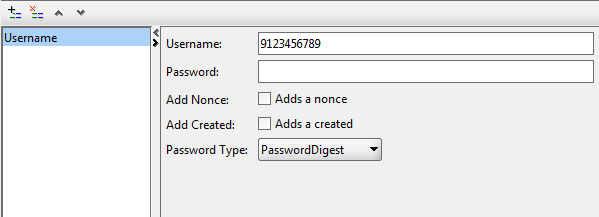
III) Add usernametoken to the configuration.
If the customer’s phone number is used as the client’s identifier, then we write the phone number, in a word, the client’s login in the system. If you have a password, select Password Type -> PasswordDigest so that it is displayed in encrypted form in the message.
IV) Since it was assumed that we are signing two parts of our SOAP message (usernametoken and Body), we need to create two signatures. To do this, along with Username, add two Signature elements.
V) The first signature is intended for signing UsernameToken: We
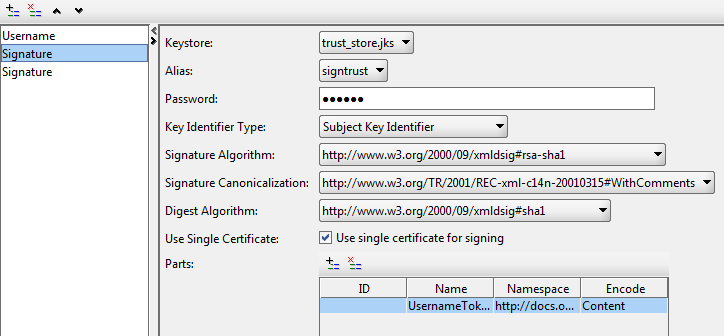
write down all the settings as shown in the figure (the settings in your case may differ), the password from the repository, in Parts we register the part of our SOAP message that we are going to sign. Namespace for UsernameToken:
docs.oasis-open.org/wss/2004/01/oasis-200401-wss-wssecurity-secext-1.0.xsd
VI) Difference of the second signature (for the Body part of the SOAP message) from the first one only in the Parts:
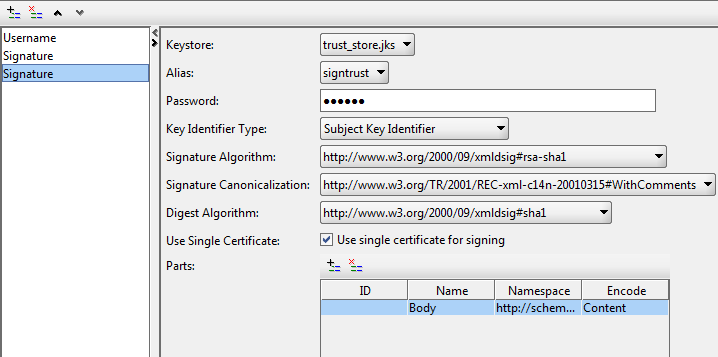
Namespace part for the Body :
schemas.xmlsoap.org/soap/envelope
This completes the authentication setup and signing. It remains to form a SOAP message in SoapUI and select the necessary configuration for it (in terms of outgoing wss):
When sending a message, SoapUI itself will add a usernametoken and two signatures. In order to see what message is being sent, you can add the name of the posttestserver.com/post.php service to the endpoint , and the response will contain a link to the page with our request. The original SOAP request may be something like this:
A signed request will look like this:
As you can see, we have two signatures... and one ... . The first signature refers to Body, as can be seen from, because
Suppose you exchanged with the system (the system means a payment system or another organization that provides access to web services) with two certificates (one for two-way ssl, the other for signing messages). For this, the system will require two certificate requests from you. You will need to create two pairs of “request for certificate-private key”. This can be done, for example, using the openssl utility (download link slproweb.com/products/Win32OpenSSL.html ). In it, you need to run the command two times:
openssl req -new -key privkey1.key -out request1.csr(second time privkey2.key and request2.csr respectively). You end up with two request-key pairs (privkey1.key & request1.csr, privkey2.key & request2.csr). Two certificate requests must be sent to system analysts, who, in turn, by signing these requests and adding to their stores, will send back certificates in * .crt format to access their system. Let the ssl.crt certificate, which will be used to provide two-way ssl, correspond to the first request-private key pair, trust.crt to the second pair, this certificate will be used to sign messages.
When we received these certificates, we can check whether the web service is available to us and whether everything is correct with the certificates even from the browser. To do this, we need to add a “private key-certificate” pair to the keystore. In the browser we will use the pkcs12 format storage. It can be created with the same openssl. The command is as follows:
openssl pkcs12 -export -in ssl.crt -inkey privkey1.key -out ssl.p12Naturally, the command must be executed in the directory in which the certificate and private key files are located (or register their full path). So, we got a file of * .p12 format, which contains a pair of “private key-certificate” (from the first pair ssl.p12, from the second - trust.p12). In order to see what elements are present in the repository, you can use the standard openssl commands, but it is better to use the Keystore Explorer program (http://keystore-explorer.sourceforge.net/). In it, you can specify the necessary aliases for identifying certificate-private key pairs, if there are several of them in the store.
The development of a client in a programming language (we implemented in Java and C #) that exchanges messages with web services and implements authentication of clients in the system is not considered in this article. At this point, it would be good to check with some tool before the development begins that there is any catch in the certificates and whether signing will work properly.
To verify authentication and signing, we will use SoapUI Pro version 4.5.1. First, we need to add an SSL certificate to SoapUI settings to provide a secure channel with a web service. In this version of the program, this is done as follows: File -> Preferences -> SSL Settings. I have an English version, so all the terms are in English. In the KeyStore field, specify the path to the ssl.p12 repository. In the KeyStore Password field, specify the password that we set when creating the store. Creating a repository without a password will fail and this cannot be done, because it contains a private key. Click OK, this completes the SSL configuration.
After that, we need to configure the so-called usernametoken, its signature and the signature of the message body. The signing and availability of a usernametoken is determined on the server by the security requirements and the availability of authentication by token. Signing up in SoapUI is described in sufficient detail on the website of SoapUI itself: www.soapui.org/SOAP-and-WSDL/applying-ws-security.html . Somewhere repeating, somewhere adding my own, I will continue my article.
I) Add storage to our key-certificate pair to create signatures:
If we are not going to check for the correct signature of the messages that come to us, then nothing needs to be added to Truststores. Here we added the trust.p12 repository, as it was created specifically for signing messages. It is also permissible to use repositories of other formats, for example, * .jks (java keystore).
II) Create a configuration to apply to SOAP requests when sending to a web service. To do this, in the Outgoing WS-Security Configurations tab, click add a new WSS configuration. Call it outgoing.
III) Add usernametoken to the configuration.
If the customer’s phone number is used as the client’s identifier, then we write the phone number, in a word, the client’s login in the system. If you have a password, select Password Type -> PasswordDigest so that it is displayed in encrypted form in the message.
IV) Since it was assumed that we are signing two parts of our SOAP message (usernametoken and Body), we need to create two signatures. To do this, along with Username, add two Signature elements.
V) The first signature is intended for signing UsernameToken: We
write down all the settings as shown in the figure (the settings in your case may differ), the password from the repository, in Parts we register the part of our SOAP message that we are going to sign. Namespace for UsernameToken:
docs.oasis-open.org/wss/2004/01/oasis-200401-wss-wssecurity-secext-1.0.xsd
VI) Difference of the second signature (for the Body part of the SOAP message) from the first one only in the Parts:
Namespace part for the Body :
schemas.xmlsoap.org/soap/envelope
This completes the authentication setup and signing. It remains to form a SOAP message in SoapUI and select the necessary configuration for it (in terms of outgoing wss):
When sending a message, SoapUI itself will add a usernametoken and two signatures. In order to see what message is being sent, you can add the name of the posttestserver.com/post.php service to the endpoint , and the response will contain a link to the page with our request. The original SOAP request may be something like this:
A signed request will look like this:
wU/JToBU67+gCBtfb2+gYL1w9zY= Ez94qqmkV642l3jIy+8PS8lozO+VtEbMZvYZv3inNV4QCZBsRCmQ9IvGcUhfMXnDlqukXaa+zRwr
dW8tVOW9vkc9DVgzeFGMSREvP2BUuqB6HzZKCGeec3Jihlc59EyuHwyiz5+18jObuyD18Mtb7T90
7adQsDVSBmQGLydX/tfptopmykYfUpRYTh0sMCcRH7J4B51RrecBs6rK9GJEslWTeW2tGgxpxQJ4
Y690rzkrR6AT6h7t4HBD6JltQUi9xwsjpnQ0j0ReSiK+jNNf99pBl7iiEPc9Kzrc8vNKRacbTfm4
/EE9xP6qu61hBxFQpmpWTRt+SmvVCkDOkBAGew== lPhvPtZSH+7TfXO2TMEIe0jlDQw= Bbt473ZLc41VKtiEZbMI+q+sFZY= F/K6Lgw3P40hFo1ifYY894V5HpVCvns8P4mbeR9pZfTVg4MH/hZf0+KKfKnURTTwS8Rw9MlOM9gG
rwkk0hEANxraZHcMIuopWJlvf6sBkykyVSgrAFCHhqjVdAb7bacv7P6U4wHjY1PNRFWMYSUavewq
KN08xp80lH30SEMIZznKX6pUuRBllEUTIvRMaR62z1GcNkLWLf5hadUGbv8Qdssj1BL5SY2zin3d
hAPFlobMzMUVh019h4Eg0ljWrtFAhHZMOJouZKVYr6ldsPaMiIm9QYTArPoh4fH/rdIIiDT6SVHr
e8v0fdywWnapepGyFDJa1ltUXw+JrqBm579PsQ== lPhvPtZSH+7TfXO2TMEIe0jlDQw= 9035153503 sTK/zTQP+BthB9Ag9uYsPXCn2Q8= wuPL8u2jN8p3T4u0oAZTiQ== 2013-12-24T12:38:03.065Z As you can see, we have two signatures