How to add additional fields in system properties
- Tutorial
 As you know, the system registry, namely changing existing ones or adding new sections and parameters, allows you to do a lot with Windows operating systems. You can change the parameters available in the control panel, customize additional system components, customize your taskbar and desktop, as well as change existing ones or add new items to various context menus. It turns out that if you know about which parameter of the registry you want to change or add, you can not only uniquely configure your system, but also completely automate this process, which is without a doubt very convenient.
Some mutable parameters can be quite simply localized using the same Process Monitor or RegMon utility (I already managed to tell you something about these utilities in the article “ Examples of monitoring the registry”»), And with some parameters, in turn, you will have to tinker a bit, because their localization can be much more complicated than it seems at first glance. With the values of the desired parameters, sometimes everything is very simple (for example, if it is a DWORD parameter, you will not encounter any difficulties in determining the value), and sometimes the task of generating eigenvalues can be very difficult (for example, it can be the value of the parameter responsible for the location of the directory from which to take pictures for the lock screen of the Windows 8.1 operating system). There are infinitely many examples of both the parameters themselves and their values.
Today, in this short article, you will learn about some registry settings that allow you to add additional user information to the system properties window. Moreover, to make it more interesting, the parameters will be added centrally, i.e. Using the functionality of Group Policy Preferences. I think you can start, and we will begin with
Localization of registry parameters responsible for additional fields of system properties
First of all, you should remember the name of the information that should be displayed in the control panel component "System Properties" . According to information from official Microsoft sources, "equipment manufacturers are also called suppliers of computer technology or OEM." So, we can conclude that the information displayed in the system properties will be called OEM information. Initially, in a clean operating system that was installed from the appropriate disk or image downloaded from TechNet or MSDN, such information is simply missing, since no vendors have had time to play with the original image of the system.
In the event that the parameters are initially absent in the system registry, it can be difficult to find them using monitoring tools, or, as in this example, even worse, it is impossible at all. For this reason, to localize the required parameters, you will need to take advantage of the “ Windows Installation Manager ” ( System Image Manager, SIM ), which allows you to create your own, unique images of the operating system.
Windows Installation Manager allows you to change the settings for the installed edition of Windows. To determine the available options, Windows System Image Manager creates a directory file.and reads its contents. A catalog file is a small file containing a list of all the options available in a particular Windows image. That is, you copy the file of the main Windows image (\ Sources \ Install.wim) from the Windows installation DVD-ROM to some folder of the host computer of your choice. In other words, in the SIM manager, you go to the Windows image group and select the previously copied file from the installation disk. In the event that you have not previously created a catalog file, the dispatcher will warn you that such a file will be created at this stage. If the .wim file contains multiple system images, you will be asked to select a specific image. After that, Windows Installation Manager creates a directory file based on the image file that you selected in the Install.wim file. Basically, as seen in the following illustration,
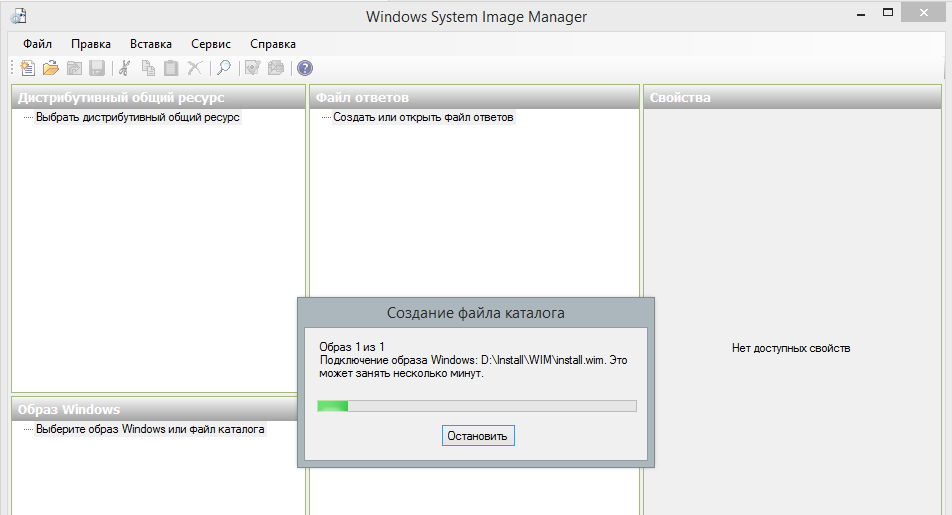
Fig. 1. Creating a catalog file and adding an operating system image
After that, an answer file is created that contains all the parameters for automating the installation of Windows. This is also not a difficult task. You only need the menu " File " select the command " New response file " ( the File> Answer the File the New ), after which the panel response files you have displayed the necessary configuration steps. Setup steps are phases of the Windows installation during which you can customize the image. Windows Automated Installation options can be applied at one or more of the configuration steps, depending on the option you are using. In this example, the configuration step we are interested in is called oobeSystem.Typically, this step is used to configure Windows shell settings, create user accounts, and also to specify language and regional settings.
And in order to add the required procedure to this stage, it is necessary to add a specific component of the operating system. All components are located in the Components node , which can be found in the Windows image pane. The most important thing is to understand which component and for what purpose you will add. Since we are interested in OEM information, it will not be difficult to localize the required component. It is called Microsoft-Windows-Shell-Setup> OEMInformation. To localize such a component, it remains only to add it to the oobeSystem stage, который также называется седьмым проходом. Теперь для того, чтобы его добавить, нужно выделить такой компонент, вызвать для него контекстное меню, а затем выбрать команду «Добавление параметра для прохода 7 oobeSystem» (Add Setting to Pass 7 oobeSystem). Процесс добавления изображен ниже:
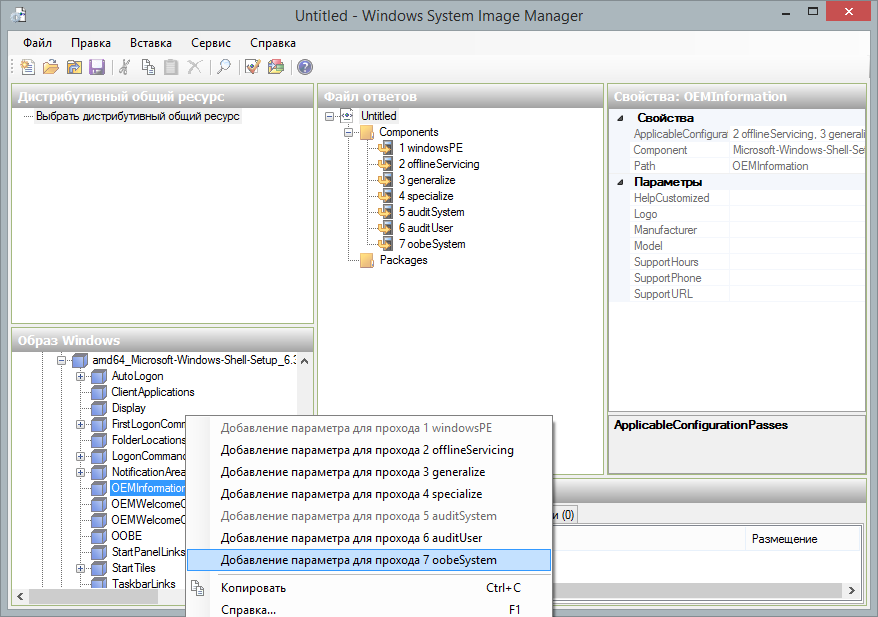
Рис. 2. Добавление компонента к 7-му проходу
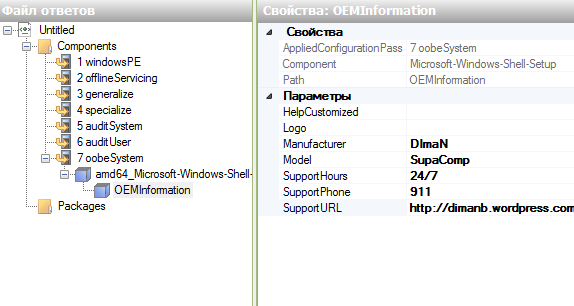
After that, finding the required parameters in the registry is not difficult. You just need to go to the seventh pass of the answer file and find the component you just added. On the right, on the properties panel of the component you added, all possible parameters that the operating system allows you to change will be displayed. As you can see in the following illustration, you can use the following parameters to change the OEM information (parameters in the system registry are created with the same names):
- Logo The . Represents the path to the logo. Here you should pay attention to the fact that the image must be saved in BMP format, and its size should not exceed 120X120 pixels. Moreover, be sure to pay attention to the fact that such a picture should be located on the target computer and the length of the line you specified should not exceed 259 characters;
- Manufacturer . This parameter allows you to determine the name of the computer manufacturer. The length of this line is also limited - 256 characters;
- Model . This parameter is the model of the target computer. The limit on the number of characters of this parameter is the same as the previous parameter;
- SupportHours . This is also a regular string parameter, with which you are allowed to specify the hours of support;
- SupportPhone . Ordinary phone number for the specified support service;
- SupportURL . The last available option where you are allowed to define a link to the computer manufacturer’s website. Here, the maximum line length can already be not 256 characters, but 2083.
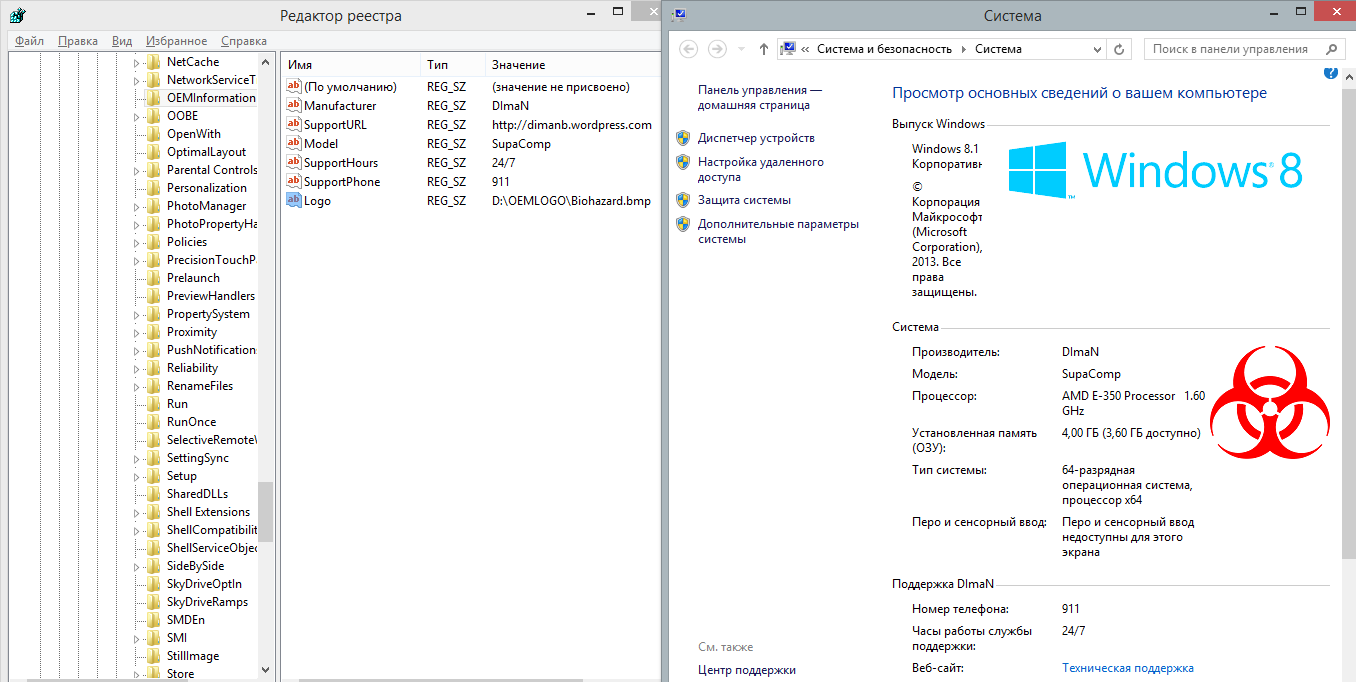
These parameters are shown below: Fig. 3. OEM information parameters in the Windows Installation Manager. We have already figured out the parameters and, in so doing, partially solved the problem of localizing the registry settings. But you still have to find out exactly where such parameters will be created. How can I find the section itself now? This is also nothing complicated. In order to find out which registry key will be used, you should create an installation image and deploy it to the tested virtual (or physical) machine. After that, you will need to open the registry editor and search for the registry key that will match the component you added, that is, OEMInformation . All these string type parameters (REG_SZ) will be saved in the section
HKLM \ SOFTWARE \ Microsoft \ Windows \ CurrentVersion \ OEMInformation . As you can see in the following illustration, in this section you can find the settings you configured, and the “System” window will look like the one shown on the right: Fig. 4. Parameters in the system registry and the result of their application
Centralized distribution of OEM information to previously deployed systems
In the event that you have already managed to install operating systems on your client computers, and after that you need to make changes to the parameters discussed earlier, naturally, you can take advantage of the functionality of Group Policy. As you might have guessed, the administrative template policy settings for setting such information simply do not exist. For this reason, we will need to take advantage of workarounds, namely to turn to Group Policy preferences.
Suppose we need to make changes to the system properties window only for computers on which Windows 8.1 is installed. In this case, this whole task can be conditionally divided into 3 stages, namely: copying the desired image to the same location on client computers, creating new system registry parameters, and also targeting the created parameters only to a certain circle of computers (machines that work under Windows 8.1). Let's consider everything in order:
- To get started you want to open a snap-in " Group Policy Management » ( Group is the Policy Management ) and create target the GPO, for example, " OEMInfo », then from the context menu of the object you want to open snap-in " Group Policy Management Editor » ( Group is the Policy Management Editor );
- The longer the displayed snap should go to the node " Computer Configuration » ( Computer the Configuration ), since these parameters are independent of the logged on user, and registry settings are in HK_LOCAL_MACHINE section, and then subsequently go to the node " Setting \ Configuration Windows \ Files »( Preferences \ Windows Settings \ Files ), call the context menu in the details pane and select the" Create " command , and then" File "( New> File );
- The display items preference new file properties dialog box, select the action " Create " ( the Create ), and in text fields " Source Files " and " destination file " ( the Source file (s) and Destination file ) to specify the path to the copied files on a file a resource (for example, \\ DC \ Logo \ Biohazard.bmp) and a new path to the file on the client machine (say, c: \ OEMLOGO \ Biohazard.bmp). The dialog box for the created preference item is shown below:
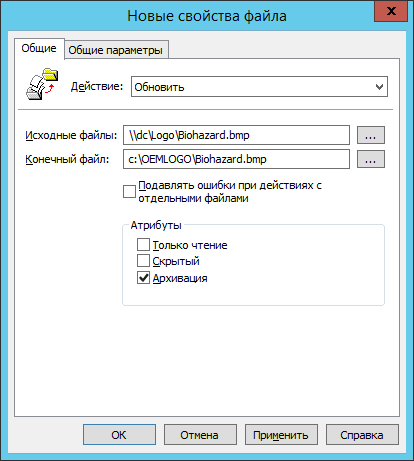
Fig. 5. File preference item - Now you should create all six registry settings. To do this in the same site " Configuring the Windows » you need to go to the site, " Register » ( Registry ). Here, in the details, to create the first item you will need to preferences from the context menu select the command " Create " and " registry entry " ( the New> Registry Item );
- In the dialog box for the new registry preference item, you need to fill in much more parameters than in the previous case. Here, since the registry entries are created for the first time, it follows from the drop-down list, select the action command " Start » ( the Create ). From the drop-down list of " bush » ( Hive ) select the registry key in which the desired parameter is created. In this case, it will be HKEY_LOCAL_MACHINE . Using a text field " Path registry » ( Key the Path) you must define the section in which the parameters will be created. Since this section is not initially available in the registry editor, it is simply pointless to call the browser of registry entries, and you will need to type the entire path manually. In this example, this path will look like this: SOFTWARE \ Microsoft \ Windows \ CurrentVersion \ OEMInformation . The above three parameters will be identical for all six preference items created. The following three parameters: “ Parameter Name ”, “ Parameter Type ” and “ Value ” ( Value name , Value type , Value data ) are used to determine the name of the parameter (for example, Logo), its type, to which REG_SZ belongs (in all six cases), as well as the value itself, which in the case of this parameter will look like " C: \ OEMLOGO \ Biohazard.bmp ". The dialog box for the populated tab of the general parameters of the registry preferences item is shown below:
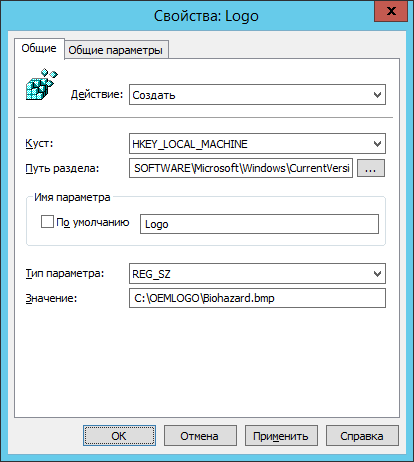
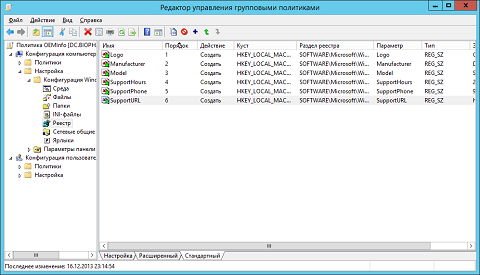
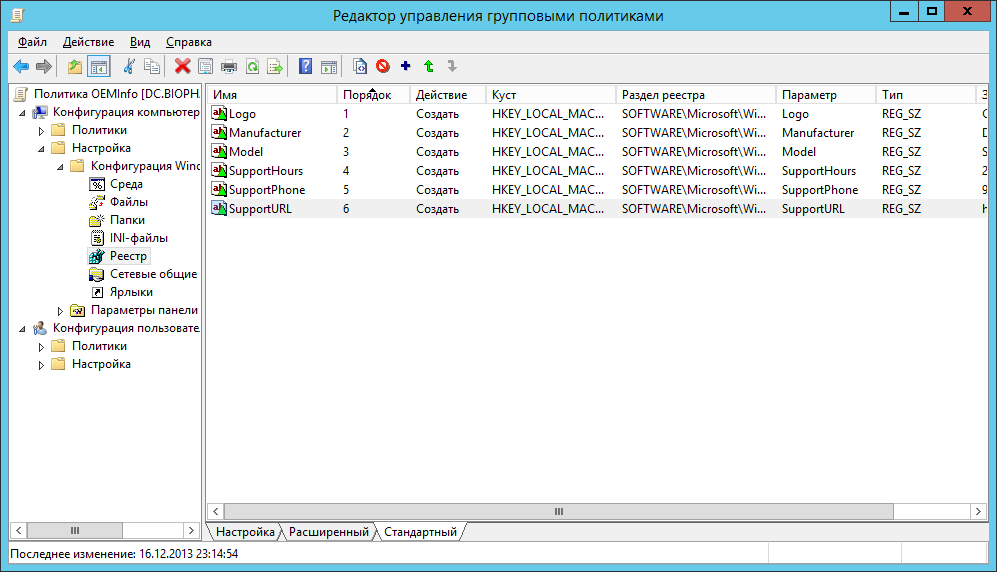
Fig. 6. Creating a registry preference item - Now, to quickly create the remaining five preference items, you can copy the created first item to the clipboard and perform the paste operation five times in a row. After that, it remains only to change the last three parameters in the properties dialog of the duplicated preference items, and all the required items will be created. Ultimately, the window snap the Group Policy Management Editor window should look like this: Fig. 7. Group Policy Management Editor with preference items created
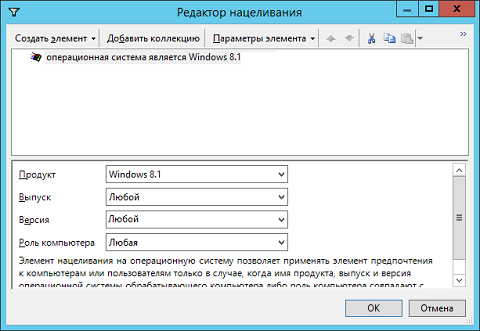
- There remains the task of targeting the generated preference items. To do it, open the Preferences dialog box Properties of elements and go to the tab " General settings » ( the Common the Options ). Here you need to check the box on the option " Targeting element level » ( Item-level targeting is ) and clicking on " Targeting » ( the Targeting ), go to the Editor targeting. While in the target processor, you will need to create a list of items to select an item " Operating system » ( the Operating the System), and then in the drop-down list of products indicate that the target operating system should be Windows 8.1. After the targeting element has been added, you can save changes to the preference elements. Editor targeting shown in the following illustration: Fig. 8. Targeting editor of previously created preference items
- After all the actions have been completed, feel free to close the snap-in of the GPME editor, associate the GPO with the necessary unit and update the policy settings on the target computers.

Ultimately, after updating the policy settings on client computers, the system properties window should look exactly the same as in illustration # 4 in the current article.
Conclusion
In this article, you learned how to find and create parameters in the registry that are necessary to add new fields in the properties window of the Windows operating system. The algorithm for searching for such parameters using the Windows Installation Manager was examined, as well as the principle of their centralized configuration using the group policy functionality. I hope that the information in this article turned out to be useful for you, and if you want to find out how you can execute a particular scenario with which you have difficulties with the means of managing registry settings and group policy, write about this scenario in the comments to this article, and I will try to parse your question in one of the following articles on using the functionality of Group Policy.