RabbitMQ tutorial 3 - Publish / Subscribe
- From the sandbox
- Tutorial
I want to continue the series of translation of lessons from the official site . Examples will be in php, but they can be implemented on most popular languages .
In a previous article, the creation of a work message queue was discussed. The assumption was made that each message will be sent to one handler (worker). This article will complicate the task - we will send a message to several subscribers. This pattern is known as “ publish / subscribe ”.
To understand this pattern, we will create a simple logging system. It will consist of two programs - the first will create logs, the second will read and print them.
In our logging system, each program the subscriber will receive every message. Thanks to this, we can start one subscriber to save the logs to disk, and then at any time we can create another subscriber to display the logs on the screen.
Essentially, each message will be broadcast to each subscriber.
In previous articles, we worked with the queue to send and receive messages. Now consider the advanced Rabbit messaging model.
Recall the terms of the previous article:
The main idea in the Rabbit message sending model is that the producer never sends messages directly to the queue. In fact, quite often the provider does not know if its message has reached a particular queue.
Instead, the provider sends a message to the access point. There is nothing complicated at the access point. The access point performs two functions:
- receives messages from the provider;
- sends these messages to the queue.
The access point knows exactly what to do with incoming messages. Send a message to a specific queue, or to several queues, or do not send to anyone and delete it. These rules are described in an exchange type.
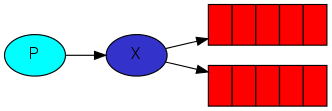
There are several types: direct, topic, headers and fanout. We will focus on the last type of fanout. Create an access point with this type and call it - logs:
The type fanout is very simple. He copies all the messages that come to him in all the queues that are available to him. This is what we need for our logging system.
To see all the access points on the server, you must run the rabbitmqctl command:
We see a list of access points with the name amq. * And an access point without a name, which is used by default (it is not suitable for our task).
In previous articles, we did not know anything about access points, but still we could send letters to the queue. This was possible because they used the default access point, which is identified by the empty string “”.
Recall how we sent letters before:
The default access point or anonymous access point is used here: the message is sent to the queue identified by the routing_key key. The key “routing_key” is passed through the third parameter of the basic_publish function.
Now we can send a message to our named access point:
All this time we used the name of the queues (“hello” or “task_queue”). The ability to give names helps to specify a specific queue for workers, as well as to divide the queue between producers and subscribers.
But our logging system requires that all messages be sent to the queue, and not just a part. We also want messages to be current, not old. For this we need 2 things:
- Each time we connect to Rabbit, we create a new queue, or let the server create a random name;
- Each time the subscriber disconnects from Rabbit, we delete the queue.
In the php-amqplib client, when we access the queue without a name, we create a temporary queue with an automatically generated name:
The method will return the automatically generated queue name. It may be like this - 'amq.gen-JzTY20BRgKO-HjmUJj0wLg.'.
When the claimed connection is terminated, the queue is automatically deleted.
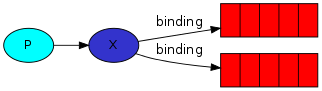
So, we have an access point of type fanout and a queue. Now we need to tell the access point to send a message to the queue. The relationship between the access point and the queue is called bindings.
From now on, messages for our queue go through the access point.
You can view the list of bindings using the rabbitmqctl list_bindings command.
The producer program that creates the posts has not changed from the previous article. The only important difference is that we now route messages to our named access point 'logs', instead of the default access point. We needed to specify the name of the queue when sending the message. But for an access point of type fanout, this is not necessary.
Consider the script code emit_log.php:
(emit_log.php source)
As you can see, after the connection is established, we create an access point. This step is necessary because the use of a non-existent access point is prohibited.
The message at the access point will be lost, since no queue is associated with the access point. But this is good for us: as long as there is not a single subscriber to our access point, all messages can be safely deleted.
Receive_logs.php Subscriber Code:
(receive_logs.php source)
If you want to save the logs to a file, you need to open the console and type:
If you want to display the logs on the screen, open another window and type:
Well, of course, launch the message producer:
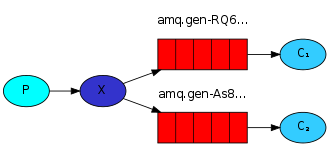
Using the rabbitmqctl list_bindings command we can verify that the code created the queue correctly and associated it with the access point. With two open receive_logs.php programs, you should have the following: It is shown here that the data of the access point logs are sent in two queues, the names of which are created automatically. This is exactly what we sought. The following article will describe how to listen to only a subset of messages.
Publish / Subscribe
In a previous article, the creation of a work message queue was discussed. The assumption was made that each message will be sent to one handler (worker). This article will complicate the task - we will send a message to several subscribers. This pattern is known as “ publish / subscribe ”.
To understand this pattern, we will create a simple logging system. It will consist of two programs - the first will create logs, the second will read and print them.
In our logging system, each program the subscriber will receive every message. Thanks to this, we can start one subscriber to save the logs to disk, and then at any time we can create another subscriber to display the logs on the screen.
Essentially, each message will be broadcast to each subscriber.
Exchange points
In previous articles, we worked with the queue to send and receive messages. Now consider the advanced Rabbit messaging model.
Recall the terms of the previous article:
- Producer (supplier) - a program that sends messages
- Queue - a buffer storing a message
- Consumer (Subscriber) - a program that accepts messages.
The main idea in the Rabbit message sending model is that the producer never sends messages directly to the queue. In fact, quite often the provider does not know if its message has reached a particular queue.
Instead, the provider sends a message to the access point. There is nothing complicated at the access point. The access point performs two functions:
- receives messages from the provider;
- sends these messages to the queue.
The access point knows exactly what to do with incoming messages. Send a message to a specific queue, or to several queues, or do not send to anyone and delete it. These rules are described in an exchange type.
There are several types: direct, topic, headers and fanout. We will focus on the last type of fanout. Create an access point with this type and call it - logs:
$channel->exchange_declare('logs', 'fanout', false, false, false);
The type fanout is very simple. He copies all the messages that come to him in all the queues that are available to him. This is what we need for our logging system.
View a list of access points:
To see all the access points on the server, you must run the rabbitmqctl command:
$ sudo rabbitmqctl list_exchanges
Listing exchanges ...
        direct
amq.direct      direct
amq.fanout      fanout
amq.headers     headers
amq.match       headers
amq.rabbitmq.log        topic
amq.rabbitmq.trace      topic
amq.topic       topic
logs    fanout
...done.
We see a list of access points with the name amq. * And an access point without a name, which is used by default (it is not suitable for our task).
Name of access points.
In previous articles, we did not know anything about access points, but still we could send letters to the queue. This was possible because they used the default access point, which is identified by the empty string “”.
Recall how we sent letters before:
$channel->basic_publish($msg, '', 'hello');
The default access point or anonymous access point is used here: the message is sent to the queue identified by the routing_key key. The key “routing_key” is passed through the third parameter of the basic_publish function.
Now we can send a message to our named access point:
$channel->exchange_declare('logs', 'fanout', false, false, false);
$channel->basic_publish($msg, 'logs');
Time Queues:
All this time we used the name of the queues (“hello” or “task_queue”). The ability to give names helps to specify a specific queue for workers, as well as to divide the queue between producers and subscribers.
But our logging system requires that all messages be sent to the queue, and not just a part. We also want messages to be current, not old. For this we need 2 things:
- Each time we connect to Rabbit, we create a new queue, or let the server create a random name;
- Each time the subscriber disconnects from Rabbit, we delete the queue.
In the php-amqplib client, when we access the queue without a name, we create a temporary queue with an automatically generated name:
list($queue_name, ,) = $channel->queue_declare("");
The method will return the automatically generated queue name. It may be like this - 'amq.gen-JzTY20BRgKO-HjmUJj0wLg.'.
When the claimed connection is terminated, the queue is automatically deleted.
Bindings
So, we have an access point of type fanout and a queue. Now we need to tell the access point to send a message to the queue. The relationship between the access point and the queue is called bindings.
$channel->queue_bind($queue_name, 'logs');
From now on, messages for our queue go through the access point.
You can view the list of bindings using the rabbitmqctl list_bindings command.
Sending to all queues:
The producer program that creates the posts has not changed from the previous article. The only important difference is that we now route messages to our named access point 'logs', instead of the default access point. We needed to specify the name of the queue when sending the message. But for an access point of type fanout, this is not necessary.
Consider the script code emit_log.php:
channel();
$channel->exchange_declare('logs', 'fanout', false, false, false);
$data = implode(' ', array_slice($argv, 1));
if(empty($data)) $data = "info: Hello World!";
$msg = new AMQPMessage($data);
$channel->basic_publish($msg, 'logs');
echo " [x] Sent ", $data, "\n";
$channel->close();
$connection->close();
?>
(emit_log.php source)
As you can see, after the connection is established, we create an access point. This step is necessary because the use of a non-existent access point is prohibited.
The message at the access point will be lost, since no queue is associated with the access point. But this is good for us: as long as there is not a single subscriber to our access point, all messages can be safely deleted.
Receive_logs.php Subscriber Code:
channel();
$channel->exchange_declare('logs', 'fanout', false, false, false);
list($queue_name, ,) = $channel->queue_declare("", false, false, true, false);
$channel->queue_bind($queue_name, 'logs');
echo ' [*] Waiting for logs. To exit press CTRL+C', "\n";
$callback = function($msg){
  echo ' [x] ', $msg->body, "\n";
};
$channel->basic_consume($queue_name, '', false, true, false, false, $callback);
while(count($channel->callbacks)) {
    $channel->wait();
}
$channel->close();
$connection->close();
?>
(receive_logs.php source)
If you want to save the logs to a file, you need to open the console and type:
$ php receive_logs.php > logs_from_rabbit.logIf you want to display the logs on the screen, open another window and type:
$ php receive_logs.phpWell, of course, launch the message producer:
$ php emit_log.phpUsing the rabbitmqctl list_bindings command we can verify that the code created the queue correctly and associated it with the access point. With two open receive_logs.php programs, you should have the following: It is shown here that the data of the access point logs are sent in two queues, the names of which are created automatically. This is exactly what we sought. The following article will describe how to listen to only a subset of messages.
$ sudo rabbitmqctl list_bindings

Listing bindings ...

logs exchange amq.gen-JzTY20BRgKO-HjmUJj0wLg queue []

logs exchange amq.gen-vso0PVvyiRIL2WoV3i48Yg queue []

...done.