HAPRoxy for Percona or Galera on CentOS. Its configuration and monitoring in Zabbix
- Tutorial
A very short article about how you can use HAProxy as a balancer for multi-master MySQL servers such as Percona or Galera.
I want to note that this instruction was born in the process of implementing Zabbix within the walls of Acronis .
In the process of examination and my research, she proved her right to life and safely serves us faithfully day by day.
For those who are not familiar with HAProxy, a quote about the purpose of the product:
With an increase in the load or attendance of the project, sooner or later, vertical scaling (increasing server resources such as memory, disk speed, etc.) rests against a certain limit and does not give a noticeable increase. In this case, horizontal scaling is used - adding new servers with redistributing the load between them.
In addition to increasing power, horizontal scaling adds reliability to the system - if one of the servers fails, the load will be balanced between those working and the application will live.
From words to action, installation and configuration is very simple:
In the previous article I described in detail what preliminary operations I performed on clean CentOS 6.4, my recommendations are current and here, all packages will be indicated taking into account the recommendations in the previous material :
Repositories are connected, the system is up to date state, proceed to install HAProxy:
# Put haproxy
yum install haproxy mariadb-client php-mysql php-cli -y
# We write configs
mv /etc/haproxy/haproxy.cfg /etc/haproxy/haproxy.cfg.old
[root @ rs-haproxy ~] # nano /etc/haproxy/haproxy.cfg
global
daemon
maxconn 4096
# If you want to see debugging information, this item should be commented out
quiet
# And this one, on the contrary, uncommented
# debug
user haproxy
group haproxy
# We will use this socket for monitoring in zabbix
stats socket / var / run / haproxy
pidfile / var /run/haproxy.pid
defaults
mode http
option tcplog
log global
option dontlognull retries 3 option redispatch
maxconn 2000
contimeout 5000
clitimeout 50000
srvtimeout 50000
option tcplog
# Specify a valid address on the server and the port on which our haproxy
listen will listen MySQL the address on which we are listening-: 3306
mode tcp
# roundrobin - writes to all servers in sequence, this is good in read mode but can cause problems if you write this way to the base
# balance roundrobin
# leastconn this mode is great when using haproxy as a failover proxy, it uses the last working server and only it
balance leastconn
# httpchk forces haproxy to check the server for availability before sending each of the
option httpchk requests
# Below is a list of servers, their port and the port on which the connection will be made to check the viability
server address address: 3306 check port 50005 inter 12000 rise 3 fall 3
server address address: 3306 check port 50005 inter 12000 rise 3 fall 3
# Servers with the backup flag are used only if other servers are not available
server address: 3306 check port 50005 inter 12000 rise 3 fall 3 backup
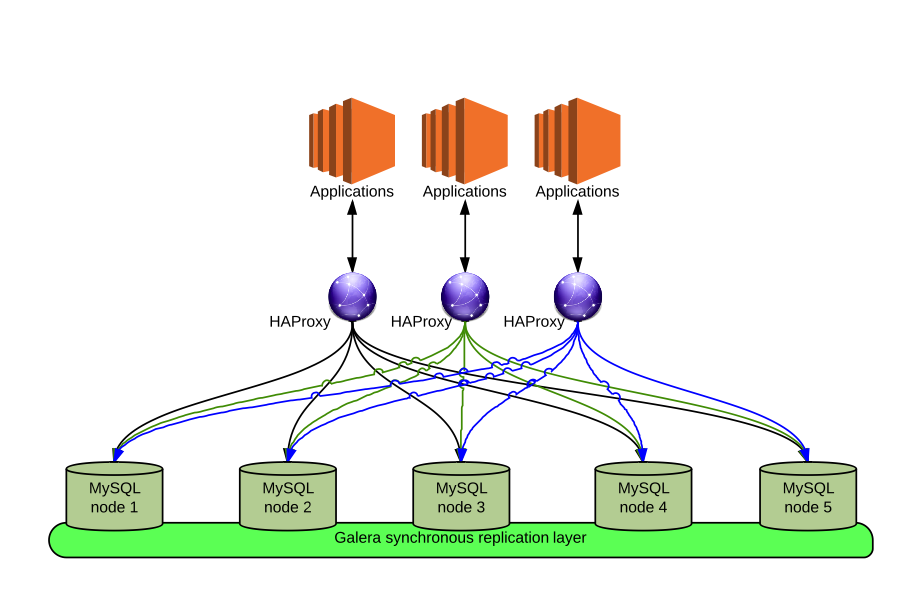
Now let's move on to the servers of our percona or galera
# We set up a mechanism for checking our databases, for this you need xinetd
yum install -y xinetd
[root @ xtrabackup-node-01 ~] # nano /etc/xinetd.d/mysqlchk
# default: on
# description: mysqlchk
service mysqlchk
{
disable = no
flags = REUSE
socket_type = stream
# the test port we specified above
port = 50005
wait = no
user = nobody
server = / usr / bin / clustercheck
log_on_failure + = USERID
# Addresses from which MySQL service status check is allowed
only_from = 10.100.100.0/24
per_source = UNLIMITED
}
# It is very important to add this entry, otherwise it will not work
root @ xtrabackup-node-01 ~] # nano / etc / services
mysqlchk 50005 / tcp # mysqlchk
# Add service to startup and start it
chkconfig xinetd on
/etc/init.d/xinetd start
# Allow access to the verification port
iptables -A INPUT -p tcp -m state --state NEW -m tcp --dport 50005 -j ACCEPT
service iptables save
# Add clustercheck permissions
GRANT PROCESS ON *. * TO 'clustercheckuser' @ 'localhost' IDENTIFIED BY 'clustercheckpassword!';
flush privileges;
# Check if everything worked out, it should look something like
[root @ xtrabackup-node-01 ~] # / usr / bin / clustercheck
HTTP / 1.1 200 OK
Content-Type: text / plain
Connection: close
Content-Length: 40
Percona XtraDB Cluster Node is synced.
# Now let's check the operation from our haproxy host
[root @ rs-haproxy ~] # telnet address 50005
Trying address ...
Connected to address.
Escape character is '^]'.
HTTP / 1.1 200 OK
Content-Type: text / plain
Connection: close
Content-Length: 40
Percona XtraDB Cluster Node is synced.
Connection closed by foreign host.
Done! it is necessary to do this operation on all percona / galera nodes
HAProxy monitoring for MYSQL in Zabbix
# This is the main tool for our script, install it
yum install -y socat
# Configure sudo for zabbix if it has not been done before
usermod -s / bin / bash zabbix
echo 'zabbix ALL = (ALL) NOPASSWD: ALL' >> / etc / sudoers
sed -i 's / Defaults \ requiretty / # Defaults \ requiretty / g' / etc / sudoers
# Create a folder for our scripts
mkdir -p / etc / zabbix / scripts /
chmod 750 / etc / zabbix / scripts /
# Actually the rm script itself
-f /etc/zabbix/scripts/haproxy.mysql
nano /etc/zabbix/scripts/haproxy.mysql
if [[ -z $1 || -z $2 ]]; then
 servers=`echo "show stat" | sudo socat /var/run/haproxy stdio | sed 's/,/\ /g' | awk '{print $2}' | grep -v -e "pxname" -e '^$'`
  if [[ -n ${servers} ]]; then
    JSON="{ \"data\":["
    for DEV in ${servers}; do
      JSON=${JSON}"{ \"{#SRV}\":\"${DEV}\"},"
    done
    JSON=${JSON}"]}"
   echo ${JSON}
  fi
  exit 0
else
server="$2"
# echo $server
if [ ${1} = "qcur" ]; then
# echo $1
echo "show stat" | sudo socat /var/run/haproxy stdio | grep "MySQL,${server}"| sed 's/,/\ /g' | awk '{print $3}'
  exit 0
  fi
 if [ ${1} = "qmax" ]; then
echo "show stat" | sudo socat /var/run/haproxy stdio | grep "MySQL,${server}" | sed 's/,/\ /g' | awk '{print $4}'
  exit 0
  fi
if [ ${1} = "scur" ]; then
echo "show stat" | sudo socat /var/run/haproxy stdio | grep "MySQL,${server}" | sed 's/,/\ /g' | awk '{print $5}'
  exit 0
  fi
  if [ ${1} = "smax" ]; then
echo "show stat" | sudo socat /var/run/haproxy stdio | grep "MySQL,${server}" | sed 's/,/\ /g' | awk '{print $6}'
  exit 0
  fi
    if [ ${1} = "econ" ]; then
echo "show stat" | sudo socat /var/run/haproxy stdio | grep "MySQL,${server}" | sed 's/,/\ /g' | awk '{print $14}'
  exit 0
  fi
if [ ${1} = "qlimit" ]; then
echo "show stat" | sudo socat /var/run/haproxy stdio | grep "MySQL,${server}" | sed 's/,/\ /g' | awk '{print $26}'
  exit 0
  fi
  fi
The script itself detects available servers and passes them to zabbix.
Check this:
[root @ rs-haproxy ~] # echo "show stat" | sudo socat / var / run / haproxy stdio | sed 's /, / \ / g' | awk '{print $ 2}' | grep -v -e "pxname" -e '^ $'
FRONTEND
10.100.100.246
BACKEND
# Minimum settings for our zabbix-agent
echo Timeout = 30 >> /etc/zabbix/zabbix_agentd.conf
echo Include = / etc / zabbix / zabbix_agentd.d / >> /etc/zabbix/zabbix_agentd.conf
# We apply the rights to execute a new script
chown zabbix: zabbix -R / etc / zabbix / scripts /
chmod + x /etc/zabbix/scripts/haproxy.mysql
# Pass zabbix our UserParameter
mkdir -p /etc/zabbix/zabbix_agentd.d/
rm -f /etc/zabbix/zabbix_agentd.d/haproxy.mysql.conf
touch /etc/zabbix/zabbix_agentd.d/haproxy.mysql.conf
echo 'UserParameter = haproxy.mysql [*], / etc / zabbix / scripts / haproxy.mysql "$ 1" "$ 2"' >> /etc/zabbix/zabbix_agentd.d/haproxy.mysql.conf
Now let's check if our script works correctly:
su zabbix
# This is how our automatic
bash-4.1 server discovery works $ /etc/zabbix/scripts/haproxy.mysql
{"Data": [{"{#SRV}": "FRONTEND"}, {"{#SRV}": "10.100.100.246"}, {"{#SRV}": "BACKEND"},]}
# Ask for any data
bash-4.1 $ /etc/zabbix/scripts/haproxy.mysql qcur FRONTEND
115
Everything seems to be in order! Reboot the service and enjoy the logs
/etc/init.d/zabbix-agent restart && tail -f -n 100 /var/log/zabbix/zabbix_agentd.log
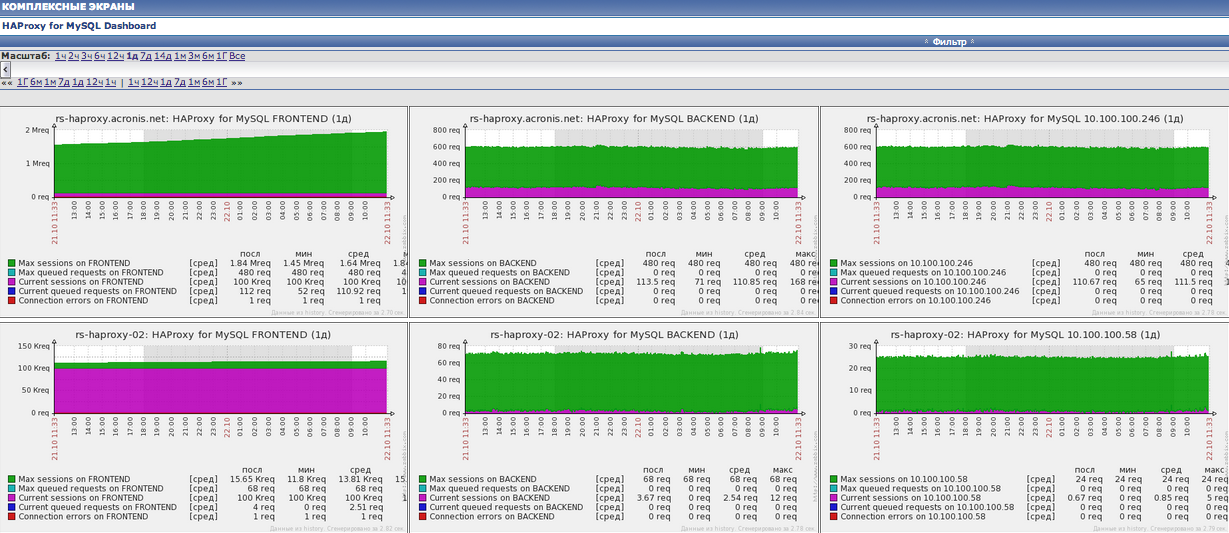
This is how our template looks like under haproxy.

Here you can download the template for import into zabbix.