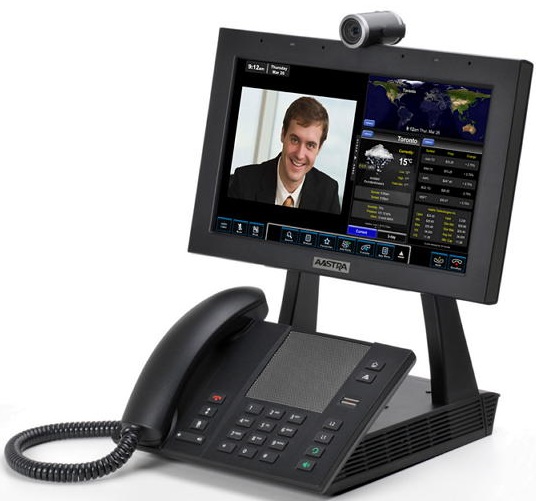
Collaboration Aastra Blustar 8000i and Cisco CUCM 9.0 Video Terminals
- Tutorial
In this article, I will continue the theme begun by my colleague mrppa here http://habrahabr.ru/post/191976/ , work together video terminals Aastra Blustar 8000i with third-party IP-PBX, in my case it will be Cisco CUCM 9.0.
This article will be useful for VoIP engineers who are implementing and operating Cisco Call Manager, and who are faced with the task of organizing video communication of users, as well as novice CUCM engineers, as this article will discuss the initial configuration of Cisco CUCM 9.0 for 3rd -Party SIP devices.
Of course, Cisco has its own video-oriented solution - it’s Tandberg’s TelePresence EX series (EX90 and EX60) solution, and this article will not compare, for example, between the Aastra 8000i and TelePresence EX90. This article is an attempt to consider other options for video devices when solving the problem of video calls, in addition to the choice that Cisco offers.
Another goal of this study is to study the functionality of Cisco CUCM and the possibility of its integration with other VoIP solutions (Aastra, Mitel, MS Lync, Asterisk) based on our Treolan demo laboratory, therefore, if Cisco CUCM specialists see any controversial issues in the article - Please indicate them in the comments, as I am not a CUCM specialist.
As a test bench with Cisco CUCM, it was decided to install the Cisco CUCM 9.0 distribution in our shared virtual PBX cloud under vmWare vSphere 5.1. Installation under vmWare is trivial and will not be described in the article, I will only note the parameters of the virtual machine: 2 vCPU Intel Xeon CPU E5-2665 0 @ 2.40GHz, disk 1: 100Gbytes, 4096Mbytes RAM. The key points are at least 2 vCPUs, a hard disk of at least 80 GB and at least 3 GB of memory.
Cisco CUCM 9.0 has a trial period of 60 days, that is, 60 days you can work fully and for free with the station without applying a license. During this time, you can fully familiarize yourself with its functionality, you can also generate a free license for 6 months on the site cisco.com. For testing in the laboratory, this is more than enough for me.
So, after installing the IP address of our installed Cisco CUCM 9.0: 172.19.19.50. All settings are carried out through the web-based interface, we turn to the station at 172.19.19.50 and select Cisco Unified Communications Manager.
To get started with the newly installed Cisco CUCM, you should consider a number of nuances that were not obvious to me. After installation, all services, including the CallManager service, are disabled for Cisco CUCM — you need to activate them by switching to Cisco Unified Serviceability mode - in the upper right corner, the Navigation combo box. Switch to this mode, then follow Tools-> Service Activation:

Just in case, I activated all services except the Cisco Messaging Interface, although this is not necessary - it’s better to consciously include the services you plan to work with, for example, the mandatory Cisco CallManager, TFTP server (which we will also use later).
Make sure that the services we need are launched in Tools-> Control Center - Feature Service:

The next caveat is that by default, Cisco CUCM would like to work using DNS names, not IP addresses, so all the names that you assigned during the installation process (for example, the Cisco CUCM server name) must be registered in the DNS server that you specified in the settings of this cucm. Otherwise, by default nothing will work until we change the names to addresses in the right places. On the one hand, it is useful to work with DNS names for higher fault tolerance of the entire system, but in this laboratory I do not need all this, so I will change all the names to IP addresses.
To do this, we return via the Navigation combo box to Cisco Unified CM Administration mode and then the System -> Server menu, click the Find button in the form that appears and see our only server, named by the DNS name during installation. We go into it and change this name to IP address:

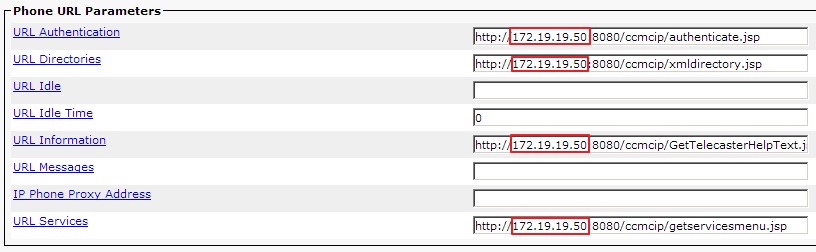
Also, in another place you should change the DNS name to IP addresses: System -> Enterprise Parameters -> Phone URL Parameters:
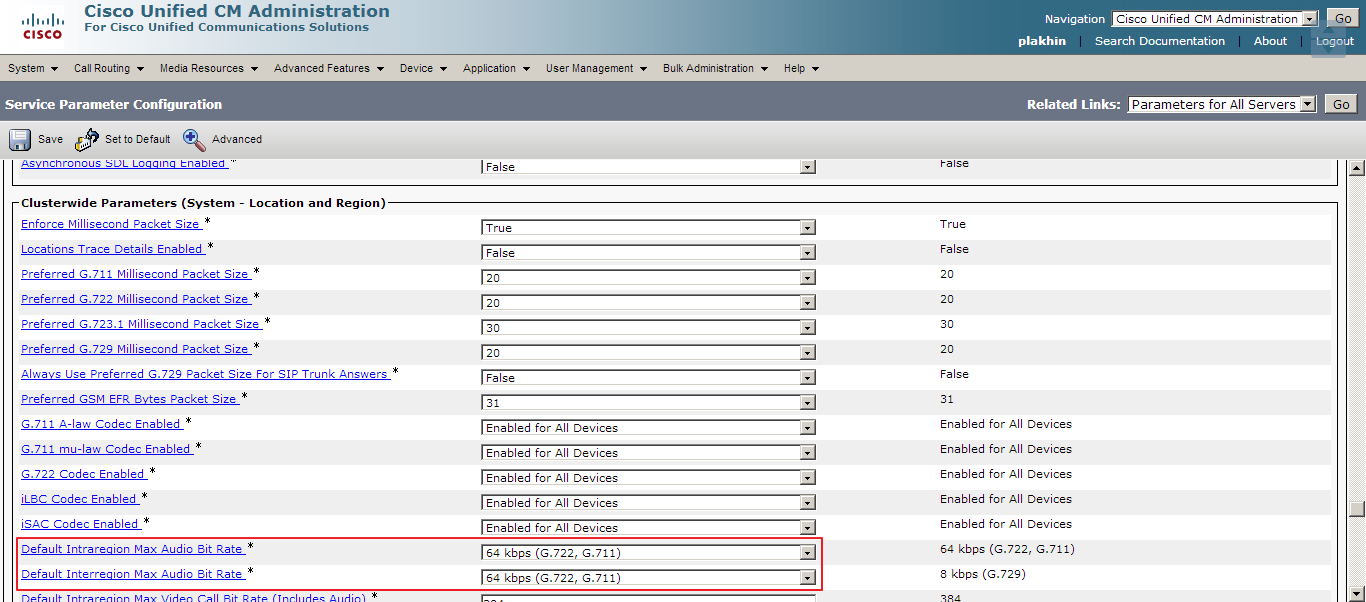
Also, according to the advice in one of the forums, I did default G.711 codec, this is done in System -> Service Parameters, in the combo box we select our only server 172.19.19.50 (Active), then we are interested in the Cisco CallManger (Active) service, and already in it the Clusterwide Parameters (System) section - Location and Region) and in it we change what is highlighted in the picture with a red frame:
This completes the initial configuration of Cisco CUCM 9.0, and CallManager is now able to register SIP subscribers and not bind to DNS names.
There are no particular nuances when setting up SIP subscribers for the Aastra 8000i, except for the video bandwidth. By default, the CUCM Region settings have a video bandwidth of 384 kbs, which does not give all the advantages of a picture with HD 720i (it will simply be displayed in lower resolution by 348 kbs) on the Aastra 8000i screen, so I increased this value to 1500 kbs. For these purposes, I decided to start a separate device pool, different from default, to which you can bind Region settings regarding the bitrate for video calls, which, in turn, we will announce here: System -> Region information -> Region:
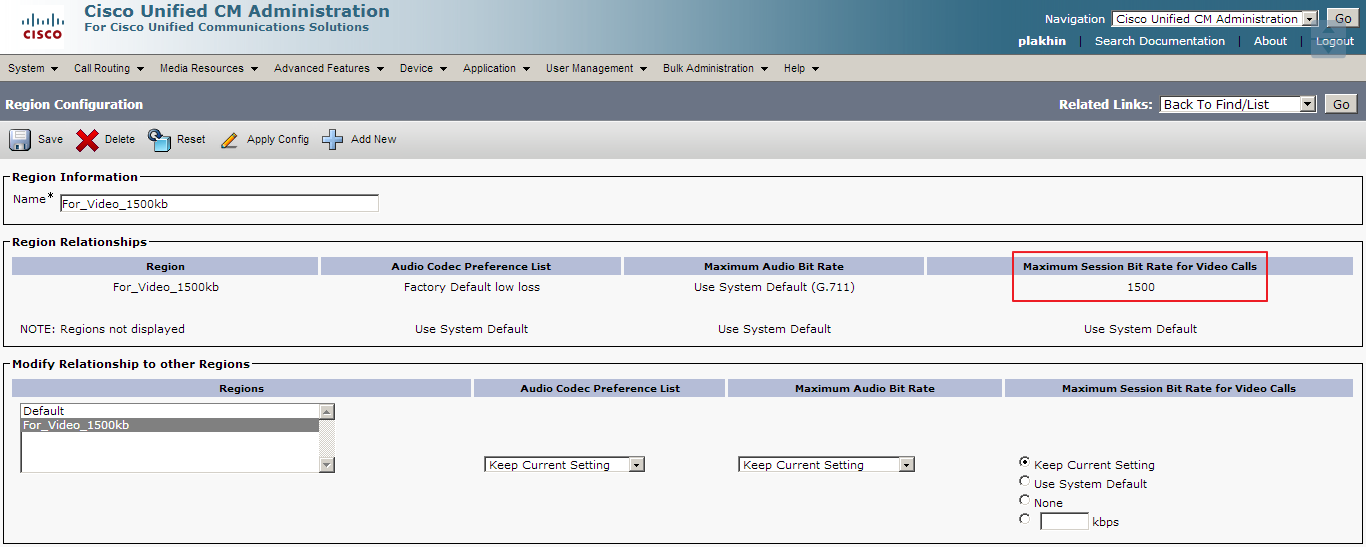
Initially, in the Regions section there will be only one profile - Default. We should add our new profile, which I called For_Video_1500kb, in which I changed the Maximum Session Bit Rate for Video Calls parameter and made it 1500 kbs.
Next, create a Device pool: System -> Device Pool -> Add new: We
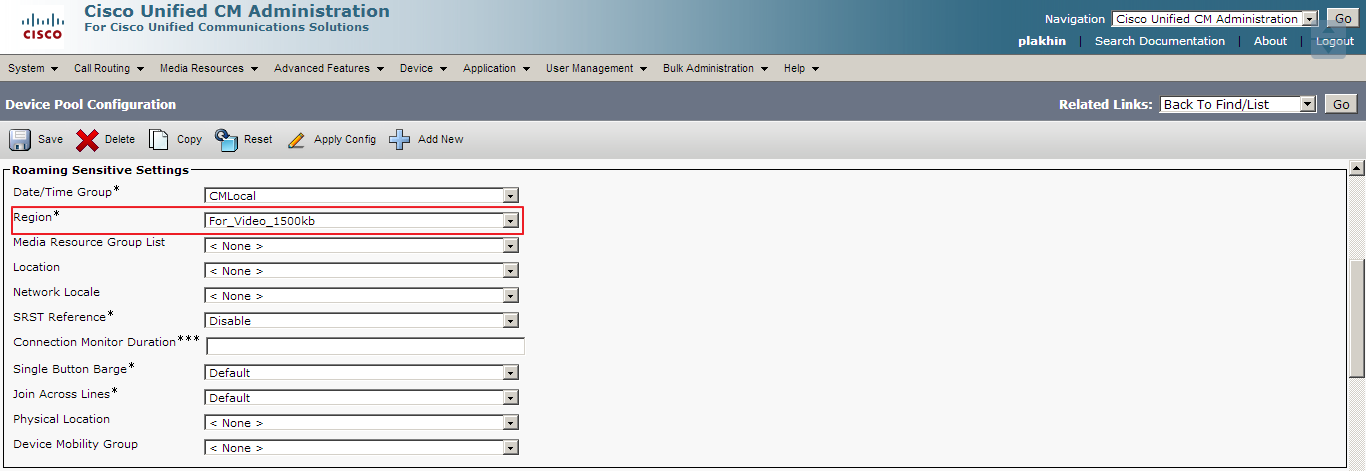
specify in it the For_Video_1500kb profile previously announced.
Next, we will get two users 901 and 902 for our two Aastra 8000i devices, there are no nuances here. Section User Management -> End User - Add New:

USER ID in this case will be SIP login, and Digest Credential - SIP password. The Password and PIN fields are used for something else, I made them match the Digest Credentials. Similarly, the plant and the user 902.
Further, describe devices that are linked to these users. Device -> Phone -> Add New:

Here you should select the type of phone Third-party SIP Device (Advanced).
Next, after clicking Next, the form for filling in the remaining parameters opens:
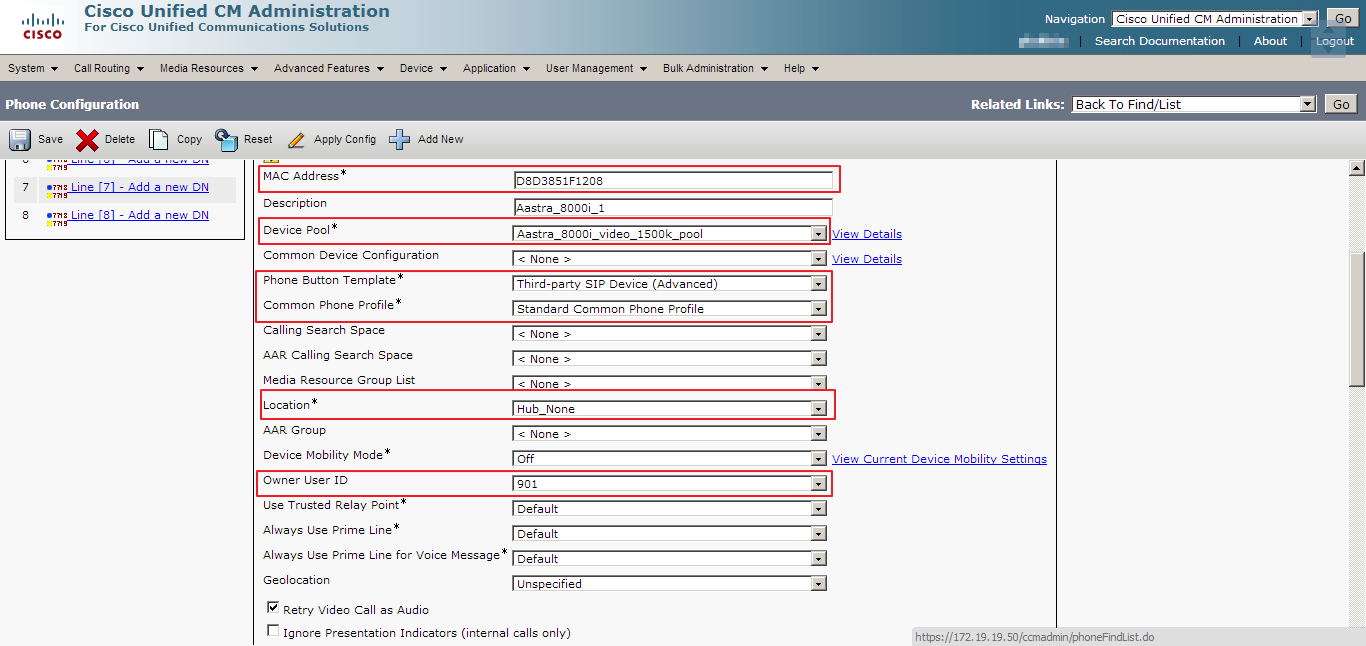
For third-party SIP devices, it is not necessary to enter the correct MAC address; here it is enough to enter an arbitrary twelve-digit number. Next, you should specify the Device Pool, which we created earlier for this type of device, otherwise if we leave Default, the video bitrate will be small and the image quality will be poor (but it will work).
Continuation of the Phone institution form:

That's it, the configuration of Cisco CUCM 9.0 is over, the station is ready to work with the Aastra 8000i, which we will configure now.
The configuration of the Aastra 8000i terminals is basically the same as described in the article habrahabr.ru/post/191976 in relation to Asterisk. The only caveat - since Cisco CUCM incorporates a TFTP server - there is no need to pick up any third-party server and use it. In any case, I will repeat the settings in this article using one of the terminals as an example.
After switching on and initial loading of the terminal, go to the main menu of the device: APP MENU -> TOOLS -> TERMINAL IDENTITY.
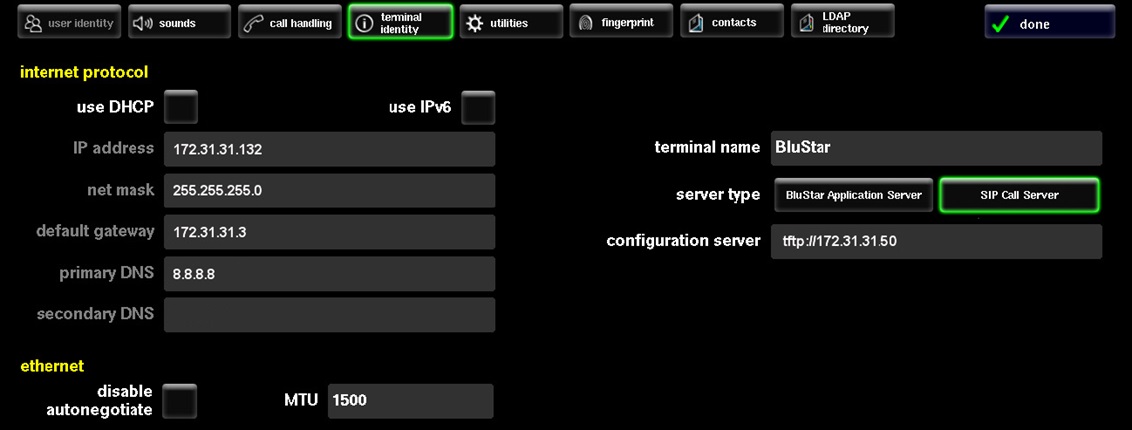
Here we need to enter the following network parameters for our terminal:
• IP address: 172.31.31.132
• Net mask: 255.255.255.0
• Default gateway: 172.31.31.3
• Primary DNS: 8.8.8.8
Thus, in the next line of the configuration server we indicate the address of the TFTP server, it matches the Cisco CUCM IP address in our case (make sure that the TFTP server service is up at the station): tftp: //172.19.19.50
After all this, click done, and the terminal will prompt you to restart to apply the entered parameters.
Each time the Aastra 8000i terminal starts, the device contacts the address specified in the configuration server line (according to the corresponding protocol, in our case it is tftp). Each terminal expects to find four configuration files at this address. These files must have the following names and be available on the tftp-server at the time of loading:
• aastra.cfg - contains configuration information that applies to all Blustar 8000i terminals.
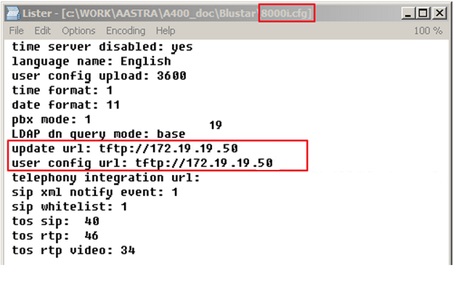
• 8000i.cfg - Contains information for a specific model (8000i).
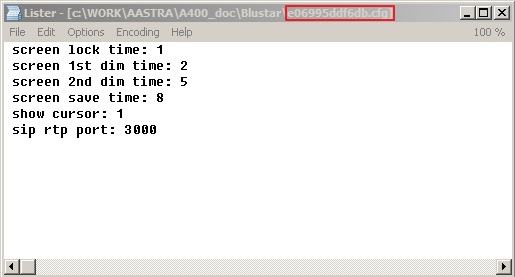
•.cfg - Contains configuration information for a specific Blustar 8000i device. The file name consists of the mac address of the terminal.
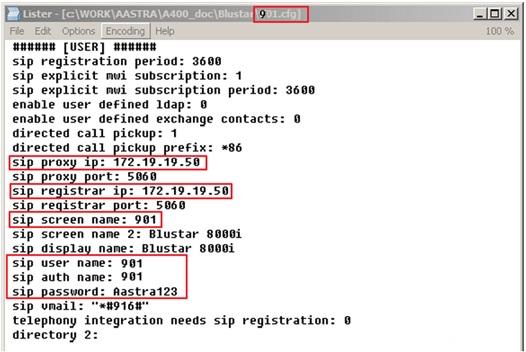
• user.cfg - contains information related to user configuration that cannot be configured through the Blustar 8000i terminal (ie SIP authentication, proxy server settings, registrar settings, etc.). * .cfg file can be edited even when the user is already logged in, however, the changes will not take effect until the next restart.
Next, we consider in more detail the four files necessary for setting up the Aastra 8000i terminal, with the MAC address E06995DDF6DB, with the SIP username 901, the password Aastra123, which must register on the SIP registrar with the address 172.19.19.50, when using the tftp server with the address 172.19.19.50:
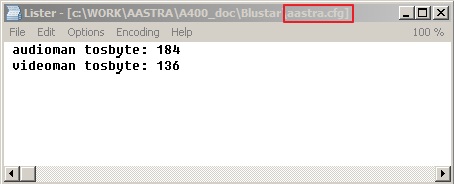
File aastra.cfg
File 8000i.cfg
File E06995DDF6DB.cfg
File 901.cfg (the file name is the same as the username that Aastra 8000i will log in to):
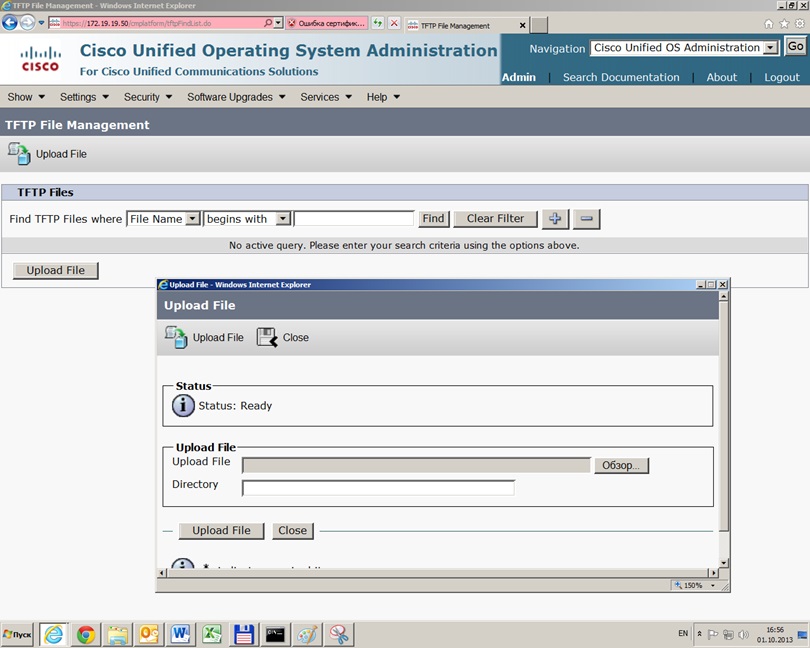
We upload all these files to the TFTP server of our Cisco CUCM. This is done in Cisco Unified OS Administration mode (upper right corner, Navigation combo box). In this mode, you will need the administrator login / password, which in general differs from the CallManager administrator login / password. In it we are interested in the Software Updates section. Next - TFTP file Management -> Upload File. We load all these files necessary for the operation of the Aastra 8000i.
After that, you can restart the Aastra 8000i terminals and enter the login and password:

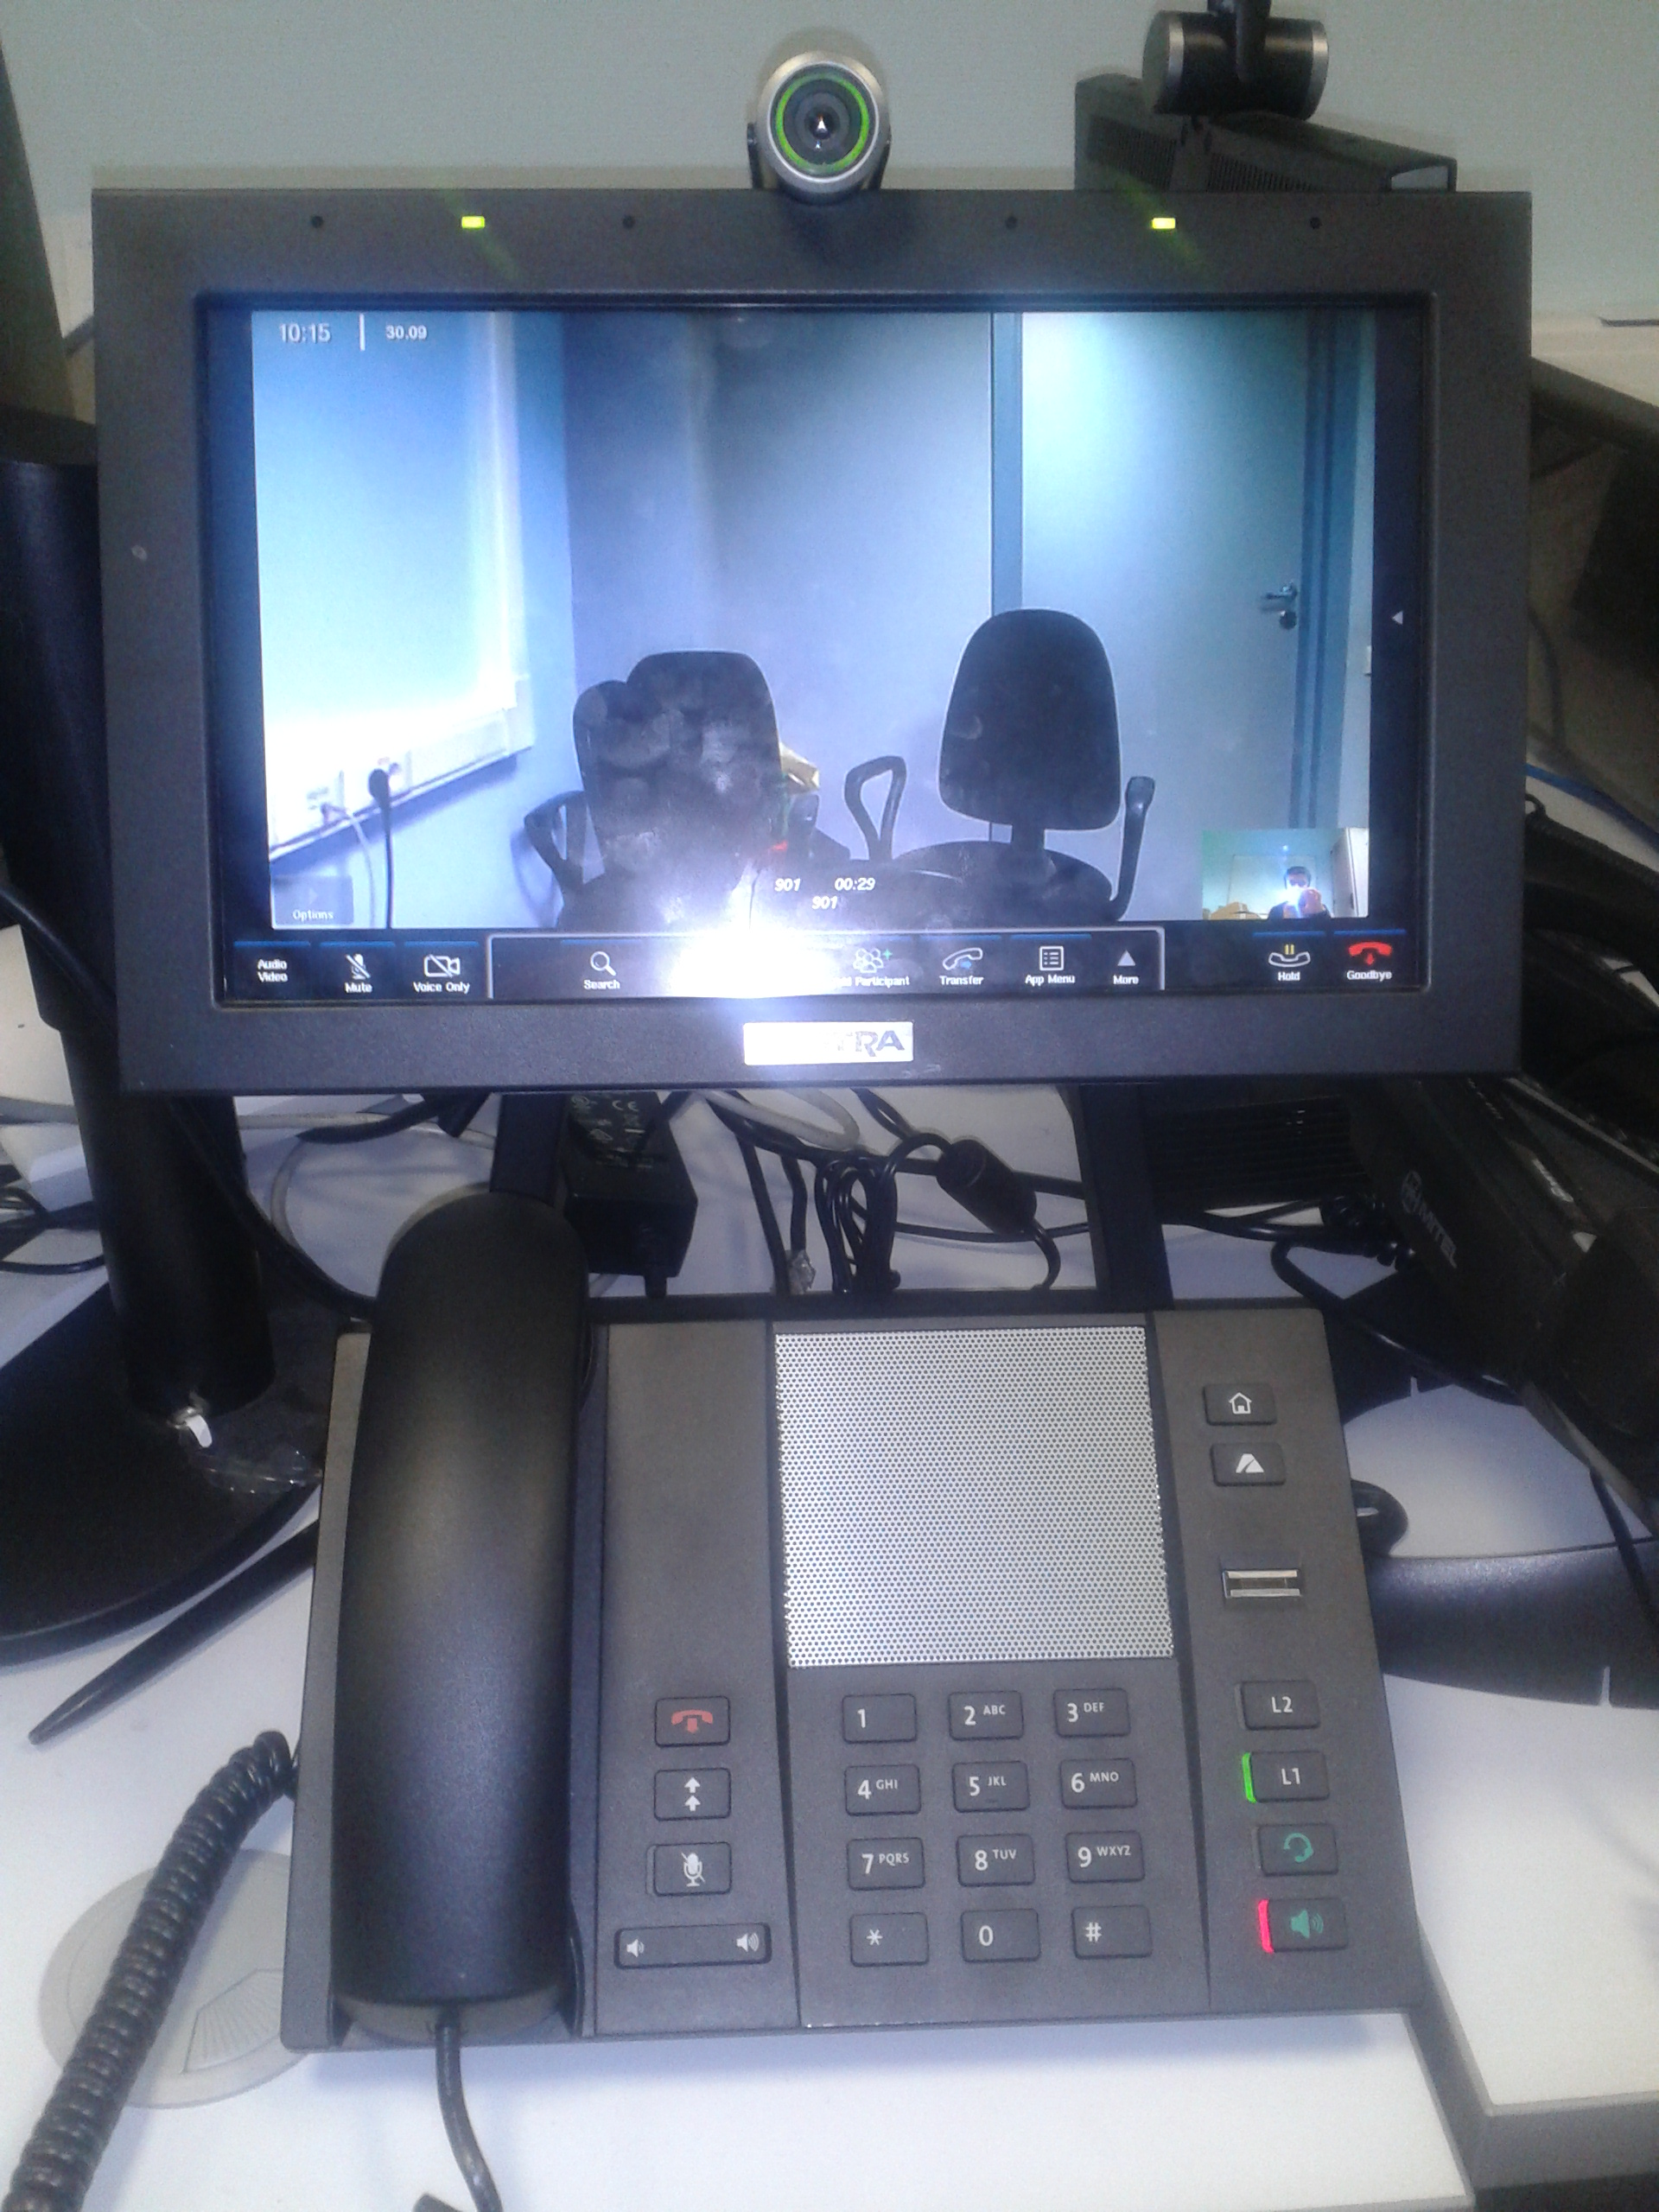
You can make a video call from one terminal to another:
This article will be useful for VoIP engineers who are implementing and operating Cisco Call Manager, and who are faced with the task of organizing video communication of users, as well as novice CUCM engineers, as this article will discuss the initial configuration of Cisco CUCM 9.0 for 3rd -Party SIP devices.
Of course, Cisco has its own video-oriented solution - it’s Tandberg’s TelePresence EX series (EX90 and EX60) solution, and this article will not compare, for example, between the Aastra 8000i and TelePresence EX90. This article is an attempt to consider other options for video devices when solving the problem of video calls, in addition to the choice that Cisco offers.
Another goal of this study is to study the functionality of Cisco CUCM and the possibility of its integration with other VoIP solutions (Aastra, Mitel, MS Lync, Asterisk) based on our Treolan demo laboratory, therefore, if Cisco CUCM specialists see any controversial issues in the article - Please indicate them in the comments, as I am not a CUCM specialist.
Initial Configuration of Cisco CUCM 9.0
As a test bench with Cisco CUCM, it was decided to install the Cisco CUCM 9.0 distribution in our shared virtual PBX cloud under vmWare vSphere 5.1. Installation under vmWare is trivial and will not be described in the article, I will only note the parameters of the virtual machine: 2 vCPU Intel Xeon CPU E5-2665 0 @ 2.40GHz, disk 1: 100Gbytes, 4096Mbytes RAM. The key points are at least 2 vCPUs, a hard disk of at least 80 GB and at least 3 GB of memory.
Cisco CUCM 9.0 has a trial period of 60 days, that is, 60 days you can work fully and for free with the station without applying a license. During this time, you can fully familiarize yourself with its functionality, you can also generate a free license for 6 months on the site cisco.com. For testing in the laboratory, this is more than enough for me.
So, after installing the IP address of our installed Cisco CUCM 9.0: 172.19.19.50. All settings are carried out through the web-based interface, we turn to the station at 172.19.19.50 and select Cisco Unified Communications Manager.
To get started with the newly installed Cisco CUCM, you should consider a number of nuances that were not obvious to me. After installation, all services, including the CallManager service, are disabled for Cisco CUCM — you need to activate them by switching to Cisco Unified Serviceability mode - in the upper right corner, the Navigation combo box. Switch to this mode, then follow Tools-> Service Activation:
Just in case, I activated all services except the Cisco Messaging Interface, although this is not necessary - it’s better to consciously include the services you plan to work with, for example, the mandatory Cisco CallManager, TFTP server (which we will also use later).
Make sure that the services we need are launched in Tools-> Control Center - Feature Service:
The next caveat is that by default, Cisco CUCM would like to work using DNS names, not IP addresses, so all the names that you assigned during the installation process (for example, the Cisco CUCM server name) must be registered in the DNS server that you specified in the settings of this cucm. Otherwise, by default nothing will work until we change the names to addresses in the right places. On the one hand, it is useful to work with DNS names for higher fault tolerance of the entire system, but in this laboratory I do not need all this, so I will change all the names to IP addresses.
To do this, we return via the Navigation combo box to Cisco Unified CM Administration mode and then the System -> Server menu, click the Find button in the form that appears and see our only server, named by the DNS name during installation. We go into it and change this name to IP address:
Also, in another place you should change the DNS name to IP addresses: System -> Enterprise Parameters -> Phone URL Parameters:
Also, according to the advice in one of the forums, I did default G.711 codec, this is done in System -> Service Parameters, in the combo box we select our only server 172.19.19.50 (Active), then we are interested in the Cisco CallManger (Active) service, and already in it the Clusterwide Parameters (System) section - Location and Region) and in it we change what is highlighted in the picture with a red frame:
This completes the initial configuration of Cisco CUCM 9.0, and CallManager is now able to register SIP subscribers and not bind to DNS names.
Establishing Third-Party SIP Subscribers on Cisco CUCM
There are no particular nuances when setting up SIP subscribers for the Aastra 8000i, except for the video bandwidth. By default, the CUCM Region settings have a video bandwidth of 384 kbs, which does not give all the advantages of a picture with HD 720i (it will simply be displayed in lower resolution by 348 kbs) on the Aastra 8000i screen, so I increased this value to 1500 kbs. For these purposes, I decided to start a separate device pool, different from default, to which you can bind Region settings regarding the bitrate for video calls, which, in turn, we will announce here: System -> Region information -> Region:
Initially, in the Regions section there will be only one profile - Default. We should add our new profile, which I called For_Video_1500kb, in which I changed the Maximum Session Bit Rate for Video Calls parameter and made it 1500 kbs.
Next, create a Device pool: System -> Device Pool -> Add new: We
specify in it the For_Video_1500kb profile previously announced.
Next, we will get two users 901 and 902 for our two Aastra 8000i devices, there are no nuances here. Section User Management -> End User - Add New:
USER ID in this case will be SIP login, and Digest Credential - SIP password. The Password and PIN fields are used for something else, I made them match the Digest Credentials. Similarly, the plant and the user 902.
Further, describe devices that are linked to these users. Device -> Phone -> Add New:
Here you should select the type of phone Third-party SIP Device (Advanced).
Next, after clicking Next, the form for filling in the remaining parameters opens:
For third-party SIP devices, it is not necessary to enter the correct MAC address; here it is enough to enter an arbitrary twelve-digit number. Next, you should specify the Device Pool, which we created earlier for this type of device, otherwise if we leave Default, the video bitrate will be small and the image quality will be poor (but it will work).
Continuation of the Phone institution form:
That's it, the configuration of Cisco CUCM 9.0 is over, the station is ready to work with the Aastra 8000i, which we will configure now.
Configuring Aastra 8000i Terminals
The configuration of the Aastra 8000i terminals is basically the same as described in the article habrahabr.ru/post/191976 in relation to Asterisk. The only caveat - since Cisco CUCM incorporates a TFTP server - there is no need to pick up any third-party server and use it. In any case, I will repeat the settings in this article using one of the terminals as an example.
After switching on and initial loading of the terminal, go to the main menu of the device: APP MENU -> TOOLS -> TERMINAL IDENTITY.
Here we need to enter the following network parameters for our terminal:
• IP address: 172.31.31.132
• Net mask: 255.255.255.0
• Default gateway: 172.31.31.3
• Primary DNS: 8.8.8.8
Thus, in the next line of the configuration server we indicate the address of the TFTP server, it matches the Cisco CUCM IP address in our case (make sure that the TFTP server service is up at the station): tftp: //172.19.19.50
After all this, click done, and the terminal will prompt you to restart to apply the entered parameters.
Each time the Aastra 8000i terminal starts, the device contacts the address specified in the configuration server line (according to the corresponding protocol, in our case it is tftp). Each terminal expects to find four configuration files at this address. These files must have the following names and be available on the tftp-server at the time of loading:
• aastra.cfg - contains configuration information that applies to all Blustar 8000i terminals.
• 8000i.cfg - Contains information for a specific model (8000i).
•
• user.cfg - contains information related to user configuration that cannot be configured through the Blustar 8000i terminal (ie SIP authentication, proxy server settings, registrar settings, etc.). * .cfg file can be edited even when the user is already logged in, however, the changes will not take effect until the next restart.
Next, we consider in more detail the four files necessary for setting up the Aastra 8000i terminal, with the MAC address E06995DDF6DB, with the SIP username 901, the password Aastra123, which must register on the SIP registrar with the address 172.19.19.50, when using the tftp server with the address 172.19.19.50:
File aastra.cfg
File 8000i.cfg
File E06995DDF6DB.cfg
File 901.cfg (the file name is the same as the username that Aastra 8000i will log in to):
We upload all these files to the TFTP server of our Cisco CUCM. This is done in Cisco Unified OS Administration mode (upper right corner, Navigation combo box). In this mode, you will need the administrator login / password, which in general differs from the CallManager administrator login / password. In it we are interested in the Software Updates section. Next - TFTP file Management -> Upload File. We load all these files necessary for the operation of the Aastra 8000i.
After that, you can restart the Aastra 8000i terminals and enter the login and password:
You can make a video call from one terminal to another: