Automate monitoring: low-level detection
- Tutorial
Monitoring a large number of devices requires automation tools to help. Otherwise, if you do everything with the mouse, you can “click out” while you add and configure everything that was required. In addition, you are sure to be mistaken somewhere, a person is not a robot. Fortunately, Zabbix has all of these tools: these are templates , APIs , discovery of network devices , auto - registration of Zabbix agents.
And since version 2.0, Low-Level Discovery (LLD) or low-level detection has been added here . I would like to tell you what it is.
Discovery of network devices (Network Discovery) is a very useful thing, which allows you to avoid manually adding new network nodes and associating them with the desired templates. Moreover, you can create quite complex scripts. For example, automatically associate a new client (its CPE) of the Wi-Fi base station with the desired template for CPE and even automatically add this node to the desired location on the map. The documentation has a good example of how network discovery is configured.
LLD is needed in the next step after the node is found and attached to the template. LLD allows you to find objects of the node itself.
LLD allows us to automatically create data items , triggers and graphs for:
You can expand the capabilities of LLD by means of your own scripts, the main thing is that the output of the script for Zabbix has a clear output of the form JSON to it.
In addition to what LLD creates, it also regularly scans a host for changes and dynamically deletes old data elements (deleted the file system) and adds new ones (inserted an expansion card with additional ports).
Of course, you can do without LLD, because in all previous versions they managed with the same templates. That's just everyone who uses Zabbix, faced with the situation that there are two logical drives in one server and four in the other. That one Ethernet port switch has 8, and the other from the same line has 24. It remains to write a template for 24 ports (4 disks), and then, after binding the device, manually disconnect unnecessary data elements, triggers. So we have already “called out”. And then someone made a new server, and there are 8 of these disks in it ... And one of the colleagues in the existing server created another partition with a non-standard path and said nothing ...
To understand what LLD gives us, there is nothing better than a good example. Recall what you had to do with multiport switches in previous versions of Zabbix.
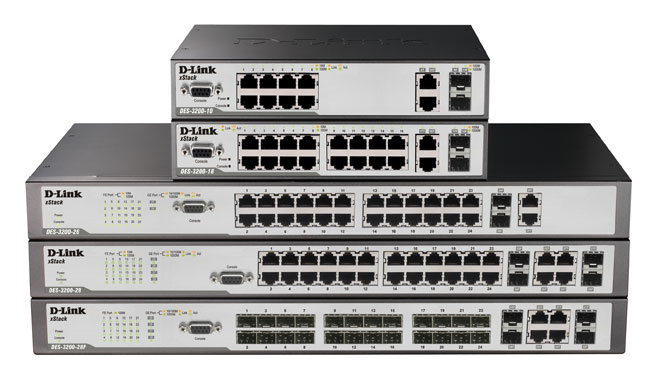
Let's say we have Cisco, D-Link, Zyxel and other “zoo” switches. With the number of ports 5/8/16/24/50.
We will monitor the status of the ports using SNMPv2 and the counters described in the IF-MIB. We do not have LLD yet, so let's start writing a regular template. Let's call it Template_IF_MIB_SNMPV2 .
In the template for one port, we need to create 14 data elements (of course, it can be less, but we decide that it is critically important for us to collect almost everything), as well as a number of triggers , graphs. In the Zabbix web interface, this will take about 10 minutes if you actively wave the mouse and use the “Clone” button.
Taking a breath, I don’t really want to continue somehow for other ports. Who wants to do the same thing 50 times? Therefore, questions immediately arise:
You can try to solve the first problem, for example, by unloading the template in XML followed by CTRL + C / CTRL + V in a text editor. Or even write a small external script and generate XML to them. But…
But with Low-Level Discovery , we have the opportunity to make everything much easier. Instead of creating data elements for one port, we will ONLY once create prototypes of data elements, as well as prototypes of the necessary triggers. Since we do this only once, it is not at all a pity to spend time and create informative graphs in the supplement, and more precisely, prototypes of graphs.
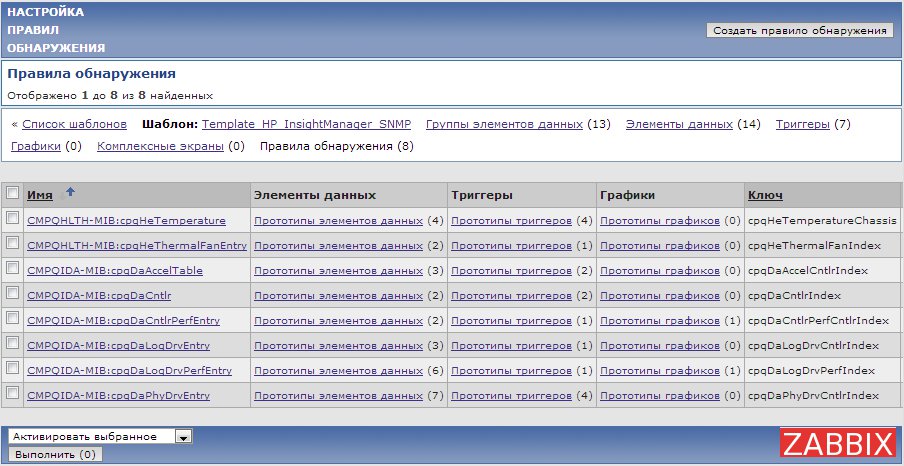
So, to create an LLD in the template, go to the discovery rules :

Next, click create a discovery rule and create a new rule, call it Network interfaces discovery : We
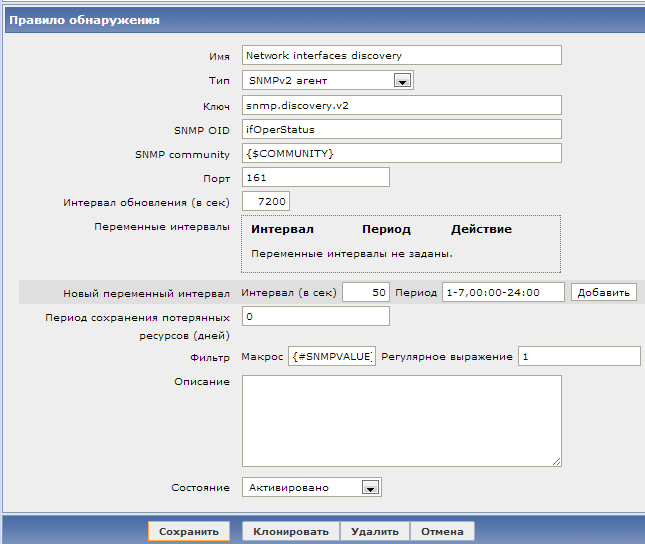
specify everything as in the picture. Some fields are worth commenting:
So, we created a rule , now we have to create prototypes of data elements . Here everything is almost the same as when creating ordinary data elements , but there are a couple of features. For example, add inbound traffic, ifInOctets:
Description of the fields:
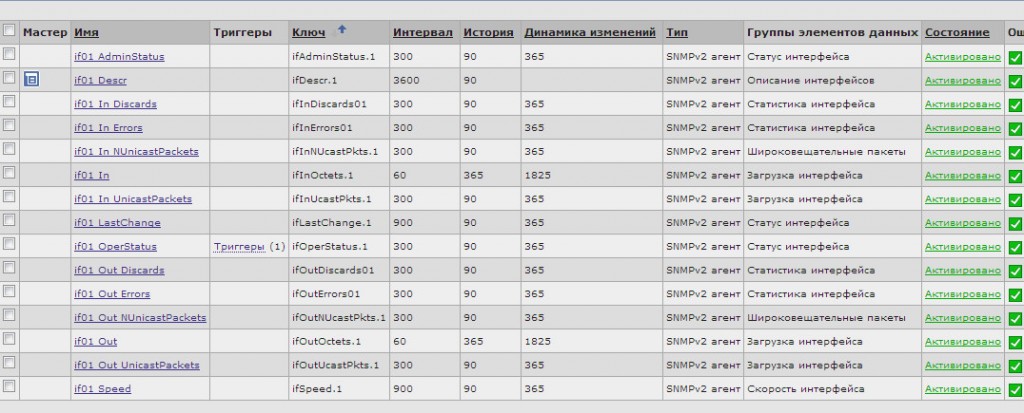
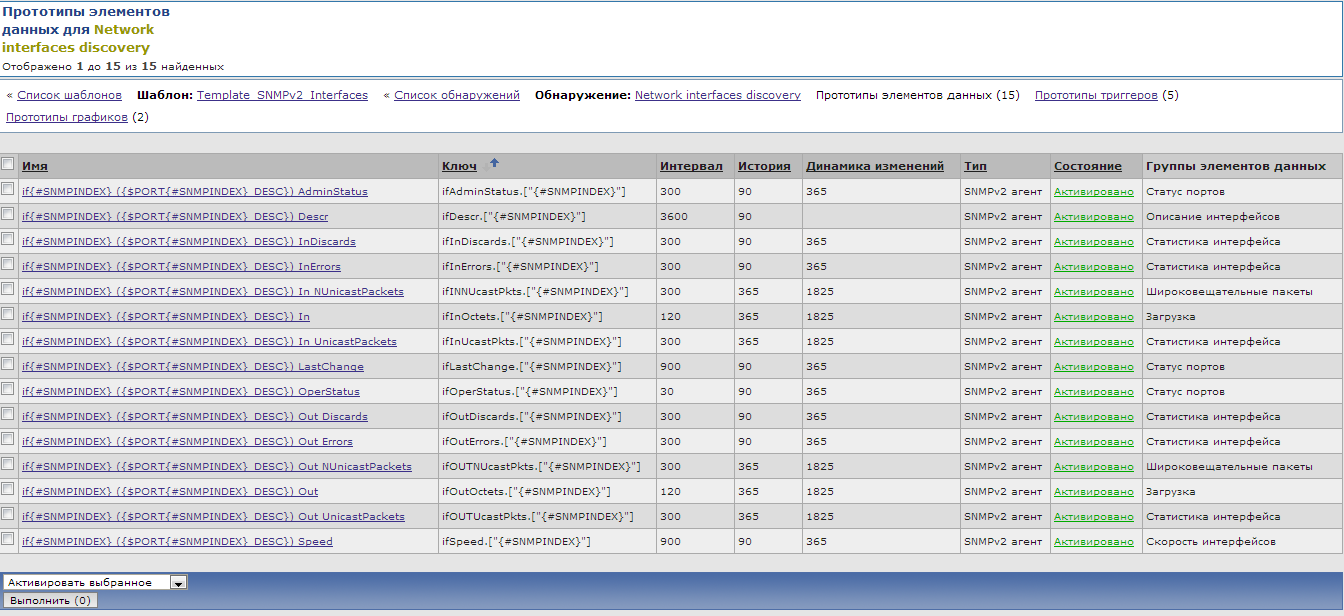
We will create prototypes and for the rest of the data elements that we need for each interface, we will get something like this list:
create prototype triggers ...
... and prototype graphs :
By hooking our template to real network nodes, after a while we will get the result. This is how the latest data for the host will look after working out LLD:
As expected, data is collected only for active ports.
And here are the graphs also dynamically created through LLD:
To summarize what we got using LLD in the template for multiport switches:
But, as already mentioned, the exact same focus can be turned on with file systems and computer network interfaces (another example here ), as well as with many other things that are stored in SNMP. True, there are limitations. For example, unfortunately, LLD will not work if the SNMP table contains several indexes. It is possible to bypass this restriction using macros, however, this is already, as they say, from the category of “crutches”.
Like this. And no more fuss with the same data elements, triggers, graphs. Just set up LLD and enjoy the benefits of automation. Or we configure LLD + network discovery and generally go on vacation :)
And since version 2.0, Low-Level Discovery (LLD) or low-level detection has been added here . I would like to tell you what it is.
Low level detection
Discovery of network devices (Network Discovery) is a very useful thing, which allows you to avoid manually adding new network nodes and associating them with the desired templates. Moreover, you can create quite complex scripts. For example, automatically associate a new client (its CPE) of the Wi-Fi base station with the desired template for CPE and even automatically add this node to the desired location on the map. The documentation has a good example of how network discovery is configured.
LLD is needed in the next step after the node is found and attached to the template. LLD allows you to find objects of the node itself.
LLD allows us to automatically create data items , triggers and graphs for:
- computer file systems
- computer network interfaces
- data from SNMP tables with a one-dimensional index
You can expand the capabilities of LLD by means of your own scripts, the main thing is that the output of the script for Zabbix has a clear output of the form JSON to it.
In addition to what LLD creates, it also regularly scans a host for changes and dynamically deletes old data elements (deleted the file system) and adds new ones (inserted an expansion card with additional ports).
Of course, you can do without LLD, because in all previous versions they managed with the same templates. That's just everyone who uses Zabbix, faced with the situation that there are two logical drives in one server and four in the other. That one Ethernet port switch has 8, and the other from the same line has 24. It remains to write a template for 24 ports (4 disks), and then, after binding the device, manually disconnect unnecessary data elements, triggers. So we have already “called out”. And then someone made a new server, and there are 8 of these disks in it ... And one of the colleagues in the existing server created another partition with a non-standard path and said nothing ...
As it was before
To understand what LLD gives us, there is nothing better than a good example. Recall what you had to do with multiport switches in previous versions of Zabbix.
Let's say we have Cisco, D-Link, Zyxel and other “zoo” switches. With the number of ports 5/8/16/24/50.
We will monitor the status of the ports using SNMPv2 and the counters described in the IF-MIB. We do not have LLD yet, so let's start writing a regular template. Let's call it Template_IF_MIB_SNMPV2 .
In the template for one port, we need to create 14 data elements (of course, it can be less, but we decide that it is critically important for us to collect almost everything), as well as a number of triggers , graphs. In the Zabbix web interface, this will take about 10 minutes if you actively wave the mouse and use the “Clone” button.
Taking a breath, I don’t really want to continue somehow for other ports. Who wants to do the same thing 50 times? Therefore, questions immediately arise:
- How to avoid wasting time creating the remaining ports (2-50)
- How to avoid without manual intervention the obviously doomed requests to counters from port 6 to 50 when a universal template is attached to a 5 port switch
- Avoiding Clogging Your Network with Port Counters That Are Not Used
You can try to solve the first problem, for example, by unloading the template in XML followed by CTRL + C / CTRL + V in a text editor. Or even write a small external script and generate XML to them. But…
What can now be done with LLD
But with Low-Level Discovery , we have the opportunity to make everything much easier. Instead of creating data elements for one port, we will ONLY once create prototypes of data elements, as well as prototypes of the necessary triggers. Since we do this only once, it is not at all a pity to spend time and create informative graphs in the supplement, and more precisely, prototypes of graphs.
So, to create an LLD in the template, go to the discovery rules :
Next, click create a discovery rule and create a new rule, call it Network interfaces discovery : We
specify everything as in the picture. Some fields are worth commenting:
| Key | snmp.discovery.v2 |
| SNMP OID | OID, which we will use for the criterion of adding an interface for monitoring, in this case ifOperStatus. |
| SNMP community | This example uses the macro {$ COMMUNITY}. The same template has a default value, {$ COMMUNITY} = public. Further, for each specific host to which we will attach this template, we can either rewrite the value of the macro if its snmp community is different or do nothing, and then the public specified in the template will be used. This technique helps to avoid the need to change data elements at the host level . |
| Filter | The value of the special macro {#SNMPVALUE}, which corresponds to the result of the ifOperStatus.X request to the device, is subjected to a very complex regular expression: 1. As we know from IF-MIB, ifOperStatus.X = 1 corresponds to up (1). Thus, we will monitor only those interfaces that were up (1) at the time of network scanning. This will save us from collecting counters of those interfaces that are not used. If we want to add all ports indiscriminately to the monitoring, we simply leave the filter field empty. |
| The period of conservation of lost resources | After how many days, remove the network interface from monitoring, if the network interface is no longer being re-scanned by LLD, or ifOperStatus.X status is no longer up (1). In this case, set to zero - do not delete. |
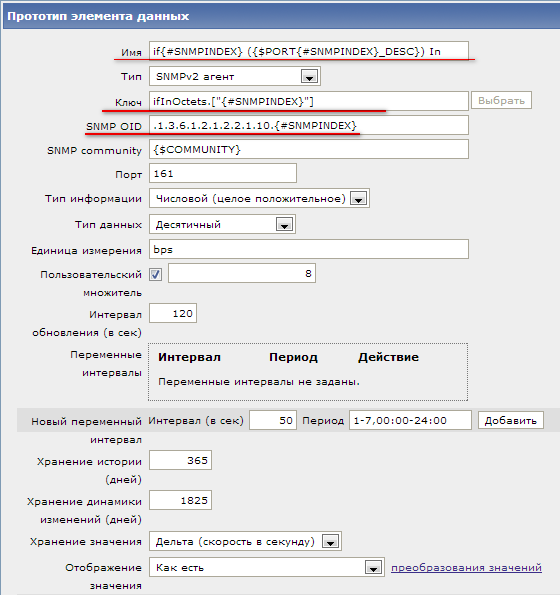
So, we created a rule , now we have to create prototypes of data elements . Here everything is almost the same as when creating ordinary data elements , but there are a couple of features. For example, add inbound traffic, ifInOctets:
Description of the fields:
| Name | if {#SNMPINDEX} ({$ PORT {#SNMPINDEX} _DESC}) In. Decipher the design. As we already know, {#SNMPINDEX} is a system macro that will correspond to the interface index in SNMP. We will substitute it in the name of the interface, for names that we understand. It will turn out: if1, if2, if3, etc. The second macro is a custom macro , {$ PORT {#SNMPINDEX} _DESC}, in whose name the interface index will be inserted, dynamically changing the macro name. It is optional, but I use it so that it is possible to write an additional description of each interface in Zabbix by simply adding a macro at the host level , for example: {$ PORT1_DESC} = uplink, ISP1 |
| Key | The key must contain {#SNMPINDEX} so that the key is always unique |
| SNMP OID | In the same way, we substitute the {$ SNMPINDEX} macro in our SNMP OID to poll the counter of the interface we need. |
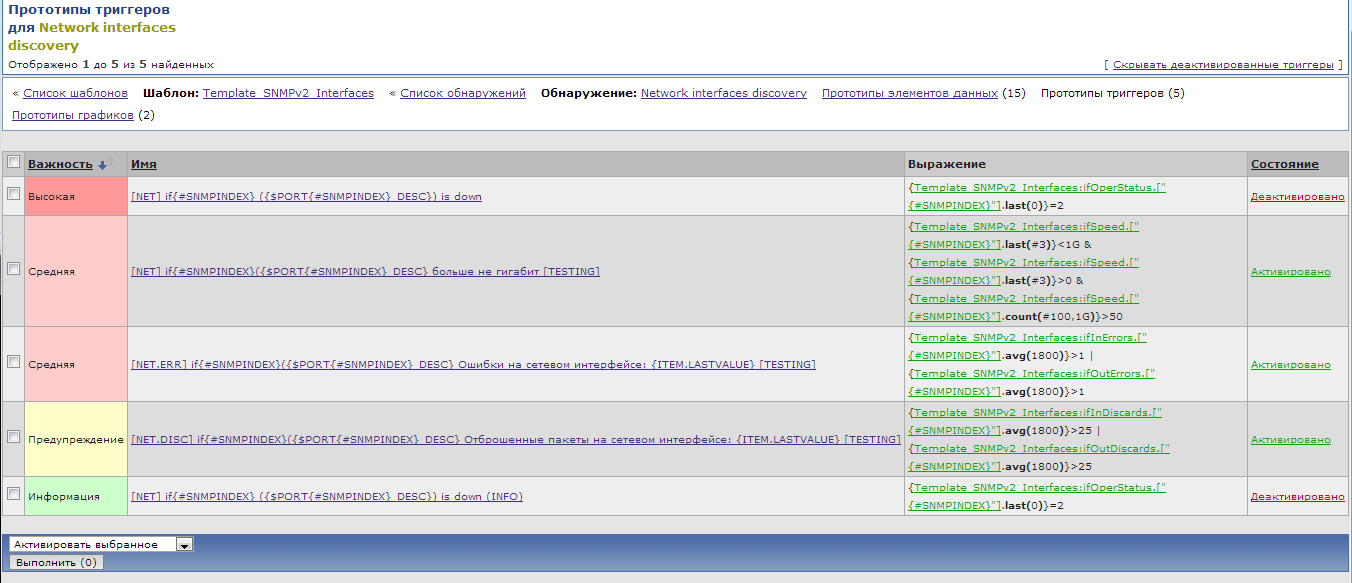
create prototype triggers ...
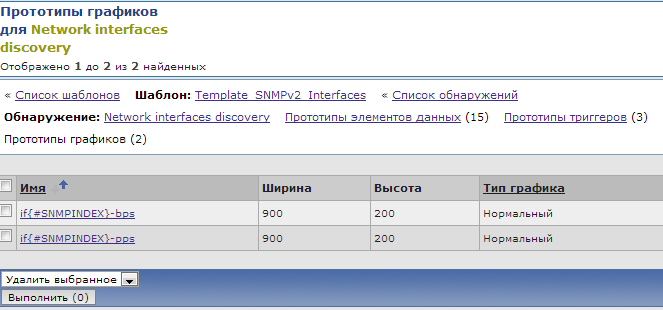
... and prototype graphs :
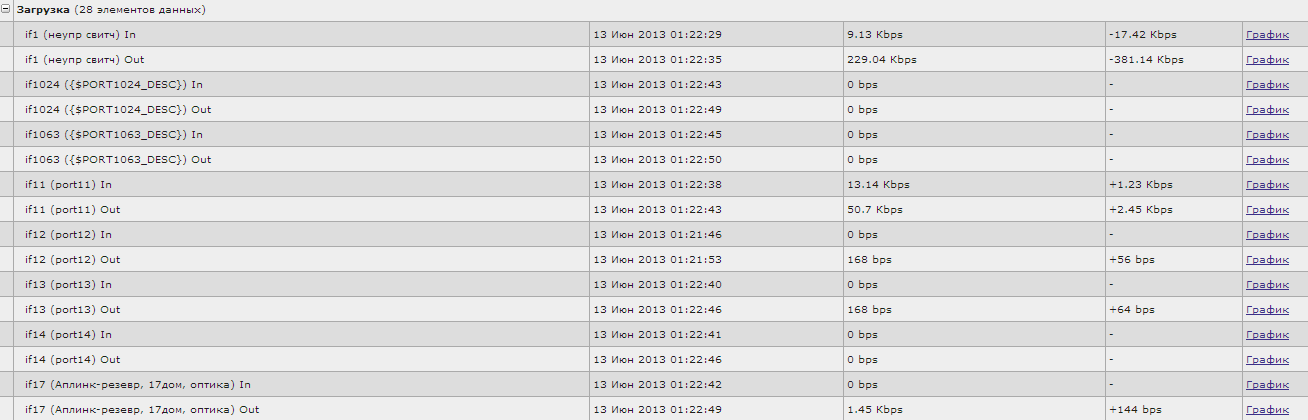
By hooking our template to real network nodes, after a while we will get the result. This is how the latest data for the host will look after working out LLD:
As expected, data is collected only for active ports.
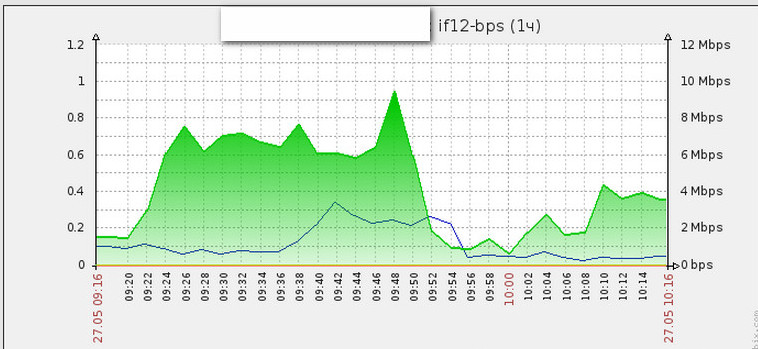
And here are the graphs also dynamically created through LLD:
Total
To summarize what we got using LLD in the template for multiport switches:
- Universal template for all devices supporting IF-MIB
- Does not require adjustment at the host level after adding a template. The maximum you need is to fill in the {$ COMMUNITY} macros (if the snmp community is not public), fill in the {$ PORTx_DESC) macro (if you want to see the port description) and activate the [NET] triggers if {#SNMPINDEX} ({$ PORT { #SNMPINDEX} _DESC}) is down for key ports that require notification of a status change from up to down (which is why these triggers in the prototypes are deactivated so as not to be bombarded with triggered triggers from access ports of users that turn them on and off computers).
But, as already mentioned, the exact same focus can be turned on with file systems and computer network interfaces (another example here ), as well as with many other things that are stored in SNMP. True, there are limitations. For example, unfortunately, LLD will not work if the SNMP table contains several indexes. It is possible to bypass this restriction using macros, however, this is already, as they say, from the category of “crutches”.
Like this. And no more fuss with the same data elements, triggers, graphs. Just set up LLD and enjoy the benefits of automation. Or we configure LLD + network discovery and generally go on vacation :)