Core Data for iOS. Chapter number 1. Theoretical part
Habralyudi, good afternoon!
Today I want to start writing a series of lectures with practical exercises on the book by Michael Privat and Robert Warner, “Pro Core Data for iOS,” which you can buy at this link. Each chapter will contain a theoretical and practical part.

Content:
Using computers to carry out their tasks, people expect that their changes will be saved. Saving changes plays an important role in office software packages, text editors, games, browsers, etc. Most software needs the ability to store user-entered data for subsequent restoration of the state of work, but of course there is software that does not need it - calculators, news feeds, alarms, weather widgets.
Understanding how data can be stored on iDevice is critical when developing advanced applications.
Apple provides a flexible framework for working with data stored on the device - Core Data. Of course, Core Data is not a panacea, and there are other options for storing data that may be better suited to certain tasks, but Core Data fits very well and beautifully into Cocoa Touch. Core Data hides most of the details about working with the data warehouse, allowing you to concentrate on what really makes your application fun, unique and easy to use.
Despite the fact that Core Data can store data in a relational database like SQLite, Core Data is not a DBMS. In truth, Core Data may not use relational databases at all as storage. Core Data is not something like Hibernate, although it does provide some ORM capabilities. Core Data is more likely a data wrapper / framework that allows you to work with entities and their relationships (relations to other objects), attributes, in a form that resembles working with an object graph in ordinary object-oriented programming.
Did you know?
Just as we should thank NeXT for the animated films released by Pixar, so we should thank her for Core Data. Core Data was born and evolved from a technology called Enterprise Objects Framework (EOF).
The debut of the framework falls on 2005 with the launch of Mac OS X 10.4 (Tiger), but the iPhone appears only since version 3.0.
Before Core Data came to IPhone, developers had a hard time and the following options could be used to store data:
1) Lists of properties that contained key-value pairs from various data types.
2) Data serialization and storage in files (NSCoding protocol was used)
3) SQLite relational database
4) Data storage in the cloud
These methods are still in use, although not one of the four methods can be compared in terms of convenience using Core Data. Despite the birth of such frameworks as FMDatabase and ActiveRecord, to solve the problem of data storage before the advent of Core Data, the developers gladly switched to Core Data after it appeared.
Although I repeat that Core Data is not a cure for all diseases, sometimes you will of course refer to solutions using, for example, a list of properties, but most often you will encounter the need and desire to use Core Data in your applications as a tool that best way to solve your problem.
The more often and the more you program and use Core Data, the more often you will have not the question “Should I use Core Data?”, But “Is there a reason not to use Core Data?”.
In this section, we will create a simple application based on Core Data from one of the Xcode templates, which we will analyze the main parts of. At the end of this part, you will understand how the application interacts with Core Data to store and retrieve data.
Before you dive into the code and parse the test application, you need to have an idea of the components of Core Data. The figure below shows the main elements that we will use in the test application.
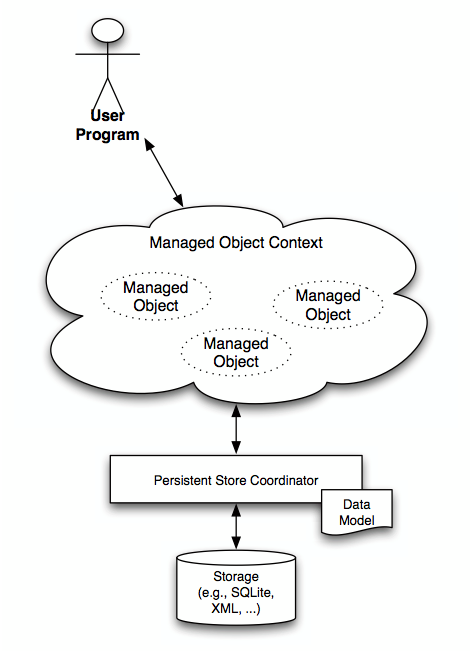
As a Core Data user, you should never work directly with a data warehouse. Get away from the storage, from the type of storage, think only about the data! A feature of this approach is the ability to painlessly change the type of storage (there was an XML file, but became SQLite) without changing the large number of code you wrote.
Objects that are managed by the framework (Core Data) must inherit the methods / properties of the NSManagedObject class.
Just like people, objects need an environment in which they can exist, such an environment exists and is called a managed object context (context of managed objects) or simply context. The environment in which the object is located not only monitors the state of the object you are working with, but also the states of related objects (objects that are dependent on this and on which it depends).
An instance of the NSManagedObjectContext class provides the same environment for objects, an object of this type should always be available in your application. Typically, an instance of the NSManagedObjectContext class is a delegate property of your application. Without an environment, without an instance of the NSManagedObjectContext class, you simply cannot work with Core Data.
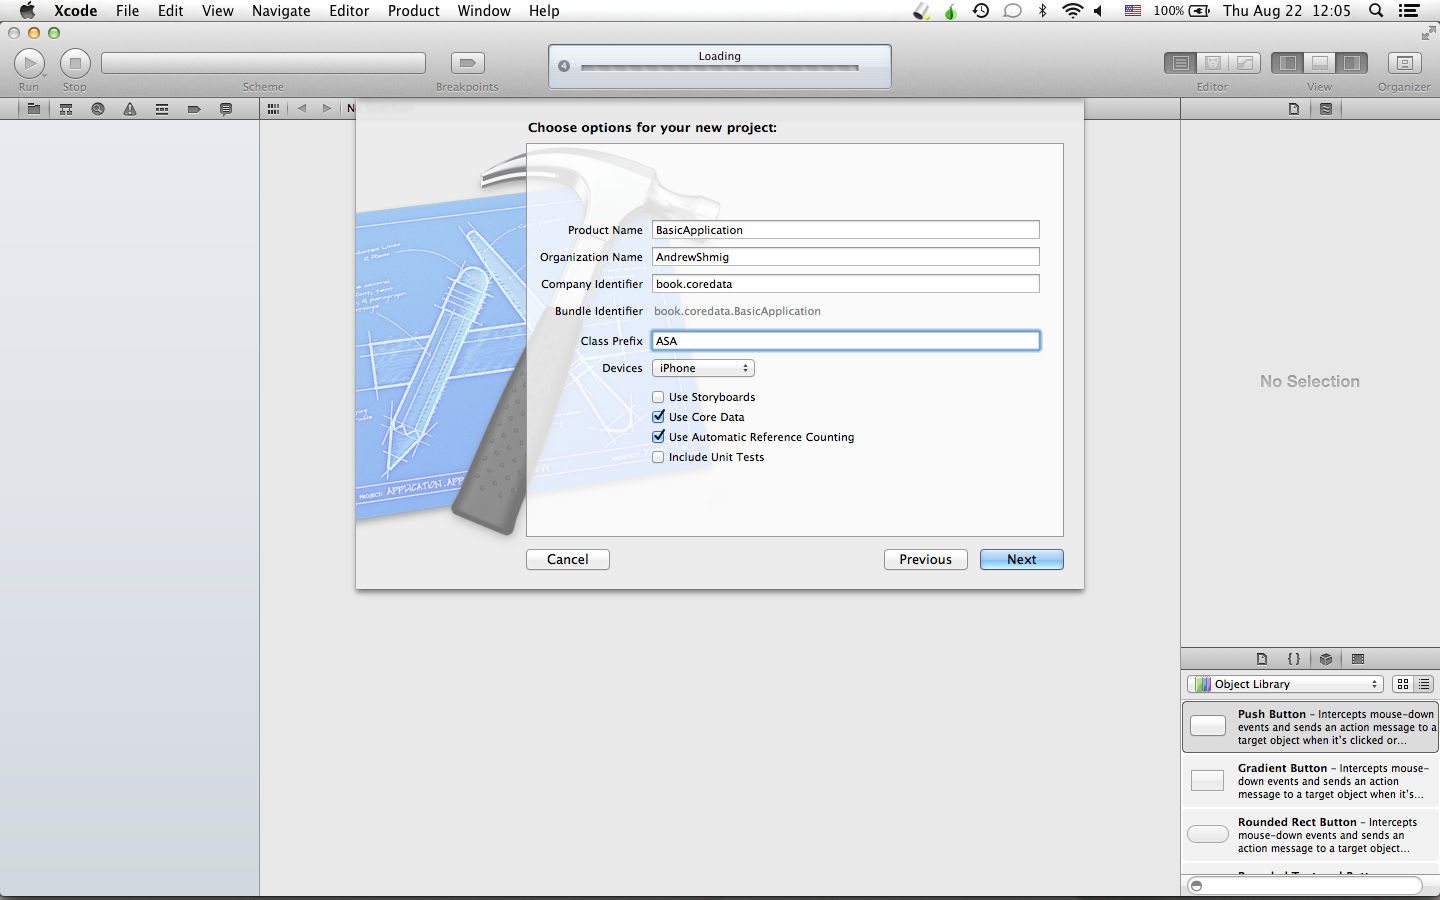
Run Xcode and create a new project from the Master-Detail Application template:
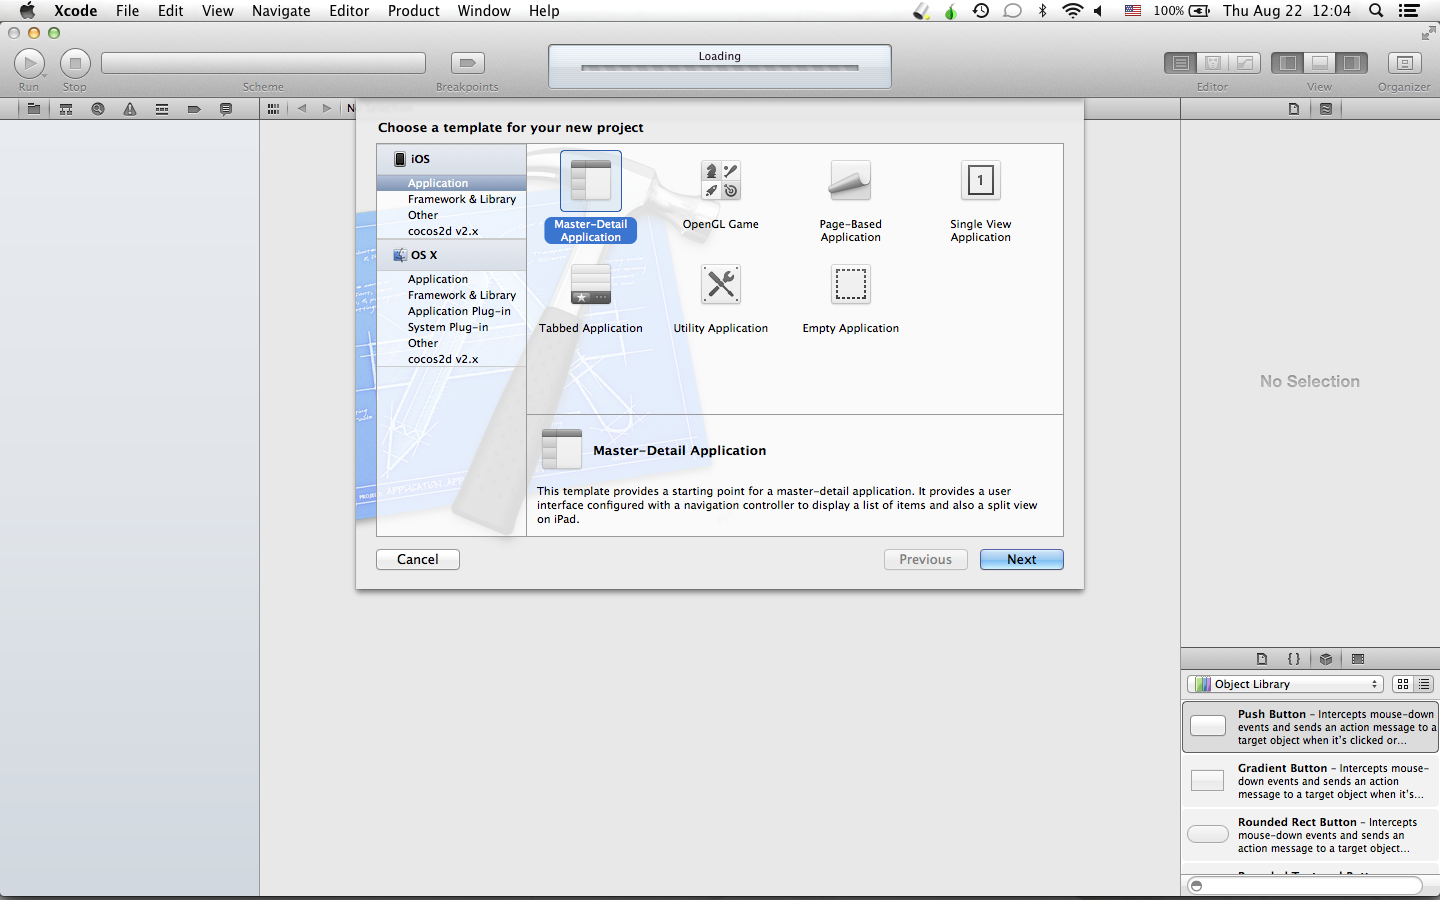
Fill in the fields as follows:
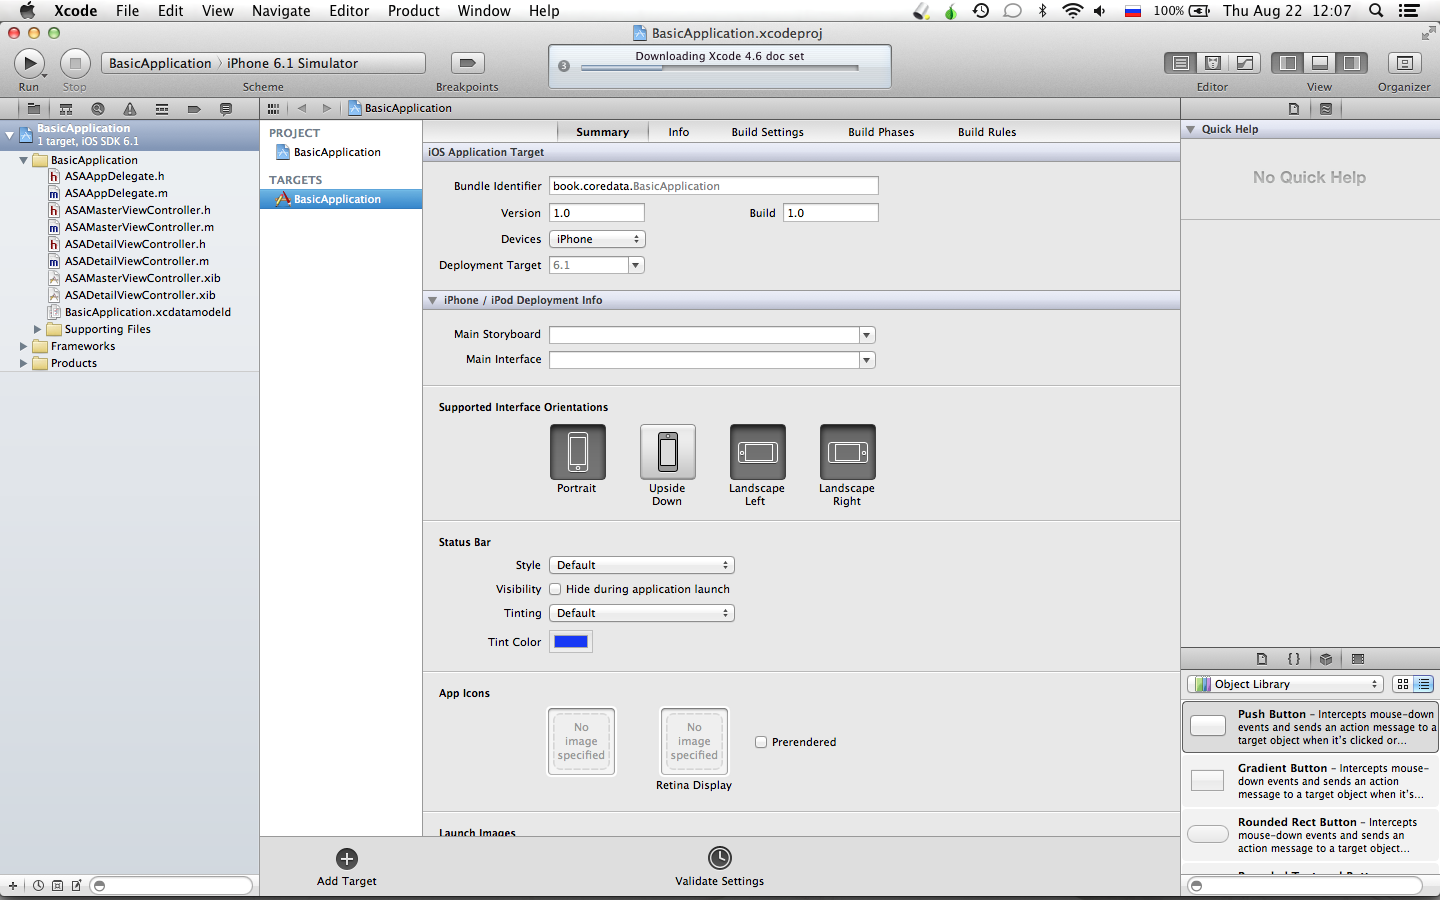
And after the creation is complete, we will see something like this:
Before we begin to understand what is under the hood of this application, let's start and figure out what the application does in general.
Click on the “Run” button and this will appear in front of us:

Press the button with “+” several times and several entries will appear in the list over time.

Now we will end (stop) the application and if the application would not use Core Data to store data, then at the next start we would see an empty list again, however after restarting we see the same picture:

The structure of the application is relatively simple. In the presence of a data model that describes the entity stored in the database (storage); a controller that facilitates the interaction between the screen (table) and the data warehouse; application delegate that helps to initialize and run the application.
The image below shows the classes used in the application and how they relate to each other:
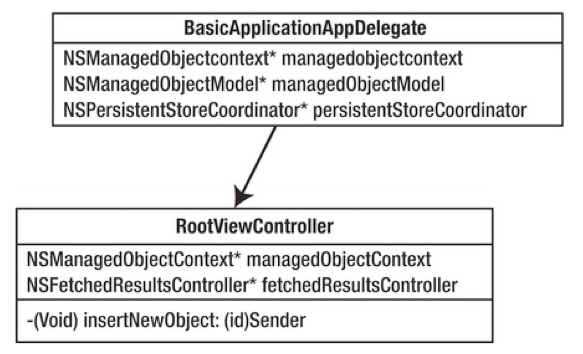
Note that the MasterViewController class contains a property that refers to an instance of the NSManagedObjectContext class to interact with Core Data. Going through the code, you can see that the MasterViewController gets the managed object context from the application delegate property.
BasicApplication.xcdatamodel is a directory in the file system that contains information about the structure of the data model. A data model is the foundation of every application using Core Data.
The data model of this application describes only one entity - Event. The Event entity contains only one property (field, attribute) - timeStamp of type Date.
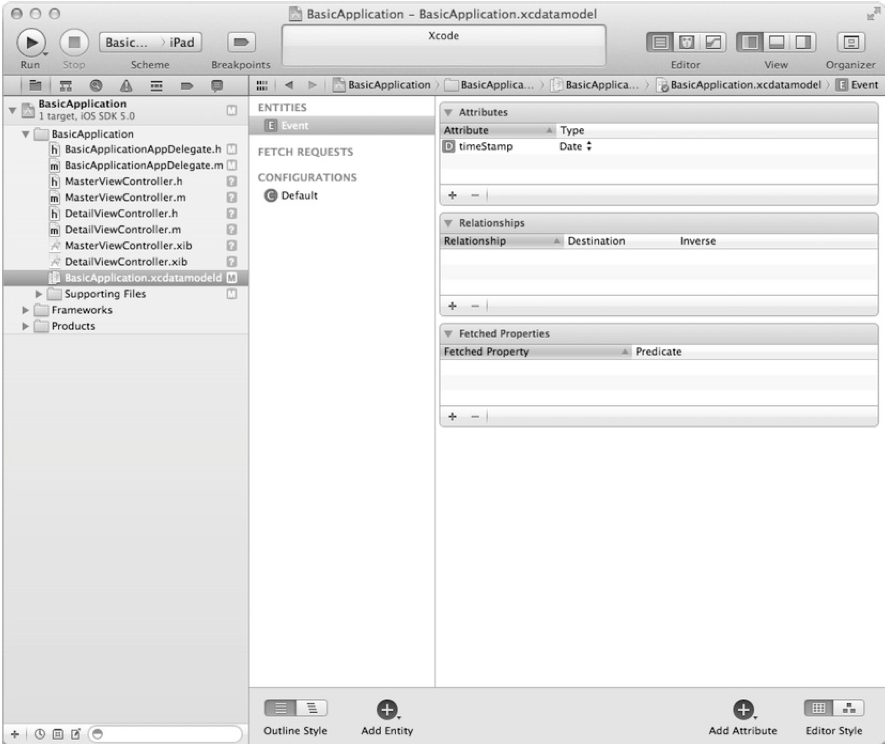
An Event entity of type NSManagedObject, which is considered the main entity for all entities under the control of Core Data. In the second chapter, we look at the NSManagedObject type in more detail.
The next class that interests us is the MasterViewController. Its header file describes two properties that we will pay attention to:
NSFetchedResultsController is a controller provided by the Core Data framework for managing storage requests.
NSManagedObjectContext is already known to us as an environment for the existence of objects of type NSManagedObject.
The implementation of the MasterViewController class, which can be found in the MasterViewController.m file, shows how you can interact with Core Data to retrieve and store data. In the implementation of the MasterVIewController class, there is an explicit getter fetchedResultsController, which pre-configures the request to select data from the storage.
The first step to making a query for data sampling is to create a query:
Query results can be sorted using NSSortDescriptor. NSSortDescriptor defines the sort field and sort type (ascending or descending).
In our example, we sort in descending order the record creation times:
After the request is defined, we can proceed to create the NSFetchedResultsController.
Using the NSFetchedResultsController MasterVIewController as a delegate, we can monitor the state of the storage data (delete, add, move, etc.) and seamlessly integrate this solution with the UITableView. Of course, we can get the same results by calling the executeFetchRequest method in the managed object context, but in this case we will not receive and cannot take full advantage of the NSFetchedResultsController.
Create and configure an instance variable of the NSFetchedResultsController class:
Did you know?
In conclusion, all that remains for us is to fulfill a request to obtain data:
Below you can find the full fetchedResultsController getter:
NSFetchedResultsController is something like a collection of objects of type NSManagedObject, for this it even has fetchedObjects properties of type NSArray to access the query results.
The MasterVIewController class, which also extends the capabilities of the UITableViewController, demonstrates how convenient it is to use NSFetchedResultsController to manage the contents of tables.
A quick glance at the insertNewObject: method will make it clear how new events are created and added to the repository. NSManagedObjects are defined by an entity description from a data model and can only exist in a specific context (environment). The first step to create a new object is to get the context in which this object will be created:
Create NSManagedObject:
The last step that needs to be done is to save the context in which the new object was created. Note that when you save the context, any changes that were not saved before will be saved.
The full method for adding a new object is presented below:
Obviously, everything that we did before cannot be achieved without creating a context object, without the very environment in which the object exists and lives. The application delegate is responsible for creating this very environment. Three properties that must be required in any application using Core Data:
Please note that all three properties are readonly, this is done so that they cannot be set externally. Studying BasicApplicationAppDelegate.m shows that all three properties have explicit getters.
Managed Object Model:
After that, a storage is created that supports the created data models. In our case, in fact, as in most others using Core Data, the data warehouse is based on SQLite.
Create a context (environment):
Context is used throughout the application as an interface for interacting with Core Data and persistent storage.
Core Data Initialization Sequence:

The engine starts when the application: didFinishLaunchingWithOptions method is called:
Calling the getter of the managedObjectContext property of the application delegate for execution, the chain of actions starts:
- (NSManagedObjectContext *) managedObjectContext calls
- (NSPersistentStoreCoordinator *) persistentStoreCoordinator, which in turn makes a call
- (NSManagedObjectModel *) managedObjectModel.
Thus, the call to the managedObjectContext getter method initializes the entire stack of Core Data objects and alerts Core Data.
It is carried out in three steps:
In the world of Objective-C, libraries are called frameworks.
The standard frameworks that are already connected in the "clean" projects and which you will most often see:
Where is the addition of new frameworks:
Choose a framework to connect:
No Core Data application can be considered complete without a data model. The data model describes all entities that will be managed by Core Data.
To create a new data model: File -> New -> New File
Let's name our model MyModel.xcdatamodeld :

After creating the model, an entity editing (creating) window will open in front of you.

You can create a new entity by clicking on the "+" button in the lower left part of Xcode, and add a new entity attribute by clicking on the "+" button already in the "Attributes" section and then select its type.
The final step is to initialize the context, storage, and object model. Most often, you can use the code that is automatically generated by Xcode in "empty" projects using Core Data.
DemoAppAppDelegate.h
Switch to the * .m file DemoAppAppDelegate and write the following lines:
The following is the code that initializes the data model, storage, and context.
Methods that we have never implemented before:
Now that we have connected Core Data, our application can use it to store data.
Let's implement a simple example that would allow us to make sure that everything works as it should and that the data is really saved.
In the test example, we will determine the number of times that our application was launched.
We’ll make small changes to the application: didFinishLaunchingWithOptions: method of the application delegate in the form of receiving the number of times that the application was launched earlier and adding a new launch event.
Code for getting previous application launches:
Then we can go through the entire array as follows:
Add a new entry and save:
After the first launch, the application displays the following line in the console:
After the second run:
The full method is as follows:
I ask you not to write about errors in the comments, it’s better to immediately write in private messages.
Should the transfers continue? Is there any interest in this topic?
Thank you for attention!
Today I want to start writing a series of lectures with practical exercises on the book by Michael Privat and Robert Warner, “Pro Core Data for iOS,” which you can buy at this link. Each chapter will contain a theoretical and practical part.
Content:
- Chapter number 1. Getting started ( practical part )
- Chapter number 2. Master Core Data
- Chapter number 3. Data storage: SQLite and other options
- Chapter number 4. Creating a data model
- Chapter No. 5. Working with data objects
- Chapter No. 6. Processing Result Sets
- Chapter number 7. Performance and memory tuning
- Chapter number 8. Versioning and Migration
- Chapter number 9. Manage tables using NSFetchedResultsController
- Chapter number 10. Using Core Data in Advanced Applications
Getting down
What is Core Data?
Using computers to carry out their tasks, people expect that their changes will be saved. Saving changes plays an important role in office software packages, text editors, games, browsers, etc. Most software needs the ability to store user-entered data for subsequent restoration of the state of work, but of course there is software that does not need it - calculators, news feeds, alarms, weather widgets.
Understanding how data can be stored on iDevice is critical when developing advanced applications.
Apple provides a flexible framework for working with data stored on the device - Core Data. Of course, Core Data is not a panacea, and there are other options for storing data that may be better suited to certain tasks, but Core Data fits very well and beautifully into Cocoa Touch. Core Data hides most of the details about working with the data warehouse, allowing you to concentrate on what really makes your application fun, unique and easy to use.
Despite the fact that Core Data can store data in a relational database like SQLite, Core Data is not a DBMS. In truth, Core Data may not use relational databases at all as storage. Core Data is not something like Hibernate, although it does provide some ORM capabilities. Core Data is more likely a data wrapper / framework that allows you to work with entities and their relationships (relations to other objects), attributes, in a form that resembles working with an object graph in ordinary object-oriented programming.
Did you know?
Core Data has only been introduced since Mac OS X 10.4 Tiger and iPhone SDK 3.0
IOS Storage History
Just as we should thank NeXT for the animated films released by Pixar, so we should thank her for Core Data. Core Data was born and evolved from a technology called Enterprise Objects Framework (EOF).
The debut of the framework falls on 2005 with the launch of Mac OS X 10.4 (Tiger), but the iPhone appears only since version 3.0.
Before Core Data came to IPhone, developers had a hard time and the following options could be used to store data:
1) Lists of properties that contained key-value pairs from various data types.
2) Data serialization and storage in files (NSCoding protocol was used)
3) SQLite relational database
4) Data storage in the cloud
These methods are still in use, although not one of the four methods can be compared in terms of convenience using Core Data. Despite the birth of such frameworks as FMDatabase and ActiveRecord, to solve the problem of data storage before the advent of Core Data, the developers gladly switched to Core Data after it appeared.
Although I repeat that Core Data is not a cure for all diseases, sometimes you will of course refer to solutions using, for example, a list of properties, but most often you will encounter the need and desire to use Core Data in your applications as a tool that best way to solve your problem.
The more often and the more you program and use Core Data, the more often you will have not the question “Should I use Core Data?”, But “Is there a reason not to use Core Data?”.
Creating a simple application with Core Data
In this section, we will create a simple application based on Core Data from one of the Xcode templates, which we will analyze the main parts of. At the end of this part, you will understand how the application interacts with Core Data to store and retrieve data.
Understanding Core Data Core Components
Before you dive into the code and parse the test application, you need to have an idea of the components of Core Data. The figure below shows the main elements that we will use in the test application.
As a Core Data user, you should never work directly with a data warehouse. Get away from the storage, from the type of storage, think only about the data! A feature of this approach is the ability to painlessly change the type of storage (there was an XML file, but became SQLite) without changing the large number of code you wrote.
Objects that are managed by the framework (Core Data) must inherit the methods / properties of the NSManagedObject class.
Just like people, objects need an environment in which they can exist, such an environment exists and is called a managed object context (context of managed objects) or simply context. The environment in which the object is located not only monitors the state of the object you are working with, but also the states of related objects (objects that are dependent on this and on which it depends).
An instance of the NSManagedObjectContext class provides the same environment for objects, an object of this type should always be available in your application. Typically, an instance of the NSManagedObjectContext class is a delegate property of your application. Without an environment, without an instance of the NSManagedObjectContext class, you simply cannot work with Core Data.
Create a new project
Run Xcode and create a new project from the Master-Detail Application template:
Fill in the fields as follows:
And after the creation is complete, we will see something like this:
We launch our project
Before we begin to understand what is under the hood of this application, let's start and figure out what the application does in general.
Click on the “Run” button and this will appear in front of us:
Press the button with “+” several times and several entries will appear in the list over time.
Now we will end (stop) the application and if the application would not use Core Data to store data, then at the next start we would see an empty list again, however after restarting we see the same picture:
We disassemble the components of the application
The structure of the application is relatively simple. In the presence of a data model that describes the entity stored in the database (storage); a controller that facilitates the interaction between the screen (table) and the data warehouse; application delegate that helps to initialize and run the application.
The image below shows the classes used in the application and how they relate to each other:
Note that the MasterViewController class contains a property that refers to an instance of the NSManagedObjectContext class to interact with Core Data. Going through the code, you can see that the MasterViewController gets the managed object context from the application delegate property.
- (id)initWithNibName:(NSString *)nibNameOrNil bundle:(NSBundle *)nibBundleOrNil
{
   self = [super initWithNibName:nibNameOrNil bundle:nibBundleOrNil];
   if(self){
      self.title = NSLocalizedString(@"Master", @"Master");
      id delegate = [[UIApplication sharedApplication] delegate];
      self.managedObjectContext = [delegate managedObjectContext];
   }
   returnself;
}
BasicApplication.xcdatamodel is a directory in the file system that contains information about the structure of the data model. A data model is the foundation of every application using Core Data.
The data model of this application describes only one entity - Event. The Event entity contains only one property (field, attribute) - timeStamp of type Date.
An Event entity of type NSManagedObject, which is considered the main entity for all entities under the control of Core Data. In the second chapter, we look at the NSManagedObject type in more detail.
Data Retrieval / Retrieval
The next class that interests us is the MasterViewController. Its header file describes two properties that we will pay attention to:
@property (nonatomic, strong) NSFetchedResultsController *fetchedResultsController;
@property (nonatomic, strong) NSManagedObjectContext *managedObjectContext;
NSFetchedResultsController is a controller provided by the Core Data framework for managing storage requests.
NSManagedObjectContext is already known to us as an environment for the existence of objects of type NSManagedObject.
The implementation of the MasterViewController class, which can be found in the MasterViewController.m file, shows how you can interact with Core Data to retrieve and store data. In the implementation of the MasterVIewController class, there is an explicit getter fetchedResultsController, which pre-configures the request to select data from the storage.
The first step to making a query for data sampling is to create a query:
NSFetchRequest *fetchRequest = [[NSFetchRequest alloc] init];
NSEntityDescription *entity = [NSEntityDescription entityForName:@"Event" inManagedObjectContext:self.managedObjectContext];
[fetchRequest setEntity:entity];
Query results can be sorted using NSSortDescriptor. NSSortDescriptor defines the sort field and sort type (ascending or descending).
In our example, we sort in descending order the record creation times:
NSSortDescriptor *sortDescriptor = [[NSSortDescriptor alloc] initWithKey:@"timeStamp" ascending:NO];
NSArray *sortDescriptors = [[NSArray alloc] initWithObjects:sortDescriptor, nil];
[fetchRequest setSortDescriptors:sortDescriptors];
After the request is defined, we can proceed to create the NSFetchedResultsController.
Using the NSFetchedResultsController MasterVIewController as a delegate, we can monitor the state of the storage data (delete, add, move, etc.) and seamlessly integrate this solution with the UITableView. Of course, we can get the same results by calling the executeFetchRequest method in the managed object context, but in this case we will not receive and cannot take full advantage of the NSFetchedResultsController.
Create and configure an instance variable of the NSFetchedResultsController class:
NSFetchedResultsController *aFetchedResultsController = [[NSFetchedResultsController alloc] initWithFetchRequest:fetchRequest managedObjectContext:self.managedObjectContext sectionNameKeyPath:nil cacheName:@"Master"];
aFetchedResultsController.delegate = self;
self.fetchedResultsController = aFetchedResultsController;
Did you know?
You've probably noticed that the initWithFetchRequest method used earlier has a cacheName parameter. When you pass nil as an argument, you exclude the possibility of caching the result of the request, but when specifying the name of the cache, you allow Core Data to check for the presence of the same previously executed request and return the result from the cache. Otherwise, if there is no request with this cache name, a request will be made to the storage and the necessary data will be returned, which will be cached later.
In conclusion, all that remains for us is to fulfill a request to obtain data:
NSError *error = nil;
if(![self.fetchedResultsController performFetch:&error]){
   NSLog(@"Unresolved error %@, %@", error, [error userInfo]);
   abort();
}
Below you can find the full fetchedResultsController getter:
- (NSFetchedResultsController *)fetchedResultsController
{
    if (_fetchedResultsController != nil)
        return _fetchedResultsController;
   NSFetchRequest *fetchRequest = [[NSFetchRequest alloc] init];
   NSEntityDescription *entity = [NSEntityDescription entityForName:@"Event" inManagedObjectContext:self.managedObjectContext];
   [fetchRequest setEntity:entity];
   [fetchRequest setFetchBatchSize:20];
   NSSortDescriptor *sortDescriptor = [[NSSortDescriptor alloc] initWithKey:@"timeStamp" ascending:NO];
   NSArray *sortDescriptors = [[NSArray alloc] initWithObjects:sortDescriptor, nil];
   [fetchRequest setSortDescriptors:sortDescriptors];
   NSFetchedResultsController *aFetchedResultsController = [[NSFetchedResultsController alloc] initWithFetchRequest:fetchRequest managedObjectContext:self.managedObjectContext sectionNameKeyPath:nil cacheName:@"Master"];
   aFetchedResultsController.delegate = self;
   self.fetchedResultsController = aFetchedResultsController;
   NSError *error = nil;
   if(![self.fetchedResultsController performFetch:&error]){
      NSLog(@"Unresolved error %@, %@", error, [error userInfo]);
      abort();
   }
   return __fetchedResultsController;
}
NSFetchedResultsController is something like a collection of objects of type NSManagedObject, for this it even has fetchedObjects properties of type NSArray to access the query results.
The MasterVIewController class, which also extends the capabilities of the UITableViewController, demonstrates how convenient it is to use NSFetchedResultsController to manage the contents of tables.
Insert a new object
A quick glance at the insertNewObject: method will make it clear how new events are created and added to the repository. NSManagedObjects are defined by an entity description from a data model and can only exist in a specific context (environment). The first step to create a new object is to get the context in which this object will be created:
NSManagedObjectContext *managedObjectContext = [self.fetchedResultsController managedObjectContext];
NSEntityDescription *entity = [[self.fetchedResultsController fetchRequest] entity];
Create NSManagedObject:
NSManagedObject *newManagedObject = [NSEntityDescription insertNewObjectForEntity:[entity name] inManagedObjectContext:context];
[newManagedObject setValue:[NSDate date] forKey:@"timeStamp"];
The last step that needs to be done is to save the context in which the new object was created. Note that when you save the context, any changes that were not saved before will be saved.
NSError *error = nil;
if(![context save:&error]){
   NSLog(@"Unresolved error: %@, %@", error, [error userInfo]);
   abort();
}
The full method for adding a new object is presented below:
- (void)insertNewObject {
   NSManagedObjectContext *managedObjectContext = [self.fetchedResultsController managedObjectContext];
   NSEntityDescription *entity = [[self.fetchedResultsController fetchRequest] entity];
   NSManagedObject *newManagedObject = [NSEntityDescription insertNewObjectForEntityForName:[entity name] inManagedObjectContext:context];
   [newManagedObject setValue:[NSDate date] forKey:@"timeStamp"];
   NSError *error = nil;
   if(![context save:&error]){
      NSLog(@"Unresolved error: %@, %@", error, [error userInfo]);
      abort();
   }
}
Initialization of the context (environment)
Obviously, everything that we did before cannot be achieved without creating a context object, without the very environment in which the object exists and lives. The application delegate is responsible for creating this very environment. Three properties that must be required in any application using Core Data:
@property (readonly, strong, nonatomic) NSManagedObjectContext *managedObjectContext;
@property (readonly, strong, nonatomic) NSManagedObjectModel *managedObjectModel;
@property (readonly, strong, nonatomic) NSPersistentStoreCoordinator *persistentStoreCoordinator;
Please note that all three properties are readonly, this is done so that they cannot be set externally. Studying BasicApplicationAppDelegate.m shows that all three properties have explicit getters.
Managed Object Model:
- (NSManagedObjectModel *)managedObjectModel {
   if(_managedObjectModel != nil){
      return _managedObjectModel;
   }
   NSURL *modelURL = [[NSBundle mainBundle] URLForResource:@"BasicApplication" withExtension:@"momd"];
   _managedObjectModel = [[NSManagedObjectModel alloc] initWithContentsOfURL:modeURL];
   return _managedObjectModel;
}
After that, a storage is created that supports the created data models. In our case, in fact, as in most others using Core Data, the data warehouse is based on SQLite.
- (NSPersistentStoreCoordinator *)persistentStoreCoordinator {
   if(_persistentStoreCoordinator != nil){
      return _persistentStoreCoordinator;
   }
   NSURL *storeURL = [[self applicationDocumentsDirectory] URLByAppendingPathComponent:@"BasicApplication.sqlite"];
   NSError* error = nil;
   _persistentStoreCoordinator = [[NSPersistentStoreCoordinator alloc] initWithManagedObjectModel:[self managedObjectModel]];
   if(![_persistentStoreCoordinator addPersistentStoreWithType:NSSQLiteStoreType configuration:nil URL:storeURL options:nil error:&error]){
      NSLog(@"Unresolved error %@, %@", error, [error userInfo]);
      abort();
   }
   return _persistentStoreCoordinator;
}
Create a context (environment):
- (NSManagedObjectContext *)managedObjectContext {
   if(_managedObjectContext != nil){
      return _managedObjectContext;
   }
   NSPersistentStoreCoordinator *coordinator = [self persistentStoreCoordinator];
   if(coordinator != nil){
      _managedObjectContext = [[NSManagedObjectContext alloc] init];
      [_managedObjectContext setPersistentStoreCoordinator:coordinator];
   }
   return _managedObjectContext;
}
Context is used throughout the application as an interface for interacting with Core Data and persistent storage.
Core Data Initialization Sequence:
The engine starts when the application: didFinishLaunchingWithOptions method is called:
- (BOOL)application:(UIApplication *)application didFinishLaunchingWithOptions:(NSDictionary *)launchOptions {
   self.window = [[UIWindow alloc] initWithFrame:[[UIScreen mainScreen] bounds]];
   MasterViewController *controller = [[MasterViewController alloc] initWithNibName:@"MasterViewController" bundle:nil];
   self.navigationController = [[UINavigationController alloc] initWithRootViewController:controller];
   self.window.rootViewController = self.navigationController;
   [self.window makeKeyAndVisible];
   returnYES;
}
Calling the getter of the managedObjectContext property of the application delegate for execution, the chain of actions starts:
- (NSManagedObjectContext *) managedObjectContext calls
- (NSPersistentStoreCoordinator *) persistentStoreCoordinator, which in turn makes a call
- (NSManagedObjectModel *) managedObjectModel.
Thus, the call to the managedObjectContext getter method initializes the entire stack of Core Data objects and alerts Core Data.
Adding Core Data to an Existing Project
It is carried out in three steps:
- Adding the Core Data Framework
- Creating a data model
- Initialization of the context (environment)
Adding the Core Data Framework
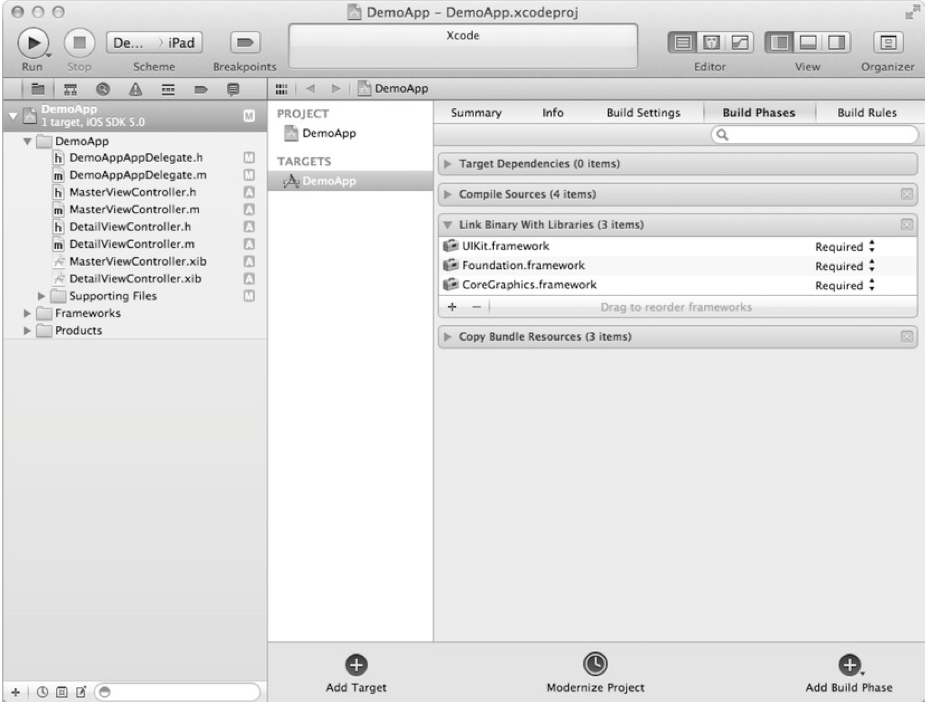
In the world of Objective-C, libraries are called frameworks.
The standard frameworks that are already connected in the "clean" projects and which you will most often see:
- Uikit
- Foundation
- Core graphics
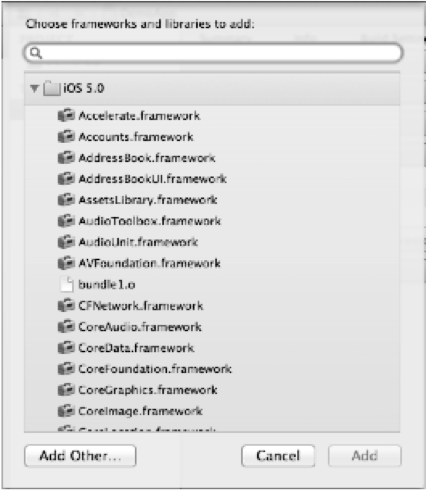
Where is the addition of new frameworks:
Choose a framework to connect:
Creating a data model
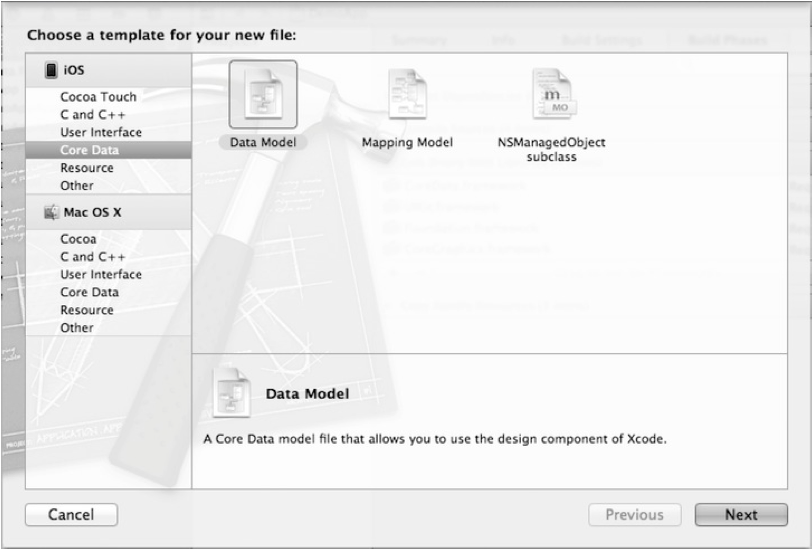
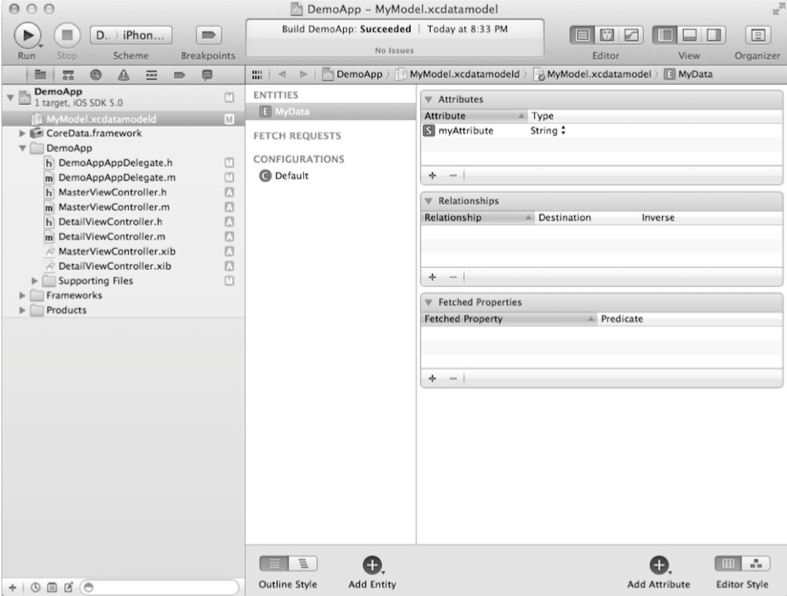
No Core Data application can be considered complete without a data model. The data model describes all entities that will be managed by Core Data.
To create a new data model: File -> New -> New File
Let's name our model MyModel.xcdatamodeld :
After creating the model, an entity editing (creating) window will open in front of you.
You can create a new entity by clicking on the "+" button in the lower left part of Xcode, and add a new entity attribute by clicking on the "+" button already in the "Attributes" section and then select its type.
Initialization of the context (environment)
The final step is to initialize the context, storage, and object model. Most often, you can use the code that is automatically generated by Xcode in "empty" projects using Core Data.
DemoAppAppDelegate.h
#import <UIKit/UIKit.h>#import <CoreData/CoreData.h>@interfaceDemoAppDelegate : UIResponder <UIApplicationDelegate> {
}
@property (strong, nonatomic) UIWindow *window;
@property (strong, nonatomic) UINavigationController *navigationController;
@property (readonly, strong, nonatomic) NSManagedObjectModel *managedObjectModel;
@property (readonly, strong, nonatomic) NSManagedObjectContext *managedObjectContext;
@property (readonly, strong, nonatomic) NSPersistentStoreCoordinator *persistentStoreCoordinator;
- (void)saveContext;
- (NSURL *)applicationsDocumentsDirectory;
@end
Switch to the * .m file DemoAppAppDelegate and write the following lines:
@synthesize managedObjectContext = _managedObjectContext;
@synthesize managedObjectModel = _managedObjectModel;
@synthesize persistentStoreCoordinator = _persistentStoreCoordinator;
The following is the code that initializes the data model, storage, and context.
- (NSManagedObjectModel *)managedObjectModel {
   if (_managedObjectModel != nil){
      return _managedObjectModel;
   }
   NSURL *modelURL = [[NSBundle mainBundle] URLForResource:@"MyModel" withExtension:@"momd"];
   _managedObjectModel = [[NSManagedObjectModel alloc] initWithContentsOfURL:modeURL];
   return _managedObjectModel;
}
- (NSPersistentStoreCoordinator *)persistentStoreCoordinator {
   if(_persistentStoreCoordinator != nil){
      return _persistentStoreCoordinator;
   }
   NSURL *storeURL = [[self applicationDocumentsDirectory] URLByAppendingPathComponent:@"DemoApp.sqlite"];
   NSError *error = nil;
   _persistentStoreCoordinator = [[NSPersistentStoreCoordinator alloc] initWithManagedObjectModel: [self managedObjectModel]];
   if(![_persistentStoreCoordinator addPersistentStoreWithType:NSSQLiteStoreType configuration:nil URL:storeURL options:nil error&error]){
      NSLog(@"Unresolved error %@, %@", error, [error userInfo]);
      abort();
   }
   return _persistentStoreCoordinator;
}
- (NSManagedObjectContext *)managedObjectContext {
   if(_managedObjectContext != nil){
      return _managedObjectContext;
   }
   NSPersistentStoreCoordinator *coordinator = [self persistentStoreCoordinator];
   if(coordinator != nil){
      _managedObjectContext = [[NSManagedObjectContext alloc] init];
      [_managedObjectContext setPersistentStoreCoordinator:coordinator];
   }
   return _managedObjectContext;
}
Methods that we have never implemented before:
- (NSURL *)applicationDocumentsDirectory{
   return [[[NSFileManager defaultManager] URLsForDirectory:NSDocumentDirectory inDomains:NSUserDomainMask] lastObject];
}
- (void)saveContext {
   NSError *error = nil;
   NSManagedObjectContext *managedObjectContext = [self managedObjectContext];
   if(managedObjectContext != nil) {
      if([managedObjectContext hasChanges] && ![managedObjectContext save:&error]){
         NSLog(@"Unresolved error %@, %@", error, [error userInfo]);
         abort();
      }
   }
}
Now that we have connected Core Data, our application can use it to store data.
Let's implement a simple example that would allow us to make sure that everything works as it should and that the data is really saved.
In the test example, we will determine the number of times that our application was launched.
We’ll make small changes to the application: didFinishLaunchingWithOptions: method of the application delegate in the form of receiving the number of times that the application was launched earlier and adding a new launch event.
Code for getting previous application launches:
NSManagedObjectContext *context = [self managedObjectContext];
NSFetchRequest *request = [[NSFetchRequest alloc] init];
NSEntityDescription *entity = [NSEntityDescription entityForName:@"MyData" inManagedObjectContext:context];
[request setEntity:entity];
NSArray *results = [context executeFetchRequest:request error:nil];
Then we can go through the entire array as follows:
for(NSManagedObject *object in results){
   NSLog(@"Found %@", [object valueForKey:@"myAttribute"];
}
Add a new entry and save:
NSString *launchTitle = [NSString stringWithFormat:@"launch %d", [results count]];
NSManagedObject *object = [NSEntityDescription insertNewObjectForEntityForName:[entity name] inManagedObjectContext:context];
[object setValue:launchTitle forKey:@"myAttribute"];
[self saveContext];
NSLog(@"Added : %@", launchTitle);
After the first launch, the application displays the following line in the console:
2011–02-2505:13:23.783 DemoApp[2299:207] Added: launch 0After the second run:
2011–02-2505:15:48.883 DemoApp[2372:207] Found launch 02011–02-2505:15:48.889 DemoApp[2372:207] Added: launch 1The full method is as follows:
- (BOOL)application:(UIApplication *)application didFinishLaunchingWithOptions:(NSDictionary *)launchOptions {
   NSManagedObjectContext *context = [self managedObjectContext];
   NSFetchRequest *request = [[NSFetchRequest alloc] init];
   NSEntityDescription *entity = [NSEntityDescription entytyForName:@"MyData" inManagedObjectContext:context];
   [request setEntity:entity];
   NSArray *results = [context executeFetchRequest:request error:nil];
   for(NSManagedObject *object in results){
      NSLog(@"Found %@", [object valueForKey:@"myAttribute"]);
   }
   NSString *launchTitle = [NSString stringWithFormat:@"launch %d", [results count]];
   NSManagedObject *object = [NSEntityDescription insertNewObjectForEntityForName:[entity name] inManagedObjectContext:context];
   [object setValue:launchTitle forKey:@"myAttribute"];
   [self saveContext];
   NSLog(@"Added : %@", launchTitle);
   [self.window makeKeyAndVisible];
   returnYES;
}
In conclusion
I ask you not to write about errors in the comments, it’s better to immediately write in private messages.
Should the transfers continue? Is there any interest in this topic?
Thank you for attention!