Stream with several cameras made from scrap materials
- Tutorial
It all started with how, with the help of OBS Studio and some program for animating desktop wallpapers, they made a videologue from the logo (which was also animated for the current playing music). At that moment I realized that OBS Studio can MUCH more than just stream games. After a closer acquaintance with OBS Studio, she claims to be the coolest program I've ever met .
I had to stream a small event for friends, but since I have the equipment for good sound and the desire to do cool, I was puzzled by the organization of the stream with a separate sound and several cameras. Stream for various reasons turned out to be so myself, but after this experience, I would seem to imagine how it should be. And I want to share. Here it is.
What?
The idea is to find 2-3 wireless operators who go to different venues of the event, communicate with people, shoot traffic, etc. (well, like serious guys, in short). And someone is sitting, communicating with them on the radio, and from all of this (and something else, for example, with all kinds of windows / monitors / projectors) is interesting video content that is not boring to watch.
It is also possible to combine the screens of several computers into one stream, perhaps this may be useful for games. Although most likely specifically for this task there are other technologies.
What for?
Because it allows you to do very cool and greatly shift the technological ceiling of the quality of the stream almost for nothing.
When using heaps of video streams, the coolness of the stream will be determined by the creative and organizational component (well, the quality of the connections).
Than?
- Note
1.1. OBS Studio
1.2. nginx with RTMP module - Operators with their smartphones
2.1. Any attachment from the issue of "stream rtmp", for example Larix Broadcaster , or (if there is some extra money) Ace Live Streaming or BitStream - Stable Wi-Fi, preferably 5GHz
- Stable uplink
If there is something else, you can make a good sound, at least on stationary cameras (which can be any relatively high-quality webcam).
And if there is another computer on Linux (they say, even Raspberry Pi is ok for ≤3 threads), you can slightly unload the main computer and its network for processing and sending the stream.
How?
Conventional protocol for video streaming - RTMP . Attempts to use something else lead to wild lags, it was my main mistake.
In fairness, it is worth noting the proprietary technology NewTek NDI (thanks, Alexsey ), which is kind of cooler than RTMP. However, for our juz-case, the use of NDI will require a lot of extra money.
It turns out that taking an RTMP stream and redirecting it to OBS Studio is a breeze. You just need to compile nginx with a custom module and write the config. But more about that later.
In an amicable way, you have to do something like this:
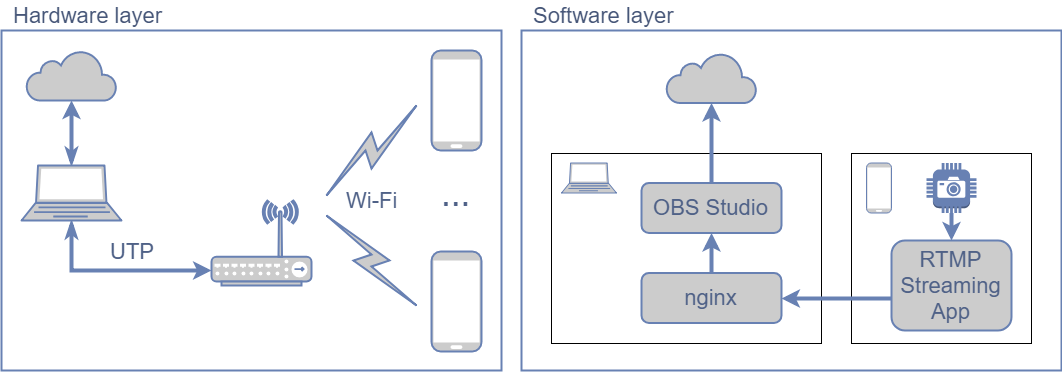
That is, do not give mobile phones the Internet so that they do not spend resources on anything other than Stream.
But if a good Wi-Fi with the Internet is already there (and there is no extra access point on 5GHz), then you can not disdain and use existing connections. However, it is still desirable to send the final stream from another connection, or, in extreme cases, from the same, but through a wire.
If there is a need to take streams from cameras and send the final stream through the same WiFi, test the stability thoroughly (and note that it will decrease greatly if a crowd of devices get into this Wi-Fi).
How to raise the RTMP server?
It is better to do it on Linux, so as not to have problems with all sorts of MINGW / MSYS. And on a separate hardware (not necessarily powerful). Either in docker, then you can skip this section, because there is already a dockerfile . It is also possible via WSL , but you will have to manually forward TCP port 1935 in the firewall.
Here is an excellent manual RTMP server using nginx , and the dock is also validly written. A brief retelling in the freestyle:
We put dependences:
sudo apt install build-essential libpcre3 libpcre3-dev libssl-devWe download the latest Mainline version of the source from here :
wget http://nginx.org/download/nginx-1.15.2.tar.gz  # Check for newer versions
tar xzf nginx-* && cd !$
Downloading the latest version of the RTMP module :
wget https://github.com/arut/nginx-rtmp-module/archive/master.zip -O rtmp-module.zip
unzip !$ -d .
Create a Makefile:
./configure --with-http_ssl_module --add-module=./nginx-rtmp-module-masterIf it falls before reaching
Configuration summary, we correct the problems.
This command will set up your streamer nginx live in/usr/local/nginx/and run on commandsudo /usr/local/nginx/sbin/nginx. Thus, nginx from the repository will not feel anything. This can be changed by studying./configure --help.Compile:
make -j4Install:
echo "nginx with RTMP module" > description-pak
sudo checkinstall --pkgname nginx-rtmp --provides nginx --nodoc --deldesc -y
sudo mkdir /usr/local/nginx/logs/  # Doesn't start without it
In principle, through
make installin this case it is safe, but still not necessary .Check
$ /usr/local/nginx/sbin/nginx -v
nginx version: nginx/1.15.2
Customize
sudo vim /usr/local/nginx/conf/nginx.confAt the end we add the config of the RTMP server:
rtmp {
    server {
        listen 1935;
        application live {
            live on;
            record off;
        }
    }
}
If desired, you can configure the HTTP server to display statistics .
The dock describes what else you can customize, there really is a lot of things. If you know how to do better, I will be happy to add a section about server configuration with material from comments.Making it convenient
alias rtmp-start="sudo /usr/local/nginx/sbin/nginx"alias rtmp-stop="sudo /usr/local/nginx/sbin/nginx -s stop"alias rtmp-status="cat /usr/local/nginx/logs/nginx.pid"
What to do with the RTMP server?
Send to it a stream from the mobile attachment to the address
rtmp://<ваш локальный IP>:1935/live/habrwherelive- this is the name of the RTMP application in the nginx config, andhabrthis is the Stream Key , which must be changed for different cameras.If you have configured the display of statistics (and did not forget to change the path to the file
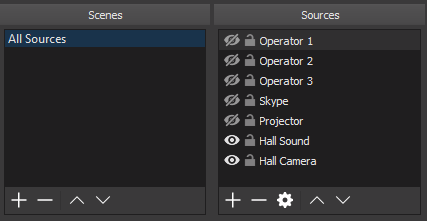
stat.xsl), check that the stream has come (at http: // localhost: 8080 / stat ).Connect to all streams OBS Studio.


PROFIT !!!
Obviously, the server can be not only local, but also accessible from the external one, which will allow you to do the same, but not via Wi-Fi, but via the Internet. You can make your analog of Instagram group streams, well, in general, endless possibilities))
Everything?
There are a couple of things that I learned from mistakes and would like to share:
- It is possible and necessary to change the target bitrate of the final stream in the course of the broadcast, and adapt to the connectivity. Restream, for example, draws cool graphs that make it clear how much you should lower. There is a pull request for auto bitrate , but it stalled ((
- There is such a parameter Keyframe Interval , and it should be more than a second (this must be manually set in the Advanced versions of the Output settings ). Restream talks about this only after the end of the stream, the UX is on top! ))
- There is another extremely useful Pull Request , in which I participated, and for which I actively drown, but it also looks stalled, although the maintener recently remembered and rethought about it. Like, pliz, if you also think that the lack of a Monitor button on audio channels is awful.
Now everything is exactly, thank you for your attention ^ _ ^
PS
For those who try to still knock out nginx for the ubiquitous Venda, here’s the rake I walked through, that quest turned out to be, I was not afraid of this process in vain:
- It is necessary to take the source code EXACTLY from Mercurial (it’s good that there is a "download zip" button), there is no folder in the archives from the site
src\os\win32. If you have sources from the site, there will be an errordon't know how to make 'src/os/win32/ngx_win32_config.h'. - Need ancient mingw from here and not
a little less ancientMSYS2. - When installing,
mingw-developer-toolkityou need to remove the Perl checkbox. Perl has to be screw. - This answer helped a lot.
- When compiling it is used
rc.exefrom%ProgramFiles(x86)%\Windows Kits\10\bin\10.0.16299.0\x64, you need to add this folder manually in PATH - It is necessary to remove the flag
-WXfromCFLAGSin the Makefile so that the vornings do not interrupt the compilation, there are vornings in 1.15.3 ...
So I did something like this:
#cmd: "%ProgramFiles(x86)%\Microsoft Visual Studio 14.0\VC\vcvarsall.bat"#cmd: set PATH=%PATH%;%ProgramFiles(x86)%\Windows Kits\10\bin\10.0.16299.0\x64#cmd: C:\MinGW\msys\1.0\msys.bat#bash: cd nginx-1.15.3
./auto/configure \
    --with-cc=cl \
    --with-debug \
    --prefix= \
    --conf-path=conf/nginx.conf \
    --pid-path=logs/nginx.pid \
    --http-log-path=logs/access.log \
    --error-log-path=logs/error.log \
    --sbin-path=nginx.exe \
    --http-client-body-temp-path=temp/client_body_temp \
    --http-proxy-temp-path=temp/proxy_temp \
    --http-fastcgi-temp-path=temp/fastcgi_temp \
    --http-scgi-temp-path=temp/scgi_temp \
    --http-uwsgi-temp-path=temp/uwsgi_temp \
    --with-cc-opt=-DFD_SETSIZE=1024 \
    --with-pcre=objs/lib/pcre-8.42 \
    --with-zlib=objs/lib/zlib-1.2.11 \
    --with-openssl=objs/lib/openssl-1.1.1 \
    --with-openssl-opt=no-asm \
    --with-select_module \
    --with-http_ssl_module \
    --add-module=nginx-rtmp-module-master
nmake