Interesting features of HP 3PAR storage systems. Part 3 - Peer Motion
If you still think that data migration from one storage system to another online and without downtime is possible only using expensive virtualizers (emc vplex, ibm svc), then you will be interested to learn about 3PAR Peer Motion technology, which allows you to solve this a task with lower financial costs and without the use of any additional equipment. This article is a brief description of how 3PAR Peer Motion works and continues the following topics about the HP 3PAR:
In August 2011, HP 3PAR arrays (InForm OS version 3.1.1) introduced the ability to migrate volumes online between any 3PAR arrays without interrupting server access to data. None of the competitors still have such functionality. 3PAR Peer Motion technology allows you to:
It is worth noting that Peer Motion is by no means a competitor to virtualizers - these are completely different technologies with different capabilities and with a big difference in the cost of the solution.
For the correct migration procedure, we need the following things:

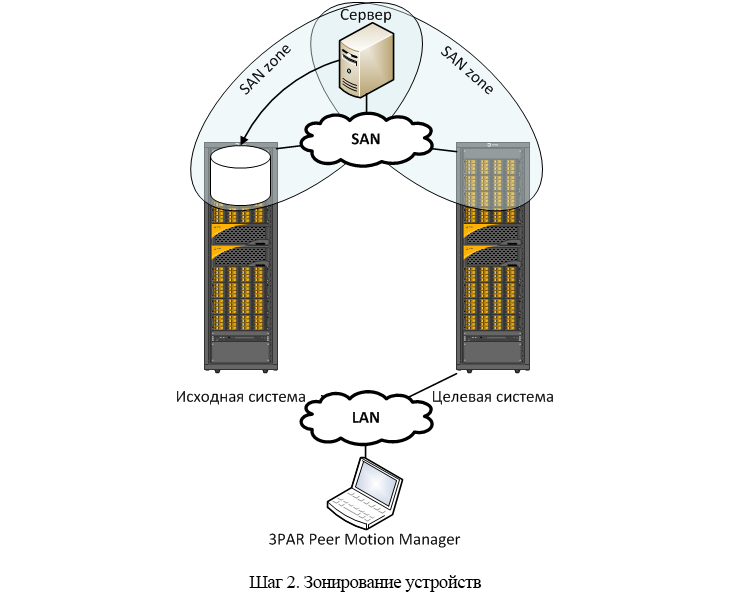
After all the preparatory procedures, the first thing you need to do is zoning on the Fiber Channel switches. The server whose data we are migrating should see both disk arrays.

At this stage, it's time to start Peer Motion Manager and select the following items from the menu:
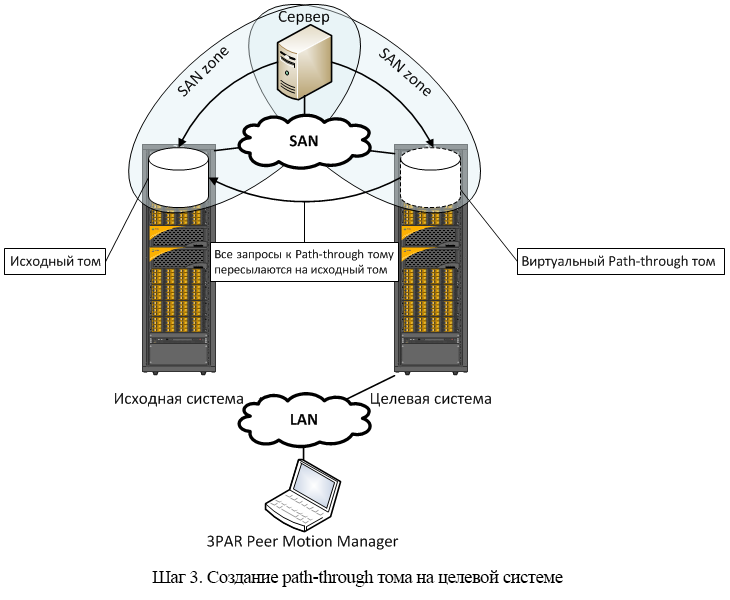
From this moment on, the target system will create and automatically export a volume (path through volume) with exactly the same unique identifier (WWID) as on the original system. After rescanning the I / O bus on the server, the number of paths on the server to the volume should double. That is, the target system can now also process server IO requests. She will forward all requests to her to the original system.

In the event that the volume that we are migrating is the only one for our server, then at this stage we can already remove the zone between the server and the source system on the Fiber Channel switches, as well as scan the I / O bus to delete the old paths to the volume .

To transfer the volume from the source system to the target, select “Import Volumes to Destination Array” in the Peer Motion Manager. At this step, you also need to select a group (CPG) into which volume data will be transferred and some additional options (for example, converting a volume from thick to thin). Importing a volume will also temporarily affect performance.

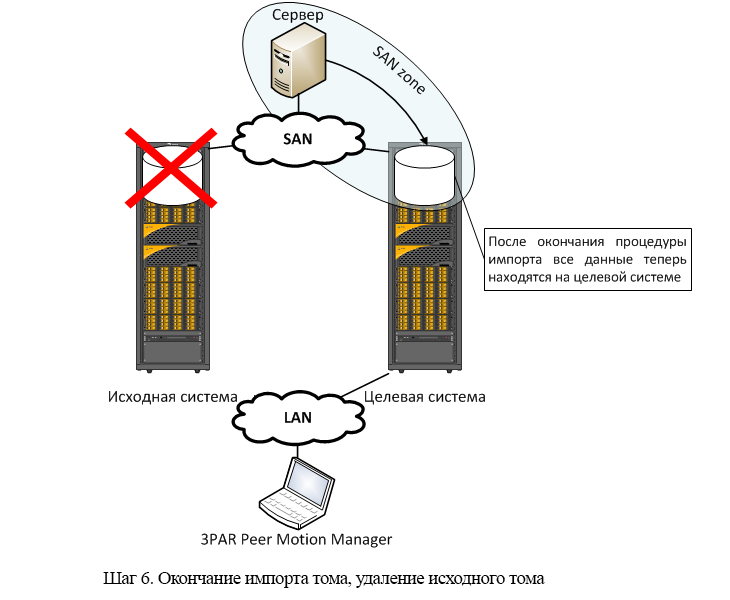
At the end of the volume import, Peer Motion will automatically break the link between the original and the imported volume. Data changes will only be written to the imported volume on the target system, and the volume will remain on the original system for the time the migration ends. To delete a volume on the source system in Peer Motion Manager, select the “Cleanup Migration Host” option.

That's all! As you can see, the procedure for online volume migration to HP 3PAR is very simple.
- Interesting features of HP 3PAR storage systems. Part 1 - Persistent Ports
- Basics of thin provisioning of volumes on storage systems (or 3PAR thin provisioning anniversary)
Why Peer Motion
In August 2011, HP 3PAR arrays (InForm OS version 3.1.1) introduced the ability to migrate volumes online between any 3PAR arrays without interrupting server access to data. None of the competitors still have such functionality. 3PAR Peer Motion technology allows you to:
- Perform volume moving online between two 3PAR storage systems in order to balance the load or to migrate from the old storage system to the new one without stopping the application
- Convert a volume when migrating from thick to thin on the fly
- For online data migration, there is no need to change server settings or install additional software there
It is worth noting that Peer Motion is by no means a competitor to virtualizers - these are completely different technologies with different capabilities and with a big difference in the cost of the solution.
How does the migration process go
Step one. Training.
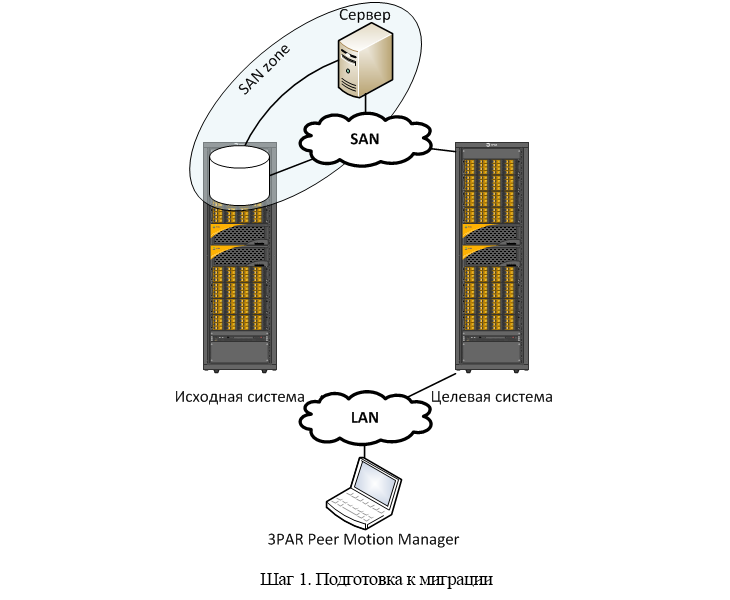
For the correct migration procedure, we need the following things:
- Two HP 3PAR Disk Arrays. The microcode version on the source system is not lower than 2.2.4, on the target one not lower than 3.1.1. Disk arrays must be interconnected by at least two links.
- Windows host on which the PMM (Peer Motion Manager) script is installed and which has network access to the target storage.
- Peer Motion license on the target system.
- The server for which the online migration procedure is carried out must be connected to the arrays through the SAN network. Direct connections are not supported.

Step Two Zoning.
After all the preparatory procedures, the first thing you need to do is zoning on the Fiber Channel switches. The server whose data we are migrating should see both disk arrays.

Step Three Path-through Volume
At this stage, it's time to start Peer Motion Manager and select the following items from the menu:
- Online Migrate Volumes
- Select Host, Export, and Admit Volumes to Destination Array
- Enter the name of the server you are migrating
From this moment on, the target system will create and automatically export a volume (path through volume) with exactly the same unique identifier (WWID) as on the original system. After rescanning the I / O bus on the server, the number of paths on the server to the volume should double. That is, the target system can now also process server IO requests. She will forward all requests to her to the original system.

Step Four Zoning.
In the event that the volume that we are migrating is the only one for our server, then at this stage we can already remove the zone between the server and the source system on the Fiber Channel switches, as well as scan the I / O bus to delete the old paths to the volume .

Step Five Data migration.
To transfer the volume from the source system to the target, select “Import Volumes to Destination Array” in the Peer Motion Manager. At this step, you also need to select a group (CPG) into which volume data will be transferred and some additional options (for example, converting a volume from thick to thin). Importing a volume will also temporarily affect performance.

Step Six The completion of the migration.
At the end of the volume import, Peer Motion will automatically break the link between the original and the imported volume. Data changes will only be written to the imported volume on the target system, and the volume will remain on the original system for the time the migration ends. To delete a volume on the source system in Peer Motion Manager, select the “Cleanup Migration Host” option.

That's all! As you can see, the procedure for online volume migration to HP 3PAR is very simple.
