Uncompromising power and real mobility
The writing of this article was prompted by the numerous requests of my friends that I “should tell the world about it.” We will talk about a compact and powerful enough computer, assembled by our own hands already in October 2011. Initially, a little about the reasons for this and the history of creation.
Caution, the article has a lot of pictures.
The need for a compact and powerful car arose for the following reason. I am quite closely connected with work in three-dimensional space and visualization. Well, and as a kind of hobby - I like to play an excellent shooter for an hour or two. The requirements for the machine with these components are clear. The need for machine mobility is also dictated by the following: often you have to work at home, and a computer for people like me is always more than a box in an office. Because of this, for a long time I bought "top-end" laptops - the so-called. workstations, at a price they pulled for 80 tr I had two of them: the first one still works successfully, pleasing with a good screen, the second one has been repaired twice, but it’s still dead. But when I tried a stationary computer with a really powerful hardware from a friend, I realized that not a single laptop could be compared to it - a workstation,
As a result of this understanding, I decided to "get on a Christmas tree and eat a fish", assemble the most powerful and most compact computer. Using a three-dimensional program, sorting through many different layout elements, I designed the computer that was optimal for me.
Total components - 38989 p.


The question ran into the manufacture of the case. I needed a completely individual. Laser cutting and metal bending firms, having seen the drawings, gave such a price tag that Apple and Dell just relax. He was sad and went along the simplest way - he assembled everything in the most compact case that generally existed and still, as I understand it, exists for machines of similar power - SilverStone Sugo SG07 .
In general, assembly in this enclosure was quick and successful. But the "worm" was gnawing: this case, in my opinion, was not designed rationally, both in terms of the layout of computer "guts" and in terms of the need for some components specifically for me. Alas - the cost of the product for the mass consumer. In short - I decided to make the case myself. Hands, it seems, grow where necessary, and at school I didn’t pick my nose at labor lessons. I did not fall in touch right away, I wanted to cut metal first, etc. Then it came to pass - you can buy aluminum corners, and assemble them into cogs by cutting a thread with a tap. Aluminum metal is soft, there should be no problems. The computer project was urgently adapted to the changing conditions.
The largest drawer in the pictures is the size of the Sugo SG07.


The expensive Sugo SG07 case with a very good PSU had to be put up for sale. Until now, by the way, no one has bought - even a pity.
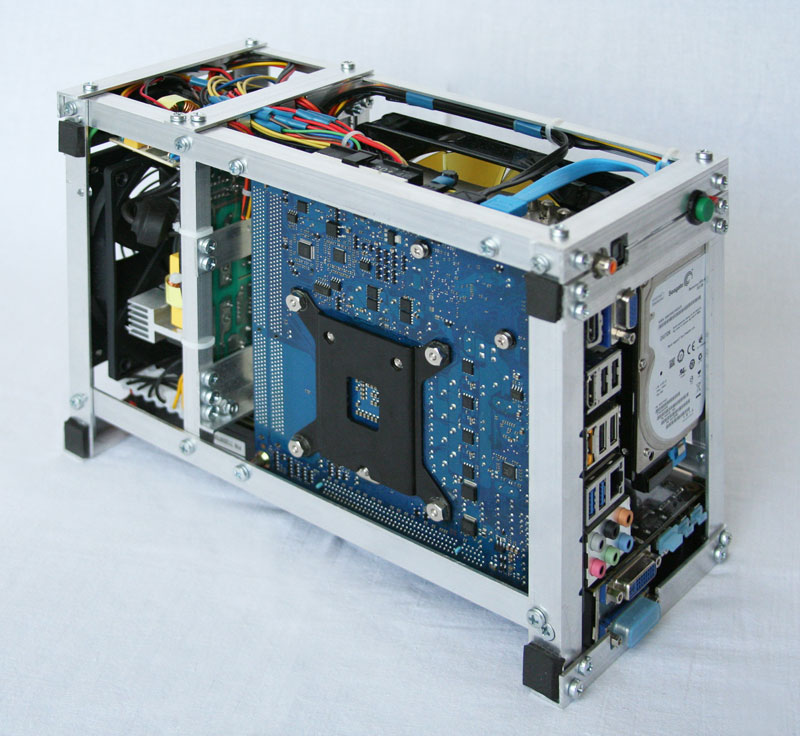
A new Cooler Master GX Lite series power supply was purchased, with a “strong” + 12V line, opened and “slightly” optimized. Namely: extra wires were removed - Molex, FDD appendix. One SATA branch is muffled and stored in case of connecting something else in case of need. And of course, all other branches are shortened to the required length. Cut and soldered each wire. The ideal option is to remove each wiring from the connectors and crimp again (24 pin, 4 pin “mother” connectors and 6 + 2 pin “video” connectors). It is very easy to remove them, but it is impossible to crimp them without the appropriate equipment and new “pins”. I confess - I did not find a thin heat shrink, so I wrapped the soldered ends of the wires with electrical tape. With SATA wires, everything is simple - their connectors with knives, you open and reinstall, where necessary. It is clear - with such manipulations I had to forget about the guarantee of the unit (already 3 years!). Therefore, the block was initially selected quite reliable.
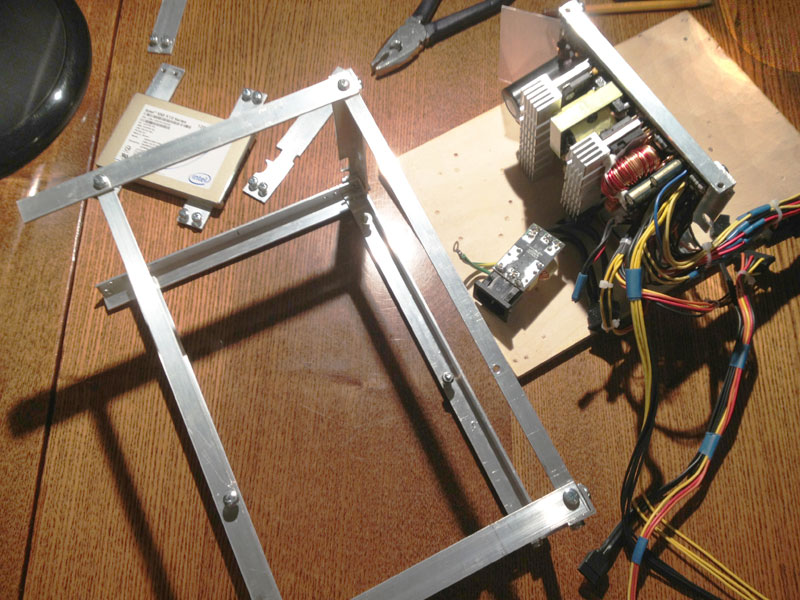
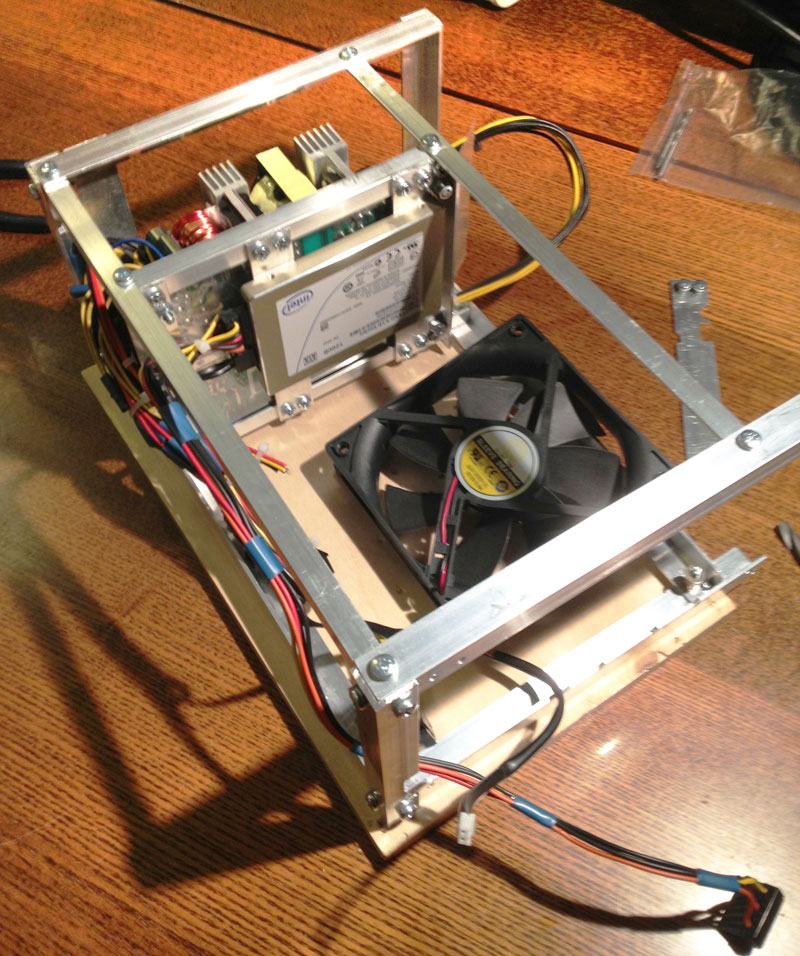
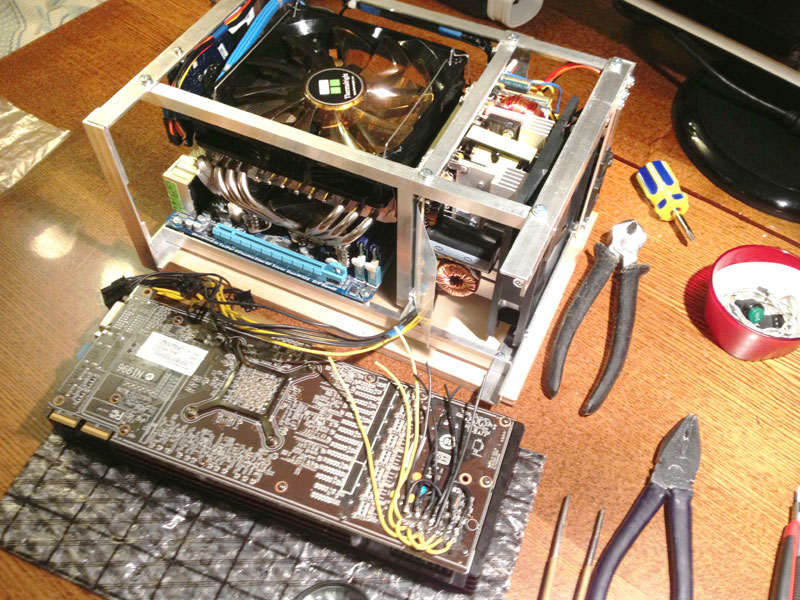
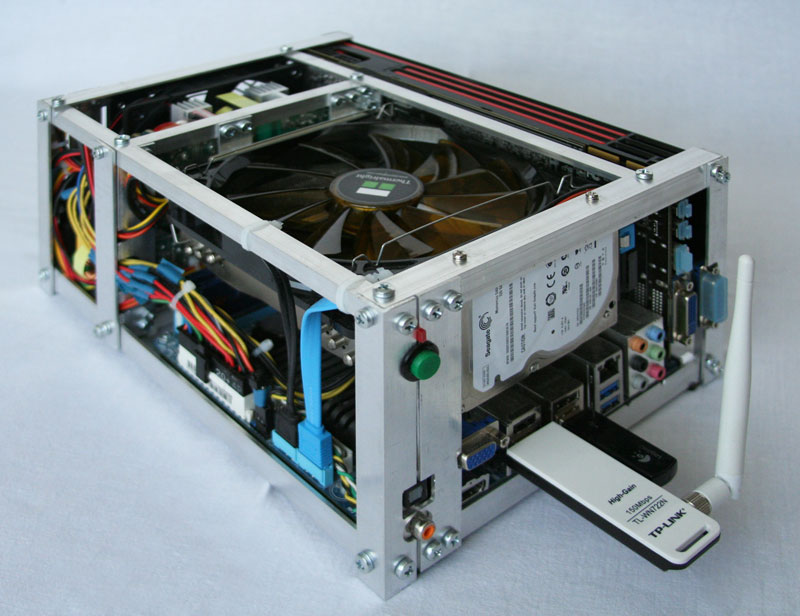
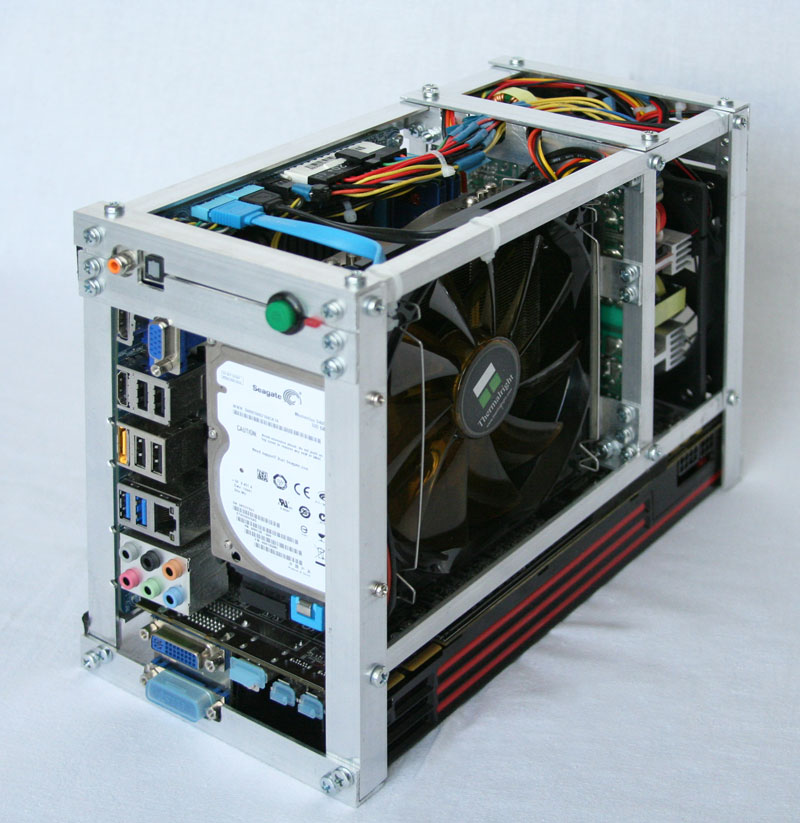
What else? An aluminum profile was purchased at the store (corner 15x15x2 and strip 15x2 2m long, both), a bunch of cogs and two taps (the price for everything is “three kopecks”). Next is the assembly. Everything went like clockwork. Thanks to the 3D model, all parts are guaranteed to fit together. I had to slightly upgrade the video card: I organized additional power by wires wired to the board - standard connectors would stick out too much over the case. As a new plug used a conventional terminal block. Plus - completely removed the metal mounting bracket of the video card (where the monitors are connected).
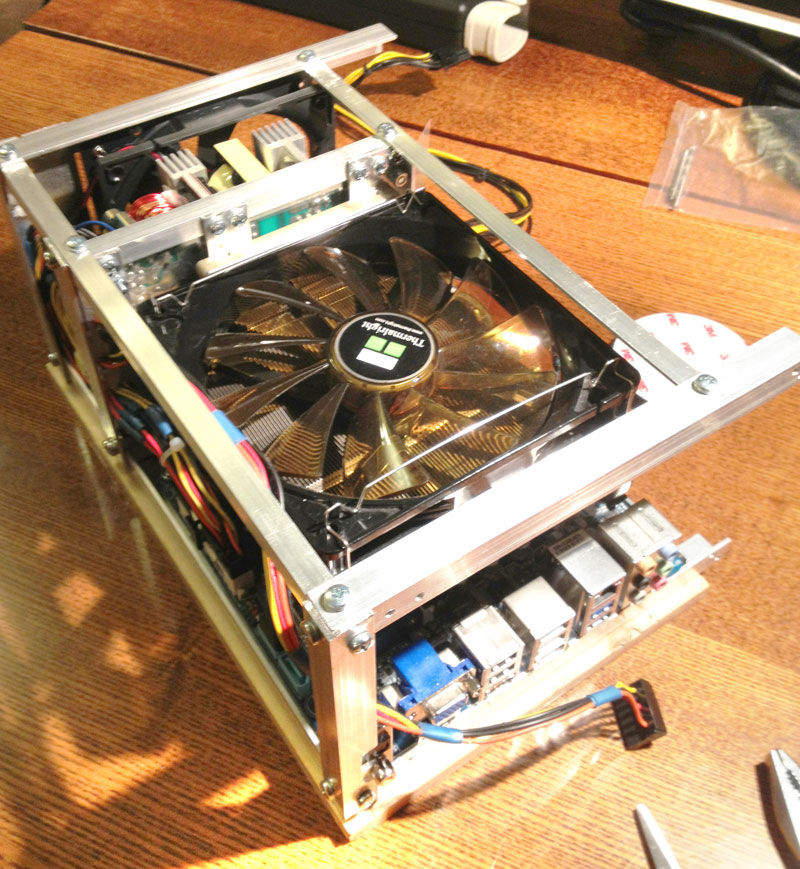
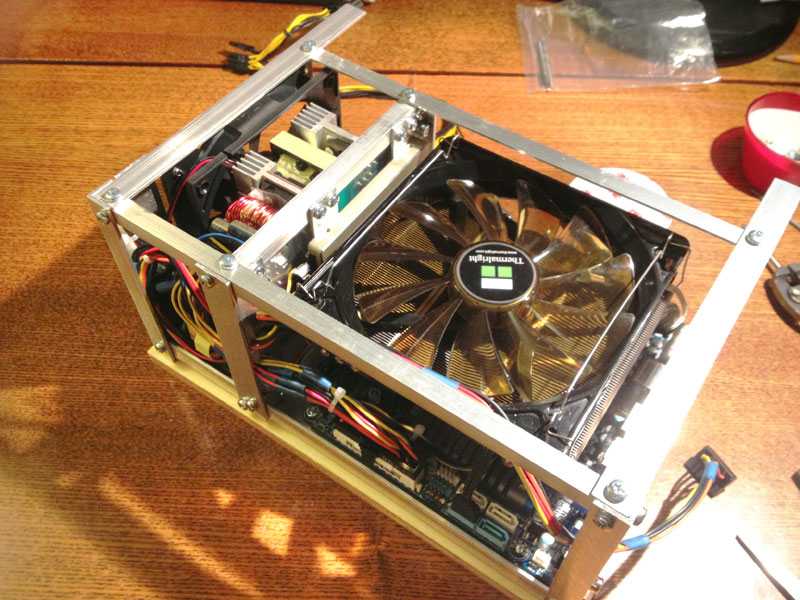
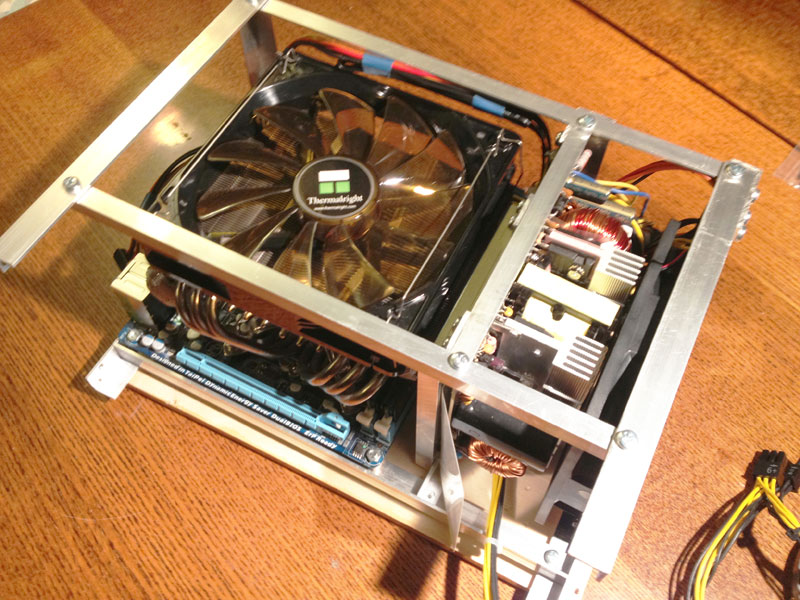
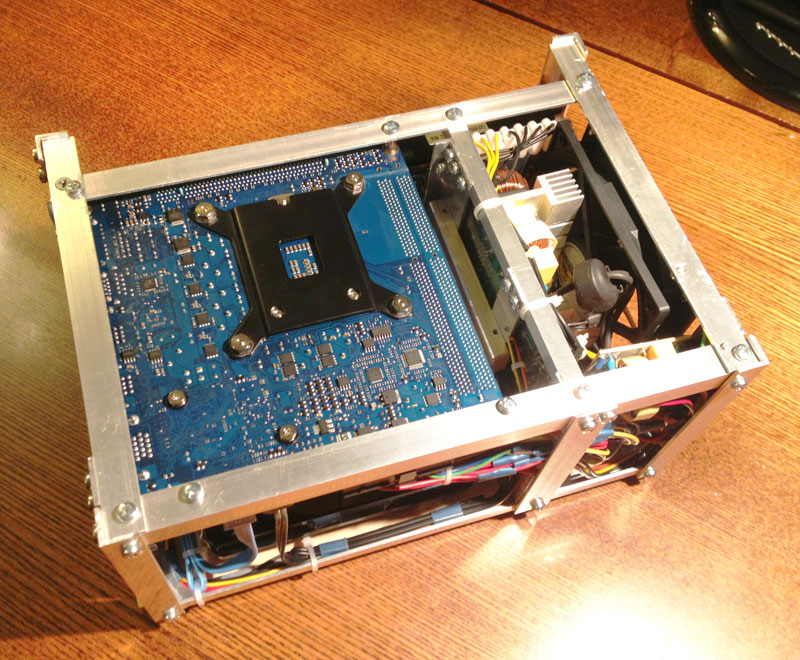
By tradition - I apologize for the pictures of the "assembly stage". Firstly, I did it not for the article, but for myself - so as not to forget where what. Secondly, he made them a telephone. Then, of course, he “pulled” in the editor, but all the same - “kaka”. But it’s good that at least these remained.
Pictures of the assembly stage: 1 , 2 , 3 , 4 , 5 , 6 , 7 , 8 , 9 , 10 , 11 , 12 , 13 , 14 , 15
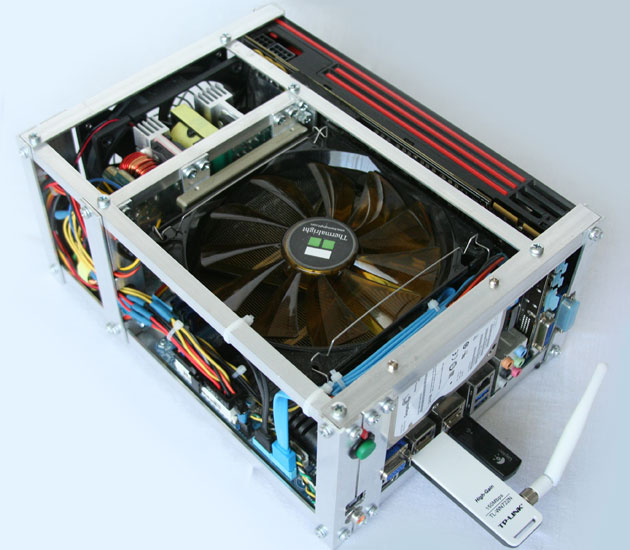
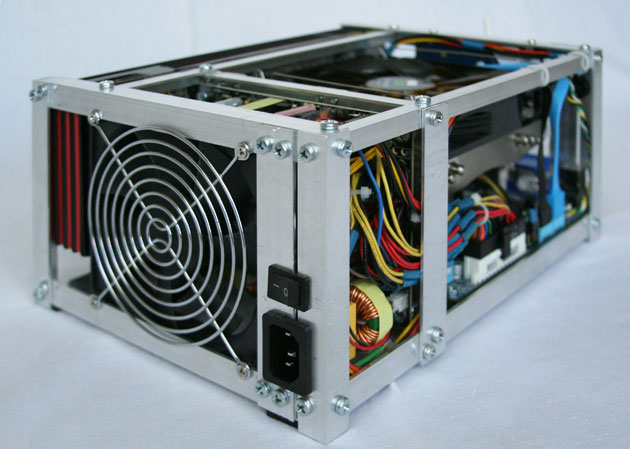
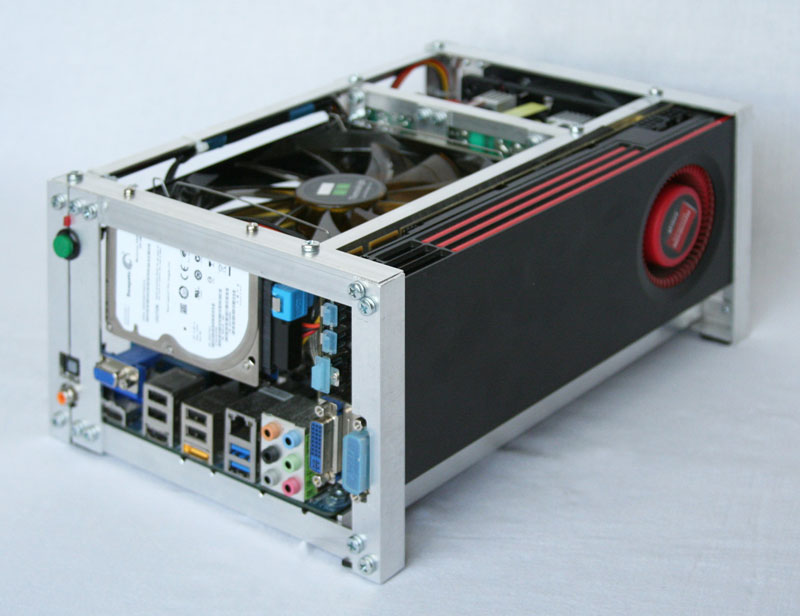
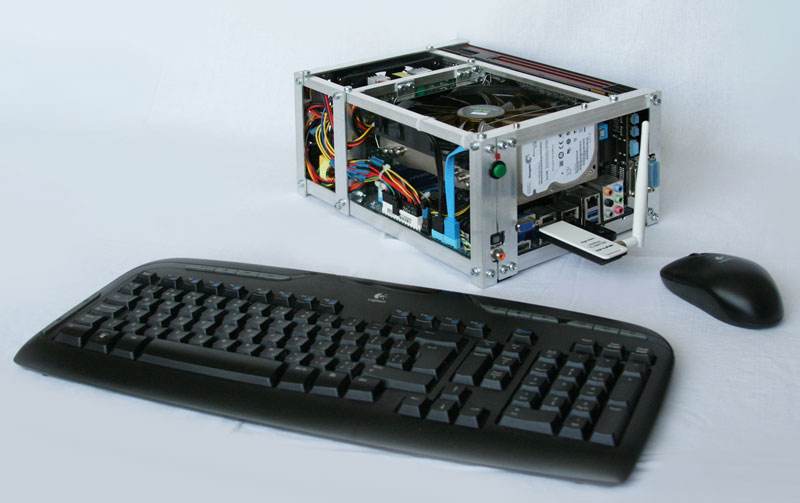
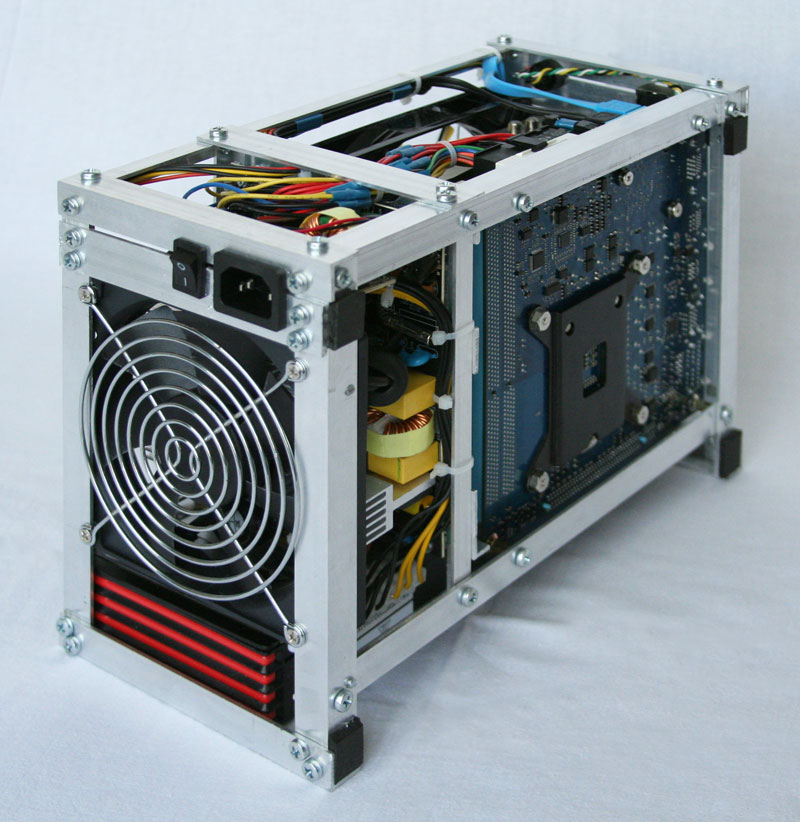
Here's what happened. The dimensions of this unit are 290x210x130 (h) mm.

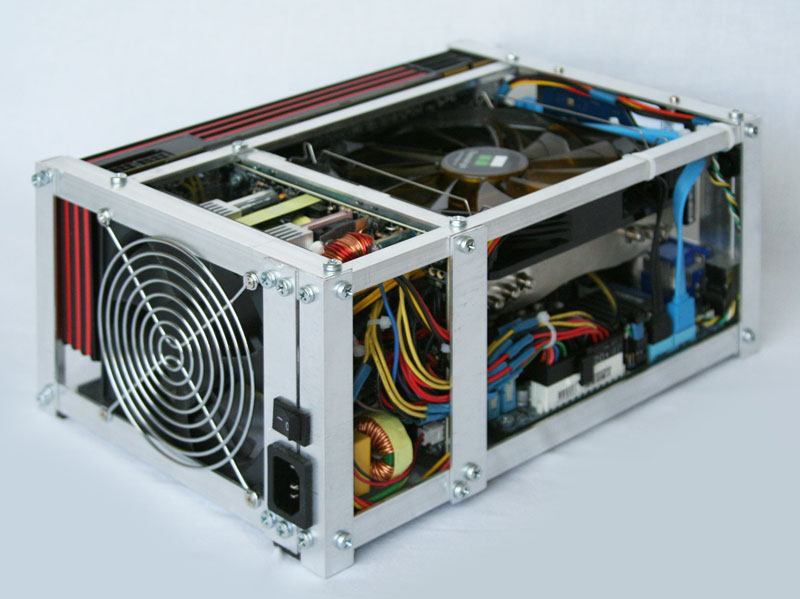
In theory, on top of the computer you need to do, order in the same laser cutting, decorative grille. And there is a drawing, but still there is no way to find time. From below and from the side, you definitely do not need to do anything. Behind, on the PSU fan, I screwed the usual "grill". As time has shown, and the computer has been in operation for more than a year, even the upper grille is needed more for beauty (nobody puts your fingers into the cooler and power supply), but this will complete the computer as a product, give it a finished look and a certain chic.


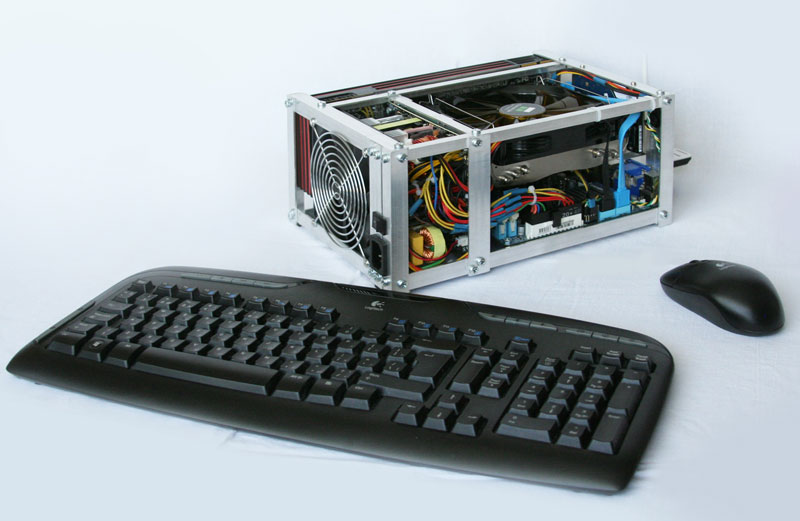
What do we have in the dry residue. A very compact computer with parameters that, and a year later, is quite nothing. Especially for this unit, a small bag was purchased. A couple of cords and any small things, like flash drives, etc., get in there. For ease of use - it is more convenient to carry than a bag with a laptop, in weight - almost the same, 100 grams back and forth is not important.
Two monitors at work and one at home, two sets of keyboards and mice, wired at home. Of course, there is no built-in sound, but I do not need built-in sound. At work - a monitor with speakers (via HDMI). At home - high-quality headphones with a headset, and when I watch movies, I connect a TV-panel and speakers (5.1 sound).
In general, I am very pleased with the unit, the decision was made uniquely correct, not to compare with the laptop. Well, at the price of the question - you see for yourself, even taking into account the cost of an additional monitor, keyboard and mouse, it turned out very “tasty”. At the same time - uncompromising power and real mobility. In principle, in this case, even upgrading a computer is possible, although it is unlikely to be needed. Technologies are developing so fast that soon we will connect smartphones to monitors and work on them.
I still wonder why such manufacturers do not do such things. Their possibilities, what a “sweetie” could be made! And buyers would certainly be found.
Well, in the end, a couple more details about the package when assembling the "comrade", if anyone is interested. I was looking for the power and reset buttons for a long time. I did not find any ready ones, I even wanted to buy an old building. The case helped. In the “zagashnik” there were old wiring with nozzles on pins - just what you need. I bought the power button itself in the store, it was for a car, with a pipe drawn - I sewed the pipe with a file. To reboot, I soldered the touch button from the old mouse, made a short stub - a centimeter and a half from the plug to the button. Thank God, there is no need to reboot. The inclusion LED is also useful, how can a decent computer be without it? In general - attention to detail, accuracy, everything on couplers, etc.
Additional pictures: 1 , 2 , 3 , 4, 5 , 6 , 7 , 8 , 9 , 10 , 11

Caution, the article has a lot of pictures.
Background
The need for a compact and powerful car arose for the following reason. I am quite closely connected with work in three-dimensional space and visualization. Well, and as a kind of hobby - I like to play an excellent shooter for an hour or two. The requirements for the machine with these components are clear. The need for machine mobility is also dictated by the following: often you have to work at home, and a computer for people like me is always more than a box in an office. Because of this, for a long time I bought "top-end" laptops - the so-called. workstations, at a price they pulled for 80 tr I had two of them: the first one still works successfully, pleasing with a good screen, the second one has been repaired twice, but it’s still dead. But when I tried a stationary computer with a really powerful hardware from a friend, I realized that not a single laptop could be compared to it - a workstation,
As a result of this understanding, I decided to "get on a Christmas tree and eat a fish", assemble the most powerful and most compact computer. Using a three-dimensional program, sorting through many different layout elements, I designed the computer that was optimal for me.
Specification of computer components (prices for October 2011):
- Motherboard (Gigabyte GA-H67N-USB3-B3) - 3562 p.
- Processor (Intel Core i7-2600K, 3.40GHz, 8MB, LGA1155, OEM) - 9437 p.
- CPU cooler (Thermalright AXP-140 (RT)) - 2090 p.
- RAM (DDR3 8Gb (2x4Gb) PC3-12800 1600MHz DIMM Kingston Hyper X Genesis, BOX) - 2260 r.
- Video card (AMD Radeon HD 6970 2048Mb MSI, PCI-E, DVIx2, HDMI, miniDPx2, Retail) - 10180 r.
- Hard drive (2.5 "120 GB SATA Solid State Disk (SSD) Intel 510 MLC) - 8730 p.
- Power supply (ATX 600W Cooler Master GX Lite RS600-ASABL3 (purchased later)) - 2300 p.
- Wifi usb adapter (TP-LINK WN722NC, 150Mbps 802.11n) - 430 p.
Total components - 38989 p.
Additionally:
- Case (Silver Stone Sugo SG07), had to sell - 6887 p.
- The hard drive (2.5 '' 320Gb Seagate Momentus, SATA 3Gb / s, 5400 rpm), already was - 1440 p.
Assembly
The question ran into the manufacture of the case. I needed a completely individual. Laser cutting and metal bending firms, having seen the drawings, gave such a price tag that Apple and Dell just relax. He was sad and went along the simplest way - he assembled everything in the most compact case that generally existed and still, as I understand it, exists for machines of similar power - SilverStone Sugo SG07 .
In general, assembly in this enclosure was quick and successful. But the "worm" was gnawing: this case, in my opinion, was not designed rationally, both in terms of the layout of computer "guts" and in terms of the need for some components specifically for me. Alas - the cost of the product for the mass consumer. In short - I decided to make the case myself. Hands, it seems, grow where necessary, and at school I didn’t pick my nose at labor lessons. I did not fall in touch right away, I wanted to cut metal first, etc. Then it came to pass - you can buy aluminum corners, and assemble them into cogs by cutting a thread with a tap. Aluminum metal is soft, there should be no problems. The computer project was urgently adapted to the changing conditions.
The largest drawer in the pictures is the size of the Sugo SG07.
The expensive Sugo SG07 case with a very good PSU had to be put up for sale. Until now, by the way, no one has bought - even a pity.
A new Cooler Master GX Lite series power supply was purchased, with a “strong” + 12V line, opened and “slightly” optimized. Namely: extra wires were removed - Molex, FDD appendix. One SATA branch is muffled and stored in case of connecting something else in case of need. And of course, all other branches are shortened to the required length. Cut and soldered each wire. The ideal option is to remove each wiring from the connectors and crimp again (24 pin, 4 pin “mother” connectors and 6 + 2 pin “video” connectors). It is very easy to remove them, but it is impossible to crimp them without the appropriate equipment and new “pins”. I confess - I did not find a thin heat shrink, so I wrapped the soldered ends of the wires with electrical tape. With SATA wires, everything is simple - their connectors with knives, you open and reinstall, where necessary. It is clear - with such manipulations I had to forget about the guarantee of the unit (already 3 years!). Therefore, the block was initially selected quite reliable.
What else? An aluminum profile was purchased at the store (corner 15x15x2 and strip 15x2 2m long, both), a bunch of cogs and two taps (the price for everything is “three kopecks”). Next is the assembly. Everything went like clockwork. Thanks to the 3D model, all parts are guaranteed to fit together. I had to slightly upgrade the video card: I organized additional power by wires wired to the board - standard connectors would stick out too much over the case. As a new plug used a conventional terminal block. Plus - completely removed the metal mounting bracket of the video card (where the monitors are connected).
By tradition - I apologize for the pictures of the "assembly stage". Firstly, I did it not for the article, but for myself - so as not to forget where what. Secondly, he made them a telephone. Then, of course, he “pulled” in the editor, but all the same - “kaka”. But it’s good that at least these remained.
Pictures of the assembly stage: 1 , 2 , 3 , 4 , 5 , 6 , 7 , 8 , 9 , 10 , 11 , 12 , 13 , 14 , 15
Total
Here's what happened. The dimensions of this unit are 290x210x130 (h) mm.
In theory, on top of the computer you need to do, order in the same laser cutting, decorative grille. And there is a drawing, but still there is no way to find time. From below and from the side, you definitely do not need to do anything. Behind, on the PSU fan, I screwed the usual "grill". As time has shown, and the computer has been in operation for more than a year, even the upper grille is needed more for beauty (nobody puts your fingers into the cooler and power supply), but this will complete the computer as a product, give it a finished look and a certain chic.
What do we have in the dry residue. A very compact computer with parameters that, and a year later, is quite nothing. Especially for this unit, a small bag was purchased. A couple of cords and any small things, like flash drives, etc., get in there. For ease of use - it is more convenient to carry than a bag with a laptop, in weight - almost the same, 100 grams back and forth is not important.
Two monitors at work and one at home, two sets of keyboards and mice, wired at home. Of course, there is no built-in sound, but I do not need built-in sound. At work - a monitor with speakers (via HDMI). At home - high-quality headphones with a headset, and when I watch movies, I connect a TV-panel and speakers (5.1 sound).
In general, I am very pleased with the unit, the decision was made uniquely correct, not to compare with the laptop. Well, at the price of the question - you see for yourself, even taking into account the cost of an additional monitor, keyboard and mouse, it turned out very “tasty”. At the same time - uncompromising power and real mobility. In principle, in this case, even upgrading a computer is possible, although it is unlikely to be needed. Technologies are developing so fast that soon we will connect smartphones to monitors and work on them.
I still wonder why such manufacturers do not do such things. Their possibilities, what a “sweetie” could be made! And buyers would certainly be found.
Well, in the end, a couple more details about the package when assembling the "comrade", if anyone is interested. I was looking for the power and reset buttons for a long time. I did not find any ready ones, I even wanted to buy an old building. The case helped. In the “zagashnik” there were old wiring with nozzles on pins - just what you need. I bought the power button itself in the store, it was for a car, with a pipe drawn - I sewed the pipe with a file. To reboot, I soldered the touch button from the old mouse, made a short stub - a centimeter and a half from the plug to the button. Thank God, there is no need to reboot. The inclusion LED is also useful, how can a decent computer be without it? In general - attention to detail, accuracy, everything on couplers, etc.
Additional pictures: 1 , 2 , 3 , 4, 5 , 6 , 7 , 8 , 9 , 10 , 11