Unity3d to help beginners
- Tutorial
This article is intended for those users of unity3d who are already familiar with the engine itself, but do not yet have their own knowledge base in order to write without additional surfing on the Internet, in order to find sometimes fundamental questions. To reduce some time for a cut, I’ll tell you a few important pieces that every unity programmer needs to know. If you have questions: how to make sure that you don’t slow down on something weaker than iPad 3, or you don’t know how convenient it is to work with sprites, how to make music not interrupt when loading, or how to bypass the maximum allowable size for android (50 megabytes ) and so on, perhaps you will find the answer in this article.
The article deals only with the problems of mobile development (iOS, Android). All examples are only in C #.
The author of the article does not pretend to be absolutely categorical and correct in the proposed solutions.
Fundamentals
1) Be sure to read the recommendations from Unity developers on how to write scripts that are optimal in terms of performance.
2) It is best to create a class, a direct descendant from MonoBehavior, which implements the caching of transform and other similar MonoBehavior properties, inherit all the main scripts from it:
Caching Example Code
public class Qwant : MonoBehaviour {
    private Transform _qwantTransform = null;
    public Transform qwantTransform {
        get {
            if (_qwantTransform == null) {
                _qwantTransform = transform;
            }
            return _qwantTransform;
        }
        protected set {
            _qwantTransform = value;
        }
    }
}
3) Use a static class to store the global parameters of your game with static methods and fields (unless of course the data should be saved when the game is closed, then use PlayerPrefs), but there should be only one such object, do not get carried away. Only store such global things in it as the current state of the game (play on pause; we are on the menu; a list of available terraces with their prices, received from the server, etc.)
4) Always use (even if your game is all in 2D) two cameras, one for game objects, the other for the GUI, indicate the required layer for the GUI elements (the camera’s GUI layer will be your happiness) Of course this does not apply to cases where there is plenty of one camera.
Screenshot with GUI camera
5) If you want your GUI for the iPad to look blurry and the same on all devices, you don’t want to resize it depending on the screen size, make the camera’s GUI size - 1.59. Layout everything to fit the size of iPad2, on other devices everything will be scaled by itself.
6) If you need to drag several objects to the list of another object, and do not want to drag them one at a time, you can fix the object displayed in the inspector by clicking on the lock in the upper right corner (you can also notice it in the previous picture).
Work with 2d sprites (tk2d plugin)
In Unity3d, there are practically no tools for working with 2d sprites. You won’t be able to create a texture map without using plugins, and you will have to write sprite animation yourself (in 4 unity, this thing was slightly corrected). To work with sprites, it is best to use the tk2d plugin . The plugin at the time of writing was worth $ 65, and, in my opinion, it works out 100%. The plugin allows you to:
- Create texture maps of various sizes (while allowing you to cut the original texture so that they fit);
- create sprite animations;
- work with texture font;
- tk2dCamera? (I’ve never used it, but the plugin developers recommend, probably a really worthwhile thing!);
- provided with quite sensible documentation and tutorials.
For a sufficiently long and dense use of the plugin, not a single bug was noticed.
In conclusion, I want to attach a script code that stretches the tk2d sprite to full screen without distortion, maybe at first glance it’s complicated for the task to be solved, but it always works.
Example: PlaneResizer.cs
Graphic text
What a game without a beautiful font? To create beautiful graphic text, it is best to use Glyph Designer , it works only under Mac, paid, but convenient. There are at least two free analogs running on Windows, but you won’t get really beautiful text in them.
Graphic font programs will create xml and texture map, use them in tk2d or in the free EZ GUI.
Pool facilities
One of the problems that you may encounter when writing a game is the high cost of the operation of creating the object, i.e., the high cost of the Instantiate operation. To solve this problem, you can use CoRoutine for a start, but if even the creation of one object is slowed down on a mobile device, then you need to use the generative design pattern Object pool .
Thus, you can get rid of lags when creating objects, and all of them can be instantiated when the level is loaded. The desired object is very convenient to search and retrieve by the name field.
This is the only way to deal with lags when writing a game with a dynamically generated level, for example, when writing a runner.
Quality levels
Mobile devices are very different in resolution, but I always want to make the game work with good performance on all devices. It is absolutely optional to prepare several different builds for various devices (4 apk for android and 2 builds for iOS).
First, set Quality levels in the game correctly (Edit-> Project settings-> Quality):
Quality settings screenshot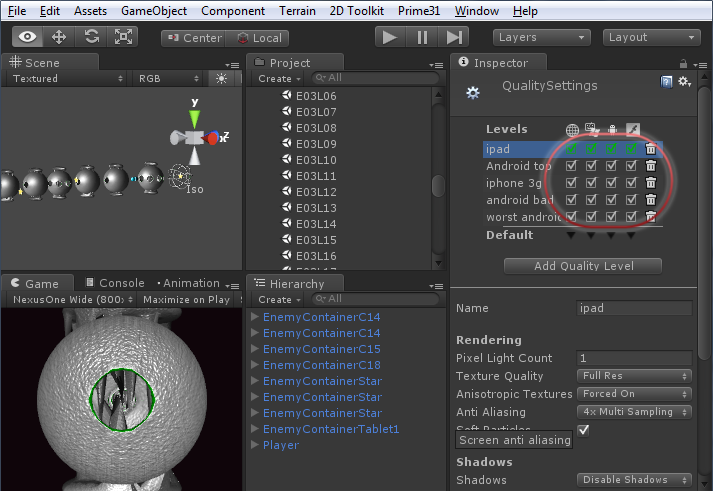
Unity3d has a great opportunity to switch Quality right at the application launch stage.
Thus: it is necessary to create the Quality Levels we need, and write a small script that can be hung on the pre-loading scene. This script will switch the quality, in accordance with any of our conditions.
For example, you can change the quality of textures from Full Res to Quarter Res. Of all the functions and properties we may need, only:
- QualitySettings.names;
- QualitySettings.SetQualityLevel (int).
An example of such a script: CorrectQuality.cs
DontDestroyOnLoad objects and endless music
If you want the main theme of the application to play continuously, even when rebooting from one scene to another, you must use DontDestroyOnLoad (gameObject);
That is, an object with our music is never deleted. It is important to take into account that such of our non-removable objects do not result in several. To do this, it is advisable to use the Singleton programming pattern .
Other non-removable objects are organized in the same way.
An example of such a script: Music.cs
Touchdispatcher
Touch events - there is a shared resource. For convenient use, it is necessary to write a certain controller that will distribute the received events between the objects that process them.
In my personal opinion, it is very conveniently organized in cocos2d / x , and the concept proposed by this game engine was taken as the basis:
1) there is an interface containing the processing of 4 standard touch event functions: TouchBegan, TouchMoved, TouchCancelled, TouchEnd. If an object catches touch events, it implements this interface.
2) There is a TouchDispatcher class - a class that controls and delegates events.
For the convenience of testing, it is necessary that there is no difference between the mouse and the finger, still compile for the device - for a long time. Also consider the following:
- the ability to use multitouch
- captures (swallow) object touch event or not
- priority of objects
- adding an object to the delegate list
- remove an object from the delegate list
After writing such a simple class, working with touch becomes very convenient, simple and clear. The resulting script is hung on a GameObject, which is placed at the root of the scene, for example, under the name SharedTouchDispatcher. A script that implements the delegate interface looks for our TouchDispatcher using GameObject.Find (“/ SharedTouchDispatcher”) .
Example: TouchDispatcher.cs , TouchTargetedDelegate.cs
AccelerometerDispatcher
All that is written above for TouchDispather is also true for an accelerometer, with one exception: the device has always only one accelerometer, which means that the code of the implementing controller is a bit simpler.
There is only one feature that should not be forgotten when working with the accelerometer: if the device is turned upside down: PortraitUpsideDown or LandscapeRight, we must not forget that the values change along the x or y axis, respectively. We get back-oriented management without considering this.
Example: AccelerometerDispatcher.cs , AccelerometerTargetedDelegate.cs
Checking points in concave polygon
One of the most common tasks of computer graphics. In short: the point is inside a non-convex polygon, if a ray directed in any direction crosses the edges of the polygon an odd number of times.
The algorithm itself can be easily found on the Internet.
I consider this task now in the context of hitting touch in a GUI object (Of course, you can do everything by checking if the beam hits the collider , but, in my opinion, it is better to use the method below for 2D objects).
For simple buttons, you can use regular rectangles and touchZone.Contains (position); . But if the objects are of complex shape and overlap each other, this will not be enough.
Stroke coordinates - the polygon of our conditional button can be taken from VertexHelperUnfortunately, I do not know anything better and nothing for windows.
As a result, we get the coordinates relative to the center of our 2D object, which is what we need.
It is easy to drive the resulting string into our processing script, and parse it into an array of points:
Code with an example of parsing a string into an array of points
private void ParsePath(){
	//получили массив пути
	char []separator={',','\n'};
	string []numbers=pathTouch.Split(separator);
	Path= new Vector2[numbers.Length/2];
	for (int i=0;i+1
Таким образом, осталось только реализовать алгоритм поиска пересечения прямых.


Пример реализации: Crossing.cs


Также прилагается макет класса, реализующий интерфейс делегата touch событий, и проверяющий попадания пальца в обводку.


Пример: SpriteTouch.cs

Догрузка уровней из интернета WWW

Если у Вас возникла необходимость догрузить часть уровней из интернета после установки игры, то WWW.LoadFromCacheOrDownload – Ваш лучший друг. Но он работает только в Unity Pro.


Загружать можно только специально подготовленные сцены, создавать такие можно при помощи
BuildPipeline.BuildStreamedSceneAssetBundle. Честно говоря под Unity 3.5.2 довольно глючно работало под IOS, но я думаю с тех времён это дело поправили.


В документации Unity подробно и исчерпывающе описан весь процесс организации загрузки уровней из сети.

Заключение

Надеюсь кому-то предложенная статья будет полезной, и поможет сэкономить немного времени.


Почти всё из описанного выше, было использовано здесь:
