Introduction to Windows 8 Game Development Using XNA and MonoGame
As you probably noticed, a number of materials appeared in our blog that reveal the basics of creating WinRT application applications for Windows 8. In this series of articles we will talk about how you can create WinRT game applications in C #.
If you were interested in the issue of creating games for WinRT, you probably know that the only way that Visual Studio 2012 offers is DirectX. This is a very powerful technology, it requires C ++ knowledge, and in general it is rather a low-level API for working with intensive graphics; it takes time to study it. If you are taking the first steps, then it’s much easier to use higher-level libraries. But due to the youth of the platform, so far there are not so many game and physical engines, nevertheless, their list is replenished. Here is some of them:
The last two - SharpDX and MonoGame deserve special attention. SharpDX is a wrapper over DirectX and allows you to work with this technology from .NET and also supports WinRT. Even more interesting is that MonoGame, the cross-platform port of the XNA library, also runs on WinRT.
XNA is a popular library for Windows, Xbox360 and Windows Phone, with which thousands of games have been created. Due to the fact that MonoGame has not changed the main scopes, porting from XNA does not require large changes in the existing application code.
In order to start developing games for WinRT on MonoGame you need to configure Visual Studio 2012 and install the necessary components on your computer to compile the project. Of course, you can download already assembled versions of SharpDX and MonoGame, but it’s better to download the source files of these libraries and collect them locally. This will allow further detailed debugging and increase your understanding of how MonoGame works.
If you decide to go the easy way, here are the links: sharpdx.org/download (or in the Package Manager console type Install-Package SharpDX) and monogame.codeplex.com/releases/view/96421
Create a directory in which we will have the source library files. for instance
Then compile and run the project. Congratulations, you created your first MonoGame application for WindowsRT. Although it still looks quite simple, a clean blue screen, since it does nothing and draws nothing except the background.
If you are not at all familiar with XNA then try searching the XNA keyword tutorial materials on the Internet. There are many articles that explain the basics of programming graphics based on this technology. You can also download an example of the CastleX platform game that runs on Windows 8 .

This is a classic platformer in which the player jumps, climbs and collects some things necessary for the plot, at the same time trying to protect themselves from all kinds of dangers.
So far, this game is not yet fully supported by Windows 8 since it does not have important components. Only minimal changes have been made compared to Windows, which allowed to run this application under WinRT.
In the catalog

One of the difficulties that you will inevitably encounter when developing games for MonoGame is the lack of support for Content Pipeline. In XNA 4.0 and the add-on for Visual Studio 2010, there was a set of extensions that packed the game's graphic and audio resources in a special XNB data format. There is no such extension in Visual Studio 2012, so the recommended way is to additionally install Visual Studio 2010 and XNA Game Studio 4.0 Refresh . Also, be sure to install the update for XNA Runtime for the Windows 8 Desktop platform.
Next, you can collect resources in VS2010 or use the third-party utility XNA Content Compiler
How does the game CastleX
The program logic of the game begins with the concept of displayed screens. There are several types of screens (their classes are in the / View / Screens / folder), for example, a screensaver screen, a demo playback screen, a level screen, a game menu screen, and so on. The screens are controlled by a special class
In the Update method of the main class of the game, the state of the screen manager is changed, which, depending on the processed events, affects what the player sees.
ScreenManager itself displays itself in the Draw method, the logic of which is obvious from the code:
The screens themselves, in turn, are engaged in processing user input in the method
The main screen of the game level contains the object "current level" in a variable
The level itself is an array of objects
Objects,
The tile also has a texture - in fact, what will be displayed on the screen, loaded through the method
There are also other objects at the level that interact with the tiles and with themselves - animated tiles, player character, monsters, keys, coins.
The level itself is entirely encoded in a text file. Different symbols mean different types of tiles and objects in their initial state: For example, L is a ladder, E is a dangerous character, C is a coin ,! - impassable tile, and so on. All codes can be found in the method. Processing of their status and position of objects is carried out in the method
There is no special physical engine in the game, the objects for which you need to calculate physics, there are methods that affect their properties (coordinates, color, etc.) Here is an example of how the position of an object that falls is calculated:
After all the event processing has been carried out and the properties of the objects have been changed, the moment comes to display the level in the method
In general, the game code and its logic are quite obvious. Having spent quite a bit of time, you can figure out how everything works.
Since the game code, in comparison with the original version, has been changed very slightly, and only for the purpose of ensuring compatibility with WinRT and MonoGame, additional changes are required in this application:
These components will be considered and finalized in the next post.
Link to the project running in Windows 8 and the original game - in case you decide to change the XNB files (graphics and sounds).
If you were interested in the issue of creating games for WinRT, you probably know that the only way that Visual Studio 2012 offers is DirectX. This is a very powerful technology, it requires C ++ knowledge, and in general it is rather a low-level API for working with intensive graphics; it takes time to study it. If you are taking the first steps, then it’s much easier to use higher-level libraries. But due to the youth of the platform, so far there are not so many game and physical engines, nevertheless, their list is replenished. Here is some of them:
- Easeljs
- Impactjs
- Construct2
- Delta engine
- Unigine
- Ogre engine
- Cocos2d
- Bepu physics
- Jitter physics
- Box2dx
- Monogame
- Sharpdx
The last two - SharpDX and MonoGame deserve special attention. SharpDX is a wrapper over DirectX and allows you to work with this technology from .NET and also supports WinRT. Even more interesting is that MonoGame, the cross-platform port of the XNA library, also runs on WinRT.
XNA is a popular library for Windows, Xbox360 and Windows Phone, with which thousands of games have been created. Due to the fact that MonoGame has not changed the main scopes, porting from XNA does not require large changes in the existing application code.
Configure the environment
In order to start developing games for WinRT on MonoGame you need to configure Visual Studio 2012 and install the necessary components on your computer to compile the project. Of course, you can download already assembled versions of SharpDX and MonoGame, but it’s better to download the source files of these libraries and collect them locally. This will allow further detailed debugging and increase your understanding of how MonoGame works.
If you decide to go the easy way, here are the links: sharpdx.org/download (or in the Package Manager console type Install-Package SharpDX) and monogame.codeplex.com/releases/view/96421
If you want to assemble everything yourself
:Create a directory in which we will have the source library files. for instance
D:\Gamedev- Install Git: msysgit.github.com
- Launch Git Bash (git console) and go to the directory
D:\Gamedev - We get the sources of SharpDX:
git clone github.com/sharpdx/SharpDX - We get the sources of MonoGame:
git clone github.com/mono/MonoGame - Launch Visual Studio 2012 x86 Native Command Line Tools (search by searching for the word Native in the start screen)
- We go into the directory
cd D:\Gamedev\SharpDXand command inMakeSharpDX.cmd win8 buildabout 3-4 minutes SharpDX will be assembled andD:\gamedev\sharpdx\Bin\Standard-winrt\binary assemblies will be located in the directory - Now we need to configure and compile the MonoGame project. To do this, using Visual Studio 2012, open the project
D:\gamedev\MonoGame\MonoGame.Framework.Windows8.slnnow. MonoGame does not know where the assembled SharpDX assemblies are located and shows errors in the references:
- In the project properties (context menu on the project, Properties ) in the Reference Paths section, specify the path
D:\gamedev\sharpdx\Bin\Standard-winrt\ - We compile the project, after which you will have an assembly
D:\gamedev\MonoGame\MonoGame.Framework\bin\Release\MonoGame.Framework.Windows8.dll - Install MonoGame project templates in Visual Studio. To do this, copy the files from directory
D:\gamedev\MonoGame\ProjectTemplates\VisualStudio2012\to directoryC:\Users\USERNAME\Documents\Visual Studio 2012\Templates\ProjectTemplates\Visual C#\Mono\and then restart Visual Studio and create a project based on this template:
- Do not forget to also specify Reference Paths for the newly created project
D:\gamedev\MonoGame\MonoGame.Framework\bin\Release\
Then compile and run the project. Congratulations, you created your first MonoGame application for WindowsRT. Although it still looks quite simple, a clean blue screen, since it does nothing and draws nothing except the background.
    public class Game1 : Game
    {
        GraphicsDeviceManager _graphics;
        SpriteBatch _spriteBatch;
        public Game1()
        {
            _graphics = new GraphicsDeviceManager(this);
            Content.RootDirectory = "Content";
        }
        ///Инициализация
        protected override void Initialize()
        {
            base.Initialize();
        }
        /// загрузка игровых ресурсов
        protected override void LoadContent()
        {
            _spriteBatch = new SpriteBatch(GraphicsDevice);
           //Content.Load...
        }
        protected override void UnloadContent()
        {
        }
        /// логика игры
        protected override void Update(GameTime gameTime)
        {
            base.Update(gameTime);
        }
        /// отрисовка игры
        protected override void Draw(GameTime gameTime)
        {
            GraphicsDevice.Clear(Color.CornflowerBlue);
            base.Draw(gameTime);
        }
    }
What's next
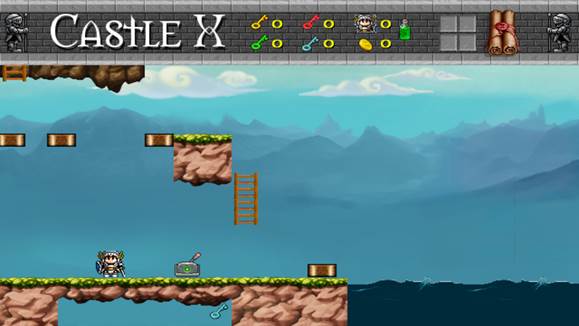
If you are not at all familiar with XNA then try searching the XNA keyword tutorial materials on the Internet. There are many articles that explain the basics of programming graphics based on this technology. You can also download an example of the CastleX platform game that runs on Windows 8 .
This is a classic platformer in which the player jumps, climbs and collects some things necessary for the plot, at the same time trying to protect themselves from all kinds of dangers.
So far, this game is not yet fully supported by Windows 8 since it does not have important components. Only minimal changes have been made compared to Windows, which allowed to run this application under WinRT.
In the catalog
AssetsCastle X games contain many files necessary for work - these are graphics, sound effects and levels. Many of these files have the unusual XNB extension. One of the difficulties that you will inevitably encounter when developing games for MonoGame is the lack of support for Content Pipeline. In XNA 4.0 and the add-on for Visual Studio 2010, there was a set of extensions that packed the game's graphic and audio resources in a special XNB data format. There is no such extension in Visual Studio 2012, so the recommended way is to additionally install Visual Studio 2010 and XNA Game Studio 4.0 Refresh . Also, be sure to install the update for XNA Runtime for the Windows 8 Desktop platform.
Next, you can collect resources in VS2010 or use the third-party utility XNA Content Compiler
How does the game CastleX
The program logic of the game begins with the concept of displayed screens. There are several types of screens (their classes are in the / View / Screens / folder), for example, a screensaver screen, a demo playback screen, a level screen, a game menu screen, and so on. The screens are controlled by a special class
ScreenManagerinherited from the type DrawableGameComponent that is registered when the application starts.Components.Add(screenManager);
In the Update method of the main class of the game, the state of the screen manager is changed, which, depending on the processed events, affects what the player sees.
ScreenManager itself displays itself in the Draw method, the logic of which is obvious from the code:
        public override void Draw(GameTime gameTime)
        {
            ViewPort = GraphicsDevice.Viewport;
            foreach (GameScreen screen in screens)
            {
                if (screen.ScreenState == ScreenState.Hidden)
                    continue;
                try
                {
                    SpriteBatch.Begin();
                }
                catch { }
                screen.Draw(gameTime, SpriteBatch);
                try
                {
                    SpriteBatch.End();
                }
                catch { }
            }
        }
The screens themselves, in turn, are engaged in processing user input in the method
HandleInput and in their own display, depending on the events that were processed.Game level screen
The main screen of the game level contains the object "current level" in a variable
leveldepending on where the player is. Levels are loaded dynamically. In the method of Drawthe screen itself, the call is transferred to the method of Drawthe level itself ( leve.Draw) and an information panel is displayed with the number of lives, keys collected -DrawHud(gameTime, spriteBatch);Game level
The level itself is an array of objects
Tilethat can be in different layers, indicating the order in which they are displayed (which is on top of what): private Tile[,] tiles;
private Layer[] layers;
Objects,
Tilein turn, can be anything - a door, a piece of brick wall, water. Tiles can also be transparent and, in fact, such tiles are triggers, since a tile, in addition to everything else, handles collisions - an important element of the game: public enum TileCollision
{
///
/// Проходной тайл, который не мешает передвижению игрока
///
Passable = 0,
///
/// Не проходной тайл сквозь который нельзя пройти
///
Impassable = 1,
///
/// Тайл платформы, через который можно пройти со всех сторон кроме верха
///
Platform = 2,
///
/// лестница, особый случай
///
Ladder = 3
}
The tile also has a texture - in fact, what will be displayed on the screen, loaded through the method
content.Load<>(). There are also other objects at the level that interact with the tiles and with themselves - animated tiles, player character, monsters, keys, coins.
The level itself is entirely encoded in a text file. Different symbols mean different types of tiles and objects in their initial state: For example, L is a ladder, E is a dangerous character, C is a coin ,! - impassable tile, and so on. All codes can be found in the method. Processing of their status and position of objects is carried out in the method
####################

X4001.................!..

.x2..EG0102...............!X1003.

\

##L.######..########

##L.........#C.C.C.C.C.C.X3003.

##L.......N..#C.C.C.C.C.Cx5..

##L.......EG0102..########

##L....N..#####......

##L...EG0102.......#.....X2003.

##L..####....#....x4..

##L..........#W....##

##L...N....N...#....##

##L...EG0102......i#www###

#############www####

wwwwwwwwwwwwwww#####

X6001wwwwwwwwwwwwwww#####

wx6wwwwwwwwwwwww######

2!2!2!2!2!2!2!2!2!2!

tit.Platforms and ghosts

des.Face your first enemies inside the castle!

Layer2.Bricks.Bricks.Bricks
LoadTile(char tileType, int x, int y, String code)Level::Update. For example, in this method, a left key press can be processed, the player’s object will be moved to the tile of the moving platform, a collision with this tile will be processed (properties of the player’s object will change)
        private void UpdateMovingItems(GameTime gameTime)
        {
            if (MovingItemsAreActive)
            {
                for (int i = 0; i < MovingItems.Count; ++i)
                {
                    MovingItem movingItem = MovingItems[i];
                    movingItem.Update(gameTime);
                    if (movingItem.PlayerIsOn)
                    {
                        //двигаем персонаж игрока если он стоит на двигающейся платформе
                        screenManager.Player.Position += movingItem.Velocity;
                    }
                }
            }
        }
There is no special physical engine in the game, the objects for which you need to calculate physics, there are methods that affect their properties (coordinates, color, etc.) Here is an example of how the position of an object that falls is calculated:
        private void ApplyPhysics(GameTime gameTime)
        {
            float elapsed = (float)gameTime.ElapsedGameTime.TotalSeconds;
            if (isFalling)
            {
                velocity.Y = MathHelper.Clamp(velocity.Y + GravityAcceleration * elapsed, -MaxFallSpeed, MaxFallSpeed);
                Position += velocity * elapsed;
            }
        }
After all the event processing has been carried out and the properties of the objects have been changed, the moment comes to display the level in the method
Draw(), which simply draws all the objects that are at the level:
            DrawTiles(spriteBatch);
            foreach (Item item in items)
                item.Draw(gameTime, spriteBatch);
            foreach (MultipleStateItem item in multipleStateItems)
                item.Draw(gameTime, spriteBatch);
            foreach (AnimatedItem item in animatedItems)
                item.Draw(gameTime, spriteBatch);
            foreach (FallingTile FallingTile in FallingTiles)
                FallingTile.Draw(gameTime, spriteBatch);
            foreach (Exit exit in exits)
                exit.Draw(gameTime, spriteBatch);
            foreach (Boss boss in bosses)
                boss.Draw(gameTime, spriteBatch);
In general, the game code and its logic are quite obvious. Having spent quite a bit of time, you can figure out how everything works.
What's next
Since the game code, in comparison with the original version, has been changed very slightly, and only for the purpose of ensuring compatibility with WinRT and MonoGame, additional changes are required in this application:
- Support for saving game state in local application storage.
- Subsystem for saving files. Because of this, the level editor is now disabled
- Multitouch and touch control support
- Mandatory privacy policy screen
These components will be considered and finalized in the next post.
Link to the project running in Windows 8 and the original game - in case you decide to change the XNB files (graphics and sounds).