Manual installation of the ADB driver
- Tutorial
I want to share with you a simple way to install the ADB driver under Windows. This article will be needed by those who have this driver either not installed at all or installed, but adb still does not see the device point-blank (as I had), or you did not find this driver at all. So everyone who has / had similar problems, or who are just interested, please, under cat.
I'll start with the background. I decided to buy a low-cost Android Tablet computers to read books (DJVU / PDF), and the choice fell on the unitof Russian course Chinese production TeXet TM-7025 . The toad pressed to buy something expensive, and for the simple reading of books some super-characteristics are not required. Later I discovered that most of the toys are good on it, it’s convenient to climb on the Internet while you are sittingin da kabin , etc. And since the study of Android loomed before me, I decided that it would be very convenient to use an iron device for this instead of tormenting with emulators.
And here an unpleasant surprise awaited me - either the native driver turned out to be crooked, or Windows, or the wire ... in general, the driver got up, the Windows device manager reported the device was fully operational, but I received an empty list for the adb devices request in the console and, Naturally, it was not possible to test the application on the tablet.
I wrote a request to TeXeT support, they even answered me with a link to the driver itself, which, as I was already convinced, did not work. I started looking for an answer on the Internet and found a bunch of different assemblies of this driver and manuals, but still none of them started up properly, and even the native driver from the SDK did not get anyway, which plunged me into gloom ... but not despair.
Here I decided to try my hand atwriting drivers for the good old method of scientific poking and opened the driver inf-file. I was given hope by the understanding that the software part of the adb interface on the tablet side should be identical for all devices, and USB worked anyway. And so, after several unsuccessful attempts to manually edit the inf file, I found a treatment recipe
So let's get started.
Step 1. Download the driver. If you have not already done so, open the Android SDK Manager, find the Extras section, check the box next to Google USB Driver and click Install Packages. Everything is simple. Wait for it to load.
Step 2. Locate the driver and make a copy of it in a separate folder. Go to the% android-sdk% \ extras \ google \ folder and you will see the coveted usb_driver dad there. Here, copy it somewhere, and there we will carry out further manipulations. In principle, you can edit the “original”, but I preferred to keep the original intact for every fireman.
Step 3. Edit the inf file. In the daddy open the file android_winusb.inf and look for lines of this kind:
We make a copy of these lines, replace Google Nexus One with % your_name% device for identification in the future and ... open the Windows device manager. We are looking for our device there ( Android , Android Composite ADB Interface or something in this style). We open the device’s properties, the “Details” tab, in the list, select the item “Equipment ID” and see such a picture.
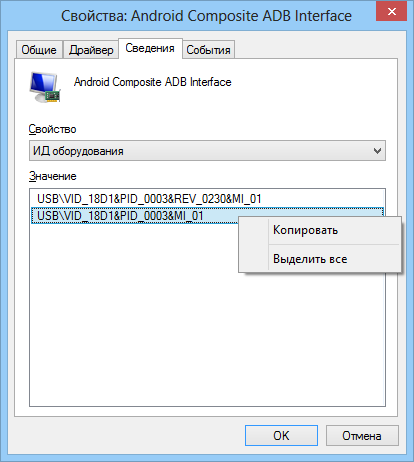
We copy the line that is most similar to the one shown in the figure (it is, in theory, just a little shorter), and paste it into our inf-file.
In% SingleAdbInterface% we delete the end of the line, as you can see, in% CompositeAdbInterface% we insert the whole. I probably don’t need to repeat everything twice, but I already have everything and I’m too lazy to experiment :)
Save (be careful - in some cases you need to run the notebook with administrator rights, because in user mode you won’t be allowed to overwrite inf file).
Step 4. Installing the driver.Now that everything is ready, go back to the device manager and remove all previously installed adb drivers (if any). We update the list of devices and see our device without drivers. We open its properties and select “update drivers”, select the installation from the folder, select the folder with the corrected inf-th and start the installation - our driver is instantly located, but during installation it may swear about incompatibility with the question “do you keep it on?”. We continue. That's it, the driver is installed.
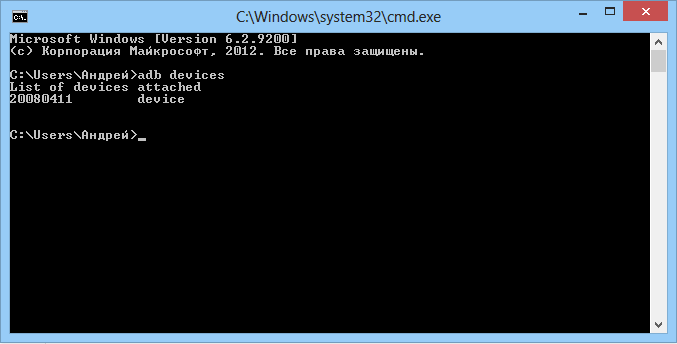
Step 5. The final. For accuracy, take out the USB stick, wait until everything is detected, open the console (Win + R, enter cmd ) and write adb devices . If everything went well, we see the treasured item on the list, indicating that adb now sees our device.
From this moment, you can safely run eclipse and build programs, enjoying convenient automatic assembly, installation and debugging directly on our device.
If the adb command doesn't work for you at all. Computer -> Properties -> Environment Variables. We are looking for the Path variable and at the end we append (by no means overwrite) the semicolon at the end, and then the address of the folder where adb lives (usually% android-sdk% \ platform-tools \). After a reboot, it should work.
Sometimes adb does not start automatically at system startup. Launch manually.
What was it?
In fact, everything is simple. For some reason (Windows mastday / programmers have crooked hands / Google info file was written only for native Google devices / everything was ruined by the Higgs bosons on your computer), Windows does not want to eat the Google driver for non-Google devices that are not written to the inf file. Apparently, there everything is just tied to these ID equipment. But the software part on the vast majority of Android devices in terms of the debugger connector to the PC is identical, because the driver should normally communicate with any Android device. Our task is to fool Windows and make it accept the device as “driver-suitable”, which we did by adding its ID to the driver inf-file.
I hope that this manual will help someone get their own Chinese or other device, for which they forgot to make a normal adb driver when assembling the system, or those who are bothered to download the official driver from the device manufacturer (it happens so gemmorno that it’s faster to do all of the above - I was so with the driver for the phone LG E510).
PS I did not conduct mass testing of this method, so I can not guarantee that it will work in 100% in all cases. But it worked for me on Windows 7, and later on Windows 8. I had to edit the file for each time separately, but I don’t think that this is such a problem.
I'll start with the background. I decided to buy a low-cost Android Tablet computers to read books (DJVU / PDF), and the choice fell on the unit
And here an unpleasant surprise awaited me - either the native driver turned out to be crooked, or Windows, or the wire ... in general, the driver got up, the Windows device manager reported the device was fully operational, but I received an empty list for the adb devices request in the console and, Naturally, it was not possible to test the application on the tablet.
I wrote a request to TeXeT support, they even answered me with a link to the driver itself, which, as I was already convinced, did not work. I started looking for an answer on the Internet and found a bunch of different assemblies of this driver and manuals, but still none of them started up properly, and even the native driver from the SDK did not get anyway, which plunged me into gloom ... but not despair.
Here I decided to try my hand at
So let's get started.
Step 1. Download the driver. If you have not already done so, open the Android SDK Manager, find the Extras section, check the box next to Google USB Driver and click Install Packages. Everything is simple. Wait for it to load.
Step 2. Locate the driver and make a copy of it in a separate folder. Go to the% android-sdk% \ extras \ google \ folder and you will see the coveted usb_driver dad there. Here, copy it somewhere, and there we will carry out further manipulations. In principle, you can edit the “original”, but I preferred to keep the original intact for every fireman.
Step 3. Edit the inf file. In the daddy open the file android_winusb.inf and look for lines of this kind:
;Google Nexus One
%SingleAdbInterface%        = USB_Install, USB\VID_18D1&PID_0D02
%CompositeAdbInterface%     = USB_Install, USB\VID_18D1&PID_0D02&MI_01
%SingleAdbInterface%        = USB_Install, USB\VID_18D1&PID_4E11
%CompositeAdbInterface%     = USB_Install, USB\VID_18D1&PID_4E12&MI_01
We make a copy of these lines, replace Google Nexus One with % your_name% device for identification in the future and ... open the Windows device manager. We are looking for our device there ( Android , Android Composite ADB Interface or something in this style). We open the device’s properties, the “Details” tab, in the list, select the item “Equipment ID” and see such a picture.
We copy the line that is most similar to the one shown in the figure (it is, in theory, just a little shorter), and paste it into our inf-file.
;TEXET TM-7025
%SingleAdbInterface%        = USB_Install, USB\VID_18D1&PID_0003
%CompositeAdbInterface%     = USB_Install, USB\VID_18D1&PID_0003&MI_01
%SingleAdbInterface%        = USB_Install, USB\VID_18D1&PID_0003
%CompositeAdbInterface%     = USB_Install, USB\VID_18D1&PID_0003&MI_01
In% SingleAdbInterface% we delete the end of the line, as you can see, in% CompositeAdbInterface% we insert the whole. I probably don’t need to repeat everything twice, but I already have everything and I’m too lazy to experiment :)
Save (be careful - in some cases you need to run the notebook with administrator rights, because in user mode you won’t be allowed to overwrite inf file).
Step 4. Installing the driver.Now that everything is ready, go back to the device manager and remove all previously installed adb drivers (if any). We update the list of devices and see our device without drivers. We open its properties and select “update drivers”, select the installation from the folder, select the folder with the corrected inf-th and start the installation - our driver is instantly located, but during installation it may swear about incompatibility with the question “do you keep it on?”. We continue. That's it, the driver is installed.
Step 5. The final. For accuracy, take out the USB stick, wait until everything is detected, open the console (Win + R, enter cmd ) and write adb devices . If everything went well, we see the treasured item on the list, indicating that adb now sees our device.
From this moment, you can safely run eclipse and build programs, enjoying convenient automatic assembly, installation and debugging directly on our device.
If the adb command doesn't work for you at all. Computer -> Properties -> Environment Variables. We are looking for the Path variable and at the end we append (by no means overwrite) the semicolon at the end, and then the address of the folder where adb lives (usually% android-sdk% \ platform-tools \). After a reboot, it should work.
Sometimes adb does not start automatically at system startup. Launch manually.
What was it?
In fact, everything is simple. For some reason (Windows mastday / programmers have crooked hands / Google info file was written only for native Google devices / everything was ruined by the Higgs bosons on your computer), Windows does not want to eat the Google driver for non-Google devices that are not written to the inf file. Apparently, there everything is just tied to these ID equipment. But the software part on the vast majority of Android devices in terms of the debugger connector to the PC is identical, because the driver should normally communicate with any Android device. Our task is to fool Windows and make it accept the device as “driver-suitable”, which we did by adding its ID to the driver inf-file.
I hope that this manual will help someone get their own Chinese or other device, for which they forgot to make a normal adb driver when assembling the system, or those who are bothered to download the official driver from the device manufacturer (it happens so gemmorno that it’s faster to do all of the above - I was so with the driver for the phone LG E510).
PS I did not conduct mass testing of this method, so I can not guarantee that it will work in 100% in all cases. But it worked for me on Windows 7, and later on Windows 8. I had to edit the file for each time separately, but I don’t think that this is such a problem.