Using Unity3D in a native iOS / Android application for modeling open space lighting

Unity3D is a well-known platform for developing 3D and 2D games that has gained popularity all over the world. At the same time, its capabilities are not limited to the development of gaming applications only, but are suitable for use in any other areas that require the creation of cross-platform applications for working with graphics. In this article we will talk about the experience of using Unity3D to develop a system for calculating the lighting of open spaces.
The company with which we collaborated is the international lighting corporation BOOS LIGHTING GROUP . In order to expand the attractiveness of its products and simplify interaction with customers, it was necessary to develop an application that allows you to visually simulate the location of lighting devices, as well as to calculate the illumination and display the necessary technical information in the report. It was assumed that the application runs on an iPad or Android tablet as a potential client or sales representative and allows the client to immediately get an idea of the possibility of lighting installations.
The work was carried out in stages based on the developed specification of requirements and consultation from BOOS LIGHTING GROUP Corporation on the subject of the project.
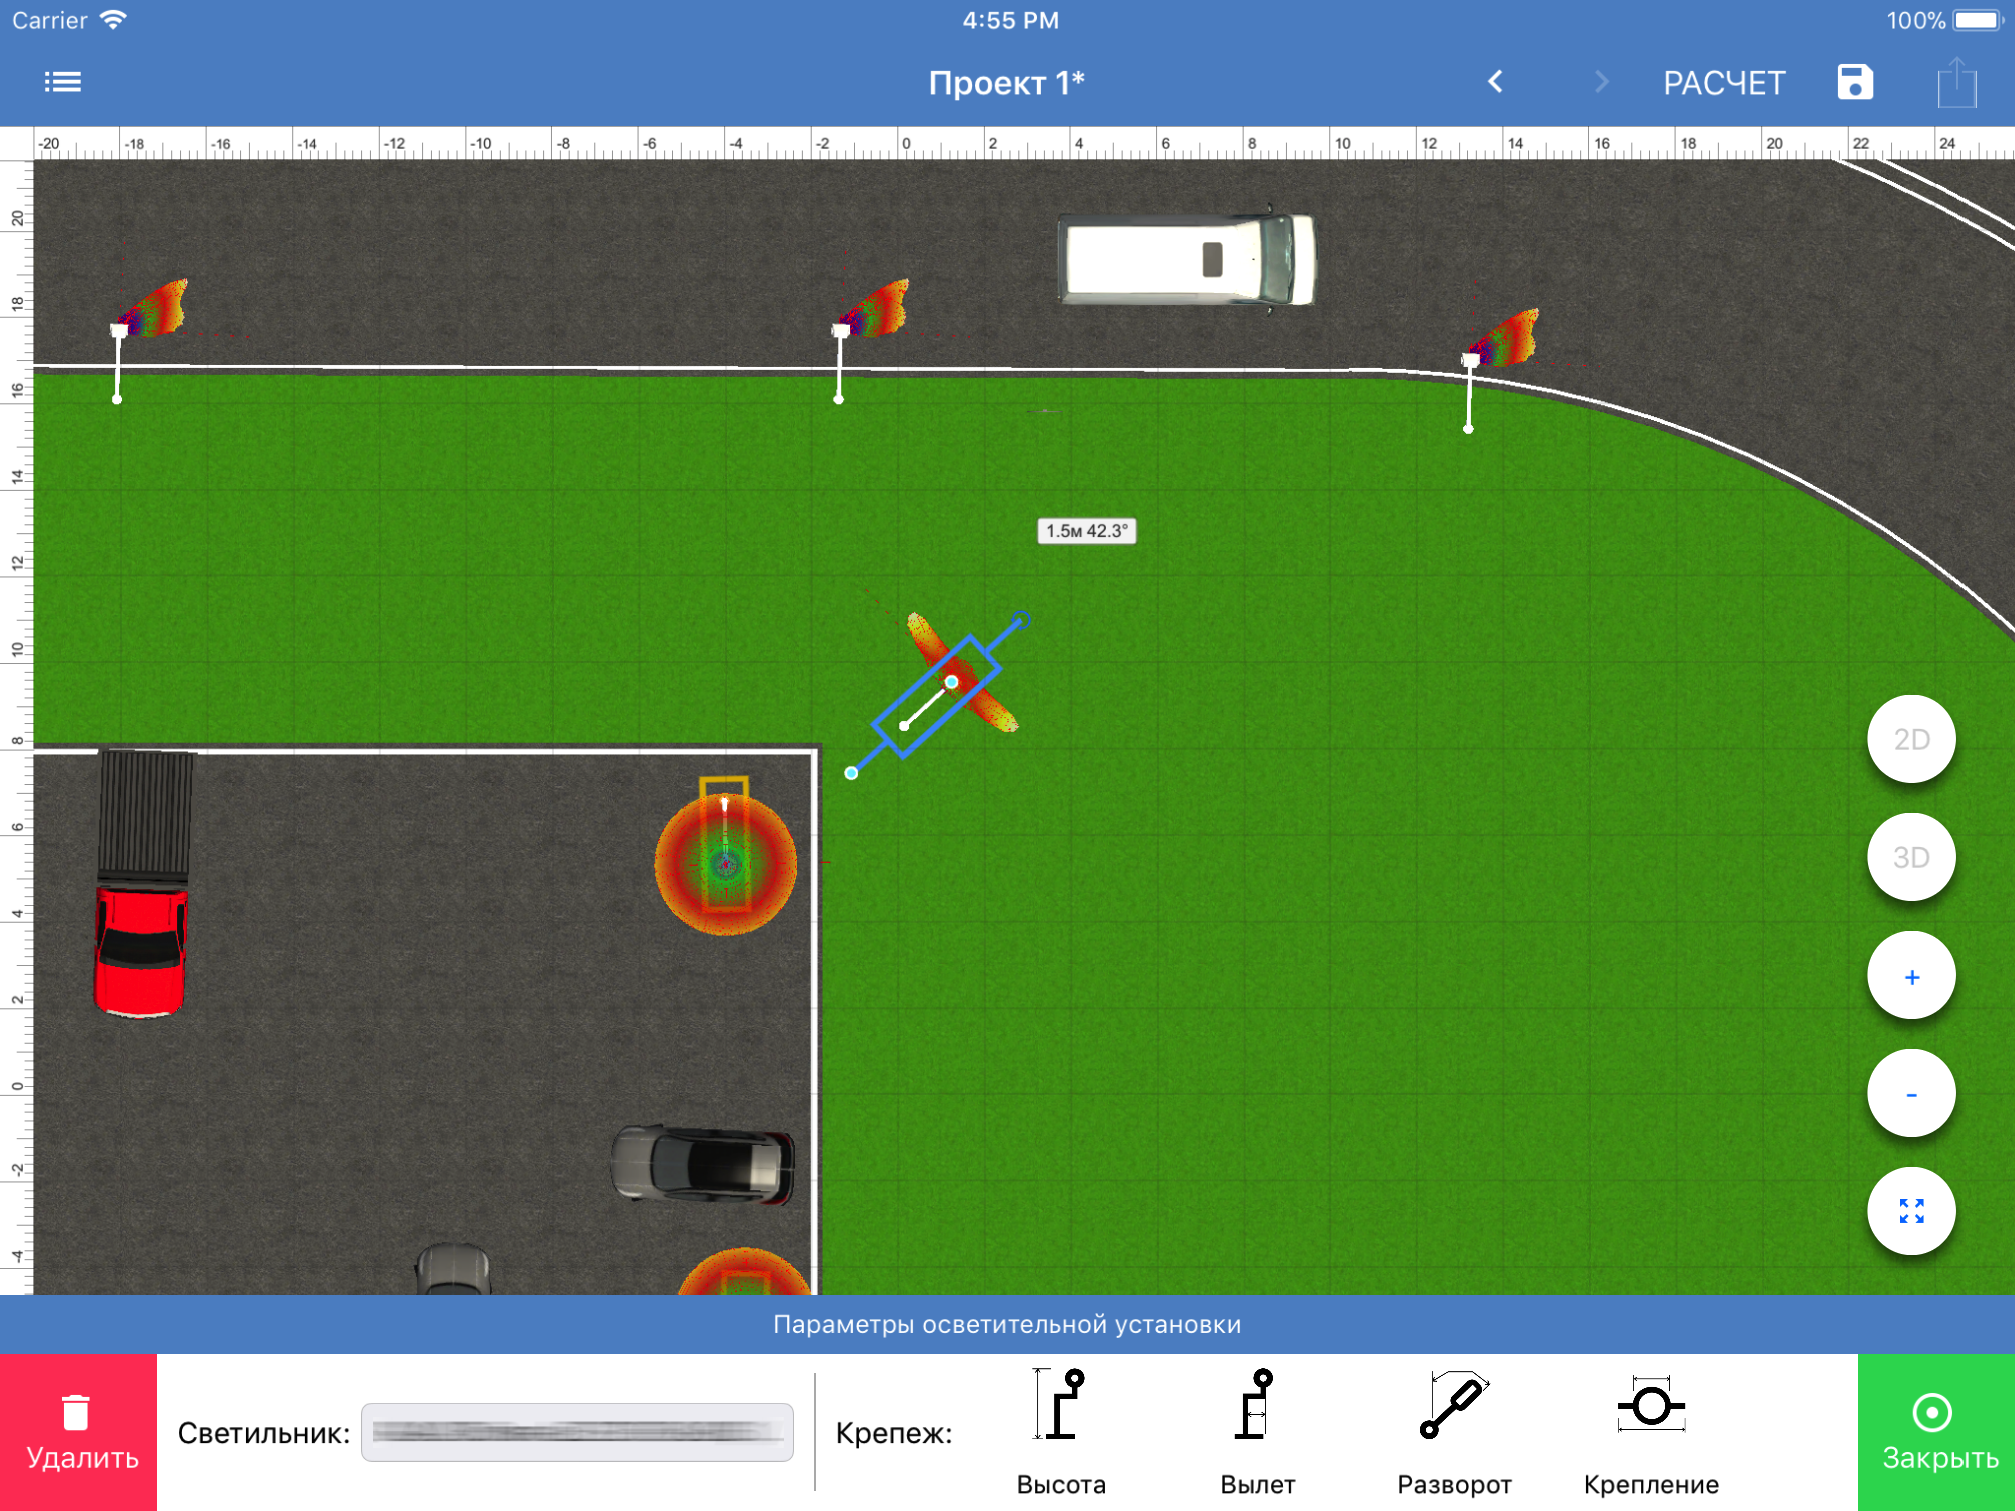
In general, the application is an editor that allows you to add and edit elements of lighting, roads, decorative elements, make lighting calculations of the scene, display the report in pdf. Each element has its own set of parameters for editing and subtypes that affect its display and calculation.
- There are several types of masts of lighting, with different types of fixing luminaires, angles of inclination of the lamps and length of removal. For certain types of luminaires, individual adjustment is possible with indication of the direction of lighting.
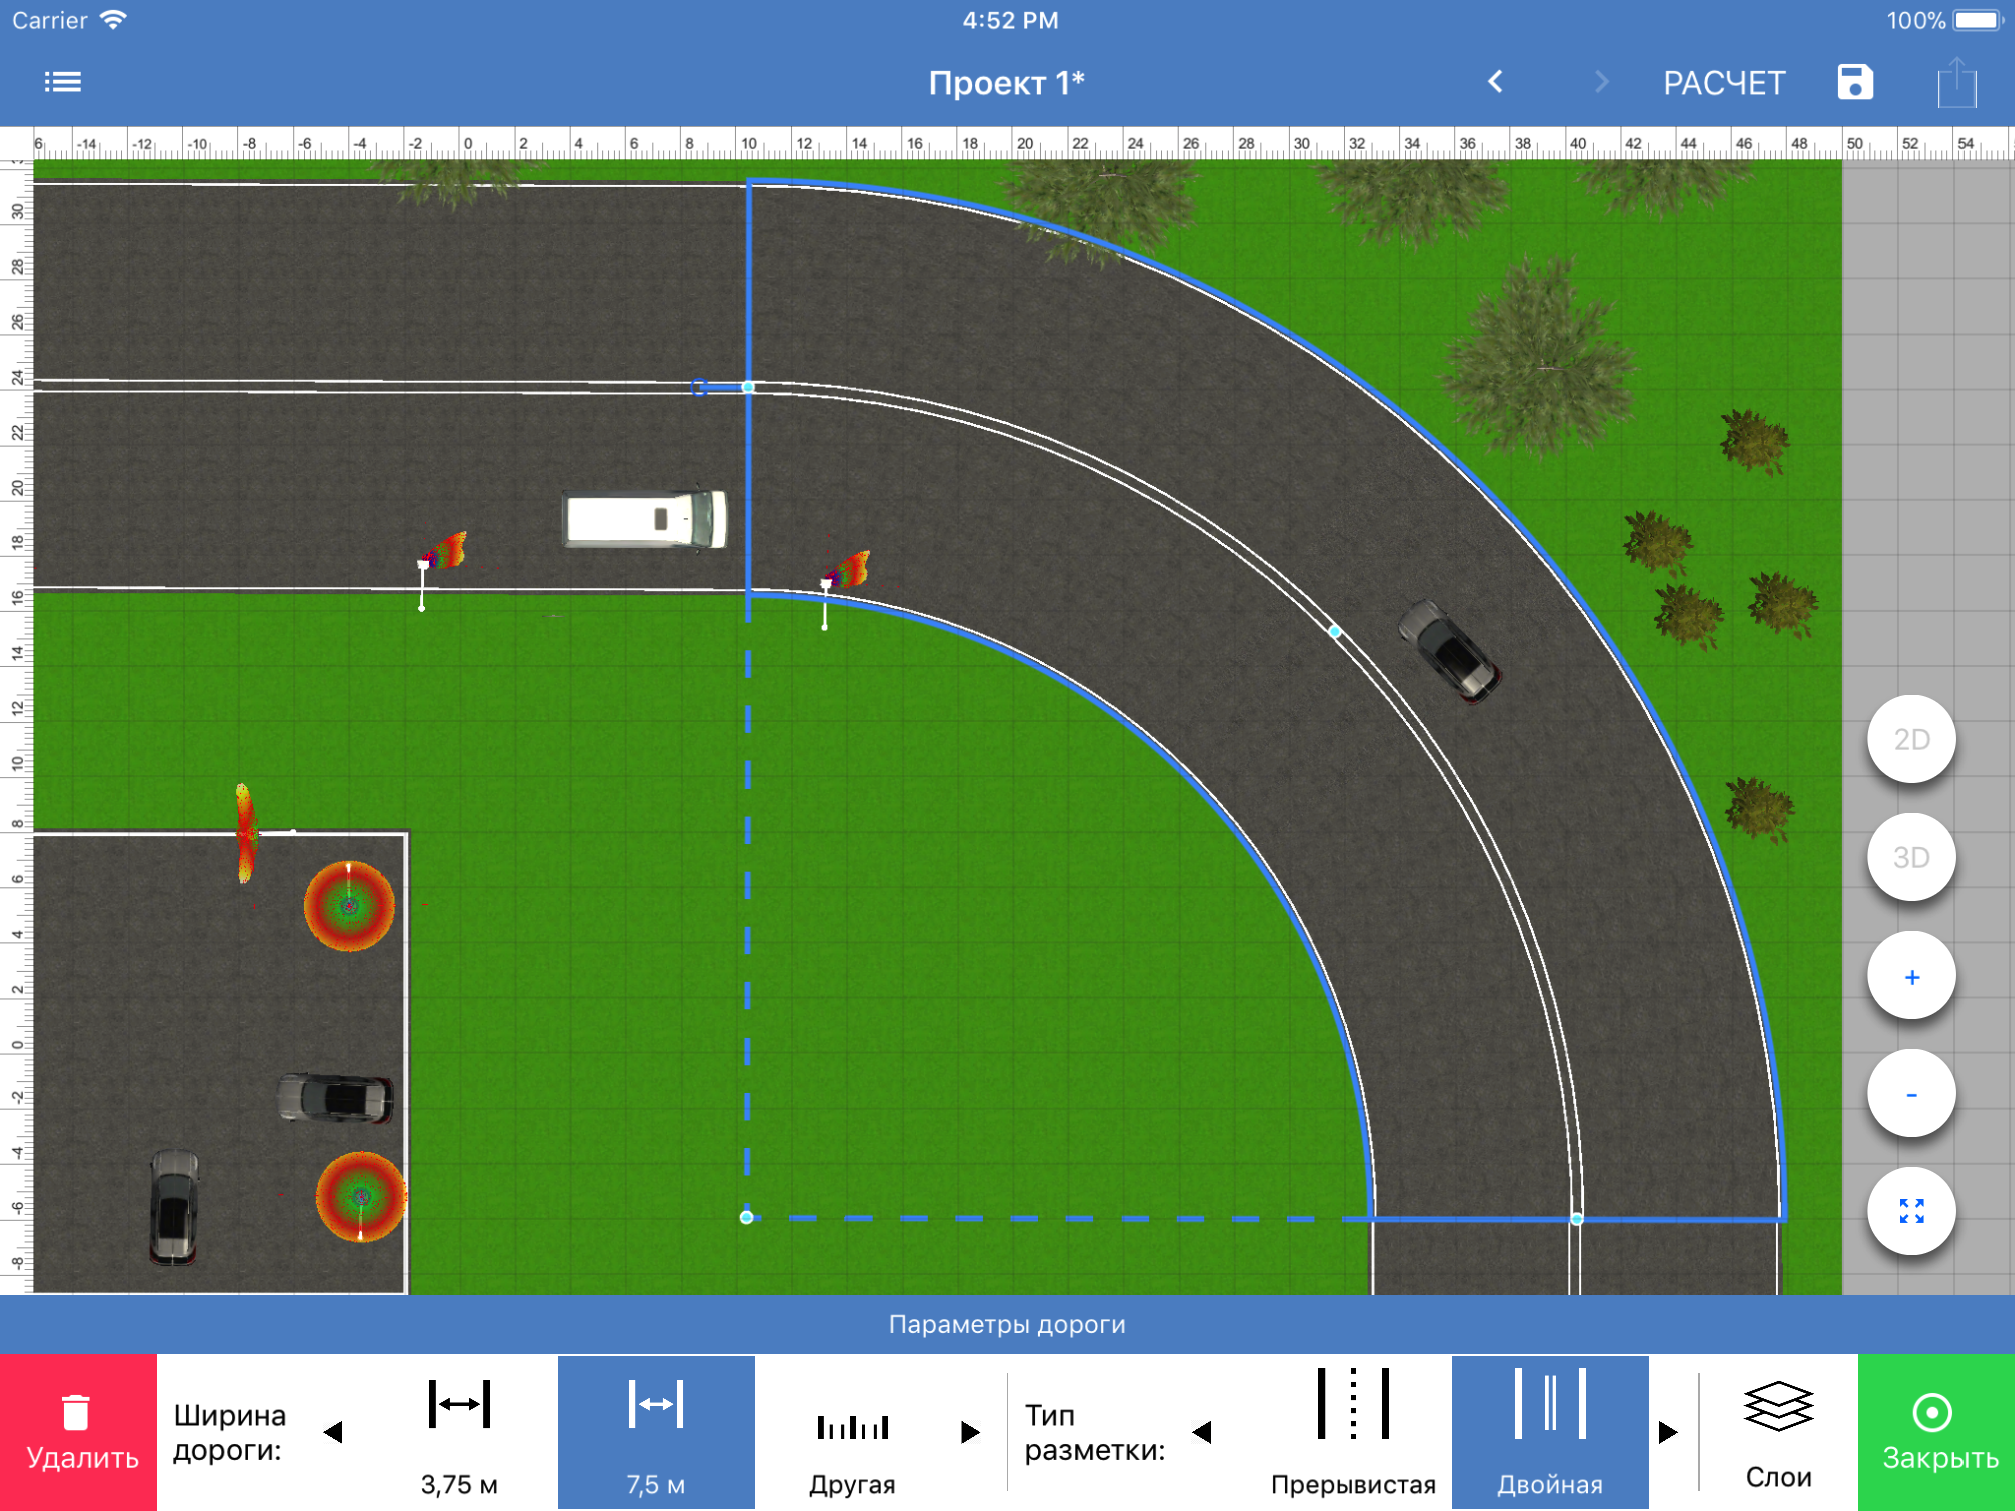
- Roads can be linear sections, elements of the arc, area, ring. For each element, dimensions, position, marking type, layer can be configured.
- Decorative elements - cars, trees, bushes, road signs
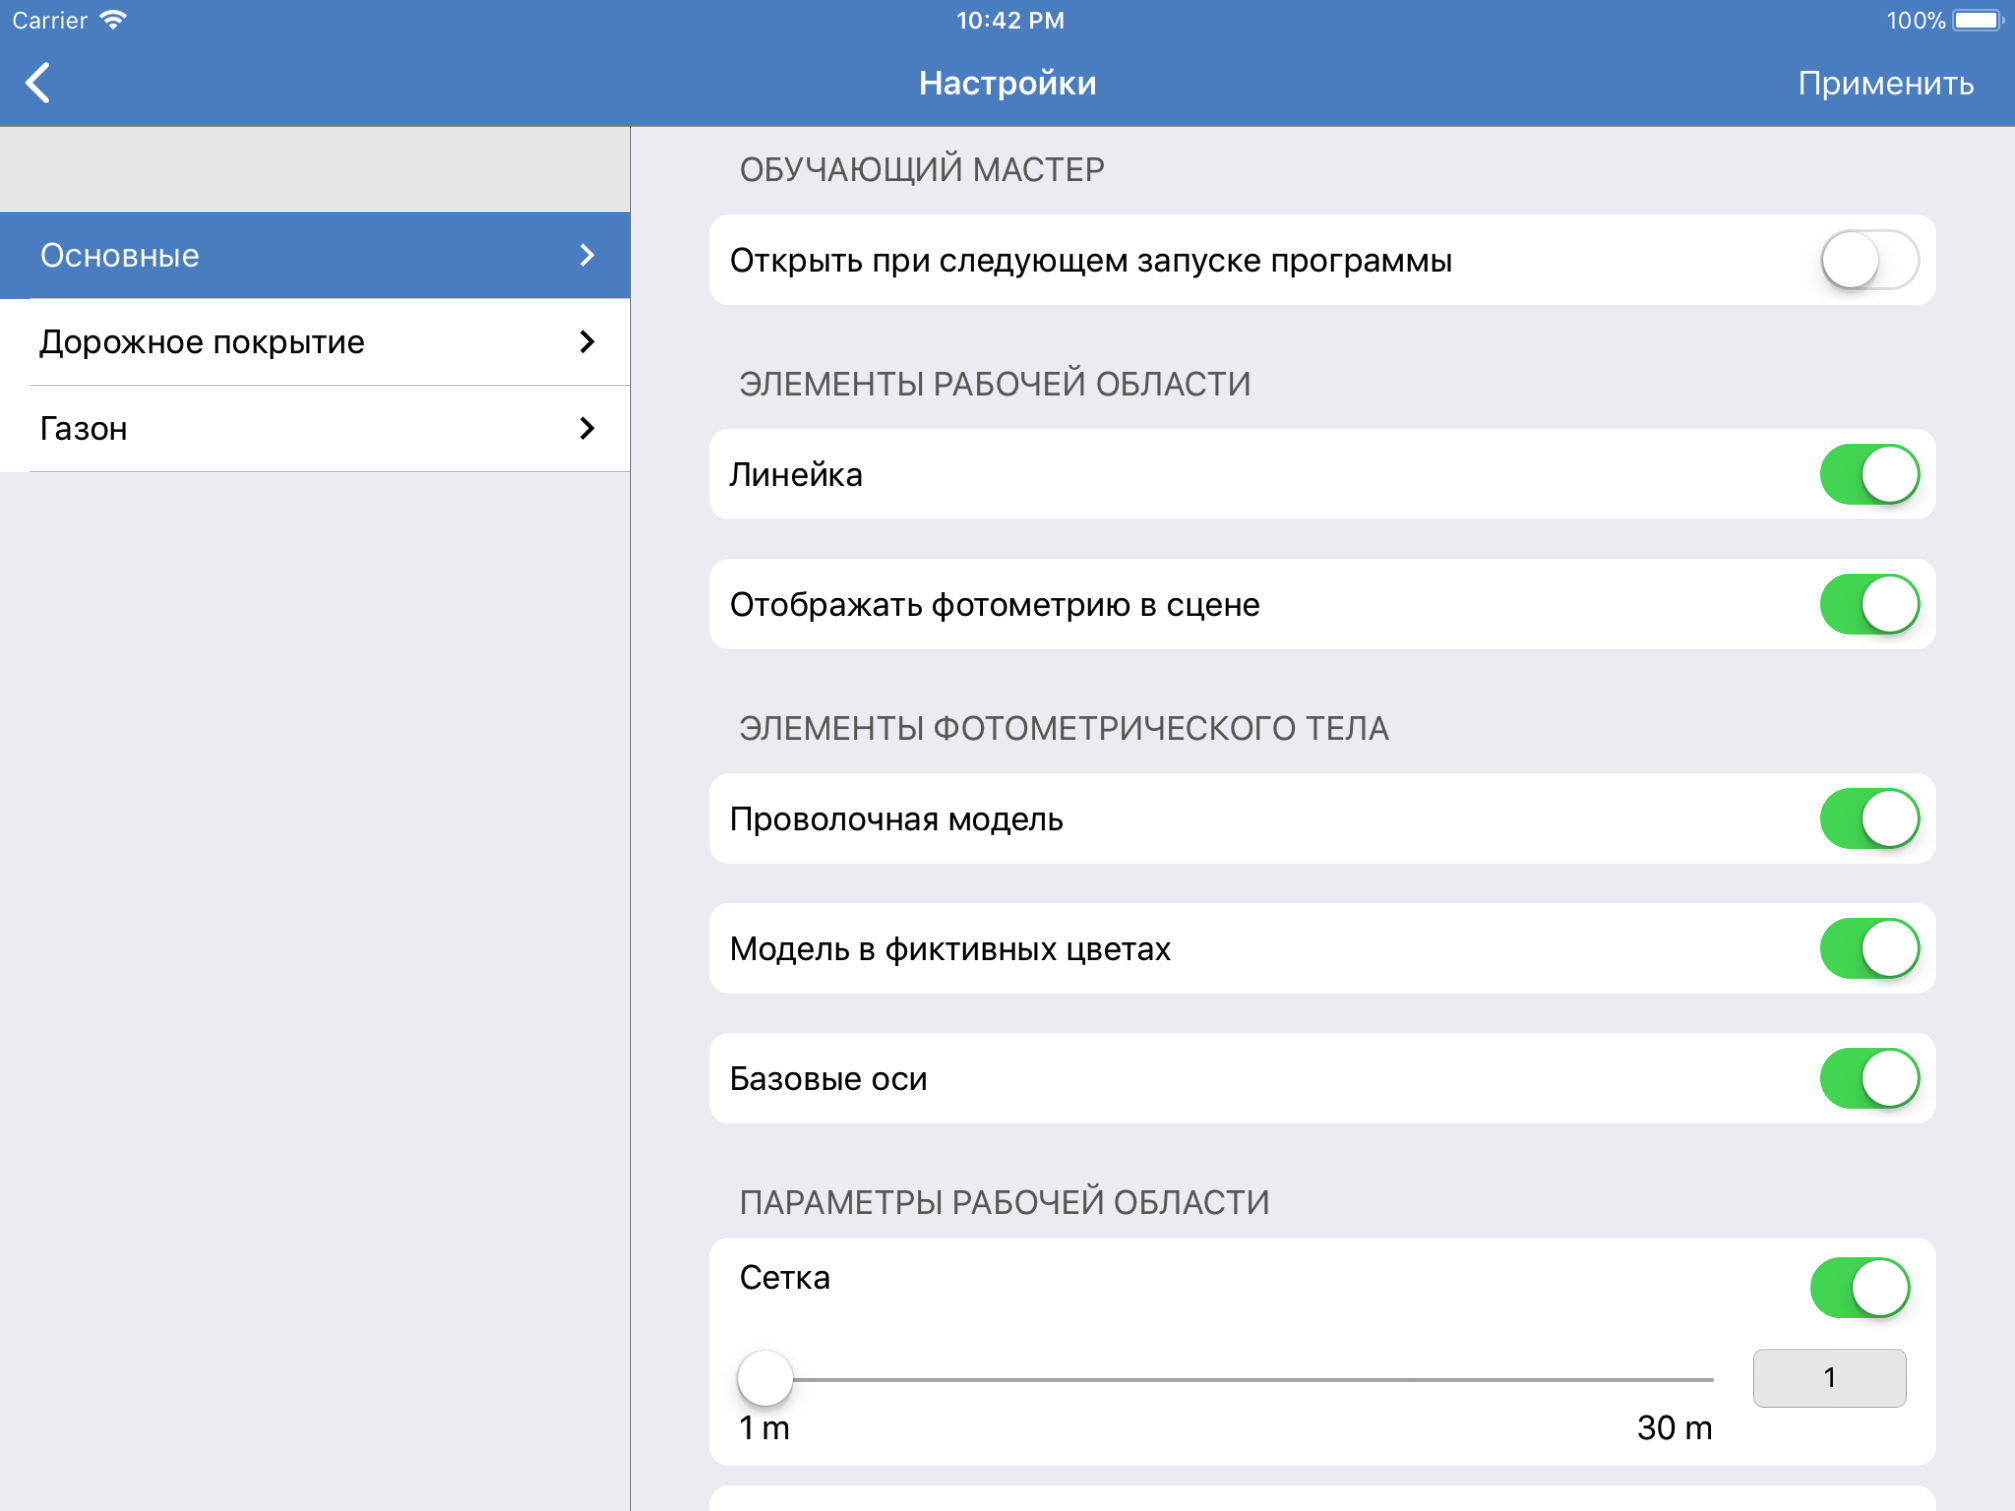
All elements of the scene can be rotated and moved. It also supports standard actions to revert or repeat the operation. The general settings of the project allow you to set the texture of the surface, the surface of the earth, the display of additional parameters. The scene is displayed in 2D / 3D modes. And when calculating the illumination on the surface, the surface irradiance map is displayed in fictitious colors.
If possible, the entire UI was required to be made native by iOS / Android.
The main technical requirement for the application is to be able to calculate the stage lighting according to the technical specification of the luminaires. Also required the ability for each lamp to display and view its radiation pattern (light intensity curves) in 3D / 2D modes.
Platform Selection
For the project, we have chosen Unity as more convenient for us to implement the required functionality. In general, our company had experience with other 3D engines and platforms (OpenSceneGraph, Ogre3D, LibGdx) and technically they can all cope with the required task, but this time the choice fell on Unity, which allows you to more easily manage the scene in progress.
Main difficulties
We will not go into the details of the development of the entire application, since technically the functionality for displaying and editing the scene is quite standard. Naturally, there were difficulties with the mechanisms of specific editing of objects, adding and deleting them, as well as preserving the chain of commands for the possibility of repeating and canceling actions.
We would like to dwell only on the features of the system associated with working with native UI, generating pdf reports and working with photometry and calculating lighting.
Work with native UI
In most cases, Unity interacts with the native functions of the system using the plugin system, which allows it to embed the necessary functionality in the application. However, in our case, the situation is somewhat opposite. We needed to have the full-fledged UI displayed over the Unity window.
Fortunately, Unity can export a project that can be used as the basis for a native application. The main difficulty in this case is how to integrate an additional UI into the resulting project. Also, it is equally important that when assembling a Unity project, its format and location of files are formed by Unity and partially overwritten, which limits the possibility of modifying the project.
When developing an iOS application, we used the mechanism proposed in the article . During development, Unity 5.5 was used and at the moment it is indicated that it may lose relevance. When building the android project, there were no additional problems except for the fact that Unity each time overwrites the manifest file and resource files.
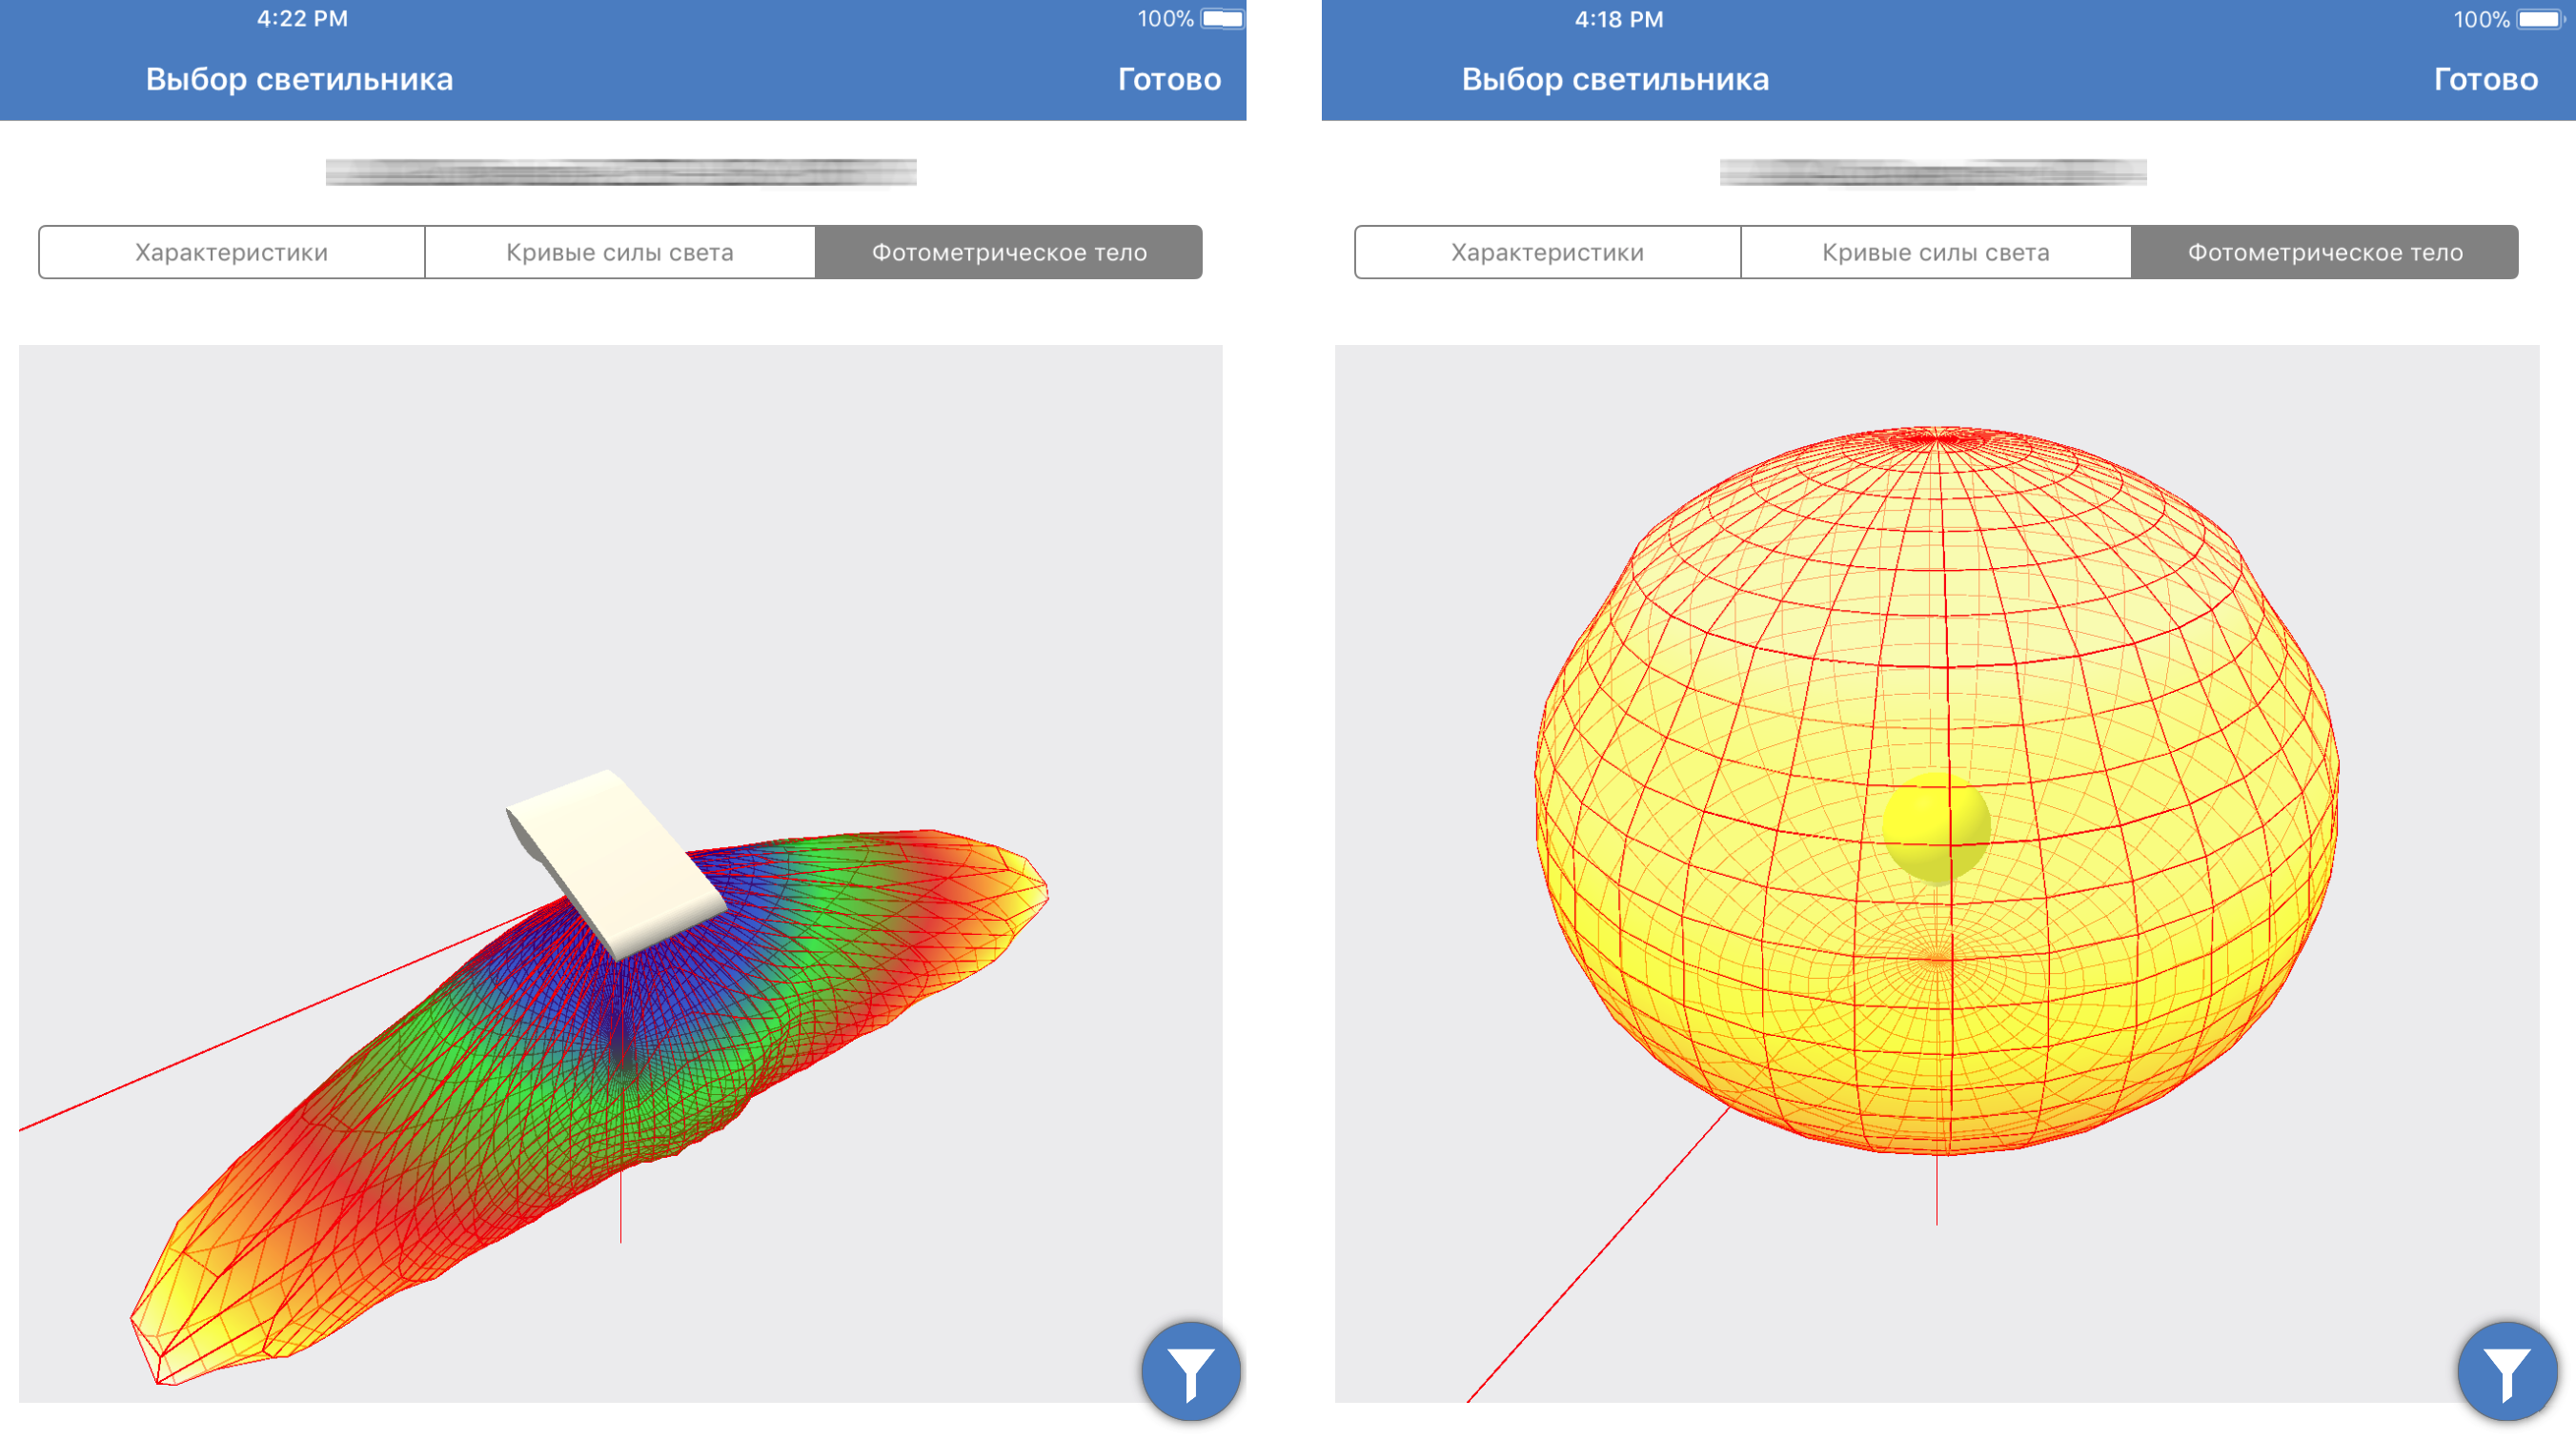
An additional problem is that Unity can only work in one window. At the same time, we needed to ensure the operation of Unity to display the entire scene, and also when opening the settings window, the 3D model of the photometric body of the lamp was to be displayed. To accomplish this, I had to use the “hack” and use the same UIView object in different windows.
To send messages, we used the standard functionality offered by Unity. That is, all messages were in json format and transmitted in simple lines. This did not impose any restrictions on performance, since the size of messages reached a maximum of 100 characters, and their frequency was determined by the speed of work with the program. At the same time, in more demanding applications, it makes sense to make your own message handler as represented in the Habré here and here .
Lighting calculation
All sources of lighting used in the application are supplied in a standard IES format that describes the distribution of light in a different direction ( specification ). This format is widely used in professional CAD systems and 3D editors. It is a text file indicating the intensity of light in different directions and additional meta information indicating the type, total intensity of the source, axes and planes of symmetry. Given the symmetry of the fixtures, the ies file can be very small. For example, in the case of axial symmetry, it is sufficient to specify the light tracking only in one plane.
Simple IES file example
IESNA91[TEST]
Simple demo intensity distribution [MANUFAC]
Lightscape Technologies, Inc.
TILT=NONE
1
-1
1
8
1
1
2
0.0 0.0 0.0
1.0 1.0 0.0
0.0 5.0 10.0 20.0 30.0 45.0 65.0 90.0
0.0
1000.0 1100.0 1300.0 1150.0 930.0 650.0 350.0 0.0
To display the pattern of light, two types of display were used:
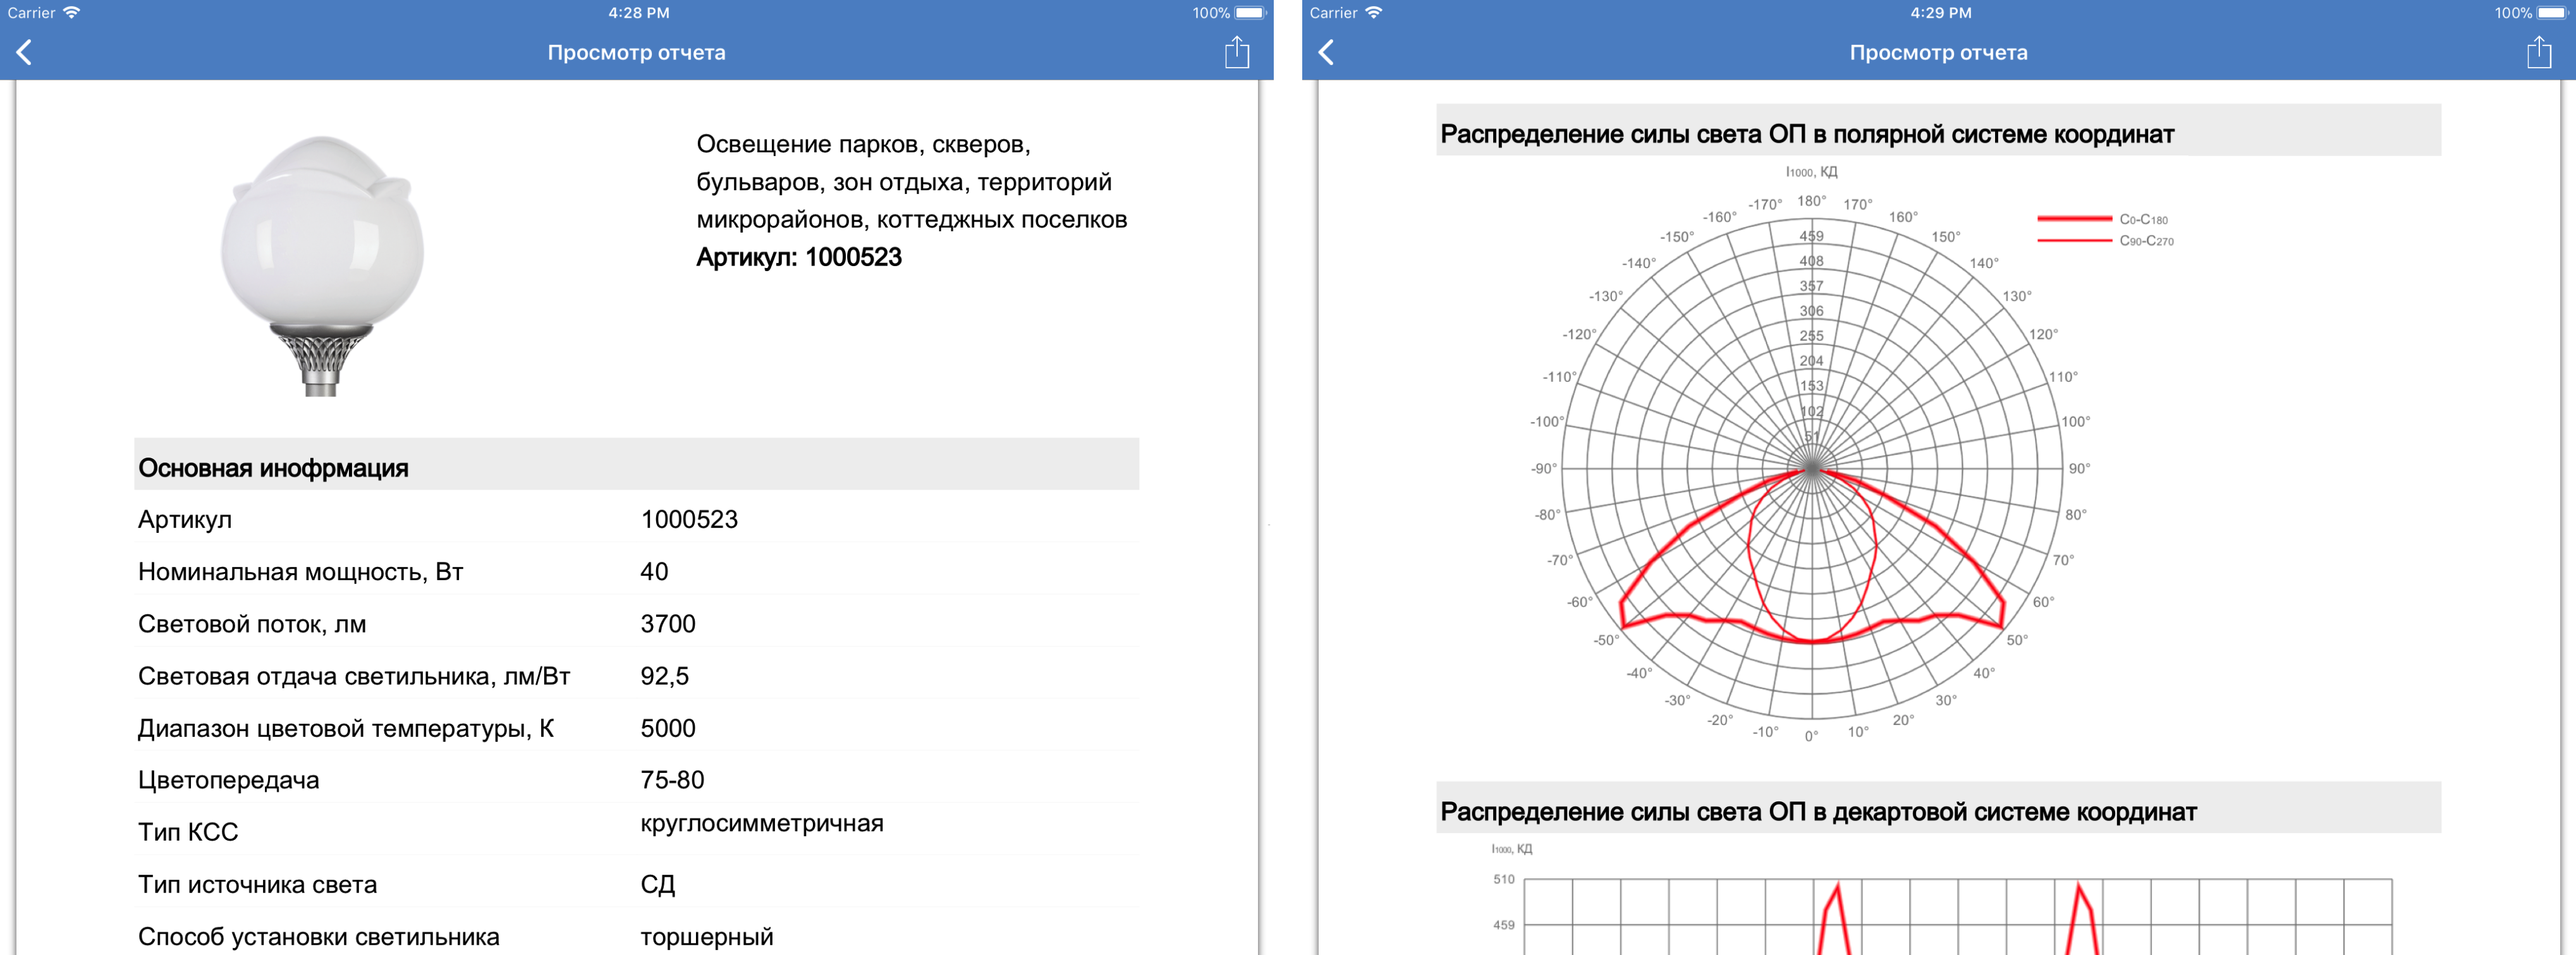
- Light intensity curves (CIL) is a two-dimensional graph which shows the light intensity in one of the main planes depending on the direction. For convenience, this graph can be presented in both polar and Cartesian coordinate systems.
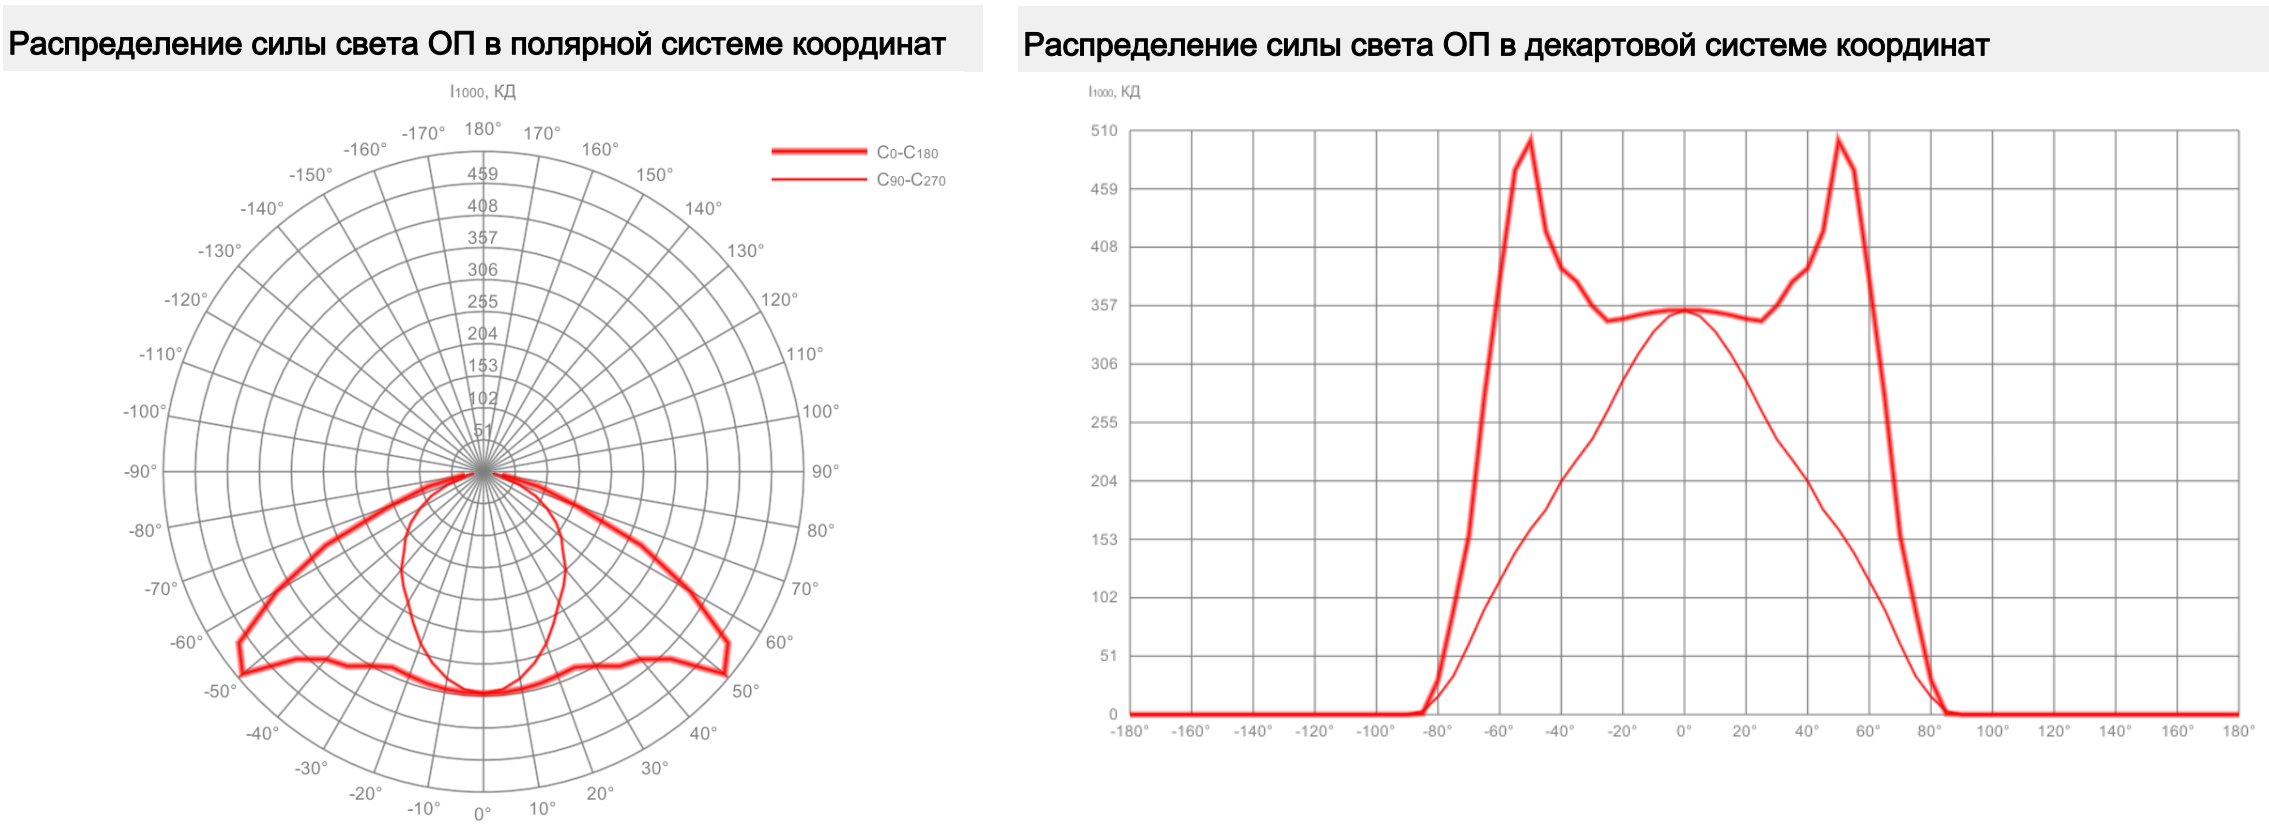
- Photometric body - a three-dimensional image of the intensity of light in different directions
Calculation Module
To calculate the lighting, the customer had its own C ++ module used in other company products, and therefore it was required to integrate it into the Unity project. The module connection procedure was different from the platform used.
- On the iOS platform, Unit can directly call the C function, therefore, it is enough to copy the source of the module directly into the project and add classes for its interaction with Unity. It is possible to store classes both directly in the iOS project and in the plugins folder that are automatically copied when the project is exported to Xcode. An example of calling C ++ functions is as follows:
[DllImport("__Internal")] publicstaticexternvoidcalculateLight([MarshalAs(UnmanagedType.LPArray, SizeParamIndex = 1)] Light[] lights, int size, ref CalculationResult result); - On the Android C ++ platform, the module must be precompiled into a separate library. This can be done directly by adding C ++ sources to the project and setting up gradle to build them into the so library.
- Also, for debugging and testing of the Unity part, development was carried out on a windows machine, so it was necessary to connect the source of the module to Windows. This is done in the same way as an android project, only in this case the files downloaded are collected in the dll library and connected to the project.
Display of the irradiance map
At the request of the customer, the results of the calculation of the illumination should be displayed on the surface of the scene. On the road surface, it is necessary to use fictitious colors with the display of the color and light intensity matching scale, and on the rest of the surface it is sufficient to simply display its brightness.
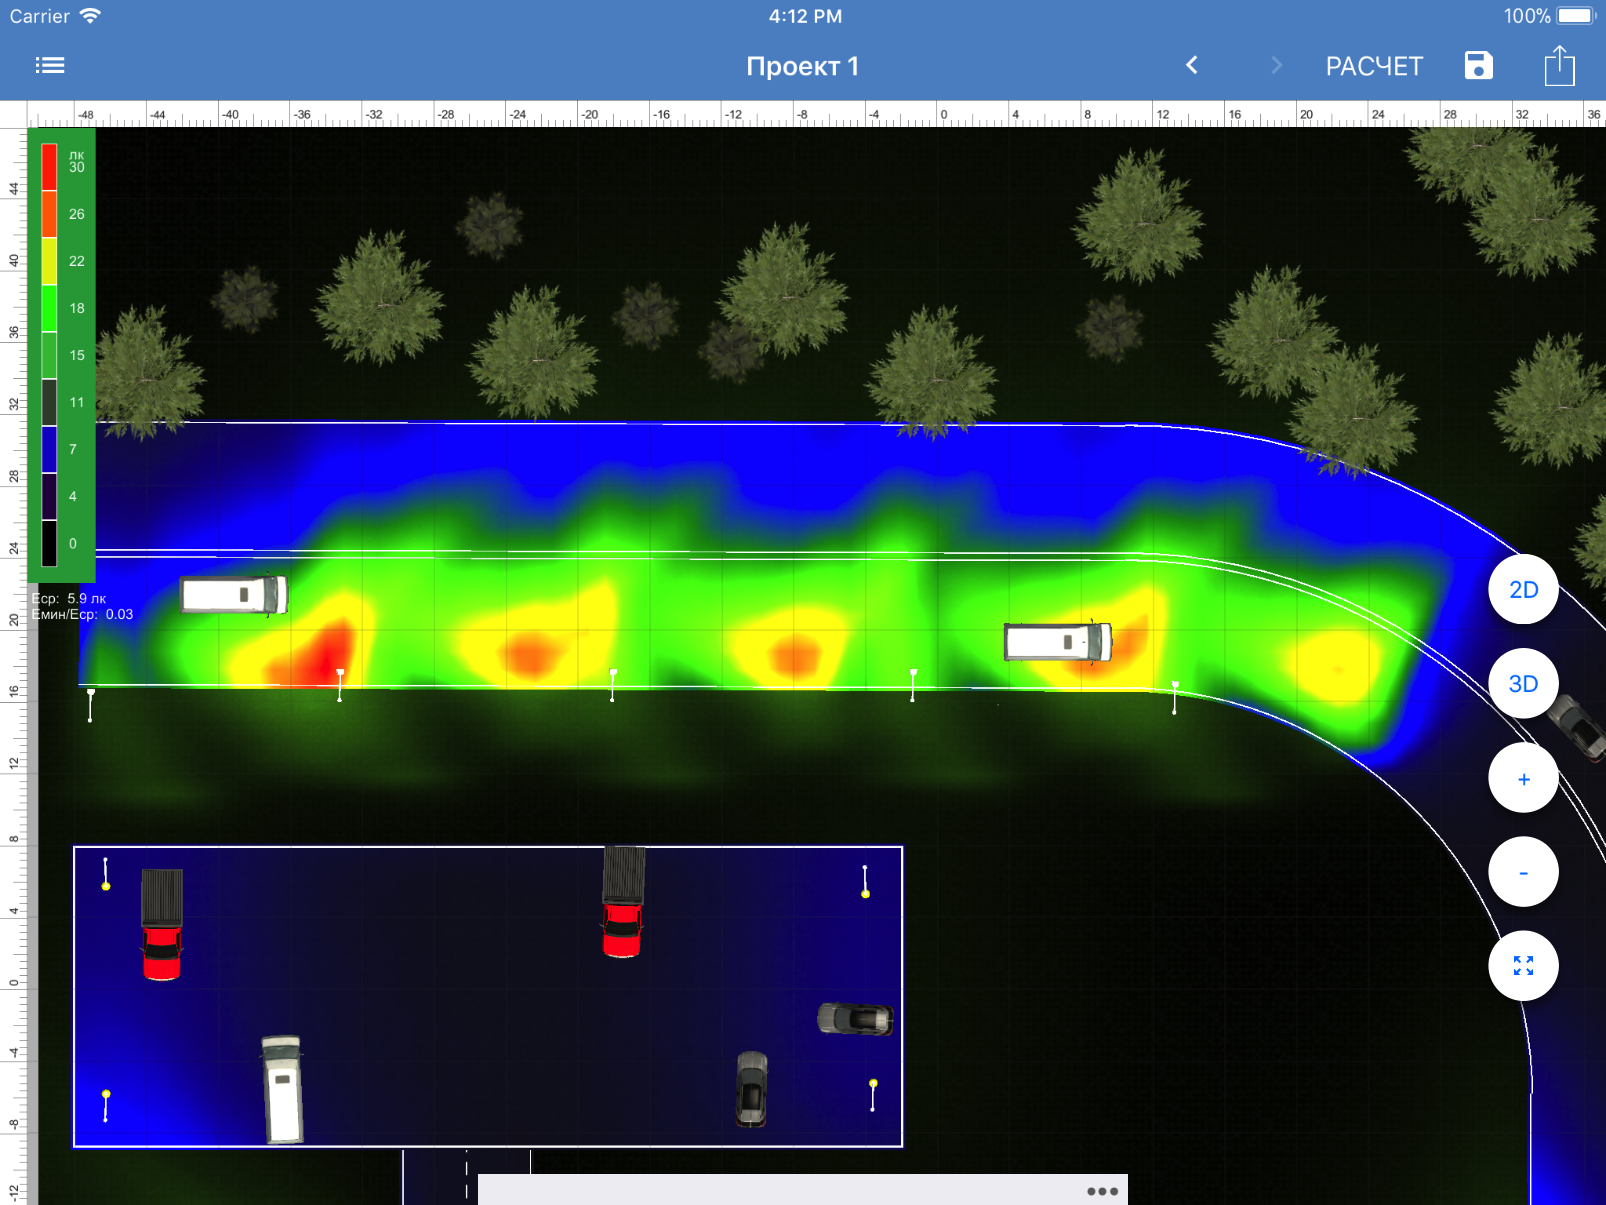
As previously mentioned, the entire calculation was performed by a C ++ plug-in that transmitted data about color sources. The result of the calculation was a two-dimensional array of light intensity over the entire surface of the scene with a given detail.
The resulting irradiance map was analyzed for the minimum, maximum value, on which the one-dimensional gradient texture was constructed (GradientRamp). Using this texture, the light intensity was transformed into fictitious colors directly in the fragment shader. At the same time, the same shader was used for different surfaces of roads and the surface of the earth, and switching the lighting mode was provided using the " multi-compile " shader.
Pdf file generation
In accordance with the technical requirements, the user had to generate a report containing information about the overall scene (dimensions, its images, lighting parameters) and information about each type of luminaire used, indicating their position, direction of characteristics, as well as KCC diagrams and the photometric body display.
Since the report had to be displayed both on iOS and Android, it was necessary to generate it directly in the Unity module, and then display it with standard native tools.
To build pdf, the library has chosen iTextSharp , which meets our requirements. Creating a report in it is not particularly difficult and consists in creating blocks of text, tables, images directly from the code. However, in the course of development, we were faced with many nuances, the solution of which sometimes required considerable effort. The main problem of which was the launch of the generation of the report in the background thread.
If, when testing on a desktop machine, pdf generation was on the order of a few seconds, then when testing on iPad mini 3, this time easily reached 1-3 minutes. Naturally, the creation of the report was required to be transferred to a separate thread, in order to avoid problems with interface hanging. In general, this is not a problem, but this is not the case when using Unity, in which it is expressly prohibited to use the Unity API not from the main thread. At the same time, for the report we needed, at a minimum, to render the CSS and an image of the scene, which needs to be done only from the main stream.
Thus, to build a report, we need to run the tasks in a certain sequence and at the same time some of them can work in the background thread, and some of them must be run in the main one.
At first glance, to solve this problem, you can try to use the standard mechanism and run each operation in a separate cororten. However, this does not save us from the problem with braking the interface. As you know, corutines work in the mainstream and are not suitable for slow operations. At the same time, when generating a report, many operations take a substantial amount of time, and therefore coruntines cannot help in solving our problem.
UniRx
Another solution is to divide the code into a part that needs to work in the main thread and a part that can be run in a separate thread. In this case, for example, images can be constructed using the corutin mechanism, and then embedded in the report already in a separate stream. However, in this case it will be necessary to save intermediate results somewhere, which imposes additional restrictions on the amount of used memory or free space on the device.
In our application, we chose to go straight and run tasks consistently in the main, then in the background threads. The problem was only how to organize such a launch of tasks so as not to get bogged down in this jumble and correctly synchronize operations.
Substantial assistance in solving this problem was brought by the use of Rx as its embodiment in the form of a free UniRx asset , which was already described in detail here and here .
Its use has significantly simplified the interaction between threads and in the example below you can run several methods in a strict sequence, but in different threads
Code example
In this example, the doHardWork () method will be run in the background thread. After its completion, the renderImage () in the main thread will start, and then doHardWork2 () will be executed again in the background thread.
var initializer = Observable.FromCoroutine(initMethod);
var heavyMethod1 = Observable.Start(() => doHardWork());
var mainThread1 = Observable.FromCoroutine(renderImage);
var heavyMethod2 = Observable.Start(() => doHardWork2());
initializer.SelectMany(heavyMethod1)
        .SelectMany(mainThread1)
        .SelectMany(heavyMethod2)
        .ObserveOnMainThread()
        .Subscribe((x) => done())
        .AddTo(this);
In this example, the doHardWork () method will be run in the background thread. After its completion, the renderImage () in the main thread will start, and then doHardWork2 () will be executed again in the background thread.
It is also worth noting that in the course of analyzing the generation of a report on speed, it was found that the slowest part is the incorporation of images into the report. An Internet search showed that we are not the only ones who are faced with this problem, but there was no suitable solution. We had to slightly reduce the quality of images to an acceptable level, which gave an increase in speed by 20-40%.
Thus, in the application created by us, it turned out to successfully implement the Unity graphics engine in the native iOS / Android application. This is different from the traditional approach when Unity is the main part of the application and addresses specific system properties through the plugin system. At the same time, our approach can be useful if you need to develop a complex native interface in which you want to embed non-trivial 3D graphics.