Cisco IOS ACLs
Good day to all!
In this article, I would like to talk about the capabilities of Cisco IOS Access Control Lists (ACLs). The topic should be familiar to many of you, so I want to summarize information on different types of ACLs. I will go over the basics briefly and then talk about special types of ACLs: time-based (time-based), reflexive (reflective), dynamic (dynamic). So, let's begin…
Quickly go over the basic concepts, syntax, so that later it would be easier to go to more interesting things. ACLs on Cisco routers allow you to solve two groups of problems:
This article is mainly devoted to filtering, i.e. Using ACLs as a firewall. Classification allows you to select packages for further processing. For example, encrypt only certain traffic when creating a VPN, apply quality of service policies, broadcast only certain addresses, etc.
ACLs can be attributed to packet filtering firewalls. Those. they allow you to filter packets by five parameters:
ACLs are divided into 2 types:
Standard ACLs allow you to filter traffic by one single criterion - the source IP address. Advanced ACLs filter on all five of the listed parameters.
An ACL consists of a set of rules. In each rule, you define filtering parameters (addresses, ports, etc.) and the action performed on the packet if it meets all the criteria of the rule. Two actions: allow (permit) and deny (deny). When enabled, the packet is processed further, if disabled, it is discarded. Rules are checked sequentially until the one to which the packet corresponds is found. An action (permit / deny) is performed on the package and further verification of the rules is terminated. At the end of any ACL is an implicit rule prohibiting all traffic. Those. restrictive access control is used: everything that is explicitly not allowed is forbidden.
Two ways to create an ACL:
The second method is more convenient. First, you use a name rather than a number to identify the ACL, i.e. by name you can understand what you are using the ACL for. Secondly, the named sheets use their own configuration mode, which allows you to edit ACLs more conveniently.
Here are some examples of standard ACLs:
The first ACL (1) allows traffic from the 192.168.1.0/24 network. The second (2) ACL allows all traffic. The third (3) allows traffic from the host 10.1.1.1. And the last fourth, in the first line allows traffic from hosts 10.1.1.0 - 10.1.1.15, in the second line allows traffic from networks 192.168.0.0 - 192.168.31.0. Please note that here are examples of four different ACLs, and not 5 rules of one ACL.
And a few extended ACLs:
ACL 100 allows TCP traffic from 10.1.1.0/24 network to any network, destination port 80. That is, allow web surfing from the local network. ACL 101 allows UDP traffic from host 1.1.1.1, port 500 to host 2.2.2.2, port 555. ACL 102 allows pings from anywhere, anywhere. And finally, the last ACL 103 allows all traffic.
Similar standard and extended ACLs, but using the new syntax:
Editing an ACL has become much more convenient since I iOS 12.3. If you give the command:
You will see a list of ACLs and their contents:
Note that the ACL lines are numbered. To add new lines to a specific position, enter the editing ACL mode and enter the line number before entering a new rule:
And it does not matter how you created the ACL — using the old syntax or in a new way, just specify the ACL number instead of the ACL name. Adding and removing rows is exactly the same.
To delete lines, use the no command with the line number:
You can renumber lines:
In the above example, for an ACL with the name LIST103, renumbering will be performed and the number of the first line will be 10, and subsequent lines will be numbered in increments of 50. That is, 10, 60, 110, 160 ...
And finally, after creating the ACL, you will need to apply it in accordance with your goals and objectives. As for filtering, the ACL is applied on the interface. When applying, it will be necessary to indicate the direction of filtering: in (input) - traffic comes from the wire to the router interface, out (output) - traffic from the interface goes to the wire. In the example, the ACL is used to filter incoming traffic:
All this, I hope, well-known things. If you have any questions, ask, I will try to answer. If there are a lot of questions, you can make a separate post. Now let's look at the additional features that ACLs have on Cisco routers.
Let's start with ACLs in which you can use time as an additional criterion by which traffic will be filtered or classified. For example, during working hours web surfing is prohibited, and at lunchtime and after work - please. What is required to create a time-based ACL? Everything is very simple:
To create a "calendar", use the time-range command , which indicates an arbitrary name assigned to the calendar. You will subsequently refer to this name in the rules of your ACLs. In the example, I create a “calendar” named WORK_DAYS:
In the "calendar" configuration mode, you define time ranges. Two types of ranges:
In the above example, two time intervals are created: absolute (determines the time from 00:00 January 01, 2012 to 23:59 December 31, 2012) and relative (determines the days from Monday to Friday, from 9:00 to 18:00). For periodic intervals, as you can see, you can use the names of the days of the week, daily - daily, weekdays - working days, weekend - days off.
To view the created “calendars” give the command show time-tange :
The word active next to the name of the “calendar” indicates that it is active, i.e. the “calendar” time now corresponds to the current time on the router.
Now let's use our "calendar" in the ACL rules:
As you can see, you can use different “calendars” for different rules of one ACL. Calendars you can use only in advanced ACLs.
Reflective or mirrored ACLs allow you to slightly expand your filtering capabilities. Essentially, they turn ACLs from packet filtering into a stateful inspection firewall. Those. Now the router will monitor the status of sessions initiated from the internal network of the company and create appropriate return rules.
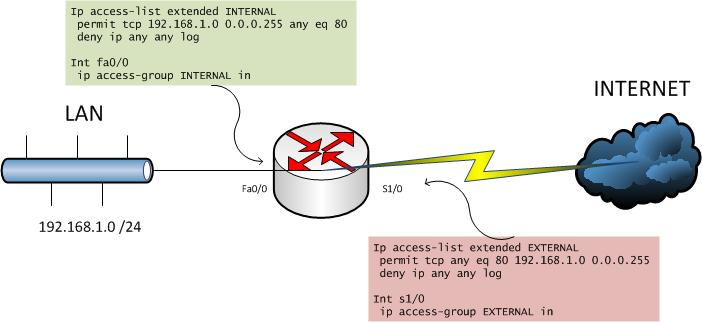
Let me explain with a typical situation. There is an internal network 192.168.1.0/24. We allow access from this network to the Internet (http) - the "green" ACL. Those. Using this ACL, we define policies for leaving the internal network to the external network. Using the second “red” ACL, we protect the internal network from intruders from the outside. But it is necessary to allow responses to sessions initiated from the internal network, so we allow return traffic. Everything seems to be logical: allowed requests there, allowed answers from there. But with this configuration, we greatly open the internal network. Any TCP packet from port 80 freely enters the internal network. Welcome to SYN Flood attacks and more. This problem can be easily solved using the stateful inspection firewall (CBAC or IOS Firewall), but what to do, if your edition of iOS does not support this functionality? Mirrored ACLs come to the rescue.
The idea is that now from one ACL (usually “green” - internal), packets that pass the test will be mirrored or reflected in the rules of a special temporary ACL, which in turn will be checked by an external (“red”) ACL.
See an example. For certain rules in the green ACL, we use the reflect parameter and specify the name of the temporary ACL (in the example, MIRROR), where the rules will be reflected. In the red ACL, we test the temporary mirrored ACL: the evaluate command. You can consider this command as an opportunity to check one ACL inside another, i.e. the command will be replaced by a set of rules from a temporary ACL.
Until sessions from the internal network are open, the mirrored ACL is empty, it does not contain any rules:
But as soon as the sessions open, the mirrored ACL will begin to fill up:
In the example, a ping was started from the internal network from the address 192.168.1.1 to the address 2.2.2.2, then a telnet connection was opened from the internal address 192.168.1.1 to the external address 192.168.2.1. An example of a telnet connection clearly shows the completed sequence of actions:
Return traffic is ultimately allowed. If an attempt were made to open any connection to the internal network from outside, then it would be prohibited: deny ip any any log .
In general, with a flick of the wrist, the ACL almost turned into a stateful inspection firewall.
The next category of ACLs is dynamic. Basically, these ACLs are used for remote connections to the company’s network, but you can also use them when connecting to various resources requires preliminary authentication. Imagine that administrators need constant connections to the company’s network, but they will connect from different places, from different IP addresses. The idea of dynamic ACLs is that a person must first authenticate and only if successful will an ACL be applied that allows access to network resources. The algorithm is as follows:
What is required to configure dynamic ACLs:
Let's look at the following example: The
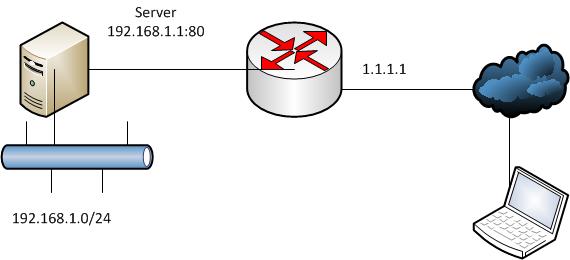
user requires a connection to the server 192.168.1.1 on port 80 on the internal network. The addresses from which the connection will occur are not known to us. First of all, create an extended ACL that allows telnet connections to the router (address 1.1.1.1) and contains dynamic ACL entries, then apply it to the desired interface:
The next step is to configure authentication. I will use local authentication, so I create a root user and enable local authentication on vty ports:
The autocommand access-enable command enables authentication and enables dynamic ACL entries. The host parameter is optional. When it is used, any as the source IP address in the dynamic ACL will be replaced with the address from which the user is connecting. The timeout parameter determines the period of inactivity in minutes for this session, by default it is infinite.
How will the process of gaining access in the given example:
As you can see, Cisco IOS ACLs have very interesting capabilities, considering that this is the basic functionality of virtually any IOS. A lot of things, of course, remained behind the scenes: ACL and QoS, rate limits. And even more so, topics such as CBAC, Zone-based Firewall, etc. Thanks for reading.
In this article, I would like to talk about the capabilities of Cisco IOS Access Control Lists (ACLs). The topic should be familiar to many of you, so I want to summarize information on different types of ACLs. I will go over the basics briefly and then talk about special types of ACLs: time-based (time-based), reflexive (reflective), dynamic (dynamic). So, let's begin…
The Basics: Remember All ...
Quickly go over the basic concepts, syntax, so that later it would be easier to go to more interesting things. ACLs on Cisco routers allow you to solve two groups of problems:
- traffic filtering;
- traffic classification.
This article is mainly devoted to filtering, i.e. Using ACLs as a firewall. Classification allows you to select packages for further processing. For example, encrypt only certain traffic when creating a VPN, apply quality of service policies, broadcast only certain addresses, etc.
ACLs can be attributed to packet filtering firewalls. Those. they allow you to filter packets by five parameters:
- Source IP Address
- Destination IP
- IP Encapsulated Protocol
- Source port
- Port of destination
ACLs are divided into 2 types:
- Standard
- Extended
Standard ACLs allow you to filter traffic by one single criterion - the source IP address. Advanced ACLs filter on all five of the listed parameters.
An ACL consists of a set of rules. In each rule, you define filtering parameters (addresses, ports, etc.) and the action performed on the packet if it meets all the criteria of the rule. Two actions: allow (permit) and deny (deny). When enabled, the packet is processed further, if disabled, it is discarded. Rules are checked sequentially until the one to which the packet corresponds is found. An action (permit / deny) is performed on the package and further verification of the rules is terminated. At the end of any ACL is an implicit rule prohibiting all traffic. Those. restrictive access control is used: everything that is explicitly not allowed is forbidden.
Syntax
Two ways to create an ACL:
- The "old" syntax. Numbers are used to identify ACLs. Standard ACLs are assigned numbers 1-99 and 1300-1999, and extended ACLs are assigned 100-199 and 2000-2699.
- Syntax for named ACLs. The name selected by the administrator is used for identification.
The second method is more convenient. First, you use a name rather than a number to identify the ACL, i.e. by name you can understand what you are using the ACL for. Secondly, the named sheets use their own configuration mode, which allows you to edit ACLs more conveniently.
Here are some examples of standard ACLs:
access-list 1 permit 192.168.1.0 0.0.0.255
!
access-list 2 permit any
!
access-list 3 permit host 10.1.1.1
!
access-list 4 permit 10.1.1.0 0.0.0.15
access-list 4 permit 192.168.0.0 0.0.31.255
The first ACL (1) allows traffic from the 192.168.1.0/24 network. The second (2) ACL allows all traffic. The third (3) allows traffic from the host 10.1.1.1. And the last fourth, in the first line allows traffic from hosts 10.1.1.0 - 10.1.1.15, in the second line allows traffic from networks 192.168.0.0 - 192.168.31.0. Please note that here are examples of four different ACLs, and not 5 rules of one ACL.
And a few extended ACLs:
access-list 100 permit tcp 10.1.1.0 0.0.0.255 any eq 80
access-list 101 permit udp host 1.1.1.1 eq 500 host 2.2.2.2 eq 555
access-list 102 permit icmp any any echo
access-list 103 permit ip any any
ACL 100 allows TCP traffic from 10.1.1.0/24 network to any network, destination port 80. That is, allow web surfing from the local network. ACL 101 allows UDP traffic from host 1.1.1.1, port 500 to host 2.2.2.2, port 555. ACL 102 allows pings from anywhere, anywhere. And finally, the last ACL 103 allows all traffic.
Similar standard and extended ACLs, but using the new syntax:
ip access-list standard LIST1
 permit 192.168.1.0 0.0.0.255
!
ip access-list standard LIST2
 permit any
!
ip access-list standard LIST3
 permit host 10.1.1.1
!
ip access-list standard LIST1
 permit 10.1.1.0 0.0.0.15
 permit 192.168.0.0 0.0.31.255
!
ip access-list extended LIST100
 permit tcp 10.1.1.0 0.0.0.255 any eq 80
!
ip access-list extended LIST101
 permit udp host 1.1.1.1 eq 500 host 2.2.2.2 eq 555
!
ip access-list extended LIST102
 permit icmp any any echo
!
ip access-list extended LIST103
 permit ip any any
Editing an ACL has become much more convenient since I iOS 12.3. If you give the command:
show access-list
You will see a list of ACLs and their contents:
R0(config-ext-nacl)#do sh access-li
Standard IP access list LIST1
    10 permit 192.168.1.0, wildcard bits 0.0.0.255
    20 permit 10.1.1.0, wildcard bits 0.0.0.15
    30 permit 192.168.0.0, wildcard bits 0.0.31.255
Standard IP access list LIST2
    10 permit any
Standard IP access list LIST3
    10 permit 10.1.1.1
Extended IP access list LIST100
    10 permit tcp 10.1.1.0 0.0.0.255 any eq www
Extended IP access list LIST101
    10 permit udp host 1.1.1.1 eq isakmp host 2.2.2.2 eq 555
Extended IP access list LIST102
    10 permit icmp any any echo
Extended IP access list LIST103
    10 permit ip any any
Note that the ACL lines are numbered. To add new lines to a specific position, enter the editing ACL mode and enter the line number before entering a new rule:
ip access-list standard LIST1
 25 permit …
And it does not matter how you created the ACL — using the old syntax or in a new way, just specify the ACL number instead of the ACL name. Adding and removing rows is exactly the same.
To delete lines, use the no command with the line number:
ip access-list standard LIST103
 no 25
You can renumber lines:
ip access-list resequence LIST103 10 50
In the above example, for an ACL with the name LIST103, renumbering will be performed and the number of the first line will be 10, and subsequent lines will be numbered in increments of 50. That is, 10, 60, 110, 160 ...
And finally, after creating the ACL, you will need to apply it in accordance with your goals and objectives. As for filtering, the ACL is applied on the interface. When applying, it will be necessary to indicate the direction of filtering: in (input) - traffic comes from the wire to the router interface, out (output) - traffic from the interface goes to the wire. In the example, the ACL is used to filter incoming traffic:
interface fa0/0
 ip access-group LIST103 in
All this, I hope, well-known things. If you have any questions, ask, I will try to answer. If there are a lot of questions, you can make a separate post. Now let's look at the additional features that ACLs have on Cisco routers.
Time-based ACLs
Let's start with ACLs in which you can use time as an additional criterion by which traffic will be filtered or classified. For example, during working hours web surfing is prohibited, and at lunchtime and after work - please. What is required to create a time-based ACL? Everything is very simple:
- Create one or more "calendars" - time ranges;
- Use these calendars in extended ACL rules.
To create a "calendar", use the time-range command , which indicates an arbitrary name assigned to the calendar. You will subsequently refer to this name in the rules of your ACLs. In the example, I create a “calendar” named WORK_DAYS:
time-range WORK_DAYS
 absolute start 00:00 01 January 2012 end 23:59 31 December 2012
 periodic weekdays 9:00 to 18:00
 periodic ?
  Friday     Friday
  Monday     Monday
  Saturday   Saturday
  Sunday     Sunday
  Thursday   Thursday
  Tuesday    Tuesday
  Wednesday  Wednesday
  daily      Every day of the week
  weekdays   Monday thru Friday
  weekend    Saturday and Sunday
In the "calendar" configuration mode, you define time ranges. Two types of ranges:
- Absolute (specific dates and times are indicated).
- Periodic (days of the week, workdays, or weekends are indicated, but without reference to a specific date).
In the above example, two time intervals are created: absolute (determines the time from 00:00 January 01, 2012 to 23:59 December 31, 2012) and relative (determines the days from Monday to Friday, from 9:00 to 18:00). For periodic intervals, as you can see, you can use the names of the days of the week, daily - daily, weekdays - working days, weekend - days off.
To view the created “calendars” give the command show time-tange :
R0#sh time-range
time-range entry: WORK_DAYS (active)
   absolute start 00:00 01 January 2012 end 23:59 31 December 2012
The word active next to the name of the “calendar” indicates that it is active, i.e. the “calendar” time now corresponds to the current time on the router.
Now let's use our "calendar" in the ACL rules:
ip access-list extended TIME_BASED_ACL
permit tcp 10.0.0.0 0.255.255.255 any eq www time-range WORK_DAYS
permit tcp 10.0.0.0 0.255.255.255 any eq ftp-data time-range ANOTHER_RANGE
As you can see, you can use different “calendars” for different rules of one ACL. Calendars you can use only in advanced ACLs.
Reflexive acl
Reflective or mirrored ACLs allow you to slightly expand your filtering capabilities. Essentially, they turn ACLs from packet filtering into a stateful inspection firewall. Those. Now the router will monitor the status of sessions initiated from the internal network of the company and create appropriate return rules.
Let me explain with a typical situation. There is an internal network 192.168.1.0/24. We allow access from this network to the Internet (http) - the "green" ACL. Those. Using this ACL, we define policies for leaving the internal network to the external network. Using the second “red” ACL, we protect the internal network from intruders from the outside. But it is necessary to allow responses to sessions initiated from the internal network, so we allow return traffic. Everything seems to be logical: allowed requests there, allowed answers from there. But with this configuration, we greatly open the internal network. Any TCP packet from port 80 freely enters the internal network. Welcome to SYN Flood attacks and more. This problem can be easily solved using the stateful inspection firewall (CBAC or IOS Firewall), but what to do, if your edition of iOS does not support this functionality? Mirrored ACLs come to the rescue.
The idea is that now from one ACL (usually “green” - internal), packets that pass the test will be mirrored or reflected in the rules of a special temporary ACL, which in turn will be checked by an external (“red”) ACL.
See an example. For certain rules in the green ACL, we use the reflect parameter and specify the name of the temporary ACL (in the example, MIRROR), where the rules will be reflected. In the red ACL, we test the temporary mirrored ACL: the evaluate command. You can consider this command as an opportunity to check one ACL inside another, i.e. the command will be replaced by a set of rules from a temporary ACL.
Until sessions from the internal network are open, the mirrored ACL is empty, it does not contain any rules:
Extended IP access list EXTERNAL
    10 evaluate MIRROR
    20 deny ip any any log
Extended IP access list INTERNAL
    10 permit ip any any reflect MIRROR (2 matches)
Reflexive IP access list MIRROR
But as soon as the sessions open, the mirrored ACL will begin to fill up:
R1#sh access-li
Extended IP access list EXTERNAL
    10 evaluate MIRROR
    20 deny ip any any log (5 matches)
Extended IP access list INTERNAL
    10 permit ip any any reflect MIRROR (36 matches)
Reflexive IP access list MIRROR
     permit icmp host 2.2.2.2 host 192.168.1.1  (19 matches) (time left 289)
     permit tcp host 192.168.2.1 eq telnet host 192.168.1.1 eq 62609 (30 matches) (time left 286)
     permit ospf host 224.0.0.5  host 192.168.1.1  (6 matches) (time left 297)
In the example, a ping was started from the internal network from the address 192.168.1.1 to the address 2.2.2.2, then a telnet connection was opened from the internal address 192.168.1.1 to the external address 192.168.2.1. An example of a telnet connection clearly shows the completed sequence of actions:
- The internal host initiates a connection from the address 192.168.1.1 and a randomly selected port 62609 to the address of the external host 192.168.2.1, port 23 (telnet).
- Packets are checked by the INTERNAL ACL, allowed by the line: 10 permit ip any any reflect MIRROR
- Reflected in the MIRROR ACL: permit tcp host 192.168.2.1 eq telnet host 192.168.1.1 eq 62609
- External responses are checked by an EXTERNAL ACL containing a reference to the MIRROR ACL: evaluate MIRROR .
Return traffic is ultimately allowed. If an attempt were made to open any connection to the internal network from outside, then it would be prohibited: deny ip any any log .
In general, with a flick of the wrist, the ACL almost turned into a stateful inspection firewall.
Dynamic (Lock-and-Key) ACLs
The next category of ACLs is dynamic. Basically, these ACLs are used for remote connections to the company’s network, but you can also use them when connecting to various resources requires preliminary authentication. Imagine that administrators need constant connections to the company’s network, but they will connect from different places, from different IP addresses. The idea of dynamic ACLs is that a person must first authenticate and only if successful will an ACL be applied that allows access to network resources. The algorithm is as follows:
Пользователь подключается к роутеру с любого (настраивается) адреса.
Пользователь проходит аутентификацию.
После успешной аутентификации, на интерфейсе активируются специальные правила динамического ACL.
Правила остаются активными в течение настраиваемого периода времени.
What is required to configure dynamic ACLs:
- Create an extended ACL that allows telnet or SSH connections to the router. These protocols will be used to connect to the router.
- Define authentication parameters. Local authentication, AAA, password on vty ports are supported.
- Configure dynamic ACL settings.
Let's look at the following example: The
user requires a connection to the server 192.168.1.1 on port 80 on the internal network. The addresses from which the connection will occur are not known to us. First of all, create an extended ACL that allows telnet connections to the router (address 1.1.1.1) and contains dynamic ACL entries, then apply it to the desired interface:
ip access-list extended TELNET-IN
 permit tcp any host 1.1.1.1 eq telnet										(1)
 dynamic DYNAMIC-ACL-NAME permit tcp any host 192.168.1.1 eq www		(4)
 deny ip any any
!
int s0/0
 description CONNECTED TO EXTERNAL NETWORK
 ip address 1.1.1.1 255.255.255.0
 ip access-group TELNET-IN in
The next step is to configure authentication. I will use local authentication, so I create a root user and enable local authentication on vty ports:
username root secret USERS_PASSWORD						(2)
!
line vty 0 4
 login local													(2)
 autocommand access-enable host timeout 10					(3)
The autocommand access-enable command enables authentication and enables dynamic ACL entries. The host parameter is optional. When it is used, any as the source IP address in the dynamic ACL will be replaced with the address from which the user is connecting. The timeout parameter determines the period of inactivity in minutes for this session, by default it is infinite.
How will the process of gaining access in the given example:
- The user opens a telnet connection to the router to the address 1.1.1.1. Permitted by the extended ACL rule (1).
- Local authentication phase (2).
- In case of successful authentication, the access-enable (3) command is automatically executed, which activates the dynamic ACL (4) rules. Telnet connection closes.
- The user is granted access in accordance with the rules of the dynamic ACL.
Conclusion
As you can see, Cisco IOS ACLs have very interesting capabilities, considering that this is the basic functionality of virtually any IOS. A lot of things, of course, remained behind the scenes: ACL and QoS, rate limits. And even more so, topics such as CBAC, Zone-based Firewall, etc. Thanks for reading.