Creating a plugin for Intellij Platform (IntelliJ IDEA, RubyMine, WebStorm, PhpStorm, PyCharm and AppCode)
Hello, Habr!
In this topic I will tell you how to create a simple plugin for IntelliJ IDEA and PyCharm. Since all IDEs contain the same interface for working with plug-ins, modifying it for other systems does not require significant efforts ( more ), unlike the process of direct development.
I warn you that if you decide to create your own plug-in, then the expected result may not correspond much to your plan or will require considerable time. If I knew what worked out and how much time I spent, I would hardly have taken it.
Plugins are written in Java, UI is created in SWING. The plugin development documentation consists of just a few pages and a handful of examples.On the Internet, this topic is not reflected at all. The only thing that slightly helps is the availability of source codes for some already created plugins .
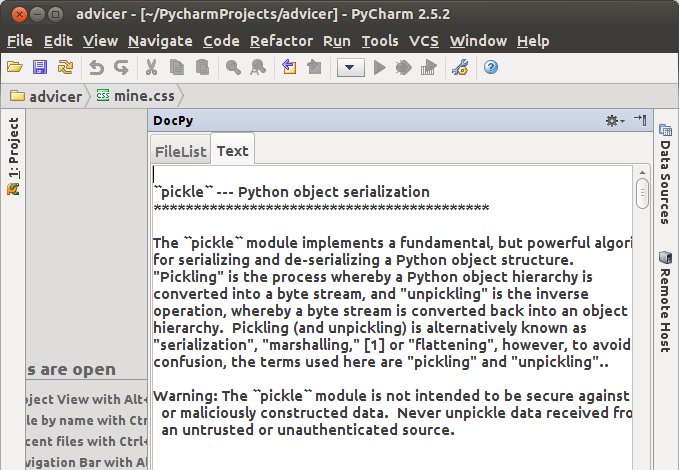
Initially, I wanted to create a window in which you can quickly and conveniently select a description of the standard python library, but it turned out badly. You can still add a lot, at least search and highlight python documentation. There is no desire to finish, while it’s easier to use the browser in the old fashioned way.
Then let's start:
Plugins for the IDE are written in the IDE. They will have to install and configure.
We will need:
- Java (developers recommend 1.6);
- IntelliJ IDEA Community Edition or Ultimate. (I used the first, as it is free. You can download it here )
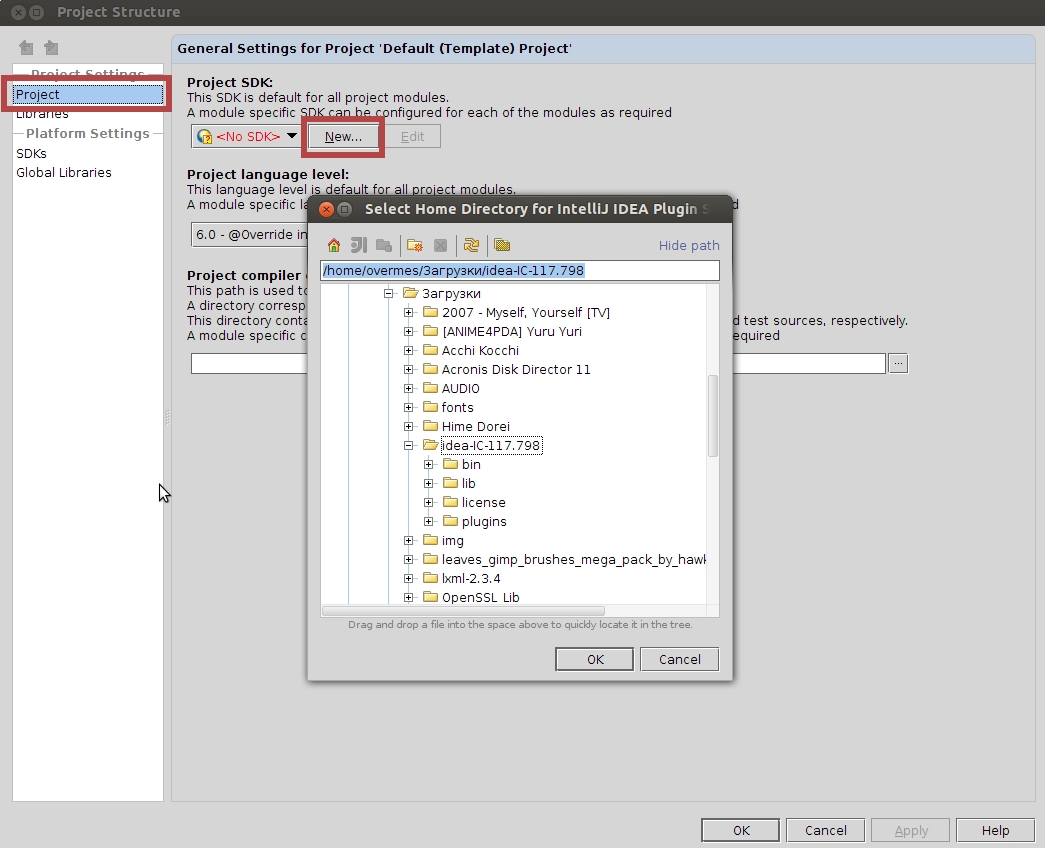
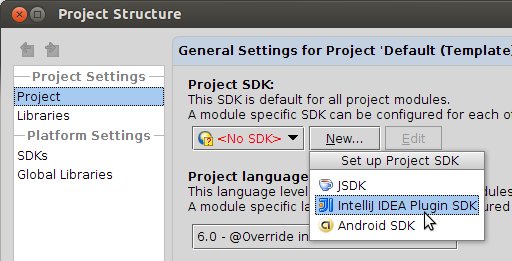
You need to configure the Java SDK and IntelliJ IDEA Plugin SDK:
- launch IntelliJ IDEA
- open the menu item File | Project Structure
- select the SDKs tab, click on the plus sign and select the path to Java
- select the Project tab
- click on new, then IntelliJ IDEA Plugin SDK and in the menu that opens - select the path to IntelliJ IDEA
Now you can create plug-in projects.
The plugin is a regular java program that uses a special open interface to interact with the IDE (it is only called open, it would be better to call closeapi). There are several main types of plugins: user action (AnAction), service (Service), extensions for other plugins (Extension) and just components. More details in the documentation. And although I did not expand a single plugin, I registered it in the configuration file.
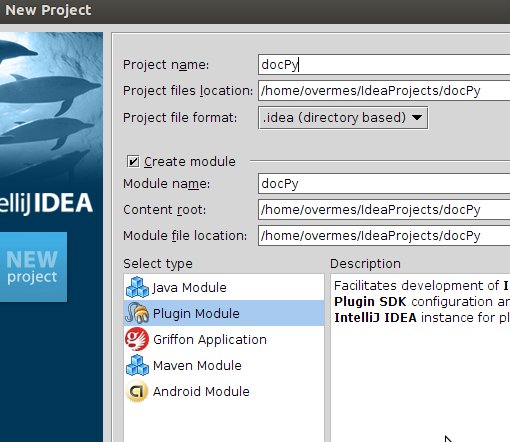
File | new project: Enter the name, select the Plugin Module type, select the SDK configured in step 1, create the project.
Further, depending on the plug-in being developed, the actions will be individual. I will describe how I created my plugin. As a basis, I took an example of a plugin from the documentation - Tool Window. To get its source code and the code for other examples, you need to download the IDE source code.
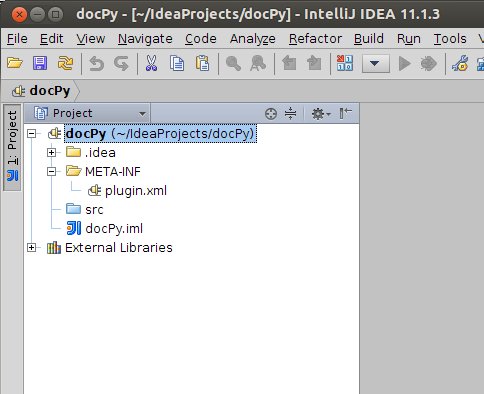
After creating the project, the plugin structure and the main configuration file appeared - plugin.xml.
In it we will register our classes and configure them. You can read more about this file in the documentation.
File Code:
For my plugin, I added two lines:
in the idea-plugin section:
in the extensions section:
- to launch the class at the start of the IDE and its initial location: anchor - window position, factoryClass - our class
As a result:
Since I have a simple graphical window, I create a class from the Gui Form template, which allows me to use a convenient graphical editor to create an interface. I add the necessary elements: The
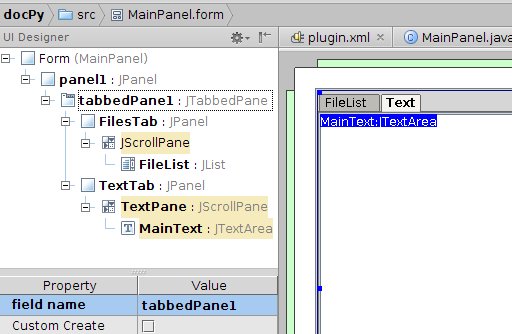
result is such a class:
Here we have a panel with two tabs, on the first list of files, on the second text from this file.
Extend this class with the ToolWindowFactory interface. Using it, you can make my class a part of the IDE and add standard controls (icons, the ability to be located in any place, scaling, etc.)
How did I find out about this interface? - you ask.
I copied from an example which still are unknown and haven’t been written anywhere, one of the ways is to look in the source for other plugins.
We implement the required method of this interface - createToolWindowContent, which is called when our window is created. Only the last three lines are interesting in it.
After adding two more functions (getting a list of files and reading from a file), the plugin is ready for the next step.
To use the plugin, you need to build it in a certain way:
Build | Prepare Plugin Module PyDoc for Deployment
We get in the project directory a jar file with the name of our project.
Through the settings-> Plugins-> Download from disk (select the jar obtained in the previous step) or copy the jar file to the plugins folder.
Unfortunately, the developers and the community of the popular IDE line write little about the process of creating plugins, which does not contribute to their appearance and development. In the end, it is like finding a way out of a room without a single light source. I hope my post will give some impetus in this direction.
Since almost everything had to be done blindly, maybe I made mistakes somewhere. I would be grateful if correct in the comments or through PM.
Some more information is here .
The source code of my project .
In this topic I will tell you how to create a simple plugin for IntelliJ IDEA and PyCharm. Since all IDEs contain the same interface for working with plug-ins, modifying it for other systems does not require significant efforts ( more ), unlike the process of direct development.
I warn you that if you decide to create your own plug-in, then the expected result may not correspond much to your plan or will require considerable time. If I knew what worked out and how much time I spent, I would hardly have taken it.
Plugins are written in Java, UI is created in SWING. The plugin development documentation consists of just a few pages and a handful of examples.On the Internet, this topic is not reflected at all. The only thing that slightly helps is the availability of source codes for some already created plugins .
Initially, I wanted to create a window in which you can quickly and conveniently select a description of the standard python library, but it turned out badly. You can still add a lot, at least search and highlight python documentation. There is no desire to finish, while it’s easier to use the browser in the old fashioned way.
Then let's start:
1) Preparation of the environment
Plugins for the IDE are written in the IDE. They will have to install and configure.
Tool Installation:
We will need:
- Java (developers recommend 1.6);
- IntelliJ IDEA Community Edition or Ultimate. (I used the first, as it is free. You can download it here )
Tool setup:
You need to configure the Java SDK and IntelliJ IDEA Plugin SDK:
- launch IntelliJ IDEA
- open the menu item File | Project Structure
- select the SDKs tab, click on the plus sign and select the path to Java
- select the Project tab
- click on new, then IntelliJ IDEA Plugin SDK and in the menu that opens - select the path to IntelliJ IDEA
Now you can create plug-in projects.
2) Creating a plugin
The plugin is a regular java program that uses a special open interface to interact with the IDE (it is only called open, it would be better to call closeapi). There are several main types of plugins: user action (AnAction), service (Service), extensions for other plugins (Extension) and just components. More details in the documentation. And although I did not expand a single plugin, I registered it in the configuration file.
Create a plugin project
File | new project: Enter the name, select the Plugin Module type, select the SDK configured in step 1, create the project.
Further, depending on the plug-in being developed, the actions will be individual. I will describe how I created my plugin. As a basis, I took an example of a plugin from the documentation - Tool Window. To get its source code and the code for other examples, you need to download the IDE source code.
Editing plugin.xml
After creating the project, the plugin structure and the main configuration file appeared - plugin.xml.
In it we will register our classes and configure them. You can read more about this file in the documentation.
File Code:
DocPy Python standard documentation 1.0 YourCompany For my plugin, I added two lines:
in the idea-plugin section:
com.intellij.modules.lang- in order for this plugin to work in PyCharme, if you do not specify any dependencies, the plugin will work only in IntelliJ IDEA. In this section, you can also specify the necessary dependencies for the plugin to work. in the extensions section:
- to launch the class at the start of the IDE and its initial location: anchor - window position, factoryClass - our class
As a result:
DocPy Python standard documentation 1.0 YourCompany com.intellij.modules.lang Create a class and graphical interface
Since I have a simple graphical window, I create a class from the Gui Form template, which allows me to use a convenient graphical editor to create an interface. I add the necessary elements: The
result is such a class:
public class MainPanel {
    private JPanel panel1;
    private JTabbedPane tabbedPane1;
    private JTextArea MainText;
    private JList FileList;
    private JPanel FilesTab;
    private JPanel TextTab;
    private JScrollPane TextPane;
}
Here we have a panel with two tabs, on the first list of files, on the second text from this file.
Extend this class with the ToolWindowFactory interface. Using it, you can make my class a part of the IDE and add standard controls (icons, the ability to be located in any place, scaling, etc.)
How did I find out about this interface? - you ask.
I copied from an example which still are unknown and haven’t been written anywhere, one of the ways is to look in the source for other plugins.
We implement the required method of this interface - createToolWindowContent, which is called when our window is created. Only the last three lines are interesting in it.
@Override
    public void createToolWindowContent(Project project, ToolWindow toolWindow) {
        final String[] FilesMas = getFileList("python-3.2.3-docs-text\library\");
        FileList.setListData(FilesMas);
        //Обработчик события выбора элемента
        FileList.addListSelectionListener(new ListSelectionListener() {
            @Override
            public void valueChanged(ListSelectionEvent e) {
                MainText.setText(readFileToStr("python-3.2.3-docs-text\library\" +
                FilesMas[FileList.getSelectedIndex()]));
                //Устанавливаем курсор в верхнюю позицию
                MainText.setSelectionStart(0);
                MainText.setSelectionEnd(0);
                //Прокручиваем в начало текста
                TextPane.getVerticalScrollBar().setValue(0);
                //Переключамся на вторую вкладку
                tabbedPane1.setSelectedIndex(1);
            }
        });
        MainText.setText(readFileToStr("A:\downloads\python-3.2.3-docs-text\library\sqlite3.txt"));
        //Создаем фабрику контента
        ContentFactory contentFactory = ContentFactory.SERVICE.getInstance();
        //Создаем контент(окно) с нашим GUI
        Content content = contentFactory.createContent(panel1, "", false);
        //Добавляем в IDE
        toolWindow.getContentManager().addContent(content);
    }
After adding two more functions (getting a list of files and reading from a file), the plugin is ready for the next step.
3) Build the plugin
To use the plugin, you need to build it in a certain way:
Build | Prepare Plugin Module PyDoc for Deployment
We get in the project directory a jar file with the name of our project.
4) Install the plugin in the IDE
Through the settings-> Plugins-> Download from disk (select the jar obtained in the previous step) or copy the jar file to the plugins folder.
conclusions
Unfortunately, the developers and the community of the popular IDE line write little about the process of creating plugins, which does not contribute to their appearance and development. In the end, it is like finding a way out of a room without a single light source. I hope my post will give some impetus in this direction.
Since almost everything had to be done blindly, maybe I made mistakes somewhere. I would be grateful if correct in the comments or through PM.
Some more information is here .
The source code of my project .