Random 2D Cavern Generator
Foreword
If you are too
This article will tell you in detail how you can use one of the many other methods of generation using the example of mountainous terrain and caves. We will consider the algorithm of Aldous-Broder and how to make the generated cave more beautiful.
Upon completion of reading the article you should have something like this:
Total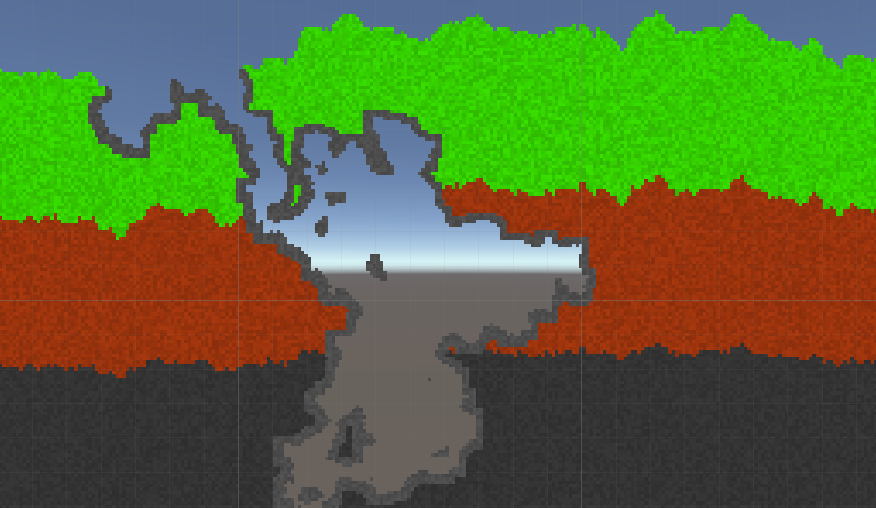
Theory
Mountain
To be honest, the cave can be generated from scratch, but will it be somehow ugly? In the role of a “platform” for mine placement I chose a mountain range.
This mountain is generated quite simply: let us have a two-dimensional array and a variable height , initially equal to half the length of the array in the second dimension; we will simply go through its columns and fill in all the lines in the column to the value of the variable height , changing it with a random chance up or down.
Cave
For the generation of the dungeons themselves, I chose - it seemed to me - an excellent algorithm. In simple language, it can be explained as follows: let us have two (maybe even ten) variables X and Y , and a two-dimensional array 50 by 50, we give random variables to these variables within our array, for example, X = 26 , and Y = 28 . Then we do the same actions a number of times: we get a random number from zero toin our case up to four ; and then, depending on the number we drop, we change
our variables:
switch (Random.Range(0, 4))
{
 case0: X += 1; break;
 case1: X -= 1; break;
 case2: Y += 1; break;
 case3: Y -= 1; break;
}
Then we, of course, check if any variable falls out of our field:
            X = X < 0 ? 0:
                (X >= 50 ? 49 : X);
            Y = Y < 0 ? 0:
                (Y >= 50 ? 49 : Y);
After all these checks, we are doing something in the new values of X and Y for our array (for example, we add one to the element) .
array[X, Y] += 1;Training
Let's, for ease of implementation and clarity of our methods, will we draw the resulting objects? I'm so glad you don't mind! We will do this with Texture2D .
For work we need only two scripts:
ground_libray is what the article will revolve around. Here we both generate, and clean, and draw
ground_generator is what will use our ground_librayLet the first be static and will not be inherited from anything:
publicstaticclassground_librayAnd the second is normal, only the Update method is not needed.
Also let's create a game object on the scene, with the SpriteRenderer component
Practical part
What is it all about?
To work with the data we will use a two-dimensional array. You can take an array of different types, from byte or int , to Color , but I think that this would be best done:
New type
Эту штуку мы пишем в ground_libray.
[System.Serializable]
publicclassblock
    {
        publicfloat[] color = newfloat[3];
        publicblock(Color col)
        {
            color = newfloat[3]
            {
                col.r,
                col.g,
                col.b
            };
        }
    }
I will explain this by the fact that it will allow us to both save our array and modify it if necessary.
Mountain range
Let's, before we begin to generate the mountain, we will designate the place where we will store it .
In the ground_generator script , I wrote this:
publicint ground_size = 128;
    ground_libray.block[,] ground;
    Texture2D myT;
ground_size is the size of our field (that is, the array will consist of 16384 elements).
ground_libray.block [,] ground - this is our field for generation.
Texture2D myT is what we will draw on.
How will this work?
Принцип работы у нас будет такой — мы будем вызывать какие-нибудь методы ground_libray из ground_generator, отдавая первому наше поле ground.
Let's create the first method in the ground_libray script:
Making mountains
И сразу же попытаемся понять, что тут происходит: как я уже сказал, мы просто пробегаемся по столбикам нашего массива b, параллельно изменяя переменную высоты h_now, которая изначально была равна половине 128 (64). Но есть тут еще кое-что новое — mount_noise. Это переменная отвечает за шанс смены h_now, ибо если менять высоту очень часто, то гора будет смотреться как расческа.
publicstaticfloat mount_noise = 0.02f;
    publicstaticvoidgenerate_mount(ref block[,] b)
    {
        int h_now = b.GetLength(1) / 2;
        for (int x = 0; x < b.GetLength(0); x++)
            for (int y = 0; y < h_now; y++)
            {
                b[x, y] = new block(new Color(0.7f, 0.4f, 0));
                h_now +=
                    Random.value > (1.0f - mount_noise) ?
                    (Random.value > 0.5 ? 1 : -1) : 0;
            }
    }
И сразу же попытаемся понять, что тут происходит: как я уже сказал, мы просто пробегаемся по столбикам нашего массива b, параллельно изменяя переменную высоты h_now, которая изначально была равна половине 128 (64). Но есть тут еще кое-что новое — mount_noise. Это переменная отвечает за шанс смены h_now, ибо если менять высоту очень часто, то гора будет смотреться как расческа.
Colour
Я сразу задал слегка коричневатый цвет, пускай хотя бы какой-нибудь будет — в дальнейшем он нам не понадобится.
Now let's go to the ground_generator and write this in the Start method :
        ground = new ground_libray.block
            [ground_size, ground_size];
        ground_libray.generate_mount(ref ground);
We initialize the ground variable
After no explanation, we send it to ground_libray .
So we generated a mountain.
Why don't I see my mountain?
Let's draw now what we have done!
For drawing we will write this method in our ground_libray :
Drawing
Тут мы уже не будем отдавать кому-то свое поле, дадим только его копию (правда, из-за слова class, мы дали чуточку больше, чем просто копию). А так же подарим этому методу нашу Texture2D.
Первые две строки: мы создаем нашу текстуру размером с поле и убираем фильтрацию.
После чего мы проходимся по всему нашему поле-массиву и там, где мы ничего не создали (class нужно инициализировать) — мы рисуем пустой квадратик, в ином случае, если там не пусто — мы рисуем то, что сохранили в элемент.
publicstaticvoidpaint(block[,] b, ref Texture2D t)
    {
        t = new Texture2D(b.GetLength(0), b.GetLength(1));
        t.filterMode = FilterMode.Point;
        for (int x = 0; x < b.GetLength(0); x++)
            for (int y = 0; y < b.GetLength(1); y++)
            {
                if (b[x, y] == null)
                {
                    t.SetPixel(x, y, new Color(0, 0, 0, 0));
                    continue;
                }
                t.SetPixel(x, y,
                    new Color(
                        b[x, y].color[0],
                        b[x, y].color[1],
                        b[x, y].color[2]
                        )
                    );
            }
        t.Apply();
    }
Тут мы уже не будем отдавать кому-то свое поле, дадим только его копию (правда, из-за слова class, мы дали чуточку больше, чем просто копию). А так же подарим этому методу нашу Texture2D.
Первые две строки: мы создаем нашу текстуру размером с поле и убираем фильтрацию.
После чего мы проходимся по всему нашему поле-массиву и там, где мы ничего не создали (class нужно инициализировать) — мы рисуем пустой квадратик, в ином случае, если там не пусто — мы рисуем то, что сохранили в элемент.
And, of course, at the end we go to the ground_generator and add this:
        ground = new ground_libray.block
            [ground_size, ground_size];
        ground_libray.generate_mount(ref ground);
        //вот тут дописываем
        ground_libray.paint(ground, ref myT);
        GetComponent<SpriteRenderer>().sprite =
            Sprite.Create(myT,
            new Rect(0, 0, ground_size, ground_size),
            Vector3.zero
            );
But no matter how much we draw on our texture, in the game we can see it only by putting this canvas on something:
SpriteRenderer never accepts Texture2D anywhere , but it’s not stopping us from creating a sprite from this texture - Sprite.Create ( texture , rectangle with the coordinates of the lower left corner and the upper right , the axis coordinate ).
These lines will be called up to date, we will finish everything else above the paint method !
Mines
Now we need to fill our fields with random caves. For such actions, we also create a separate method in ground_libray . I would like to immediately explain the parameters of the method:
ref block[,] b - это мы отдаем наше поле.
int thick - толщина краев пещеры
int size - в некотором роде это можно назвать размером пещеры
Color outLine - цвет краев
Cave
Для начала мы объявили наши переменные X и Y, вот только назвал я их xNow и yNow соответственно.
Первая, а именно xNow — получает случайное значение от нуля до размера поля по первому измерению.
А вторая — yNow — так же получает случайное значение: от нуля, до середины поля по второму измерению. Почему? Мы генерируем нашу гору с середины, шанс того, что она будет дорастать до «потолка» — не большой. Исходя из этого я не считаю релевантным генерировать пещеры в воздухе.
После сразу идет цикл, количество тиков которого зависит от параметра size. Каждый тик мы обновляем поле в позиции xNow и yNow, а уже потом обновляем их самих (обновления поля можно поставить в конец — разницы вы не ощутите)
Так же тут есть метод make_thick, в параметры которого мы передаем наше поле, ширину обводки пещеры, текущую позицию обновления пещеры и цвет обводки:
publicstaticvoidmake_cave(ref block[,] b,
        int thick, int size, Color outLine)
    {
        int xNow = Random.Range(0, b.GetLength(0));
        int yNow = Random.Range(0, b.GetLength(1) / 2);
        for (int i = 0; i < size; i++)
        {
            b[xNow, yNow] = null;
            make_thick(ref b, thick, newint[2] { xNow, yNow }, outLine);
            switch (Random.Range(0, 4))
            {
                case0: xNow += 1; break;
                case1: xNow -= 1; break;
                case2: yNow += 1; break;
                case3: yNow -= 1; break;
            }
            xNow = xNow < 0 ? 0 :
                (xNow >= b.GetLength(0) ? b.GetLength(0) - 1 : xNow);
            yNow = yNow < 0 ? 0 :
                (yNow >= b.GetLength(1) ? b.GetLength(1) - 1 : yNow);
        }
    }
Для начала мы объявили наши переменные X и Y, вот только назвал я их xNow и yNow соответственно.
Первая, а именно xNow — получает случайное значение от нуля до размера поля по первому измерению.
А вторая — yNow — так же получает случайное значение: от нуля, до середины поля по второму измерению. Почему? Мы генерируем нашу гору с середины, шанс того, что она будет дорастать до «потолка» — не большой. Исходя из этого я не считаю релевантным генерировать пещеры в воздухе.
После сразу идет цикл, количество тиков которого зависит от параметра size. Каждый тик мы обновляем поле в позиции xNow и yNow, а уже потом обновляем их самих (обновления поля можно поставить в конец — разницы вы не ощутите)
Так же тут есть метод make_thick, в параметры которого мы передаем наше поле, ширину обводки пещеры, текущую позицию обновления пещеры и цвет обводки:
Обводка
Метод берет переданную ему координату start, и вокруг нее на расстоянии t перекрашивает все блоки в цвет o — все очень просто!
staticvoidmake_thick (ref block[,] b, int t, int[] start, Color o)
    {
        for (int x = (start[0] - t); x < (start[0] + t); x++)
        {
            if (x < 0 || x >= b.GetLength(0))
                continue;
            for (int y = (start[1] - t); y < (start[1] + t); y++)
            {
                if (y < 0 || y >= b.GetLength(1))
                    continue;
                if (b[x, y] == null)
                    continue;
                b[x, y] = new block(o);
            }
        }
    }
Метод берет переданную ему координату start, и вокруг нее на расстоянии t перекрашивает все блоки в цвет o — все очень просто!
Now let's add this line to our ground_generator :
ground_libray.make_cave(ref ground, 2, 10000,
 new Color(0.3f, 0.3f, 0.3f));
You can install the ground_generator script as a component on our object and check how it works!

More about caves ...
- Чтобы сделать больше пещер, вы можете вызвать метод make_cave несколько раз (использовать цикл)
- Изменение параметра size не всегда увеличивает размер пещеры, но зачастую она становится больше
- Изменяя параметр thick — вы значительно увеличиваете количество операций:
если параметр равен 3, то количество квадратиков в радиусе 3 будет 36, значит при параметре size = 40000 — количество операций будет 36* 40000 = 1440000
Cavern Correction
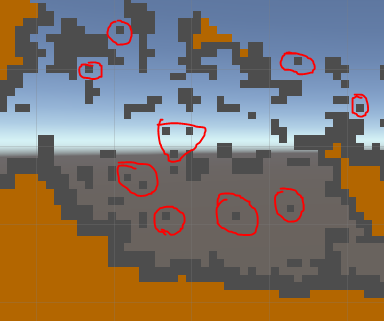
You did not notice that in this kind of cave does not look the best way? Too many extra details (you may think otherwise) .
To get rid of some # 4d4d4d blotches, we will write this method in ground_libray :
Cleaner
Но будет сложно понять, что тут происходит, если вы не будете знать, что делает функция solo:
В параметрах у этой функции обязано находиться наше поле, радиус проверки точки, «порог уничтожения» и координаты проверяемой точки.
Вот подробное объяснение того, что делает эта функция:
Краткое описание алгоритма: мы проходимся по всему полю и проверяем все точки на то, нужны они ли нет.
publicstaticvoidclear_caves(ref block[,] b)
    {
        for (int x = 0; x < b.GetLength(0); x++)
            for (int y = 0; y < b.GetLength(1); y++)
            {
                if (b[x, y] == null)
                    continue;
                if (solo(b, 2, 13, newint[2] { x, y }))
                    b[x, y] = null;
            }
    }
Но будет сложно понять, что тут происходит, если вы не будете знать, что делает функция solo:
staticboolsolo (block[,] b, int rad, int min, int[] start)
    {
        int cnt = 0;
        for (int x = (start[0] - rad); x <= (start[0] + rad); x++)
        {
            if (x < 0 || x >= b.GetLength(0))
                continue;
            for (int y = (start[1] - rad); y <= (start[1] + rad); y++)
            {
                if (y < 0 || y >= b.GetLength(1))
                    continue;
                if (b[x, y] == null)
                    cnt += 1;
                elsecontinue;
                if (cnt >= min)
                    returntrue;
            }
        }
        returnfalse;
    }
В параметрах у этой функции обязано находиться наше поле, радиус проверки точки, «порог уничтожения» и координаты проверяемой точки.
Вот подробное объяснение того, что делает эта функция:
int cnt — то счетчик текущего «порога»
Далее идут два цикла, которые проверяют все точки вокруг той, координаты которой переданы в start. Если находится пустая точка, то мы прибавляем к cnt единицу, по достижении «порога уничтожения» мы возвращаем истину — точка является лишней. Иначе мы ее не трогаем.
Порог уничтожения я установил в 13 пустых точек, а радиус проверки 2 (то есть проверит он 24 точки, не включая центральную)
Пример
Вот эта останется невредимой, так как всего 9 пустых точек.

А вот этой не повезло — вокруг целых 14 пустых точек

А вот этой не повезло — вокруг целых 14 пустых точек
Краткое описание алгоритма: мы проходимся по всему полю и проверяем все точки на то, нужны они ли нет.
Then we simply add this line to our ground_generator :
ground_libray.clear_caves(ref ground);Total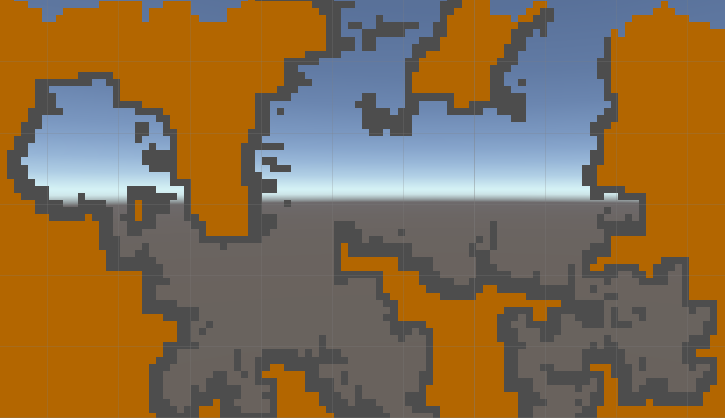
As we see - most of the unnecessary particles just gone.
Add some color
Our mountain looks very monotonous, I find it boring.
Let's add some paint. Add the level_paint method to the ground_libray :
Mountain painting
Я выбрал всего 3 цвета: Зеленый, темно-красный и темно-серый.
Вы, разумеется, можете изменить как количество цветов, так и значения каждого. У меня получилось так:
Но все же это выглядит слишком строго, чтобы добавить немного хаотичности цветам, мы напишем в ground_libray вот такое свойство:
В итоге у вас должно все выглядеть примерно так:
publicstaticvoidlevel_paint(ref block[,] b, Color[] all_c)
    {
        for (int x = 0; x < b.GetLength(0); x++)
        {
            int lvl_div = -1;
            int counter = 0;
            int lvl_now = 0;
            for (int y = b.GetLength(1) - 1; y > 0; y--)
            {
                if (b[x, y] != null && lvl_div == -1)
                    lvl_div = y / all_c.Length;
                elseif (b[x, y] == null)
                    continue;
                b[x, y] = new block(all_c[lvl_now]);
                lvl_now += counter >= lvl_div ? 1 : 0;
                lvl_now = (lvl_now >= all_c.Length) ?
                                (all_c.Length - 1) : lvl_now;
                counter = counter >= lvl_div ? 0 : (counter += 1);
            }
        }
    }
</
<cut />source>
В параметры к методу мы передаем нашу гору и массив красок. Цвета будут использовать так, чтобы нулевой элемент массива красок был сверху, а последний снизу.
Мы проходимся по всем столбикам нашего поля, а обход по строчкам начинаем сверху. Найдя первую строчку с существующим элементом мы делим значение <b>Y </b>на количество цветов, чтобы поровну разделить цвета на столбик.
</spoiler>
После мы дописываем в <b>ground_generator </b>вот это:
<source lang="cs">
        ground_libray.level_paint(ref ground,
            new Color[3]
            {
                new Color(0.2f, 0.8f, 0),
                new Color(0.6f, 0.2f, 0.05f),
                new Color(0.2f, 0.2f, 0.2f),
            });
Я выбрал всего 3 цвета: Зеленый, темно-красный и темно-серый.
Вы, разумеется, можете изменить как количество цветов, так и значения каждого. У меня получилось так:
Итог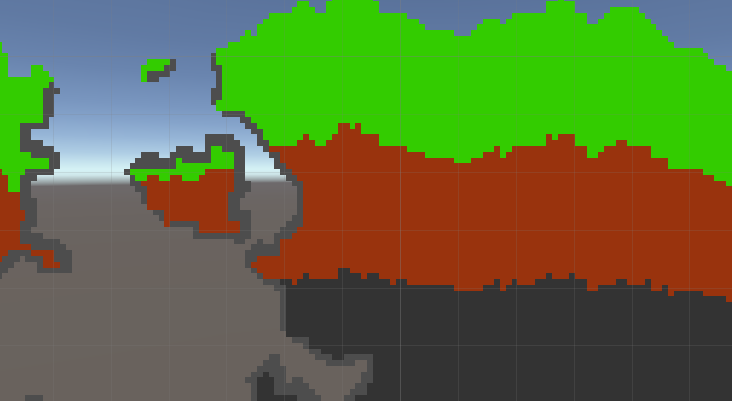
Но все же это выглядит слишком строго, чтобы добавить немного хаотичности цветам, мы напишем в ground_libray вот такое свойство:
Случайные цвета
И теперь в методах level_paint и make_thick, в строчках, где мы присваиваем цвета, например в make_thick:
Мы напишем так:
А в level_paint
publicstaticfloat color_randomize = 0.1f;
    staticfloat crnd
    {
        get
        {
            return Random.Range(1.0f - color_randomize,
                1.0f + color_randomize);
        }
    }
И теперь в методах level_paint и make_thick, в строчках, где мы присваиваем цвета, например в make_thick:
b[x, y] = new block(o);Мы напишем так:
b[x, y] = new block(o * crnd);А в level_paint
b[x, y] = new block(all_c[lvl_now] * crnd);В итоге у вас должно все выглядеть примерно так:
Итог
disadvantages
Suppose that we have a field of 1024 by 1024, we need to generate 24 caves, the edge thickness of which will be 4, and the size will be 80000.
1024 * 1024 + 24 * 64 * 80000 = 5 368 832 000 000 operations.
This method is only suitable for generating small modules for the game world; it is impossible to generate something very large at a time .