Ethereum Account and Contract Ownership Guide
- Tutorial

The material that we decided to publish today was born about 6 months ago and still has not lost its relevance (maybe it was necessary to refresh it a little). Then we were still able to be surprised, looking at businessmen and startups who intend to conduct ICO, but who are not able to make a transaction with the translation of one broadcast. Today, we have ceased to be surprised, but such characters are not much less.
In general, the understanding of the importance of safekeeping of your secret keys and the ability to do this is the basis of a decentralized economy, which we hope will soon relieve the classical centralized model. You need to clearly understand that as soon as you transfer control of your secret key to someone - for example, a bank, stock exchange, or the state - the decentralization magic disappears immediately, and you can safely change the blockchain to Postgres without much loss of meaning. In short, in this article we will talk about the basics of securely storing private keys on the example of the Ethereum blockchain.
If for you this article does not carry anything new - super, we are very glad that you are in our "club". And, by the way, now you have where to send all the kryptone-ophites, so that they do not accidentally lose all of their broadcasts by stupidity.
Content:
0. Do it yourself!
1. Introduction
1.1. Accounts
1.2. Wallets
1.3. Contracts
1.4. Multisig-wallets
2. Possession
2.1. Pretty safe
2.1.1. Laptop and operating system
2.1.2. Ethereum-node
2.1.2.1 Installation on Linux
2.1.2.2. Installation on macOS
2.1.3. Account
2.1.4. We collect signatures into a single whole
2.1.4.1 Standard MultiSig wallet
2.1.4.2 MixBytes MultiSig
2.2. Slightly less secure
2.3. Normal
2.3.1 Ethereum Wallet
2.3.2 MEW
Authors:
Alexey therealal Makeev
Pavel pkruglov
Sergey Kruglov BoogerWooger Prilutsky
0. Do it yourself!
Who to entrust possession and management of their values in the blockchain? Best of all - yourself. In a pinch, to a person to whom you can entrust a suitcase with money of equivalent value. Further guidance is intended for you or your trusted people. Any, even short-term access to computers / equipment from which management will occur, is possible only for people with an appropriate level of trust.
Why is this so? The current mechanics of the banks have taught us that, no matter how many PIN codes and passwords from the Internet bank we lose, we can always come to the bank branch, show a passport and withdraw money or start restoring access. Even if fraudsters withdrew money from a bank account, with some probability the operation will be able to be challenged. In the blockchain world, this is not the case - if an operation is made (for example, a money transfer), it is protected by the full power of cryptographic technologies.
Next, basic background information will be given to understand the overall picture and, without details of information security, recommendations for safe ownership of accounts / contracts in Ethereum.
1. Background information
1.1. Accounts
The basic entity, which can be owned on the Ethereum network, is an account (in ethereal terms: external account) - a pair of private and public keys. The private key must be kept secret, the public (more precisely, the address obtained from it) can be freely published.
Money can be transferred to the address (in the Ethereum network - ether, ether). To indicate the ownership of any funds, contracts, transactions (the sender of the transaction), it is the address that is used (for example, 0x36c9cc925dd58747044f52d0a57917df64555a3d ). However, to perform any action on behalf of the address of your account, you need a private (secret) key. It is the secure storage of secret keys that is the main function of any cryptographic wallet. Wallets additionally encrypt the private key with a password, which must be entered during the use of the key to sign transactions. At this very moment, the crypto-purse uses the secret key to create a signature for the transaction.
To own an account, you must understand exactly where and how the secret key is stored that corresponds to a specific address. If you enter the personal account of the exchange, and the exchange itself conducts transactions for you (ie, signs each of them with a secret key), then she knows the secret key. And this address actually belongs not to you, but to the exchange. In the case of centralized exchanges, you often do not have secret keys to the addresses that you see in the exchange interface. In the case of decentralized exchanges, you sign a transaction on your machine, and the secret key is not transferred anywhere. In this case, you control your account completely independently.
Typically, accounts (addresses and secret keys that control them) are stored in a special file called keystore. The secret keys in it are encrypted using a password that you will enter each time you need to sign the transaction sent to the network. This means that even if your file is copied, without knowing the password it will be very difficult to get the secret key from it. It is almost impossible if you use a long and complex password, and it is much easier if you use a password like "lena1984", which attackers go through. In any case, leaking this file is a serious problem.
In addition to the password that controls access to account data (decrypting the secret key at the moment it is needed), some crypto cracks use a long string of words called seed.
Knowing the seed, you can recreate the same secret key. Seed is information that allows you to generate a new keystore file from scratch, and set a password in it that you want. This keystore file will be used to manage the same addresses as the previous one. So keep the seed very secure, perhaps even in the form of a well-hidden hard copy. Do not use meaningful pieces of text from the literature for seed, for example "moroz i solntse den chudesniy" - attackers will be able to sort through these texts with greater efficiency than a random set of words like "shop ban trick track chrome bunny york".
So remember:
- seed - to fully recreate the account from scratch;
- Password - to decrypt the secret key stored in the keystore file when it is required to sign the transaction sent to the network.
Most wallets help you generate a reliable seed. In the case of web wallets, usually the generation is done strictly in your browser, using JavaScript (the program runs on your computer, inside your browser, and only your browser sees the generated seed). But we must understand that if a Trojan program is running on your computer, or if there is a malicious extension in your browser, your seed may be stolen. The situation when the seed is generated on the side of the service (that is, it can spy on it) is generally unacceptable. Even if the service can be trusted, the service itself can be hacked.
Accounts can be transferred between computers as files, but you need to know that you cannot “completely” delete a file from a disk / flash drive. When deleting a computer from a disk, it does not delete all the bytes of the file, but only marks the file as deleted, special programs can restore such a file. If the account is or will be of great value, it should not travel through computers and networks. All disks and flash drives that were used to transfer it, you must either physically destroy, or use to back up your account and store as securely as the account itself.
1.2. Wallets
A program that operates with accounts, contracts and other blockchain entities is called a wallet or a crypto wallet. A wallet can contain multiple accounts and support simultaneous work with them. Wallets come in the form of ordinary programs, as a separate device (hardware) or as a web service. The wallet program does not “store bitcoins in itself” in the form of some data, but stores only the keys for managing addresses and can communicate with the blockchain (form transactions or search for information in the blockchain).
1.3. Contracts
The contracts contain logic that will be executed with mathematical precision, with a large number of miners, most of whom are interested in honest execution of the contract. The resulting changes in the state of the contract will be certified cryptographically and sent to the general Ethereum blockchain, where any participant can see them. Owning a contract is prescribed in the contract itself (using the addresses of the owners, the addresses of their accounts), i.e. it is part of the logic or state of the contract. If the contract logic requires transactions from several owners, it is called a multi-signature (multi-signature, multisig). It is on the basis of this logic that multisig-wallets contracts are implemented. Multi-signature is not limited to the protection of contracts that store air; it can protect access to any contract.
1.4. Multisig wallets
Do not confuse them with the program-wallets described above. A multisig wallet consists of a multi-signature contract and a graphical interface for more convenient interaction with the contract. The contract contains multi-signature parameters:
- owners (usually accounts);
- the number of signatures to take action.
Sometimes the withdrawal of small amounts (the threshold is set in the contract) requires the signature of only one owner. For example, the Ethereum Wallet wallet (works on the basis of the Mist graphics engine, therefore, sometimes mistakenly called Mist) allows you to create a multisig-contract wallet, and it is convenient to work with it. A wallet program can manage multiple multisig wallets.
Do not confuse the implementation of multisig wallets in Ethereum and Bitcoin. Unlike Ethereum, in Bitcoin, in order to use Bitcoins from a previously created multisig address, all the necessary signatures must be “collected” in advance and packaged in one transaction, whereas in Ethereum several transactions from signatories can come independently.
2. Ownership
The following are some of the ways with a different balance of security, price and usability. All that has been said is our recommendation.
2.1. Pretty safe
Multisig-wallet with several signatures, whose accounts are stored on different laptops. For values of more than 100,000 dollars, this method is needed. Mandatory signatures - at least two. Total signatures - one or two more than mandatory (in case of loss / compromise of one or two signatures). As an option: there are three signatures, two mandatory (any).
2.1.1. Laptop and operating system
It is bought from a reliable company that has no idea what the laptop will be used for. A company should have a near-zero motive to embed software / hardware “bookmarks” into a laptop. All laptops purchased from different companies. Iron must be reliable and have a minimal chance of a normal breakdown. In the event of a breakdown / problem, either we solve it ourselves, or we take out all the hard drives and return for repair, after which the laptop is NOT used for further storage of accounts.
Operating system: Linux or macOS. Hardware requirements: SSD (SSD required!), 256+ GB disk, 16+ GB RAM, Intel Core i5 processor or better. Between the laptop and the Internet should be a firewall, for example on the router. The laptop should be clean: do not install any programs other than the operating system and Ethereum nodes, do not connect any third-party flash drives and disks. No remote control tools!
2.1.2. Ethereum node
Wallets use the Ethereum node to interact with the blockchain. We need the so-called complete Ethereum-noda.
2.1.2.1. Installing on Linux
Будем рассматривать установку на deb-совместимые дистрибутивы (Debian, Ubuntu, CentOS). Заходим на https://github.com/ethereum/mist/releases и скачиваем последний релиз, на момент написания статьи это был 0.9.3:
- Если у вас 64-битная система https://github.com/ethereum/mist/releases/download/v0.9.3/Ethereum-Wallet-linux64-0-9-3.deb
- Если вдруг 32-битная https://github.com/ethereum/mist/releases/download/v0.9.3/Ethereum-Wallet-linux32-0-9-3.deb
После скачивания неплохо проверить целостность пакета, чтобы исключить подмену файла. Для этого на странице представлены SHA256-хеши всех файлов, например для Ethereum-Wallet-linux64-0-9-3.deb это 946b4b7dec1b6f2b58b6ef21d06a12dcee691fa2186baad7d99872f94240ced8.
В Linux вычислить хеш можно с помощью стандартной консольной утилиты sha256sum. В окне терминала вводим следующую команду:
$ sha256sum ~/Downloads/Ethereum-Wallet-linux64-0-9-2.debГде:
$— приглашение терминала, означающее, что команда будет выполнена от имени пользователя (вводить не нужно);~— путь до директории текущего пользователя;~/Downloads/Ethereum-Wallet-linux64-0-9-2.deb— полный путь к файлу.
В ответ нам должен отобразиться хеш, который приведен выше (для вашего файла может быть другой). Для установки пакета используем команду:
$ sudo dpkg -i ~/Downloads/Ethereum-Wallet-linux64-0-9-2.debГде:
sudo— команда, позволяющая выполнить действие с правами root (администратора);dpkg— стандартная утилита для установки deb-пакета;-i— флаг установки пакета (install).
После запуска команды необходимо ввести пароль пользователя.
Другой способ установки: дважды кликаем на файл в графическом файл-менеджере и следуем указаниям.
2.1.2.2. Installation on macOS
Для установки используем ту же страницу https://github.com/ethereum/mist/releases, только нам потребуется файл с расширением *.dmg, на момент написания статьи это Ethereum-Wallet-macosx-0-9-3.dmg. После скачивания проверим хеш файла через терминал. Для запуска терминала в macOS нужно:
- Запустить Finder.
- Выбрать в меню Finder пункт «Переход», далее — «Служебные программы».
- Найти иконку «Терминал» и запустить.
В терминале ввести команду:
$ shasum -a 256 ~/Downloads/Ethereum-Wallet-macosx-0-9-2.dmgДалее дважды кликаем на dmg-файл и устанавливаем кошелек.
2.1.2.3. Синхронизация ноды
Перед какими-либо действиями в блокчейне следует полностью синхронизировать Ethereum-ноду (дождаться, пока все индикаторы синхронизации, подобные нижеприведенному, закончат работу и исчезнут).
Со временем блокчейн будет «распухать». Чтобы его сжать (либо если с последней синхронизации прошло много времени), можно полностью удалить блокчейн (только блокчейн! Не аккаунт), тогда будет выполнена быстрая синхронизация. Данные блокчейна находятся в директории chaindata, которую можно найти:
- в ~/.ethereum/geth/ на Linux;
- в ~/Library/Ethereum/geth/ на macOS.
Для удаления данных блокчейна, следовательно, можно просто удалить директорию chaindata. Лучше всего закрыть кошелек, переименовать chaindata в chaindata.old, запустить кошелек (должна начаться синхронизация с нуля и основной интерфейс по-умолчанию не появится — поэтому нажимаем Launch Application), убедиться, что аккаунты на месте (если нет — переименовали что-то не то, ищем их в переименованном каталоге), после чего можно удалять chaindata.old.
2.1.3. Account
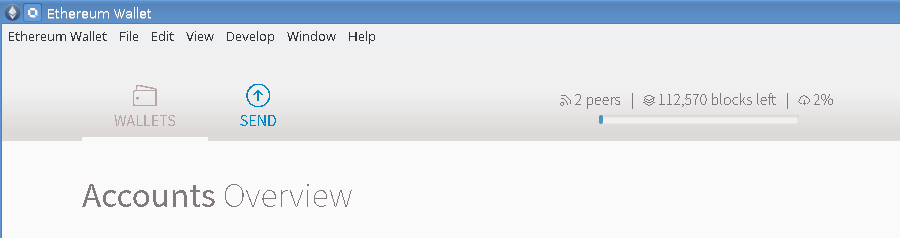
When you start Ethereum Wallet for the first time, follow the instructions:

In this step, create a complex password for your future wallet. After this account will be created.
To secure a hard drive from crash, make a backup of your account on a USB flash drive, store it with your laptop. Even a non-working hard disk on which the account was located should be physically destroyed.
To back up your account, you need to copy the key file located at:
- in Linux: ~ / .ethereum / keystore
- on macOS: ~ / Library / Ethereum / keystore
The same directories can be opened in Ethereum Wallet through the top menu File -> Backup -> Accounts .
2.1.4. We collect signatures in a single unit
There are two sub-options here. Standard MultiSig Wallet is suitable if the asset you own is broadcast or ERC-20 tokens, and it is transferred to your address (i.e., no additional action is required on your part). To protect any contract with multi-signatures, we developed our solution based on the standard one. Which of the sub-options to choose depends on what needs to be protected.
2.1.4.1. Standard MultiSig wallet
To create multisiga you need to do two things:
- copy the public addresses of other accounts created on the current laptop;
- have a broadcast on the main wallet (about 0.2 or more) to send transactions.
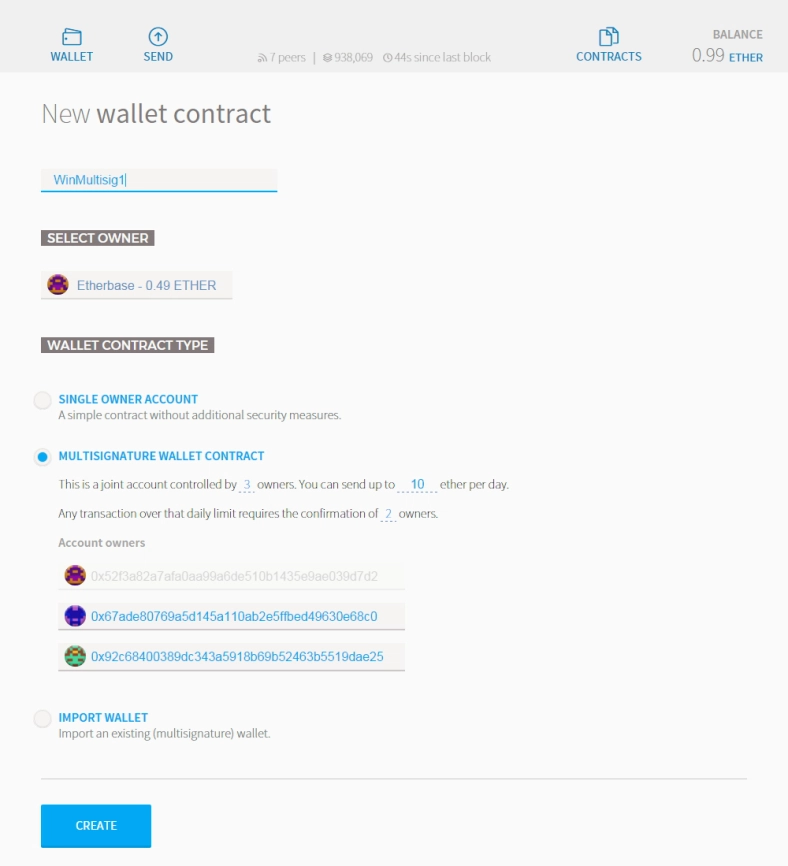
Once the conditions are met, you can begin to create. In the Wallet Contracts section, click on ADD WALLET CONTRACT . Enter the contract name and select the Multisignature Wallet Contract option. You will see the following message:
This is a joint account controlled by X owners. You can send up to X ether per day. Any transaction over that limit is required by the X owners.
At this stage, you need to choose how many owners the purse will have and how many signatures are needed to complete the transaction over the daily limit. Next, you need to insert the addresses of all accounts-owners (those that we created earlier on different laptops) and click CREATE .
To add an existing multisig wallet on another computer (for example, if you need to replace your laptop or reinstall the wallet), you need to import an existing wallet. Actions are performed in the main Ethereum Wallet window:
- On the WALLETS tab, scroll down to the Wallet Contracts section and click the ADD WALLET CONTRACT button .
- Enter the convenient name of the wallet.
- Select IMPORT WALLET .
- Enter the wallet address.
- If one of your existing accounts is the owner of the wallet, a green sign appears to confirm this.
- Click the CREATE button .

To transfer funds from the multisig wallet, you, as usual, need to go to the SEND tab, select the multisig wallet address from which you will transfer, enter the amount and password to create a transaction. However, after entering the password, you will see differences with a normal transaction:
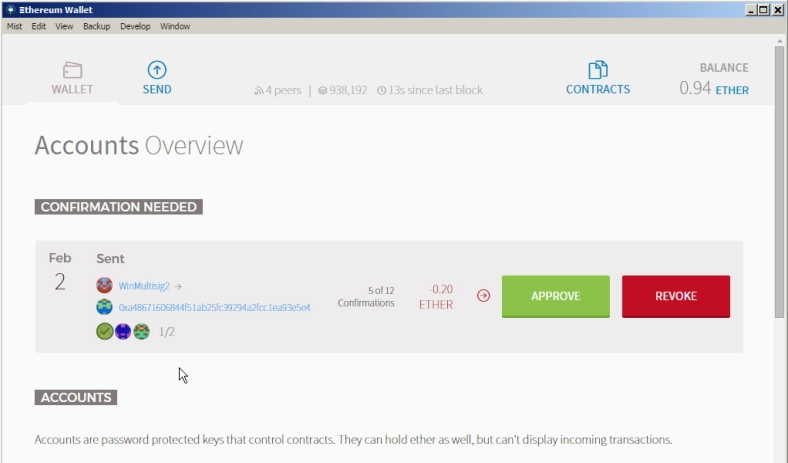
Here you need to approve the transaction with the APPROVE button .
The same message will be displayed on the computer of another owner:
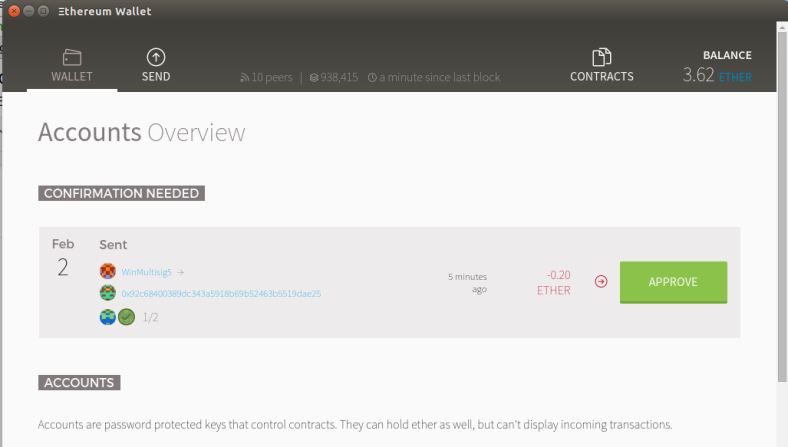
And only after the minimum required number of owners approve the transaction, the funds will be transferred.
2.1.4.2. MixBytes MultiSig
To send a transaction to any contract protected by MixBytes MultiSig, you should follow the same steps to send a transaction as you would to a regular contract, but repeat them from several management notebooks. With as many as minimum signatures required. In this case, the first requests will only record the fact of the signature, and the action will execute the last signature.
We describe how to send transactions to a contract. Contracts can be managed in Ethereum Wallet, in the header there is a Contracts tab, go to it:
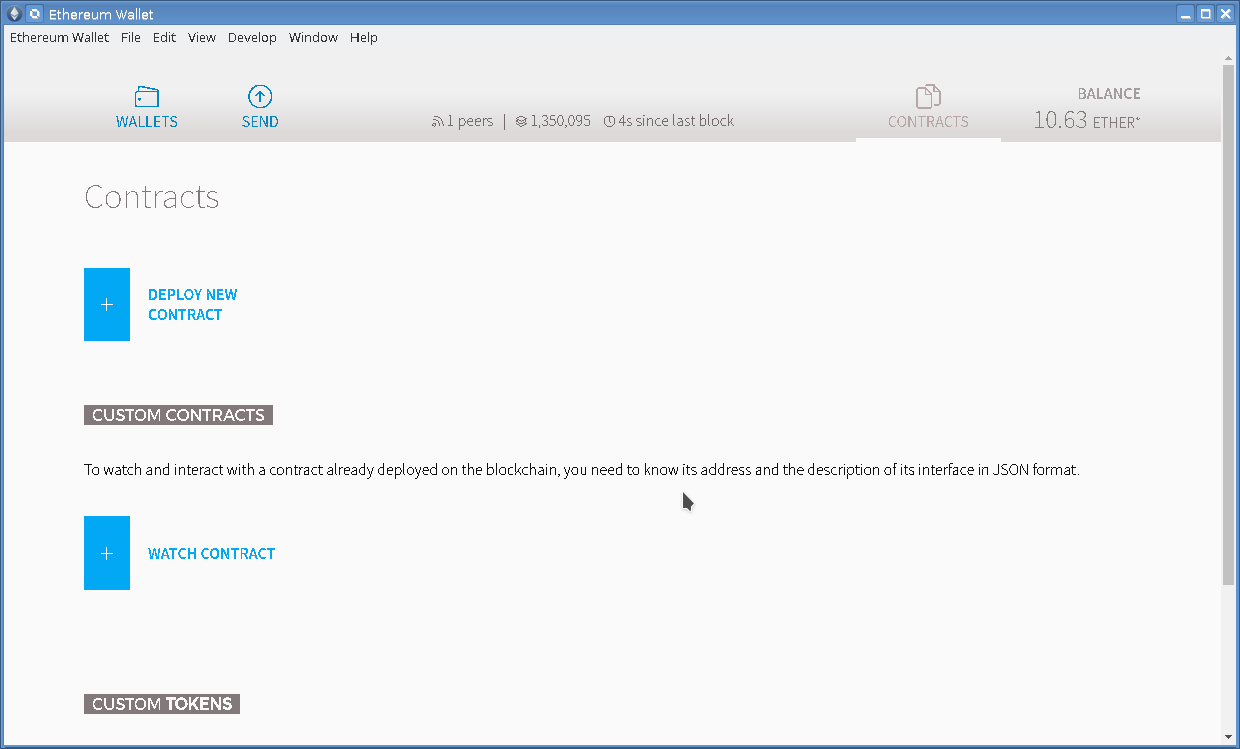
Here you can add an existing contract - click WATCH CONTRACT . In the form that appears, you need to enter the contract address, its name (select any - it remains only in your wallet), as well as the so-called ABI (application binary interface, represented by large JSON text):
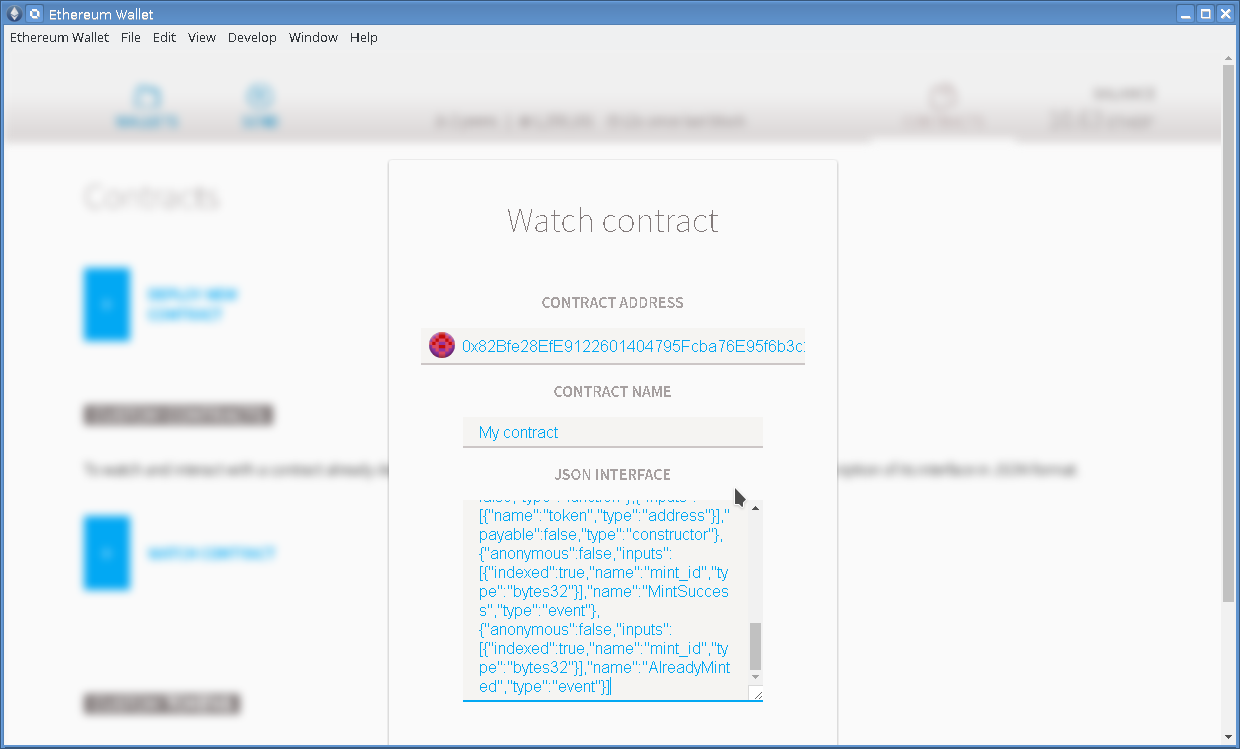
ABI must provide the developer of the contract. Or you can try to find the ABI on the etherscan.io service at the contract address in the Contract Source tab (only for verified contracts):

If everything is successful, the contract will appear on the page of contracts in the wallet. We go into it:
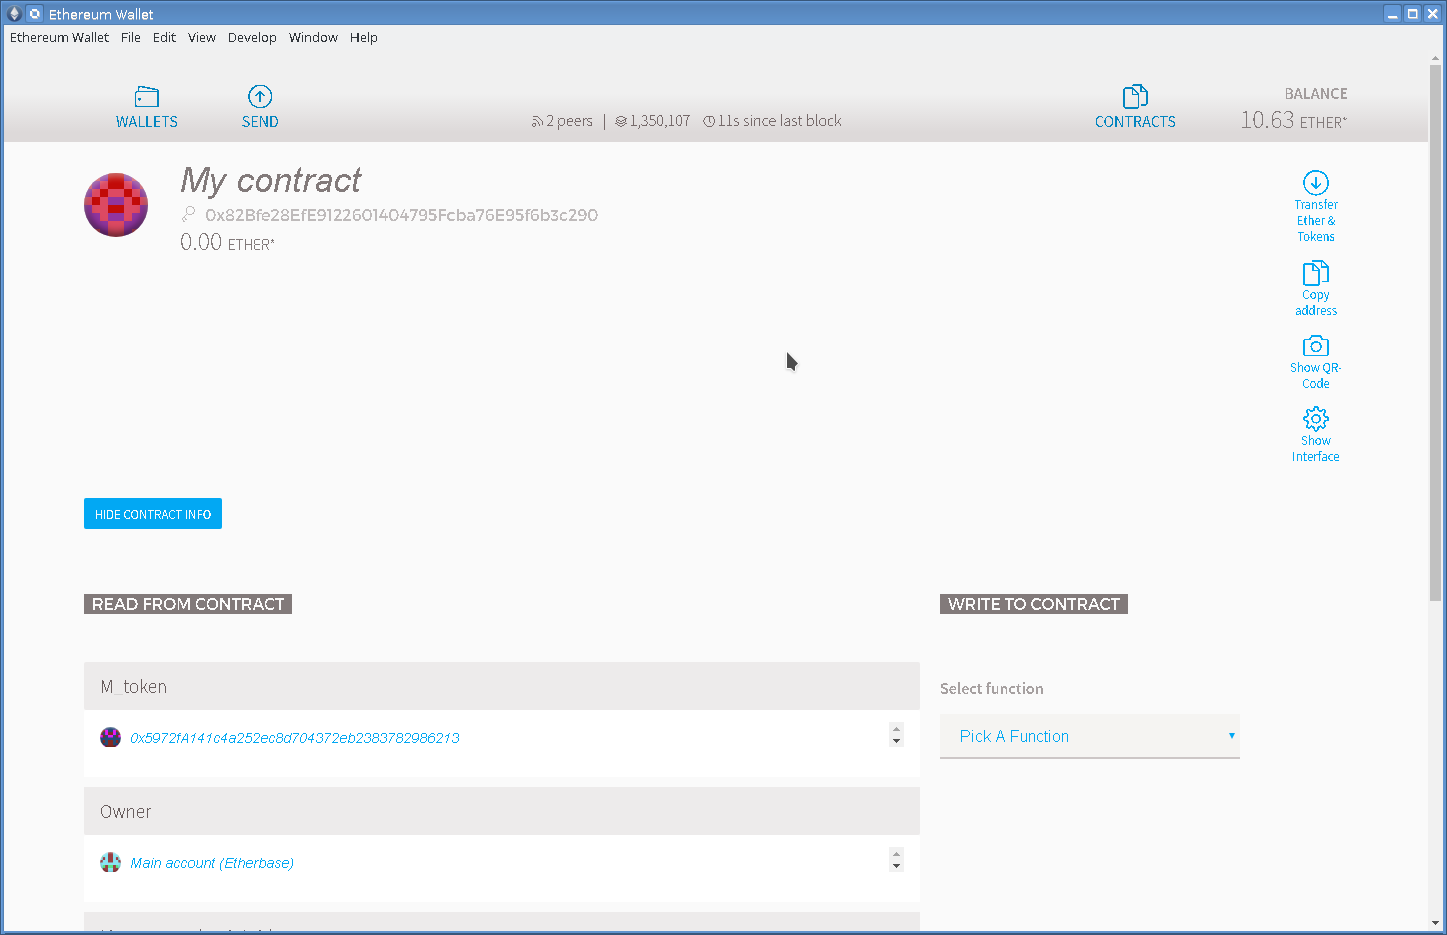
On the left, you can see the contract status data, and on the right, select the function to send a transaction (Select function): press Pick A Function , select the desired function, a form appears where you need to fill in the call parameters:
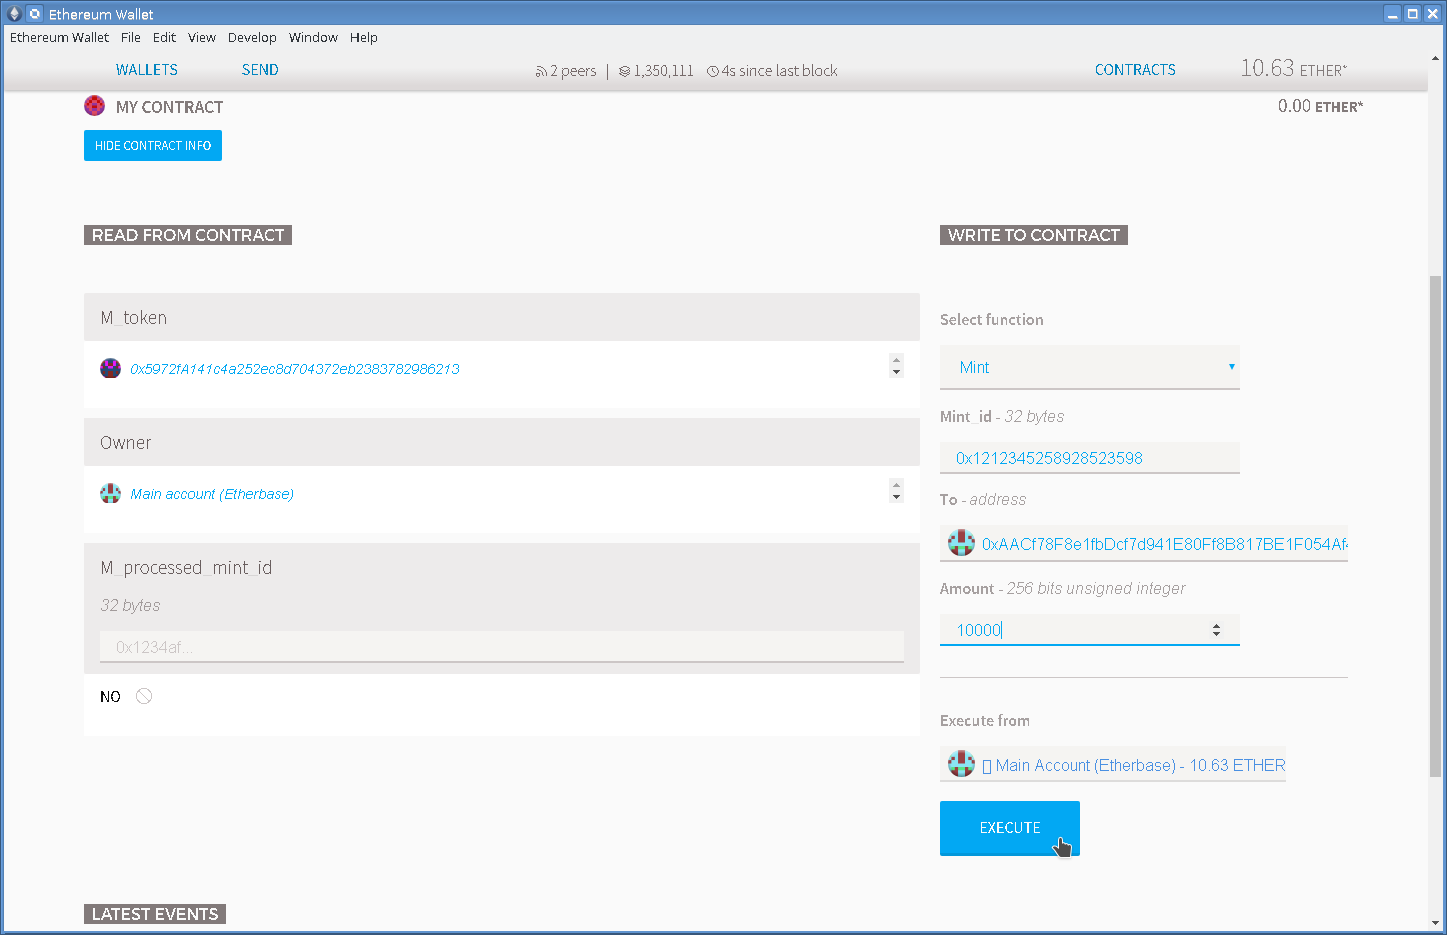
When the necessary parameters are filled, choose which account to execute the transaction (Execute from), press EXECUTE (you will need to enter the password from the account). After that, the transaction goes to the network and reaches the contract. We remind you that in order for MixBytes MultiSig to work, you will need to do the same procedure on two or more laptops (depending on the minimum required number of signatures). It is not necessary to send signatures over the required ones.
2.2. Slightly less secure
These are hardware wallets. They represent a physical device from which it is impossible to extract (and therefore steal) a private key. And to confirm the transaction, you must click on the physical button on the device. Thus, if a hacker gets remote access to your computer, to which a hardware wallet will be connected at this time, the attacker will still not be able to physically press a button and transfer money to himself.

Consider the example of Ledger Nano S. When you first connect the device to the computer, you need to initialize the device, this includes:
- Set an 8-digit PIN. The code will be asked each time the device is connected to the computer, as well as when it is released from sleep mode.
- Write a phrase recovery (seed) of 24 words. This is a bottleneck, and we’ll dwell here. If someone gets access to the phrase - you can say goodbye to the assets. Therefore, it is necessary to take care of its storage in a safe place. Write down on a piece of paper and hide. Plus, we recommend storing it in two different places - in fact, make a backup in case of loss. There are many ways to safely store the phrase and in digital form - storage in parts, steganography, etc. Limited only by your imagination.
You can store different currencies in this hardware wallet, their number is already approaching twenty and constantly updated. To access individual wallets, Chrome applications are used, thus the problem of access on different operating systems has been solved.
2.3. Ordinary
There are many sub-options here. Consider two.
2.3.1. Ethereum wallet
How to work with separate accounts is described in the first decision (“Fairly safe”, not reaching the section “Collecting Signatures as a Whole”) - this is a separate clean laptop and Ethereum Wallet on it.
2.3.2. MEW
Probably the most popular wallet for Ethereum at the moment, because it's simple. We go to the site https://myetherwallet.com/ , select the file with the key, enter the password and can already carry out transactions. Without raising the node, downloading the blockchain, and so on. The keys themselves do not go to the site, after downloading in the browser the application works autonomously.
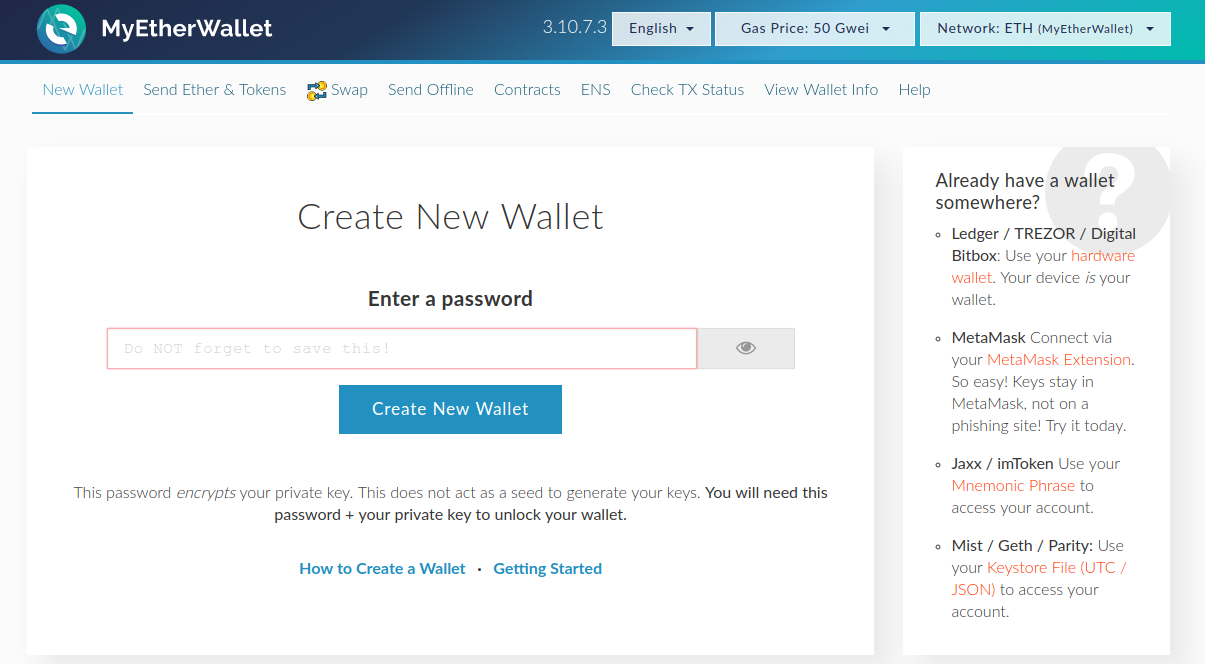
But there is a risk that the site is replaced. We can insure against this: just download the site to your computer and open it locally, the source code is available on GitHub . Download the archive with the latest version (at the time of this writing it was an etherwallet-v3.21.15.zip archive ), unzip it and simply open index.html . We get the same MEW, but locally.
It must be remembered: despite the fact that MEW does not store your secret keys, hacking your computer or browser will allow you to find out the secret keys at the moment you enter them.