Organize navigation in iOS applications using the Root Controller
- Transfer

Most mobile applications contain more than a dozen screens, complex transitions, as well as parts of the application, divided by meaning and purpose. Consequently, there is a need to organize the correct navigation structure of the application, which will be flexible, convenient, extensible, provide comfortable access to various parts of the application, and will also take care of the system resources.
In this article, we will design the in-app navigation so as to avoid the most frequent errors that lead to memory leaks, spoil the architecture, and break down the navigation structure.
Most applications have at least two parts: authentication (pre-login) and closed part (post-login). Some applications may have a more complex structure, multiple profiles with one login, conditional transitions after the launch of the application (deeplinks), etc.
To navigate the application in practice, two approaches are mainly used:
- One navigation stack for both view controllers (present) and navigation controllers (push), without the ability to go back. This approach leads to the fact that all previous ViewControllers remain in memory.
- The window.rootViewController switch is used. With this approach, all previous ViewControllers are destroyed in memory, but this does not look the best from the point of view of the UI. It also does not allow moving back and forth if necessary.
And now let's see how you can make an easily supported structure that allows you to easily switch between different parts of the application, without spaghetti code and with easy navigation.
Let's imagine that we are writing an application consisting of:
- The primary screen ( Splash screen ): this is the first screen that you see, as soon as the application is started, there can be added, such as animation or make any primary, the API requests.
- Authentication screens ( Authentification part ): the login screens, registration, password reset confirmation email, etc. The user's work session is usually saved, so there is no need to enter a login every time you start the application.
- The main application ( the Main part ): the business logic of the main application
All these parts of the application are isolated from each other and each exists in its navigation stack. Thus, we may need the following transitions:
- Splash screen -> Authentication screen , in case the current session of the active user is absent.
- Splash screen -> Main screen, in case the user has already entered the application before and there is an active session.
- Main screen -> Authentication screen , in case the user has logged out
Basic setting
When the application starts, we need to initialize the RootViewController , which will be loaded first. This can be done both by code and through Interface Builder. Create a new project in xCode and everything will be done by default: the main.storyboard is already attached to the window.rootViewController .
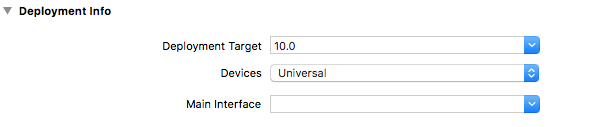
But in order to focus on the main topic of the article, we will not use storyboards in our project. Therefore, delete main.storyboard , and also clear the “Main Interface” field in the Targets -> General -> Deployment info:
Now let's change the didFinishLaunchingWithOptions method in AppDelegate so that it looks like this:
funcapplication(_ application: UIApplication, didFinishLaunchingWithOptions launchOptions: [UIApplicationLaunchOptionsKey: Any]?) -> Bool {
   window = UIWindow(frame: UIScreen.main.bounds)
   window?.rootViewController = RootViewController()
   window?.makeKeyAndVisible()
   returntrue
}
Now the application will launch RootViewController first . Rename the base ViewController to RootViewController :
classRootViewController: UIViewController {
}
This will be the main controller responsible for all transitions between different sections of the application. Therefore, we will need a link to it every time we want to make the transition. To do this, add an extension to AppDelegate :
extensionAppDelegate{
   staticvar shared: AppDelegate {
      returnUIApplication.shared.delegate as! AppDelegate
   }
var rootViewController: RootViewController {
      return window!.rootViewController as! RootViewController
   }
}
Forcibly extracting an option in this case is justified, because the RootViewController does not change, and if this happens by chance, then the application crash is a normal situation.
So, now we have a link to RootViewController from anywhere in the application:
let rootViewController = AppDelegate.shared.rootViewControllerNow let's create some more controllers we need: SplashViewController, LoginViewController, and MainViewController .
Splash Screen is the first screen that the user sees after launching the application. At this time, all the necessary API requests are usually made, the user's session activity is checked, etc. To display the ongoing background actions use the UIActivityIndicatorView :
classSplashViewController: UIViewController{
   privatelet activityIndicator = UIActivityIndicatorView(activityIndicatorStyle: .whiteLarge)
   overridefuncviewDidLoad() {
      super.viewDidLoad()
      view.backgroundColor = UIColor.white
      view.addSubview(activityIndicator)
      activityIndicator.frame = view.bounds
      activityIndicator.backgroundColor = UIColor(white: 0, alpha: 0.4)
      makeServiceCall()
   }
   privatefuncmakeServiceCall() {
   }
}
To simulate API requests, add the DispatchQueue.main.asyncAfter method with a delay of 3 seconds:
privatefuncmakeServiceCall() {
   activityIndicator.startAnimating()
   DispatchQueue.main.asyncAfter(deadline: DispatchTime.now() + .seconds(3)) {
      self.activityIndicator.stopAnimating()
   }
}
We believe that these requests also set the user's session. In our application, we use UserDefaults for this :
privatefuncmakeServiceCall() {
   activityIndicator.startAnimating()
   DispatchQueue.main.asyncAfter(deadline: DispatchTime.now() + .seconds(3)) {
      self.activityIndicator.stopAnimating()
      ifUserDefaults.standard.bool(forKey: “LOGGED_IN”) {
         // navigate to protected page
      } else {
         // navigate to login screen
      }
   }
}
You will definitely not use UserDefaults to save the session state of the user in the release version of the program. We use local settings in our project to simplify understanding and not to go beyond the main topic of the article.
Create LoginViewController . It will be used to authenticate the user if the current session of the user is inactive. You can add your custom UI to the controller, but I will add here only the screen title and login button in the Navigation Bar.
classLoginViewController: UIViewController{
   overridefuncviewDidLoad() {
      super.viewDidLoad()
      view.backgroundColor = UIColor.white
      title = "Login Screen"let loginButton = UIBarButtonItem(title: "Log In", style: .plain, target: self, action: #selector(login))
      navigationItem.setLeftBarButton(loginButton, animated: true)
   }
@objcprivatefunclogin() {
      // store the user session (example only, not for the production)UserDefaults.standard.set(true, forKey: "LOGGED_IN")
      // navigate to the Main Screen
   }
}
And finally, let's create the main controller of the MainViewController application :
classMainViewController: UIViewController{
   overridefuncviewDidLoad() {
      super.viewDidLoad()
      view.backgroundColor = UIColor.lightGray // to visually distinguish the protected part
      title = “MainScreen”
      let logoutButton = UIBarButtonItem(title: “LogOut”, style: .plain, target: self, action: #selector(logout))
      navigationItem.setLeftBarButton(logoutButton, animated: true)
   }
   @objcprivatefunclogout() {
      // clear the user session (example only, not for the production)UserDefaults.standard.set(false, forKey: “LOGGED_IN”)
      // navigate to the Main Screen
   }
}
Root Navigation
Now back to the RootViewController .
As we said earlier, the RootViewController is the only object that is responsible for transitions between different independent controller stacks. In order to be aware of the current state of the application, we will create a variable in which we will store the current ViewController :
classRootViewController: UIViewController {privatevar current: UIViewController
}
Add a class initializer and create the first ViewController that we want to load when the application starts. In our case, it will be SplashViewController :
classRootViewController: UIViewController{
   privatevar current: UIViewControllerinit() {
      self.current = SplashViewController()
      super.init(nibName: nil, bundle: nil)
   }
}
In viewDidLoad, add the current viewController to the RootViewController :
classRootViewController: UIViewController{
   ...
   overridefuncviewDidLoad() {
      super.viewDidLoad()
      addChildViewController(current)               // 1
      current.view.frame = view.bounds              // 2
      view.addSubview(current.view)                 // 3
      current.didMove(toParentViewController: self) // 4
   }
}
Once we add childViewController (1), we set its size, assigning current.view.frame value view.bounds (2).
If we skip this line, viewController will still be placed correctly in most cases, but problems may arise if the frame size changes.
Add a new subview (3) and call the didMove method (toParentViewController :). This completes the add controller operation. Once loaded RootViewController , immediately thereafter displayed SplashViewController .
Now you can add several methods for navigation in the application. We will displayLoginViewController without any animation, the MainViewController will use a smooth dimming animation, and switching screens when a user is logged out will have a slide effect.
classRootViewController: UIViewController {
   ...
func showLoginScreen() {
      letnew = UINavigationController(rootViewController: LoginViewController())                               // 1
      addChildViewController(new)                    // 2new.view.frame = view.bounds                   // 3
      view.addSubview(new.view)                      // 4new.didMove(toParentViewController: self)      // 5
      current.willMove(toParentViewController: nil)  // 6
      current.view.removeFromSuperview()]            // 7
      current.removeFromParentViewController()       // 8
      current = new// 9
}
Create LoginViewController (1), add it as a child controller (2), set the frame (3). Add a LoginController view as a subview (4) and call the didMove (5) method. Next, prepare the current controller for removal by the willMove (6) method. Finally, remove the current view from superview (7), and remove the current controller from the RootViewController (8). Do not forget to update the value of the current controller (9).
Now let's create the switchToMainScreen method :
funcswitchToMainScreen() {
   let mainViewController = MainViewController()
   let mainScreen = UINavigationController(rootViewController: mainViewController)
   ...
}
To animate the transition, you need another method:
privatefuncanimateFadeTransition(to new: UIViewController, completion: (() -> Void)? = nil) {
   current.willMove(toParentViewController: nil)
   addChildViewController(new)
   transition(from: current, to: new, duration: 0.3, options: [.transitionCrossDissolve, .curveEaseOut], animations: {
   }) { completed inself.current.removeFromParentViewController()
        new.didMove(toParentViewController: self)
        self.current = new
        completion?()  //1
   }
}
This method is very similar to showLoginScreen , but all the last steps are done after the animation is complete. In order to notify the caller of the end of the transition, we at the very end call a closure (1).
Now the final version of the switchToMainScreen method will look like this:
funcswitchToMainScreen() {
   let mainViewController = MainViewController()
   let mainScreen = UINavigationController(rootViewController: mainViewController)
   animateFadeTransition(to: mainScreen)
}
And finally, let's create the last method that will be responsible for the transition from MainViewController to LoginViewController :
funcswitchToLogout() {
   let loginViewController = LoginViewController()
   let logoutScreen = UINavigationController(rootViewController: loginViewController)
   animateDismissTransition(to: logoutScreen)
}
The AnimateDismissTransition method provides a slide animation:
privatefuncanimateDismissTransition(to new: UIViewController, completion: (() -> Void)? = nil) {
   new.view.frame = CGRect(x: -view.bounds.width, y: 0, width: view.bounds.width, height: view.bounds.height)
   current.willMove(toParentViewController: nil)
   addChildViewController(new)
   transition(from: current, to: new, duration: 0.3, options: [], animations: {
      new.view.frame = self.view.bounds
   }) { completed inself.current.removeFromParentViewController()
      new.didMove(toParentViewController: self)
      self.current = new
      completion?()
   }
}
These are just two examples of animation, using the same approach you can create any complex animations you need.
To complete the customization, add the method calls with animation from SplashViewController, LoginViewController, and MainViewController :
classSplashViewController: UIViewController{
   ...
   privatefuncmakeServiceCall() {
      ifUserDefaults.standard.bool(forKey: “LOGGED_IN”) {
         // navigate to protected pageAppDelegate.shared.rootViewController.switchToMainScreen()
      } else {
         // navigate to login screenAppDelegate.shared.rootViewController.switchToLogout()
      }
   }
}
classLoginViewController: UIViewController{
   ...
   @objcprivatefunclogin() {
      ...
      AppDelegate.shared.rootViewController.switchToMainScreen()
   }
}
classMainViewController: UIViewController{
   ...
   @objcprivatefunclogout() {
      ...
      AppDelegate.shared.rootViewController.switchToLogout()
   }
}
Compile, run the application and check his work in two ways:
- when a user already has an active current session (logged in)
- when an active session, no authentication is required
and in that and in other case, you should see a move to the right screen, right after downloading SplashScreen .
As a result, we created a small test model of the application, with navigation through its main modules. In case you need to expand the capabilities of the application, add additional modules and transitions between them, you can always quickly and conveniently expand and scale this navigation system.