Continuous integration in TFS 11
- Tutorial

Good afternoon, colleagues.
Long holidays end, and tomorrow, we will again plunge into the abyss of daily routine. Today, at the junction of the holidays that have not yet ended and the work week that has not yet begun, I would like to talk a little about continuous integration .
Starting to implement Agile practices in development, many, having read: “Personalities and their interactions are more important than processes and tools”, are delighted. After all, you can assemble a team, rally them, set tasks, and here it is: “the star of captivating happiness” (working and useful for software users). But, unfortunately, in life everything is much more boring and unpredictable. Starting to implement the new-fangled Scrum or Kanban, they often forget that all the advantages of these techniques appear only if they fall on the correct engineering practices. These practices include unit testing in general, and TDD in particular; pair programming; Code Review; continuous integration and more.
Under the cut, I’ll try to show how to configure continuous integration within TFS 11 and in which scenarios, which way of building projects will be most justified (a lot of pictures and text).
So, preceding the main content, a couple of words about what is needed to repeat everything described below in the article:
1. Installed TFS 11
2. Visual Studio 11 or 2010.
You can download TFS 11 and VS 11 from the Microsoft website .
If you do not have TFS 11, but there is TFS 2010, then with differences in the user interface, but you can configure everything described in the article in it as well.
Setting up Team Foundation Build Service
If the Build Service is already configured for you, then go directly to the second part of the article .
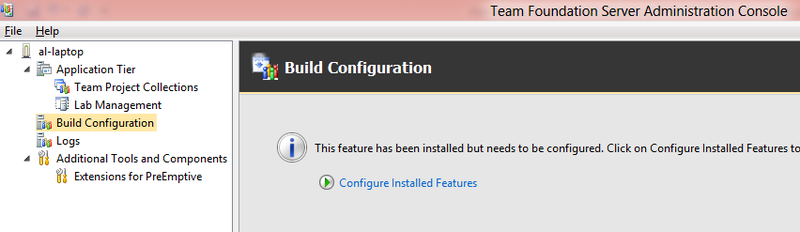
Launching the TFS administration console and selecting Build Configuration, you will see this prompt:
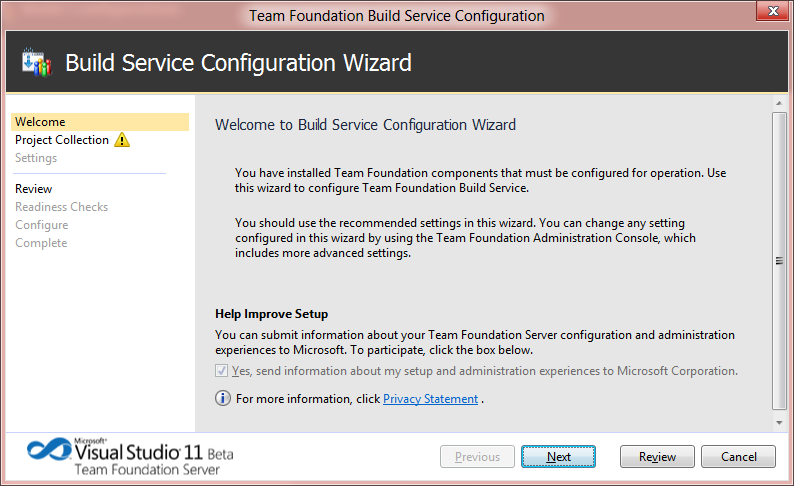
Configure! The wizard is quite simple, skip its first screen immediately Next:
In the second step, you need to specify which collection of projects and which TFS server the custom Build Service will work on. By default, the first collection of the current TFS server is selected:

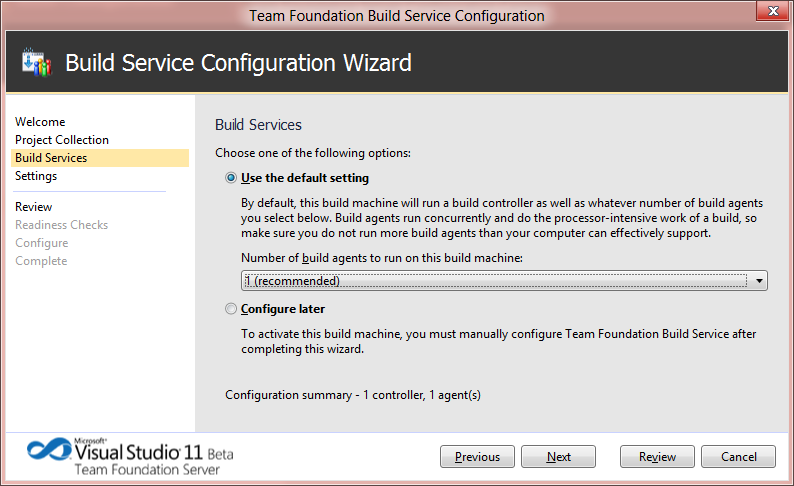
In the third step, you have to decide how many agents will service the construction within this server. If you select 1, then all assembly requests will be queued, and after compiling one project, the next request from the queue will begin to compile. The main plus of this approach is reducing the load on the server, minus - if the projects are compiled for a long time, and the queue is large, then you have to wait. With an increase in the number of Build Agents, the queue will be serviced faster, the main thing is that with their huge number the server does not spend more time switching between agents than compiling:
On the last screen, we will be asked to indicate with which credentials you need to run the Build Service. If you plan to only compile projects without deployment to a test and / or production environment, you can leave the default value as well. Otherwise, the choice of account for the Build Service must take into account what rights the account must have to perform these tasks.
Actually, the setup ends here. There are two more screens ahead, with what we selected and checking whether it is possible to configure what is selected. Clicking Configure on Readiness Check and waiting for the configuration to finish, we will see:
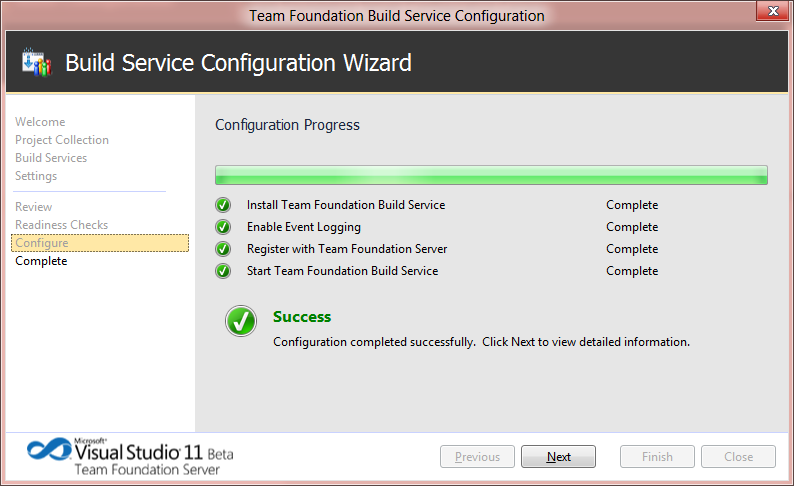
If you successively reached this place, then the Build Configuration in the TFS administration console will look something like this:
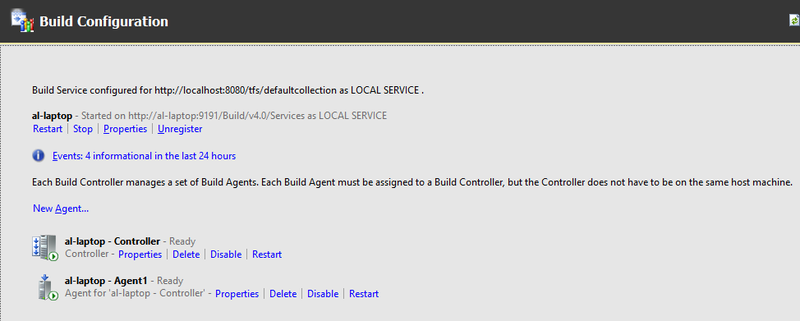
This is where you can end work with the Team Foundation Server administration console and switch to Visual Studio.
Demonstration Environment
For clarity, let's take a simple WPF application, which should be located in Source Control. We also add a project with unit tests that will test the functionality from the first project.
The folder structure in TFS for this article looks like this for me:
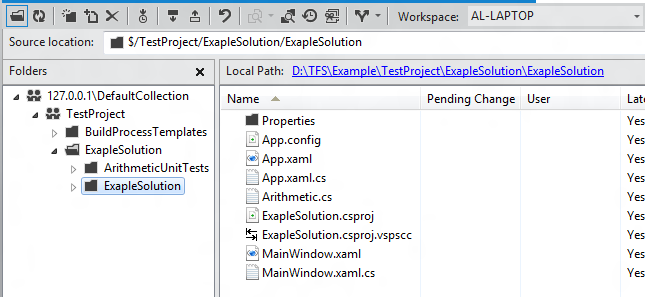
Yes, until I forgot, the network folder should act as the folder where the built-in solutions will be added. In which, the account under which the Build Service is running must have access.
1. Manual request to build a solution
Immediately make a reservation, manual launch and continuous integration, these are concepts from different fairy tales. Continuous integration involves the automatic, regular construction of projects, without human intervention. But, because manual build requests are the simplest, and the setup for all other startup cases will be very reminiscent of manual requests, then let's start with it.
Scenario:
You have a Branch in which you are developing. And there is a branch in which you store the version of the project that is deployed in the operational environment. From time to time, there are bugs in the working version. You download the appropriate project, fix the error, check it on the local developer's computer, put it in Source Control. Testers and / or deployment specialists need to build this solution. To do this, they will perform a manual request.
Settings:
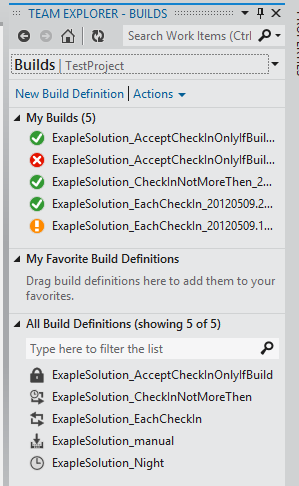
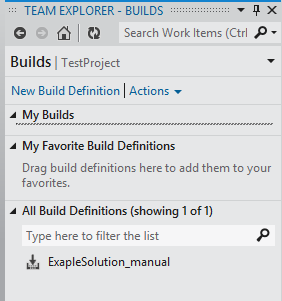
On the Team Explorer home page, select Builds and in the New Build Definition tab that opens:
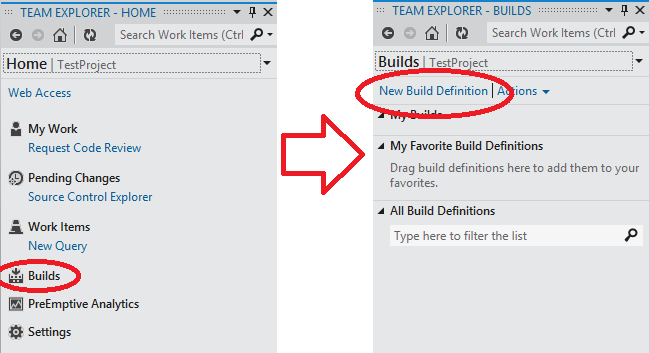
At the first step of the wizard for creating a new Build Definition, we need to specify the name by which we will further identify this build request. For this example, I added the suffix “_manual” to the default name: The
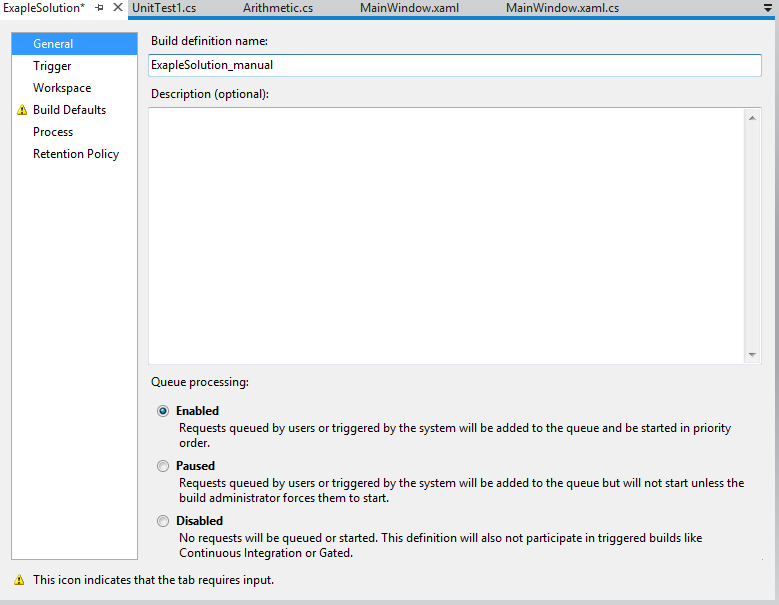
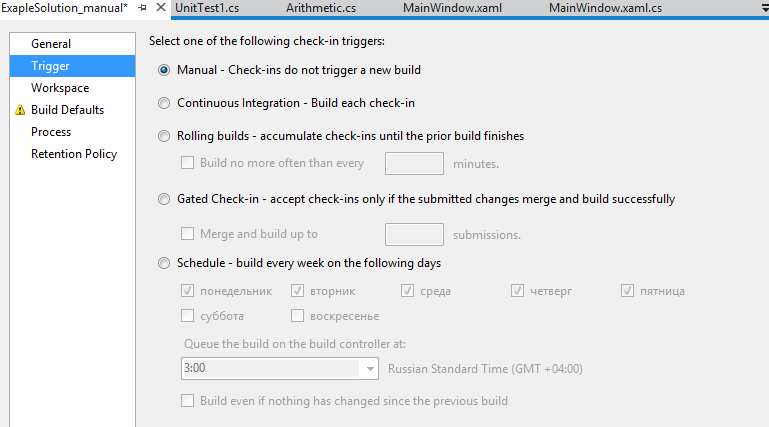
second step allows you to configure when the Build Agent should be active and start building. The default value of Manual is quite fine with us:
The third step allows you to specify the location of the solution folder in Source Control and the location of the Build Agent on the server. In most cases, these values can be left by default.
The fourth step allows you to specify with which controller we will build, as well as the folder in which you want to place the output project (Staging location). Moreover, the first placement option (do not copy files to the output folder) is justified if you just want to build a project, run all Unit Tests on it, and you do not need the resulting exe and dll. The third option (putting the result of the build in Source Control) may be convenient for developers, in order not to lose the stable Build. But basically, of course, the second option is applied, when the construction results will be copied to the network folder. Moreover, for each Build Definition launch, a subfolder is created, and all builds, by default, are saved according to the scheme: <project name> _ <build date>. <Build number for the build date>.

In the penultimate step, we set the general build settings. Please note that by default, open sln is immediately selected and unit tests are worth running:
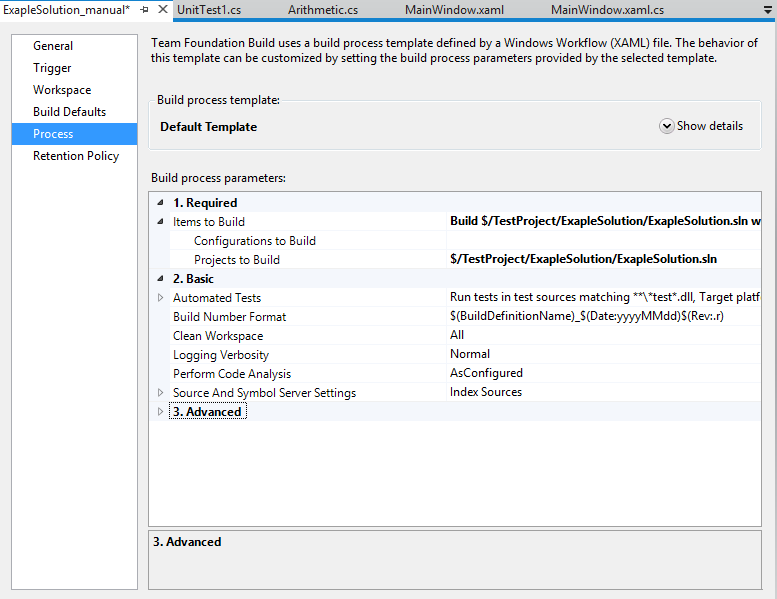
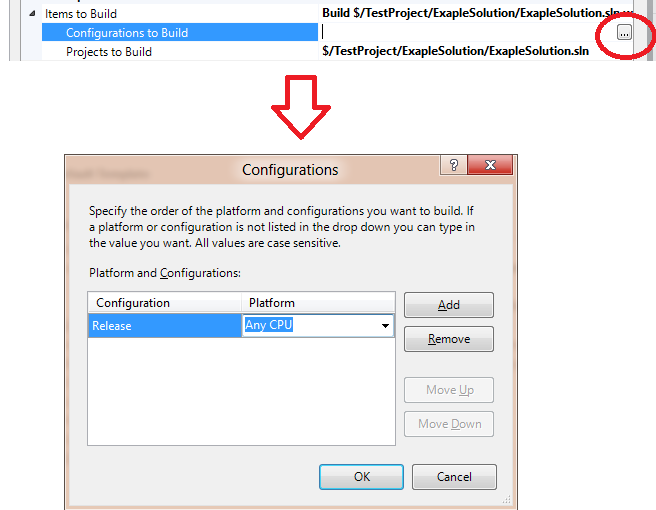
But, of course, the build mode can be changed. For example, configuration changes in which to compile the project:
Save the Build Definition using the "Save" button from the toolbar. A new Build Definition has appeared in Team Explorer:
To start it, just open the context menu on it and select "Queue New Build ...". In the window that opens, click "Queue". And we see that we are building, and at the end, the icon tells us about the result of the construction:
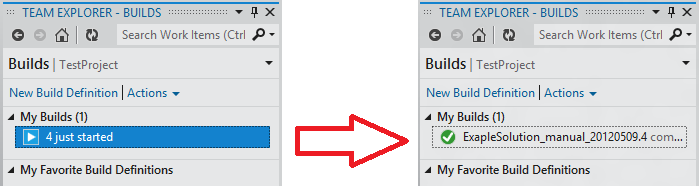
Double-clicking on the construction allows you to see detailed information, including the result of unit tests:

Everything, with a manual start and basic queries, I finish. Let's quickly go through the rest of the scenarios.
2. Building a solution for each code placement in Source Control
Scenario:
Developers write code, unit tests. Putting all this in a code repository. We want to be sure that this is all going and all the tests pass.
Settings:
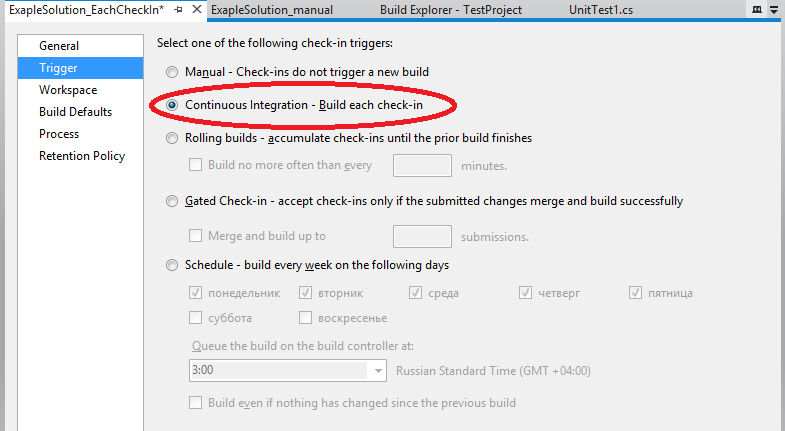
Setting up a new Build Definition will differ only in the first step (you need to give a different name) and in the 2nd step of the wizard. We indicate the second option as a trigger:
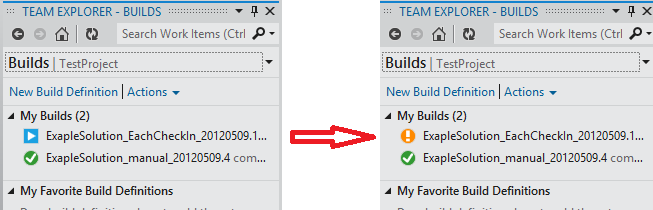
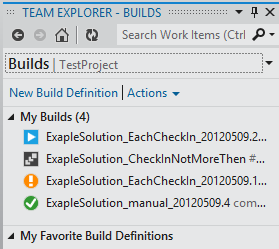
To start building, just make changes to the code of projects or unit tests and place the changes in Source Control. At the end of Check In, if we go to the Builds tab in the Team Explorer panel, we will immediately see that our build is running. By the way, I added a new test to the project that did not pass:
We can also open the details of this construction and analyze what went wrong.
With this construction scenario, there is a significant drawback. If there are a lot of developers, they work on TDD (frequent Check-ins), and it takes 5-10 minutes to complete the project and run the tests, then the build queue with 1 Build Agent will be very long and you will have to wait a long time to place the changes in Source Control build result.
3. Build by Check-In but not more often than ...
Scenario:
The scenario is the same as in option 2, but the TFS server does not cope with it, and the manual does not give money for a separate Build Server.
Setup:
Similar to manual, in the second step we select the third construction option: We
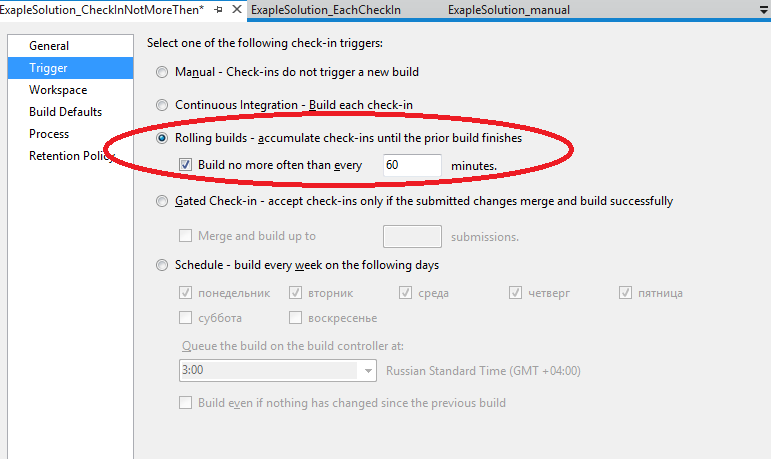
fix the project so that it passes the test added in the previous paragraph, Check-In. And we see that we immediately launched two builds. The one that needs to be run on each Check-In and the one that needs to be run on Ckeck-In, but no more than once per hour (pay attention to the icon indicating that the construction is in the queue):
True at the next Check- In, if it happens sooner than after 60 minutes, our new build will not start.
Using these two types of builds, we can, for example, build a project for each Check-In without running tests, and at least once an hour build with running tests.
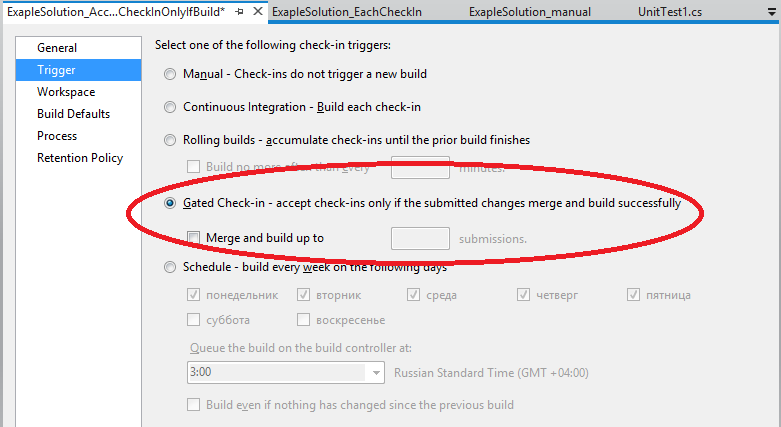
4. You cannot put code in Source Control if it does not compile
Scenario:
You have a new developer in your team who forgets to check before putting the code in Source Control, but does it even compile?
Setting:
Create a new Build Definition, give it a name, and select option 4 of the trigger to start building:
We make changes to the code (by itself, so that it stops compiling) and when you try Check In, this is the notification:
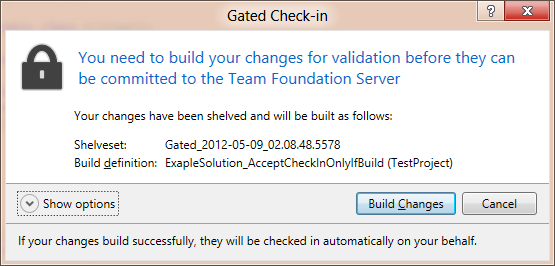
And after starting compilation, in Team Explorer we will be unambiguously reminded that we need to wait until the construction is completed, and at the end of the compilation a notification pops up:

It’s convenient, damn it!
5. Daily builds
Scenario:
How do you still have no daily builds? Then urgently read the 3rd paragraph of the Joel Spolsky test (http://russian.joelonsoftware.com/Articles/TheJoelTest.html).
Setup:
Well, you probably already know, create a new Build Definition, change the name and in the second step set what days and what time to compile:
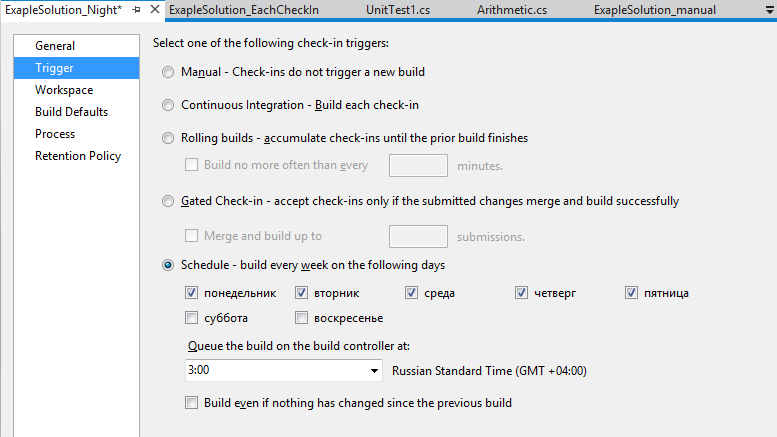
Everything, every night, the evil Build Agent will come and compile, compile, compile.
Instead of a conclusion
Do you still live in a world without continuous integration? If yes, then in vain!
As you can see, the setup does not take so much time, but the result from the fact that your project is regularly compiled, undergoes unit tests, etc., you will feel almost immediately.
And lastly, I like the new version of VS design. Everything is very convenient and clear: