Clean swift architecture as an alternative to VIPER
Introduction
At the moment there are many articles about VIPER - clean architecture, various variations of which at one time became popular for iOS projects. If you are not familiar with the Viper, you can read here , here or here .
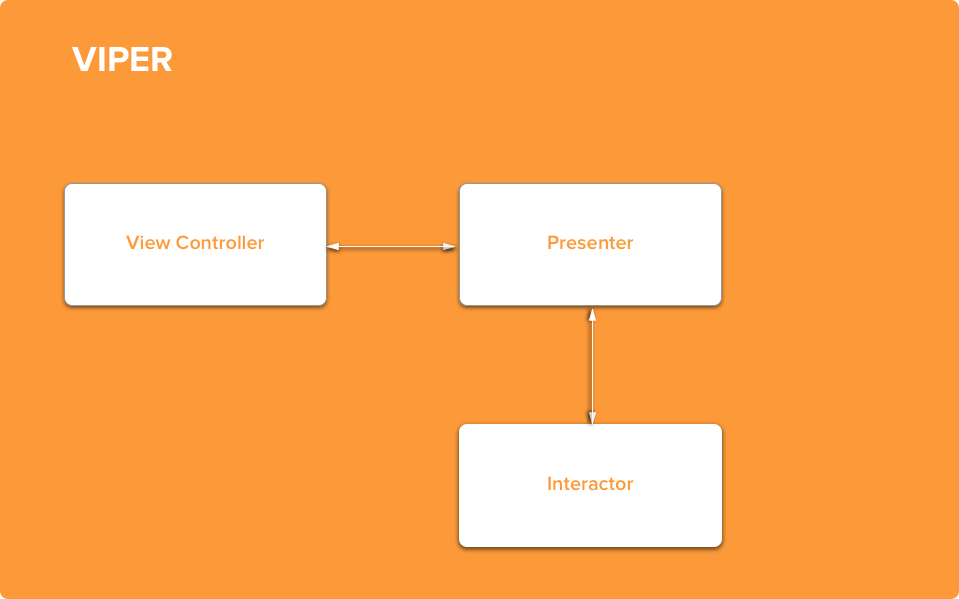
I would like to talk about the VIPER alternative - Clean Swift. At first glance, Сlean Swift is similar to VIPER, but the differences become visible after studying the principle of interaction between modules. In VIPER, the basis of the interaction is Presenter, it sends user requests to Interactor for processing and formats the data received from it back for display on the View Controller:
In Clean Swift, the main modules as well as in VIPER are View Controller, Interactor, Presenter.

The interaction between them occurs cyclically. Data transfer is based on protocols (again, similar to VIPER), which allows you to change one of the components of the system in the future simply to replace it with another. The process of interaction in a general form looks like this: the user clicks a button, the View Controller creates an object with a description and sends it to Interactor. Interactor, in turn, implements a specific scenario in accordance with business logic, creates a result object and passes it to the Presenter. Presenter forms an object with data formatted for display to the user and sends it to the View Controller. Let's take a closer look at each Clean Swift module in more detail.
View (View Controller)
View Controller, as in VIPER, performs all VIew configurations, whether color, UILabel or Layout font settings. Therefore, each UIViewController in this architecture implements an Input protocol for displaying data or reacting to user actions.
Interactor
Interactor contains all business logic. It accepts user actions from the controller, with parameters (for example, modified text of the input field, pressing a particular button) defined in the Input protocol. After working out the logic, the Interactor, if necessary, must transfer data for their preparation to the Presenter before displaying it in the ViewController. However, Interactor only accepts requests from View, as opposed to VIPER, where these requests go through Presenter.
Presenter
Presenter processes the data for display to the user. The result in this case is the InputController'a Input protocol, for example, you can change the text format, convert the color value from enum to rgb, etc.
Worker
In order not to overly complicate Interactor and not duplicate the details of business logic, you can use the additional element Worker. In simple modules, it is not always needed, but when loaded enough, it allows you to remove some tasks from the Interactor. For example, in a worker, the logic of interaction with a database can be made, especially if the same database queries can be used in different modules.
Router
Router is responsible for transferring data to other modules and transitions between them. He has a link to the controller, because in iOS, unfortunately, controllers, among other things, are historically responsible for transitions. When using segue, you can simplify the initialization of transitions by calling the Router methods from Prepare for segue, because Router knows how to transfer data, and does it without an extra loop code from Interactor / Presenter. Data is transferred using the data warehouse protocols of each module, implemented in Interactor. These protocols also limit the ability to access internal module data from the Router.
Models
Models is a description of the data structures for transferring data between modules. Each implementation of the business logic function has its own model description.
- Request - to send a request from the controller to the interactor.
- Response - Interactor's response for passing to the data presenter.
- ViewModel - to transfer data in a ready-to-display form.
Implementation example
Let's take a closer look at this architecture using a simple example . They will serve the application ContactsBook in a simplified, but quite sufficient for an understanding of the essence of the architecture of the form. The application includes a list of contacts, as well as adding and editing contacts.
Sample protocol input:
protocolContactListDisplayLogic: class{
    funcdisplayContacts(viewModel: ContactList.ShowContacts.ViewModel)
}
Each controller contains a link to an object that implements the input Interactor protocol.
var interactor: ContactListBusinessLogic?as well as to the Router object, which must implement the logic of data transmission and switching modules:
var router: (NSObjectProtocol & ContactListRoutingLogic & ContactListDataPassing)?You can implement module configuration in a separate private method:
privatefuncsetup() {
        let viewController = selflet interactor = ContactListInteractor()
        let presenter = ContactListPresenter()
        let router = ContactListRouter()
        viewController.interactor = interactor
        viewController.router = router
        interactor.presenter = presenter
        presenter.viewController = viewController
        router.viewController = viewController
        router.dataStore = interactor
    }
or create a Singleton Configurator to remove this code from the controller (for those who believe that the controller should not participate in the configuration) and not tempt themselves to access parts of the module in the controller. There is no configurator class in Uncle Bob’s view and in the classic VIPER. Using the configurator for the add contact module looks like this:
overridefuncawakeFromNib() {
        super.awakeFromNib()
        AddContactConfigurator.sharedInstance.configure(self)
    }
The configurator code contains the only configuration method that is absolutely identical to the setup method in the controller:
finalclassAddContactConfigurator{
    staticlet sharedInstance = AddContactConfigurator()
    privateinit() {}
    funcconfigure(_ control: AddContactViewController) {
        let viewController = control
        let interactor = AddContactInteractor()
        let presenter = AddContactPresenter()
        let router = AddContactRouter()
        viewController.interactor = interactor
        viewController.router = router
        interactor.presenter = presenter
        presenter.viewController = viewController
        router.viewController = viewController
        router.dataStore = interactor
    }
}
Another very important point in the implementation of the controller is the code in the standard prepare for segue method:
overridefuncprepare(for segue: UIStoryboardSegue, sender: Any?) {
        iflet scene = segue.identifier {
            let selector = NSSelectorFromString("routeTo\(scene)WithSegue:")
            iflet router = router, router.responds(to: selector) {
                router.perform(selector, with: segue)
            }
        }
    }
The attentive reader most likely noticed that Router is also required to implement the NSObjectProtocol. This is done so that we can use the standard methods of this protocol for routing using segues. To support such a simple redirect, the segue identifier naming must match the terminations of the Router method names. For example, to go to viewing a contact there is a segue, which is tied to the choice of a cell with a contact. His identifier is “ViewContact”, here is the corresponding method in Router:
funcrouteToViewContact(segue: UIStoryboardSegue?)A request to display data to Interactor also looks very simple:
private func fetchContacts() {
        letrequest = ContactList.ShowContacts.Request()
        interactor?.showContacts(request: request)
    }
Let's go to the Interactor. Interactor implements the ContactListDataStore protocol, which is responsible for storing / accessing data. In our case, this is just an array of contacts, limited only by the getter method, to show the router that it should not be changed from other modules. The protocol that implements the business logic for our list is as follows:
func showContacts(request: ContactList.ShowContacts.Request) {
        let contacts = worker.getContacts()
        self.contacts = contacts
        letresponse = ContactList.ShowContacts.Response(contacts: contacts)
        presenter?.presentContacts(response: response)
    }
It receives contact data from ContactListWorker. The way in which the data is loaded is in this case the Worker is responsible. He can turn to third-party services that decide, for example, to take data from the cache or download from the network. After receiving the data, Interactor sends a response (Response) to the Presenter to prepare for the display, for this Interactor contains a link to the Presenter:
var presenter: ContactListPresentationLogic?Presenter implements only one protocol - ContactListPresentationLogic, in our case, it simply forcibly changes the register of the contact's first and last names, forms the DisplayedContact view model from the data model and sends it to the Controller for display:
funcpresentContacts(response: ContactList.ShowContacts.Response) {
        let mapped = response.contacts.map {
            ContactList
                .ShowContacts
                .ViewModel
                .DisplayedContact(firstName: $0.firstName.uppercaseFirst,
                                  lastName: $0.lastName.uppercaseFirst)
        }
        let viewModel = ContactList.ShowContacts.ViewModel(displayedContacts: mapped)
        viewController?.displayContacts(viewModel: viewModel)
    }
Then the cycle ends and the controller displays the data, implementing the ContactListDisplayLogic protocol method:
funcdisplayContacts(viewModel: ContactList.ShowContacts.ViewModel) {
        displayedContacts = viewModel.displayedContacts
        tableView.reloadData()
    }
Here are the models for displaying contacts:
enumShowContacts{
        structRequest{
        }
        structResponse{
            var contacts: [Contact]
        }
        structViewModel{
            structDisplayedContact{
                let firstName: Stringlet lastName: Stringvar fullName: String {
                    return firstName + " " + lastName
                }
            }
            var displayedContacts: [DisplayedContact]
        }
    }
In this case, the request does not contain data, since it is just a general list of contacts, however, if, for example, the list screen contained a filter, the filter type could be included in this request. The Intrecator response model contains the necessary contact list, while the ViewModel contains an array of ready-to-display data — DisplayedContact.
Why Clean Swift
Consider the pros and cons of this architecture. First, Clean Swift has code templates that simplify the creation of a module. These templates can be written for a variety of architectures, but when they are out of the box, at least it saves several hours of your time.
Secondly, this architecture, as well as VIPER, is well tested, sample tests are available in the project. Since the module with which interaction takes place is easy to replace with a cap, the definition of the functionality of each module using protocols allows this to occur without a headache. If we simultaneously create business logic and corresponding tests (Interactor, Interactor tests), this fits well with the principle of TDD. Due to the fact that the output and input of each logic case is determined by the protocol, it is sufficient to simply write a test that determines its behavior and then implement the logic of the method itself.
Thirdly, Clean Swift (unlike VIPER) implements a unidirectional data processing and decision-making flow. Only one loop is always executed - View - Interactor - Presenter - View, which, among other things, simplifies refactoring, as less entities have to be changed most often. Due to this, projects with logic that often changes or is supplemented more easily refactor using the methodology of Clean Swift. Using Clean Swift you separate entities in two ways:
- Isolate components by declaring the Input and Output protocols.
- Isolate features using structures and encapsulating data into separate requests / responses / UI models. Each feature has its own logic and is controlled within the framework of one process, without intersecting in one module with other features.
Clean Swift should not be used in small projects without a long-term perspective, in projects - prototypes. For example, an application for scheduling a developer conference using this architecture is too costly. Long-term projects, projects with a large number of business logic, on the contrary, fit well within the framework of this architecture. It is very convenient to use Clean Swift when the project is implemented for two platforms - Mac OS and iOS, or you plan to port it further.