Quick installation and publishing on the server of the open electronic learning platform Moodle
With the advent of increasingly convenient development tools, working with web applications is becoming more simple and accessible to everyone. For example, today, using the WebMatrix development tool, you can upload, edit and publish to the server any of several dozens of popular web applications in a matter of minutes: Drupal, BlogEngine.NET, DotNetNuke, WordPress, Orchard, Joomla and others.

This article will explain how to use WebMatrix in the shortest possible time to automatically download, install and publish a project based on the popular Moodle open-source educational platform.
Surely you already heard about Moodle, and if not, then I suggest you familiarize yourself with this article on Habré.
WebMatrix is a free, easy-to-use tool for developing, deploying and maintaining web applications. The WebMatrix installation package takes only 8 megabytes and installs in a few seconds. WebMatrix is built to work with the latest Microsoft technologies: IIS Express 7.5 server, SQL Server Compact 4.0 compact database, and Web Deploy 2.0 project automatic deployment tool.
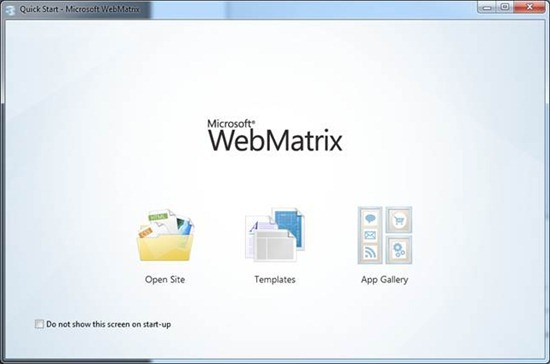
Fig. 1. Start window WebMatrix 2
WebMatrix offers the following features for web developers:
When working with specific projects, WebMatrix can be configured to offer developers quick links to relevant resources, for example, a special link to the administration panel of the current project. In Figure 2, you can see such links in the form of buttons on the WebMatrix control panel when working with a Moodle-based project. In this case, the environment is expanded specifically for a specific type of project offering access to the Moodle admin panel, modules and plugins. In addition, on the main page of the downloaded Moodle project in WebMatrix, you can find links to useful resources integrated into the editor: official website, news, support, forums, community, documentation and APIs and others.
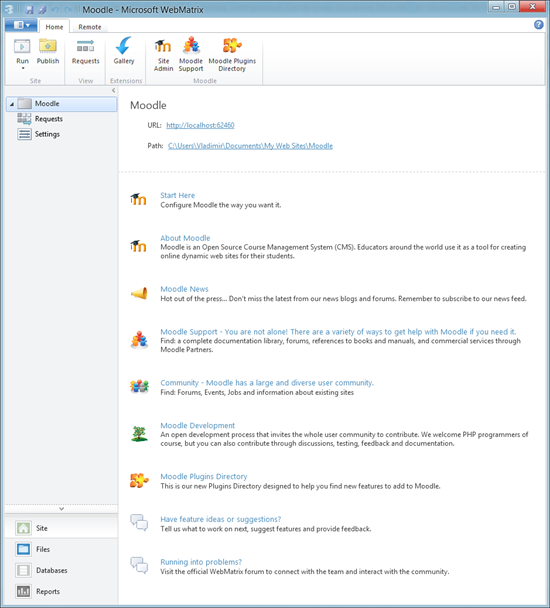
Fig. 2. Working with Moodle in WebMatrix
The ability to expand and adjust WebMatrix to a specific type of project allows this editor to become special for working with different systems, in this case, a special editor for LMS Moodle.

Fig. 3. Working with code in WebMatrix
An important feature of WebMatrix is the ability not only to create web applications, but also to accompany them throughout the life cycle. Thus, WebMatrix will be useful to you not only at the stage from design to development of a web application, but also later, when your application will work as a real project.
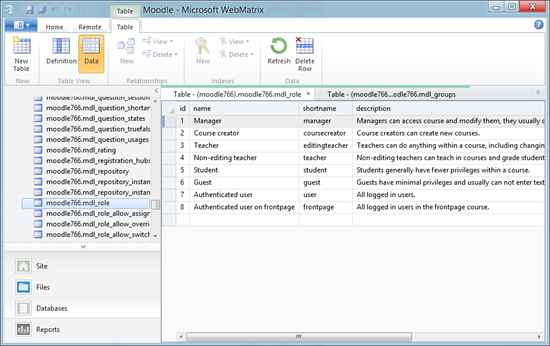
Fig. 4. Working with databases in WebMatrix
WebMatrix, as well as other important development tools designed for web developers, is available for automatic download through the automatic installation tool for the web platform Web Platform Installer. You can learn how to download and use the Web Platform Installer from this article on the MSDN blog .
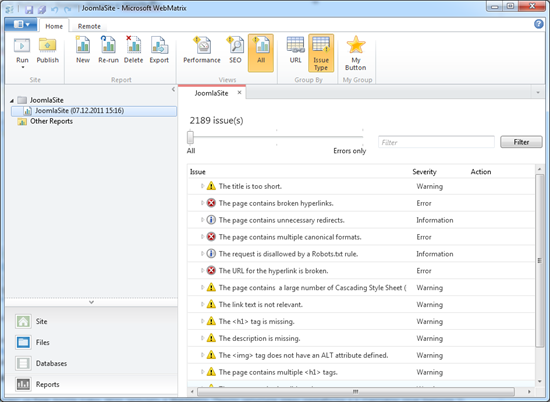
Fig. 5. Analysis of the project and work with reports in WebMatrix
A large amount of information on WebMatrix can be found on the official websites http://www.microsoft.com/web/webmatrix/ and http://www.asp.net/WebMatrix . WebMatrix Developer Course in Russian can be found on MSDN .
A Moodle project is very easy to upload to WebMatrix. Just start the development environment and in the start window (Figure 1) select the item Site From Web Gallery (Website based on a template from the gallery).
In the window that appears with a list of web application templates available in the remote repository, find Moodle (Figure 6). For a quick search, select the CMS section.
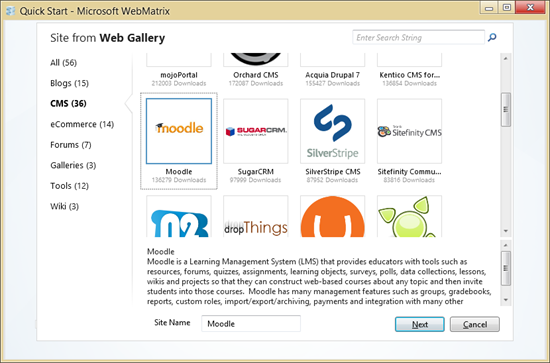
Fig. 6. Choosing the Moodle engine in WebMatrix
Enter the site name in the Site Name field and click OK. If you do not have the necessary components for Moodle to work on your computer, for example, a MySQL database server, WebMatrix will automatically detect this and offer to install the required tools. Installation of the missing components will occur automatically without your participation.
After that, WebMatrix will offer you to familiarize yourself with the license of the downloaded template and tell you the size of the data that you need to download from the repository (Figure 7) for installation.

Fig. 7. Information window before installation
Click the “I Accept” button to start the automatic download and installation of all components. After a few minutes, all the components will be installed, after which you will be offered the opportunity to configure some initial data for the Moodle site. Here you can also indicate the need to install demo data for your site.
Enter the necessary site data and click the “Next” button. After a couple of seconds, you will receive a notification that all the components necessary to run Moodle have been automatically installed and configured on your system. In addition, you will receive all logins and passwords automatically set for your site (Figure 8).

Fig. 8. Notification of successful installation of components
After you click OK, you will be taken to the WebMatrix development environment with a loaded and ready to work project based on Moodle. Please note that the main WebMatrix window is customized to offer additional information on LMS Moodle: links, documentation, forum (Figure 9). All you need to start the site is to click the Run button.
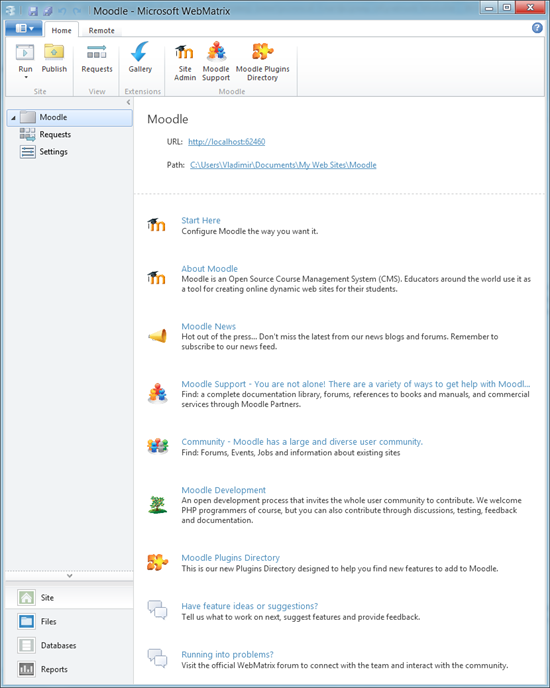
Fig. 9. The main window of WebMatrix
After starting the Moodle application, it will open in a browser, where you can go through the initial setup steps necessary for the system (Figure 10).


Fig. 10. Initial setup of Moodle
After completing the initial initialization of Moodle, you can go to the administration panel to manually configure the site (Figure 11). After authorization, you can access the control panel.
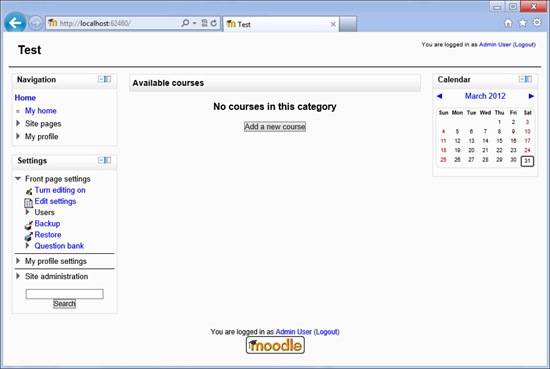
Fig. 11. The main window of the site based on Moodle
Log in to the site using the admin login and password that you entered at the installation stage in order to gain access to your working project based on Moodle. After entering the login and password, you will be taken to the Moodle admin panel (Figure 12).
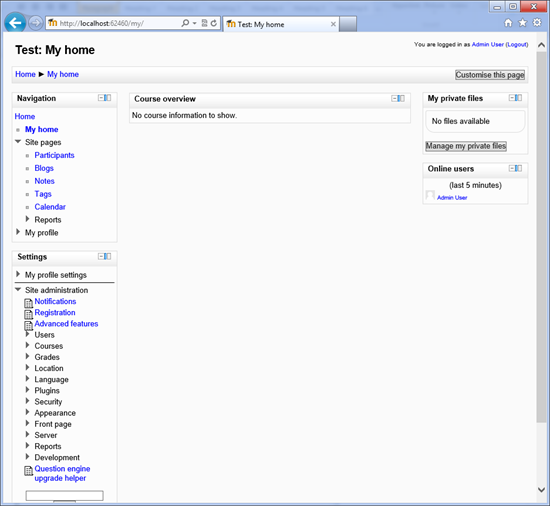
Fig. 12. Moodle admin panel
The default Moodle-based project works with English localization. In order for the site to work in Russian, you need to take a few simple steps.
Go to the administration panel on your website and select Language and then Language Packs in the panel in order to switch to the function of loading additional modules (Figure 13).
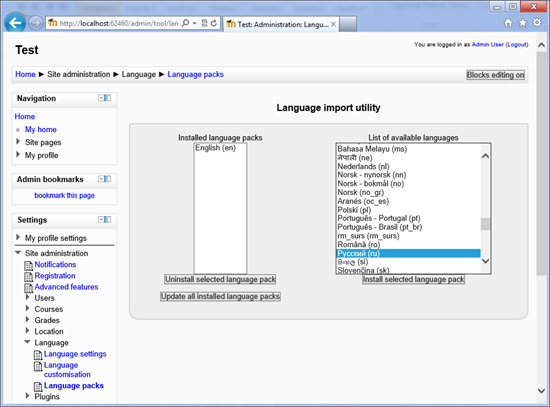
Fig. 13. Download form for additional modules
In the list of available language packs, select Russian and click on the “Install selected language pack” button. After some time, the new language pack will be added to the first list. After that, go to the Language Settings section and set the Russian language in the Default Laguage settings (Figure 14).
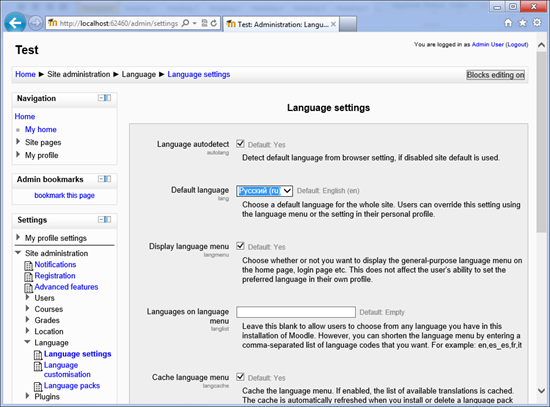
Fig. 14. Installing the Russian language in the Moodle settings
Click the Save Changes button. Now you can switch between several languages at any time using the control in the header of the site (Figure 15).

Fig. 15. Choice of interface language Moodle
Choose Russian. Now the entire interface of the administration panel based on Moodle is localized in Russian (Figure 16).
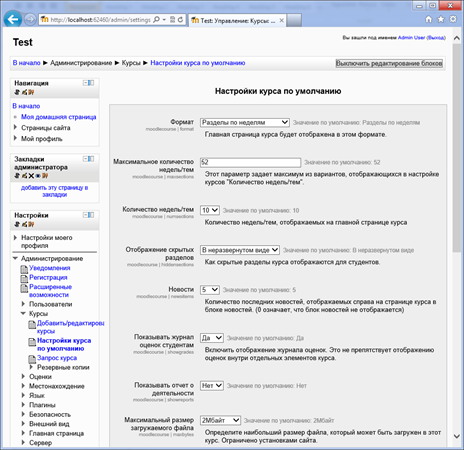
Fig. 16. Localized Moodle admin panel
After you have downloaded, installed and configured all the necessary components using WebMatrix, launched and configured your Moodle site, you will want to publish it to the server so that it is available on the Internet.
The good news for you is that WebMatrix can take all the routine work of publishing the site, its files and database onto the server and do it automatically. You only need to know the parameters of the server on which you want to place the site and click the Publish button.
After you click the Publish button, you will be asked to specify the server settings on which you want to deploy the Moodle site (Figure 17).
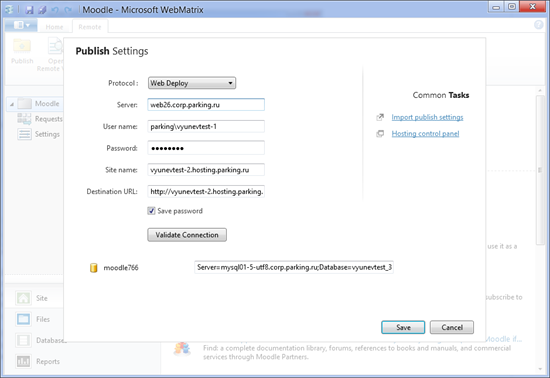
Fig. 17. Entering server data for publication
In order to publish a site on the Internet, you can use your own server or use the services of hosting providers that offer support for easy publishing through WebMatrix. For example, you can use the free service http://webmatrixhosting.ru/ . Using this service, you can get up to 60 days of free hosting with the possibility of subsequent migration of the project to a paid tariff, the cost of which starts from 80 rubles per month.
After you specify the data of your server for publication, WebMatrix will start publishing all the necessary files and a database in order for your website to work on the Internet. Before transferring data to the server, WebMatrix will tell you a list of all files that will be published to the server (Figure 18).
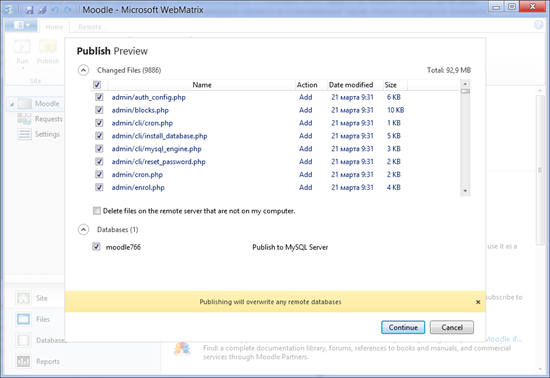
Fig. 18. List of files for publication
You can select files for publication or cancel the publication of files that you do not want to publish. After you click Continue, WebMatrix will start publishing files to the server. Please note that the publication will take place in the background, so that you can continue to work with your site in the environment. The status of the current publication will be displayed at the bottom of the window, with the help of which you can monitor how your files are published and find out when the publication is completed (Figure 19).

Fig. 19. The publication status of the site on the server
After successful publication, you can start working with your site on the Internet.
As you can see, working with WebMatrix greatly simplifies downloading and installing site templates and management systems such as Moodle. WebMatrix does all the work of determining the dependencies that are required to be installed on a computer for the site to work. WebMatrix automatically downloads such dependencies and installs them.
WebMatrix offers rich tool support for working with projects like Moodle. You can edit the code, databases, test sites for the quality of the code, and so on.
WebMatrix greatly simplifies the publication on the server, which with its help turns into a click of a button. Thus, you can avoid the mass of routine work on publishing data to the server and save your time. All this makes WebMatrix a tool that even the most untrained users can use.
As you can see, downloading, installing, and publishing a Moodle site using WebMatrix took just a few minutes. This makes WebMatrix a very useful tool.

This article will explain how to use WebMatrix in the shortest possible time to automatically download, install and publish a project based on the popular Moodle open-source educational platform.
Surely you already heard about Moodle, and if not, then I suggest you familiarize yourself with this article on Habré.
What is WebMatrix?
WebMatrix is a free, easy-to-use tool for developing, deploying and maintaining web applications. The WebMatrix installation package takes only 8 megabytes and installs in a few seconds. WebMatrix is built to work with the latest Microsoft technologies: IIS Express 7.5 server, SQL Server Compact 4.0 compact database, and Web Deploy 2.0 project automatic deployment tool.

Fig. 1. Start window WebMatrix 2
WebMatrix offers the following features for web developers:
- creating web application projects from scratch or based on basic templates;
- Downloading popular web application templates from remote storage
- built-in tracking of parameters of requests to the web application during testing and automatic data logging;
- built-in editor of web application codes: scripts, styles, markup and so on with syntax highlighting and other standard features;
- Built-in full-fledged editor of the database schema: creating databases and tables, deleting and editing the database structure, entering, deleting and editing data in the database;
- built-in tool for supporting projects by analyzing pages and creating reports on search engine optimization problems, layout errors, broken links, and many other parameters.
When working with specific projects, WebMatrix can be configured to offer developers quick links to relevant resources, for example, a special link to the administration panel of the current project. In Figure 2, you can see such links in the form of buttons on the WebMatrix control panel when working with a Moodle-based project. In this case, the environment is expanded specifically for a specific type of project offering access to the Moodle admin panel, modules and plugins. In addition, on the main page of the downloaded Moodle project in WebMatrix, you can find links to useful resources integrated into the editor: official website, news, support, forums, community, documentation and APIs and others.

Fig. 2. Working with Moodle in WebMatrix
The ability to expand and adjust WebMatrix to a specific type of project allows this editor to become special for working with different systems, in this case, a special editor for LMS Moodle.

Fig. 3. Working with code in WebMatrix
An important feature of WebMatrix is the ability not only to create web applications, but also to accompany them throughout the life cycle. Thus, WebMatrix will be useful to you not only at the stage from design to development of a web application, but also later, when your application will work as a real project.

Fig. 4. Working with databases in WebMatrix
WebMatrix, as well as other important development tools designed for web developers, is available for automatic download through the automatic installation tool for the web platform Web Platform Installer. You can learn how to download and use the Web Platform Installer from this article on the MSDN blog .

Fig. 5. Analysis of the project and work with reports in WebMatrix
A large amount of information on WebMatrix can be found on the official websites http://www.microsoft.com/web/webmatrix/ and http://www.asp.net/WebMatrix . WebMatrix Developer Course in Russian can be found on MSDN .
Automatically download and install Moodle
A Moodle project is very easy to upload to WebMatrix. Just start the development environment and in the start window (Figure 1) select the item Site From Web Gallery (Website based on a template from the gallery).
In the window that appears with a list of web application templates available in the remote repository, find Moodle (Figure 6). For a quick search, select the CMS section.

Fig. 6. Choosing the Moodle engine in WebMatrix
Enter the site name in the Site Name field and click OK. If you do not have the necessary components for Moodle to work on your computer, for example, a MySQL database server, WebMatrix will automatically detect this and offer to install the required tools. Installation of the missing components will occur automatically without your participation.
After that, WebMatrix will offer you to familiarize yourself with the license of the downloaded template and tell you the size of the data that you need to download from the repository (Figure 7) for installation.

Fig. 7. Information window before installation
Click the “I Accept” button to start the automatic download and installation of all components. After a few minutes, all the components will be installed, after which you will be offered the opportunity to configure some initial data for the Moodle site. Here you can also indicate the need to install demo data for your site.
Enter the necessary site data and click the “Next” button. After a couple of seconds, you will receive a notification that all the components necessary to run Moodle have been automatically installed and configured on your system. In addition, you will receive all logins and passwords automatically set for your site (Figure 8).

Fig. 8. Notification of successful installation of components
After you click OK, you will be taken to the WebMatrix development environment with a loaded and ready to work project based on Moodle. Please note that the main WebMatrix window is customized to offer additional information on LMS Moodle: links, documentation, forum (Figure 9). All you need to start the site is to click the Run button.

Fig. 9. The main window of WebMatrix
After starting the Moodle application, it will open in a browser, where you can go through the initial setup steps necessary for the system (Figure 10).


Fig. 10. Initial setup of Moodle
After completing the initial initialization of Moodle, you can go to the administration panel to manually configure the site (Figure 11). After authorization, you can access the control panel.

Fig. 11. The main window of the site based on Moodle
Log in to the site using the admin login and password that you entered at the installation stage in order to gain access to your working project based on Moodle. After entering the login and password, you will be taken to the Moodle admin panel (Figure 12).

Fig. 12. Moodle admin panel
Control Panel and Localization Moodle
The default Moodle-based project works with English localization. In order for the site to work in Russian, you need to take a few simple steps.
Go to the administration panel on your website and select Language and then Language Packs in the panel in order to switch to the function of loading additional modules (Figure 13).

Fig. 13. Download form for additional modules
In the list of available language packs, select Russian and click on the “Install selected language pack” button. After some time, the new language pack will be added to the first list. After that, go to the Language Settings section and set the Russian language in the Default Laguage settings (Figure 14).

Fig. 14. Installing the Russian language in the Moodle settings
Click the Save Changes button. Now you can switch between several languages at any time using the control in the header of the site (Figure 15).

Fig. 15. Choice of interface language Moodle
Choose Russian. Now the entire interface of the administration panel based on Moodle is localized in Russian (Figure 16).

Fig. 16. Localized Moodle admin panel
Publishing a site to a server
After you have downloaded, installed and configured all the necessary components using WebMatrix, launched and configured your Moodle site, you will want to publish it to the server so that it is available on the Internet.
The good news for you is that WebMatrix can take all the routine work of publishing the site, its files and database onto the server and do it automatically. You only need to know the parameters of the server on which you want to place the site and click the Publish button.
After you click the Publish button, you will be asked to specify the server settings on which you want to deploy the Moodle site (Figure 17).

Fig. 17. Entering server data for publication
In order to publish a site on the Internet, you can use your own server or use the services of hosting providers that offer support for easy publishing through WebMatrix. For example, you can use the free service http://webmatrixhosting.ru/ . Using this service, you can get up to 60 days of free hosting with the possibility of subsequent migration of the project to a paid tariff, the cost of which starts from 80 rubles per month.
After you specify the data of your server for publication, WebMatrix will start publishing all the necessary files and a database in order for your website to work on the Internet. Before transferring data to the server, WebMatrix will tell you a list of all files that will be published to the server (Figure 18).

Fig. 18. List of files for publication
You can select files for publication or cancel the publication of files that you do not want to publish. After you click Continue, WebMatrix will start publishing files to the server. Please note that the publication will take place in the background, so that you can continue to work with your site in the environment. The status of the current publication will be displayed at the bottom of the window, with the help of which you can monitor how your files are published and find out when the publication is completed (Figure 19).

Fig. 19. The publication status of the site on the server
After successful publication, you can start working with your site on the Internet.
Conclusion
As you can see, working with WebMatrix greatly simplifies downloading and installing site templates and management systems such as Moodle. WebMatrix does all the work of determining the dependencies that are required to be installed on a computer for the site to work. WebMatrix automatically downloads such dependencies and installs them.
WebMatrix offers rich tool support for working with projects like Moodle. You can edit the code, databases, test sites for the quality of the code, and so on.
WebMatrix greatly simplifies the publication on the server, which with its help turns into a click of a button. Thus, you can avoid the mass of routine work on publishing data to the server and save your time. All this makes WebMatrix a tool that even the most untrained users can use.
As you can see, downloading, installing, and publishing a Moodle site using WebMatrix took just a few minutes. This makes WebMatrix a very useful tool.
