Creating your own network of homemade devices based on Arduino (Part 1)
Good afternoon, habravchane! Today I will tell you about the integration of Arduino with a PC on Windows and other devices. It was already in 2018, my Arduino boards of various models finally arrived to me.
I have long wanted to build a smart home, and decided to use this particular platform. Why? Well, I know C # and some C ++ quite well, and as you know, the Arduino firmware is written exactly on modified pluses. In addition, the platform has a digital-to-analog converter, which simplifies working with analog sensors. In addition, the platform is very well known and has a large modular base.
With all my love for microcontrollers, I prefer to calculate everything on Windows, and all my strength in .NET applications. That was my problem. I just could not perceive the Arduino IDE development environment. I had to get used to. However, simple projects for warming up still worked mostly on PCs. Who are interested in the topic, please under the cat!
My first experiment was a simple USB communication (serial port), through which I sent packets with simple commands to perform actions on the microcontroller. For example, I used the Arduino UNO model.

This is the program interface for Windows. “Squeak” - a signal to the pin (output Arduino) at number 10 of a constant electric signal that feeds the buzzer connected by me. “LED” is the supply of direct current to pin 13, which by default on the controller is connected to the built-in LED, which serves to debug sketches (firmware).

However, all this functionality lies precisely on the controller.
What does the program do? Just sends the numbers to the port! “0” means to turn off the
LED, “1” to turn on the LED, “2” to turn off the buzzer, “3” to turn on
buzzer. Everything is done using the basic elements of Windows Forms. If
anyone is interested, the data rate is 115200 baud. Thanks to
this, I can easily view the content of messages from the microcontroller in the
Arduino IDE.

I think that many now wanted to know that in the firmware of the microcontroller. So, as it was relatively long ago, it was not easy to look for the Arduino firmware code, but the necessary file was found!
However, this is only an example. The only thing is that this system should have a hub - that is, the intersection point of all devices. And this will instantly destroy the entire decentralization of the system.
Hence the conclusion - the method of using the hub is only suitable for information gathering and management. The hub is needed, for example, for accessing devices to the Internet, but not as a key point of communication between them.
Let's say we can connect all the devices using I2C or using our own protocol. But how to dump the data in the hub? And in general, what will serve as a hub? Option 3:
Consider everything in turn. So, the router. Let's start with the fact that the router is needed not simple, but with Linux on board and a USB port for connecting any Arduino board from the system. Any because the network will consist of a huge number of devices and a general “chat” where all devices send messages about their condition. From routers suitable for example "Linksys E2100L 802.11b / g / n".
As you can see, this router has a USB-connector, and according to the characteristics it is clear that everything is spinning on Linux. I personally did not use it, but according to its characteristics it will suit us. And this is NOT an advertisement.
In the case of a router, you can dump data on the serial port, as on Windows, and run a script on Linux - a message handler (forgive me if I don’t call something, just not familiar with Linux).
Consider option 2. Another Arduino board. Here, the models Nano, Mini, Micro are no longer suitable. Need an Arduino model for either UNO or MEGA. But just because the board does not connect to the network. As an option to use the Arduino UNO WI-FI, or more reliably than the Arduino Yun or Tian. The problems of the latter are relatively long loading and price, but by functionality they look like all the same router, because they work on Linux.
Here it is best to use the so called "Ethernet Shield". This is an Arduino expansion card, which is worn on top and allows you to pick up a simple WEB server on your device with simple PHP scripts to process information from other devices on the network.

Some models of this expansion card are equipped with a slot for a micro-sd memory card, which, in addition to remote control, also allows local logging.
Option 3. Almost similar to the previous one and least of all I like. Using a micro computerRaspberry Pi. It is a computer. Agree, to hang up a whole computer for this task, albeit a very weak one, is a waste of resources. Both monetary and computational. Personally, I would if I used the Raspberry Pi, then only as a video surveillance server or under a ready-made smart home control program of the “Major DoMo” type and the like. You can also take it to tasks such as bots in messengers and complex microclimate control algorithms, well, or in the most unlikely case, artificial intelligence can be placed there.
As you can see, Raspberry Pi 3 has:
And much more. But despite all the advantages, as a hub, Raspberry Pi will not work.
Conclusion: for me personally, Arduino UNO + Ethernet Shield is more suitable as a hub. Of all the options considered, this is the cheapest and easiest to implement.

In this configuration, the system does not depend on the hub. And even if the hub fails, it will not affect the performance of the network itself. The network will only lose access to the Internet.
I think this is the first part that can be completed. See you!
I have long wanted to build a smart home, and decided to use this particular platform. Why? Well, I know C # and some C ++ quite well, and as you know, the Arduino firmware is written exactly on modified pluses. In addition, the platform has a digital-to-analog converter, which simplifies working with analog sensors. In addition, the platform is very well known and has a large modular base.
With all my love for microcontrollers, I prefer to calculate everything on Windows, and all my strength in .NET applications. That was my problem. I just could not perceive the Arduino IDE development environment. I had to get used to. However, simple projects for warming up still worked mostly on PCs. Who are interested in the topic, please under the cat!
My first experiment was a simple USB communication (serial port), through which I sent packets with simple commands to perform actions on the microcontroller. For example, I used the Arduino UNO model.
This is the program interface for Windows. “Squeak” - a signal to the pin (output Arduino) at number 10 of a constant electric signal that feeds the buzzer connected by me. “LED” is the supply of direct current to pin 13, which by default on the controller is connected to the built-in LED, which serves to debug sketches (firmware).
However, all this functionality lies precisely on the controller.
What does the program do? Just sends the numbers to the port! “0” means to turn off the
LED, “1” to turn on the LED, “2” to turn off the buzzer, “3” to turn on
buzzer. Everything is done using the basic elements of Windows Forms. If
anyone is interested, the data rate is 115200 baud. Thanks to
this, I can easily view the content of messages from the microcontroller in the
Arduino IDE.
I think that many now wanted to know that in the firmware of the microcontroller. So, as it was relatively long ago, it was not easy to look for the Arduino firmware code, but the necessary file was found!
All code
Ate that, this is the old version of the file, without the buzzer, only with the LED.
int i = 0;  // переменная для счетчика имитирующего показания датчикаint led = 13;
voidsetup() {
  Serial.begin(115200);    // установим скорость обмена данными
  pinMode(led, OUTPUT);  // и режим работы 13-ого цифрового пина в
качестве выхода
}
voidloop() {
  i = i + 1;  // чтобы мы смогли заметить что данные изменились
  String stringOne = "Info from Arduino ";
  stringOne +=i;  // конкатенация
  Serial.println(stringOne);  //отправляем строку на порт
  char incomingChar;
  if (Serial.available() > 0)
  {
    // считываем полученное с порта значение в переменную
    incomingChar = Serial.read();
    //в зависимости от значения переменной включаем или выключаем LED
    switch (incomingChar)
    {
      case'1': digitalWrite(led, HIGH);
        break;
      case'0': digitalWrite(led, LOW);
        break;
    }
  }
  delay(300);
}
However, this is only an example. The only thing is that this system should have a hub - that is, the intersection point of all devices. And this will instantly destroy the entire decentralization of the system.
Hence the conclusion - the method of using the hub is only suitable for information gathering and management. The hub is needed, for example, for accessing devices to the Internet, but not as a key point of communication between them.
Let's say we can connect all the devices using I2C or using our own protocol. But how to dump the data in the hub? And in general, what will serve as a hub? Option 3:
- Hub from the router.
- Hub from another Arduino board.
- Hub of Raspberry Pi.
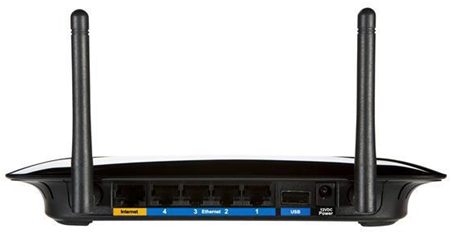
Consider everything in turn. So, the router. Let's start with the fact that the router is needed not simple, but with Linux on board and a USB port for connecting any Arduino board from the system. Any because the network will consist of a huge number of devices and a general “chat” where all devices send messages about their condition. From routers suitable for example "Linksys E2100L 802.11b / g / n".
As you can see, this router has a USB-connector, and according to the characteristics it is clear that everything is spinning on Linux. I personally did not use it, but according to its characteristics it will suit us. And this is NOT an advertisement.
In the case of a router, you can dump data on the serial port, as on Windows, and run a script on Linux - a message handler (forgive me if I don’t call something, just not familiar with Linux).
Consider option 2. Another Arduino board. Here, the models Nano, Mini, Micro are no longer suitable. Need an Arduino model for either UNO or MEGA. But just because the board does not connect to the network. As an option to use the Arduino UNO WI-FI, or more reliably than the Arduino Yun or Tian. The problems of the latter are relatively long loading and price, but by functionality they look like all the same router, because they work on Linux.
Here it is best to use the so called "Ethernet Shield". This is an Arduino expansion card, which is worn on top and allows you to pick up a simple WEB server on your device with simple PHP scripts to process information from other devices on the network.
Some models of this expansion card are equipped with a slot for a micro-sd memory card, which, in addition to remote control, also allows local logging.
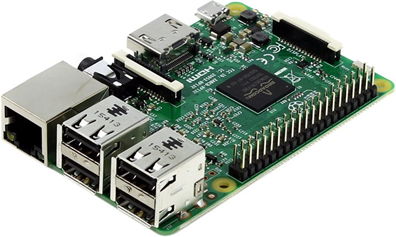
Option 3. Almost similar to the previous one and least of all I like. Using a micro computerRaspberry Pi. It is a computer. Agree, to hang up a whole computer for this task, albeit a very weak one, is a waste of resources. Both monetary and computational. Personally, I would if I used the Raspberry Pi, then only as a video surveillance server or under a ready-made smart home control program of the “Major DoMo” type and the like. You can also take it to tasks such as bots in messengers and complex microclimate control algorithms, well, or in the most unlikely case, artificial intelligence can be placed there.
As you can see, Raspberry Pi 3 has:
- 4 USB ports;
- 1 Ethernet port;
- 1 HDMI port;
- Wi-Fi;
- DSI interface for connecting a Raspberry Pi touchscreen display;
- Slot for micro-sd cards.
And much more. But despite all the advantages, as a hub, Raspberry Pi will not work.
Conclusion: for me personally, Arduino UNO + Ethernet Shield is more suitable as a hub. Of all the options considered, this is the cheapest and easiest to implement.
In this configuration, the system does not depend on the hub. And even if the hub fails, it will not affect the performance of the network itself. The network will only lose access to the Internet.
I think this is the first part that can be completed. See you!