DIY shelf speakers
Once I decided to collect high-quality acoustics for sounding a small room, as well as for use as near-field monitors when working with sound on a computer (hobby). The main requirement is adequate sound in relation to the source. Not that the “lower classes were sausage” or “the plates rang”, but the adequate natural sound. So, we collect high-quality “shelves”.
In theory, the ideal system is single-lane. But, like everything ideal, such a system does not exist in nature. Yes, there are very high-quality broadband speakers at the same Visaton, but for some reason all well-known manufacturers make two-way shelf systems. And when it comes to the outdoor version, then 3 stripes are not uncommon. There wasn’t much of a question - the classic two-way version: LF and HF.
The main requirement for the speakers is the optimal price / quality ratio. Those. it should not be "cheap" at 500 rubles., But also not a breathtaking "high-end" for $ 1000. Besides, I was in no hurry. The idea of assembling “half-wheelers” with my own hands came a long time ago, and I threw a bait in advance to my good friend, a “sick” sound, with whom we have been constantly and fruitfully communicating on this subject for a long time.
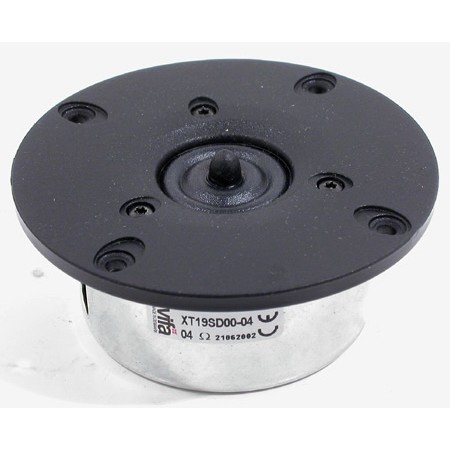
The first to appear were the treble - Vifa XT19SD-00/04 ring-rad. These are high-quality 4-ohm “peepers” quite popular among audiophiles. We planned for one set, but for some reason did not go and ended up in my set.
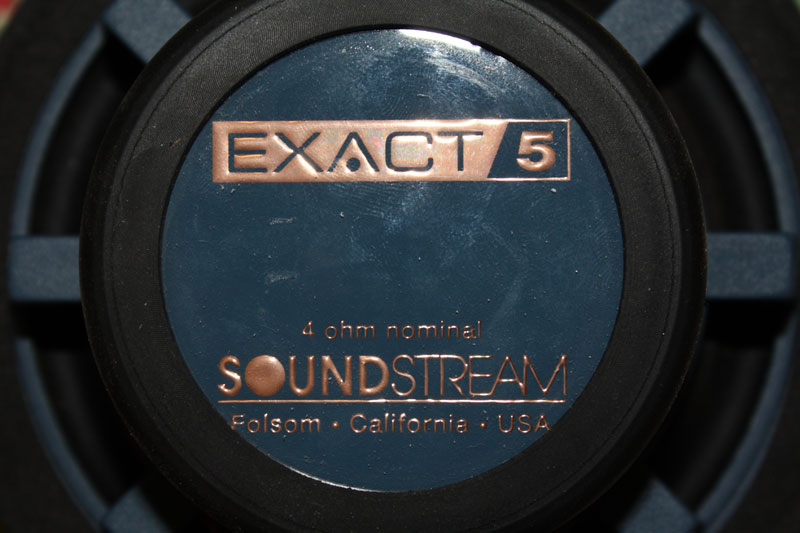
The second arrived in time LF. They turned out to be very decent midbasses from the Soundstream Exact 5.3 kit. Right hereyou can read a little about them. It so happened that the “tweeters” burned during installation, and lone woofers were not needed on their own. 4-ohm 5.5 "midbasses mounted in a cast aluminum basket were immediately purchased.

Now that you have the speakers, you can start creating acoustics.
Each option has its pros and cons. Firstly, it is necessary to take into account the compactness of the columns themselves and the associated difficulties in layout in a confined space. And it does not make sense to mount outside. Secondly, individual modules as independent components can be combined in the future, and it is also easier to repair if something happens. And thirdly, active speakers are quite expensive. Because if you make a decent amplifier (and sometimes even one in each case), then it will turn out more expensive than the acoustics themselves. In addition, I already had an amplifier. But in any case, I am for the scheme - passive acoustics + amplifier, it is more universal.
We decided on the speakers, now you need to understand which case is optimal for them. Dimensions are based on the sound characteristics of the woofer. There are no recommendations on the manufacturer’s website, as The speaker was intended primarily for car audio. It makes no sense to keep special equipment for these purposes, unless this is your job. Therefore, an intelligent dude with a special stand comes to the rescue. As a result of laboratory tests, we obtain the estimated housing size 310 x 210 x 270 mm. During measurements, the parameters of the phase inverter were also calculated.
By the way, many manufacturers on their sites publish recommended housing sizes for speakers. When such information is available, it is logical to use it, but in this case I did not have such data, so I had to do laboratory research.
In my opinion, the most optimal material for the body is MDF. It is acoustically neutral and also slightly better in performance than chipboard. Plywood is also good, but finding quality plywood is not easy, and it is more expensive and more difficult to process. As a source material for the case, a 22mm MDF sheet was selected. In principle, the standard 18-20mm is quite enough, but I decided to do a bit with a margin. Stiffness is never superfluous.
One of the most important stages. Before you go for MDF, I advise you to decide on the design in order to immediately ask the seller to cut the sheet in parts, and at a normal point of sale there are always good machines with an accurate and even cut. At home, such a cut is difficult to obtain.
So the design. The speakers should look at least as good as the “industrial ones” so that there is no sensation of a club of crazy hands. We do not only high-quality, but also beautiful acoustics. In general, there are practically no beautiful, interesting, and at the same time structurally uncomplicated speaker systems. Italian Acoustic Sonus Faber makes beautiful acoustics, amazing in beauty - Magico Mini. But they are all made using precision machine tools, which by definition are not at home. Alternatively, you can order the case to a good cabinetry with hands and CNC. Such work will cost, depending on where and what you order, from 10 000 rub. up to 30 000 rub. along with materials. If the specialist is good, then the speakers will look no worse, or even better than the “store ones”. In this case, I decided that I would completely do everything myself. Therefore, we look at things realistically and make a construction without any bevels, curly cuts, etc. Those. it will be a box. The calculated dimensions give a fairly pleasant proportion, and the proportion in the design is already half the battle.
What to design? Although I am associated with design by occupation, I know 3D packages, to put it mildly, superficially. In this case, the program should be more engineering than rendering. Specialized "Kad" for this purpose are heavy and redundant. The solution was quickly enough found - the freeware SketchUp is more than suitable for this purpose. It is so simple and intuitive that it was fully mastered in about an hour. He can do the main thing: quickly create any shapes, put down sizes, use simple textures. I think that such a program is ideal for "home" purposes. In it you can easily, for example, design a kitchen or even a small house.
Here is the case design:


The design is simple. Six walls glued together. Front 2 cutouts for speakers. There are 2 cutouts at the back: under the bass reflex and under the terminal block. The 120x80 rectangle indicates the place for the crossover. Inside the phase inverter is another wall in the width of the internal space, attached perpendicularly under the cut:

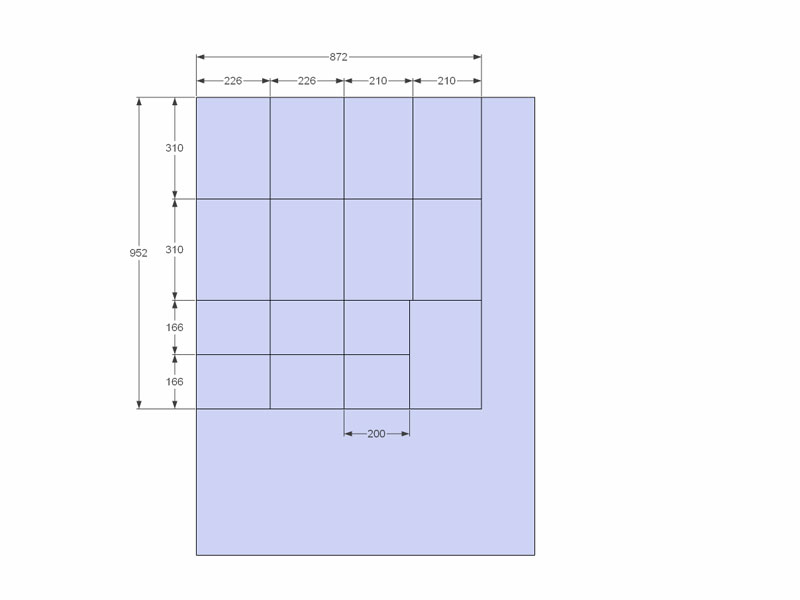
Based on the drawing, a sheet sawing pattern emerges:
How will we finish the case? Pasting with a film was immediately ruled out - the acoustics should look decent. As an option, painting was considered. I abandoned this idea, because such speakers will not fit into every interior (at least they did not fit into the current one). I want more versatility. In this regard, natural veneer is more suitable. But completely veneered acoustics look boring. Search for a combined solution:

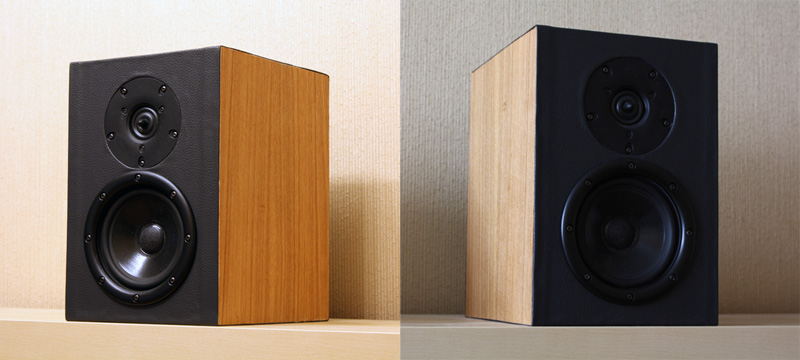
In general, the options are not bad in appearance, but purely structurally cause difficulties. As a result, it was decided to trim the side walls with ash veneer, and tighten the remaining 4 walls around the circumference with leather, more precisely with high-quality automotive leatherette. The squeak is beautiful in itself, but the woofer has a structural patch on the front side of the case, which will not look very nice. Therefore, it was decided to make an additional decorative overlay (ring) for it, which will press it to the body, and at the same time give beauty to the column itself. With the design and design decided.
Before moving on to the next step, I will outline what basic tools are needed to work:
- Circular.
- Jigsaw.
- Drill.
- Milling cutter.
- Polishing machine.
- Straight arms.
Without this kit, it is better to order a case for a good master.
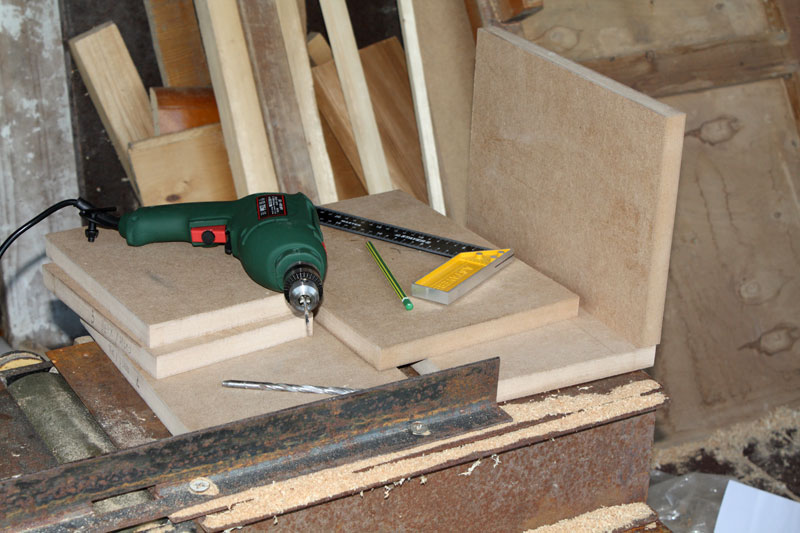
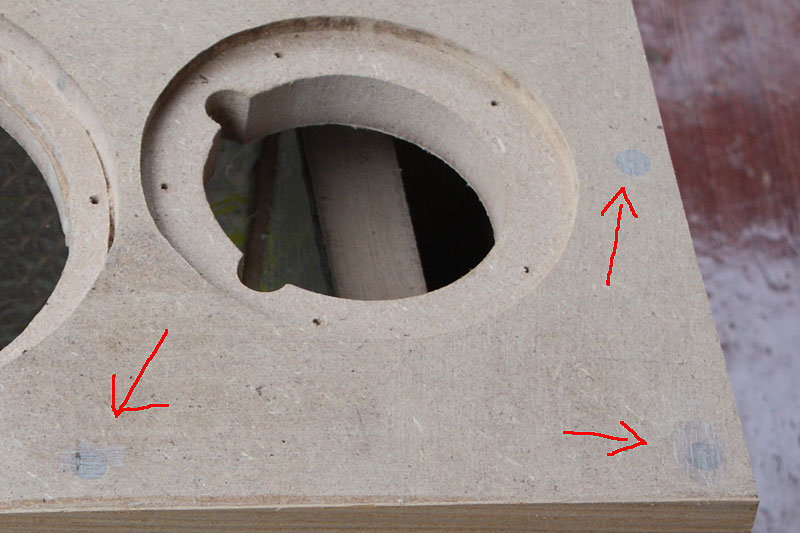
So, we are cuttingthe MDF sheet budget . I already wrote that it is better to saw on special machines - this is inexpensive, but it turns out for sure. But since I decided to make the case myself from inside to out, then for the purity of the experiment I sawed it myself with a hand circular, and small pieces with a jigsaw with a guide. As expected, the ideal cut did not work. After the cut, pairs of walls (left-right, front-back, etc.) are installed in pairs, adjusted with a grinder and / or electric plane and checked for perpendicularity with a square. And in the future, during assembly, they are finally adjusted after gluing. Loss of 2-3 mm is not significant. But still I recommend to cut right away “on the base”, save a lot of time.
The walls are glued together with PVA and pulled together with screws. First, glue the body without the front wall.


Next, saw the hole of the bass reflex with a jigsaw.
Now a hole for the terminal block, as well as a chamfer in order to “drown” it. Initially, according to the project, the terminal block was supposed to be placed at the bottom. But in the process it became clear that it would not be very convenient to mount the crossover in the center through the woofer hole, so I moved the hole for the terminal block higher, and the place for the crossover lower.

Before “attach the lid”, it is necessary to glue the insides with vibration-insulating material.
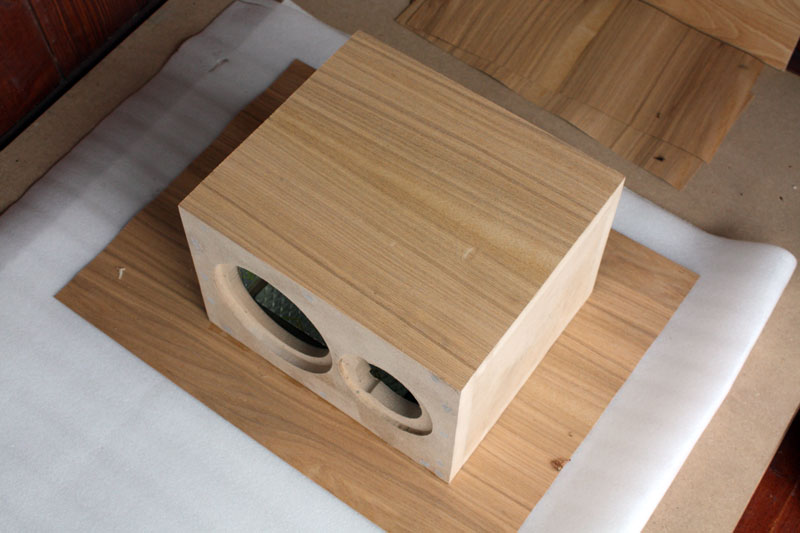
You can close the box.

Now one of the most crucial steps is to cut out the holes for the speakers on the front panel. I have already said that the ideal speaker system is single-band. Why? Because the propagation of sound comes from one source to the listener without a time mismatch due to the difference (scanty) in the distance that is when using a multi-band system. Therefore, speakers are best placed as close to each other as possible. So the sound picture is "denser". We calculate the holes so that the distance between the edges of the speakers will be about 1 cm. The holes are sawn with a jigsaw with a circular guide.
The speakers must be recessed. We apply the speakers and along their edge draw a diameter for chamfering. We measure the depth of the chamfer on the overlay of each speaker. The chamfer was removed by hand milling. The depth of cut was set to stop. No guides were used, neatly round-off was filmed layer by layer to the line. For "peeping", two "ears" were additionally cut under the terminals.

After the chamfers are removed, we apply the terminal strip and speakers, after which we drill holes for future self-tapping screws with a thin drill. Without them, firstly, the MDF itself can “tear apart” when screwing in the screws, and secondly, during the final installation of the speakers it will be more difficult to deliver smoothly. For a very long time I thought about how to set the dynamics relative to each other, I came to this scheme:
The holes from the screws on the external surfaces must be repaired before the final finish. I used an epoxy. In order not to wait until one surface hardens, he glued each surface with tape and took up the next. When the epoxy dried up, walked with a grinder.
The veneer has remained from some ancient times, so I did not have to buy it. The sheets were not wide, so a couple of sheets were picked up, fastened with adhesive tape and glued to the body. First, one side, then the other.
The veneer needs to be protected. I covered it with clear yacht varnish.
Now you need to fit the case with leatherette. There are many options for how to do this. I decided to do as follows. A strip is cut 20 mm more than the width of the body and slightly longer than the circumference of the body. On each side it is bent by 10 mm, the hem is glued to "special glue 88". Then, on the same glue, the strip is glued around the circumference to the body. First, the bottom (partially), then the back wall, then the top, then the front and again the bottom. At the last stage, before the adhesive strip is cut in place and glued butt. I glued all sides at a time, i.e. didn't wait for each side to dry. After each side, I took a short pause (the glue sticks fast enough), and set to the next one.
After everything has dried out, the skin is carefully cut and sealed inward at the opening of the bass reflex.
If you really want to, then Fazik can somehow be ennobled.
Then holes are cut through on the terminal block, “woofer” and “tweeter”. The skin on the terminal strip and RF will flush down, so the cutout diameter can be left less by 5-10 mm. The leather on the woofer will be pressed by a decorative ring, so you need to trim so that it is not visible.
First of all, we mount the crossover. Cross - self-made, on a good elemental base. They use air-core coils, film capacitors for the tweeter and MOX resistors. I myself did not solder it, but ordered the sensible guys.

By the way, many manufacturers sin by the fact that sometimes even not very good crosses put in even quite expensive acoustics. On the Internet, you can find many "gutted" systems on this subject. Before mounting the cross, you need to solder three pairs of wires: for the terminal block, bass and treble. It turned out that it would have to be mounted directly on a plate with vibration isolation. He considered that she was superfluous and dismantled it. Now you can screw it on. I used a piece of packaging film from under some device as a substrate.

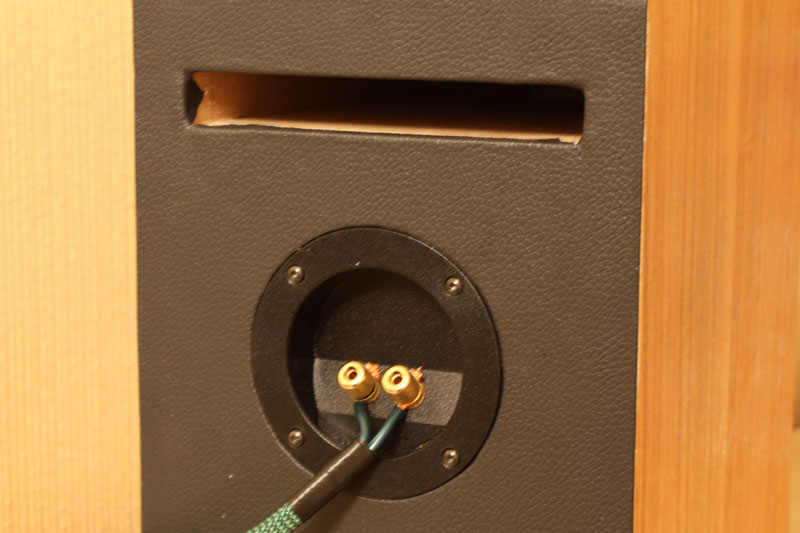
Now we solder the required pair of wires to the terminal strip and fix it on the case. The terminal block and speakers are screwed on with decorative black self-tapping screws with a head under the “star”. The “squeak” pad is screwed on with similar screws, so it would be logical to use the same for the rest. The back wall is ready.
Before mounting the speakers, it is necessary to dampen the housing with a special padding polyester. For these purposes, was used "wool" company Visaton. The synthetic winterizer is glued around the walls.
What dynamics to start with, in principle, no difference. I started with a squeak. Solder the appropriate pair of wires from the cross, insert the speaker and fasten with screws. Done.

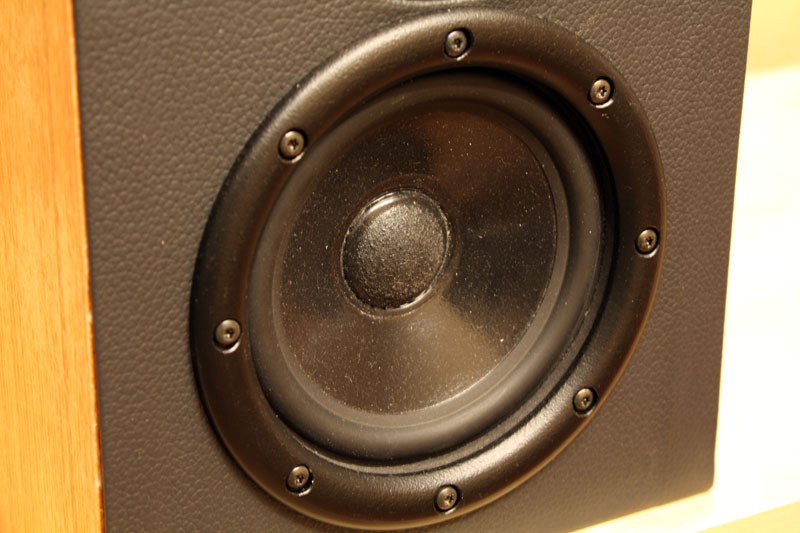
Midbass needs to be slipped under the skin, and pressed down on top with a decorative ring. Solder the remaining pair of wires and mount the speaker.
All? All. We fasten the acoustic cable to the terminal block and begin the tests.
The system test was carried out in the following configurations:
1. Sherwood VR-758R receiver + speakers.
2. Computer + Unicorn (USB-DAC) + Self-made stereo amplifier + speakers.
3. Computer + E-mu 0204 (USB-DAC) + Sherwood VR-758R + speakers.
A little about the configurations themselves. I personally think that at the moment the ideal option for a home music center is: comp + USB-DAC + amplifier + acoustics. Sound in a digital image is distorted without distortion via USB and fed to a high-quality DAC, from which it is transmitted to a high-quality amplifier and then to acoustics. In such a chain, the amount of distortion is minimal. In addition, you can use completely different phonograms: 44000/16, 48000/24, 96000/24, etc. Everything is limited by the capabilities of the driver and the DAC. Receivers in this regard are less flexible and pre-obsolete option. The size of modern hard drives allows you to store almost the entire media library on them. And the tendency to subscribe to Internet content can also eliminate this option, although this is not the near future and is far from suitable for everyone.
I will say right away that in all three configurations the acoustics sounded great. I honestly did not even expect it. Here are some subjective aspects.
1. Adequate and natural sound. What is recorded is reproduced. There are no distortions in any direction. As I wanted.
2. Great sensitivity to the source material. All recording flaws, if any, are well audible. High-quality mixed tracks listen perfectly.
3. Well-readable bass for these sizes. Of course, organ music on the shelves is not fully appreciated (it is generally difficult to evaluate it on acoustics), but most of the material “digests” without problems. It is difficult to expect more from such babies.
4. Very good elaboration of details. Every instrument is audible. Even with a rich sound picture and a decent volume, the sound does not move into a mess (the amplifier plays an important role here).
5. I want to make it louder;) Ie acoustics do not yell, but plays smoothly. Although there is also not a small merit of the amplifier itself, because as the load increases, a good amplifier maintains linearity.
6. From long listening does not hurt the head. Personally, this often happens to me, but then he plays all day and at least that.
7. Concerns about the incorrect panorama and the strong dependence of the sound on the listening position have not been confirmed. As far as I know, car speakers have a specific phasing of sound due to the peculiarities of the location of the speakers in the cabin. And it was about this kit that I read that his midbasses are more universal in this regard. Which actually was confirmed. You can sit in the center in front of the speakers, you can stand next to them sideways - the sound is excellent. There is a dependency, but very small.
As for the configurations themselves, the most high-quality sound was achieved with the second configuration.
Firstly, a very high-quality Unicorn DAC was used. Here you can read about him.
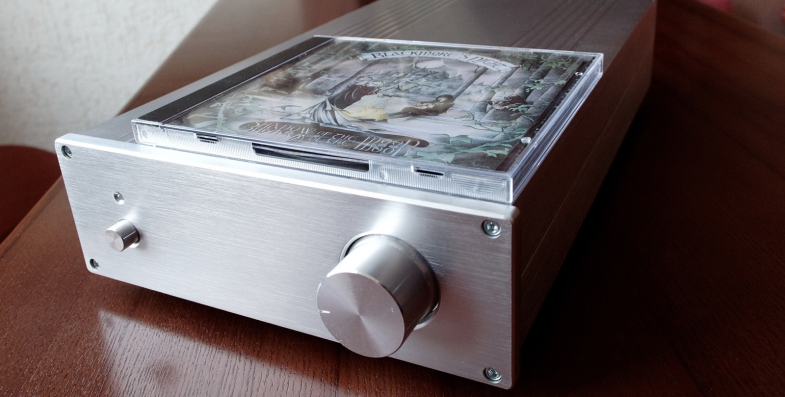
Secondly, the “self-made amplifier” is the know-how of one sensible Togliatti “soundman”. Here it is in a beautiful small aluminum case:

But “gutted”:
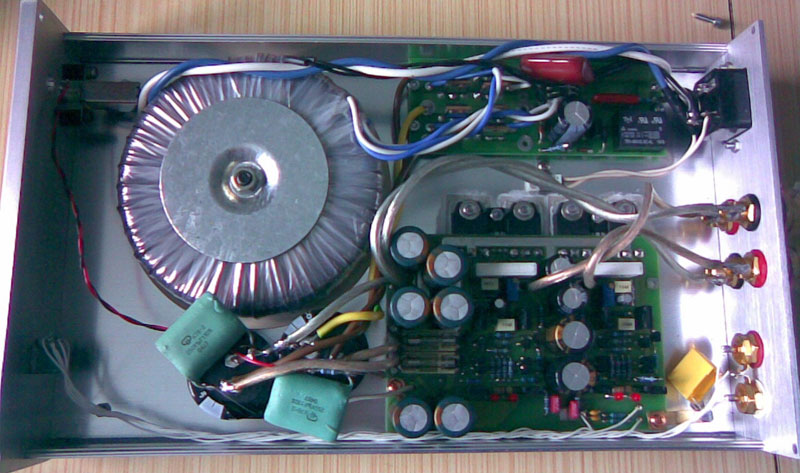
In a nutshell, we managed to find a circuit solution in which the amplifier retains its characteristics when changing the volume, i.e. does not distort the sound at any (structurally acceptable) volume. Too many amplifiers (even very expensive) suffer from this. It was amazing to hear how such an amplifier enlivened many speakers, i.e. made them sound like they should sound. By the way, some industrial amplifiers (in particular, quite good Xindak itself) were redone according to this scheme, and they opened a second wind.
Compare acoustics with something else, you ask? Yes, for example, with ProAC Studio 110 - this is a fairly high-quality shelf speakers, here's a little about them . They compared, realized that they definitely sound no worse. The “prows” may have a slightly lesser dependence of sound on the position of the listener due to the specific placement of the inverter and the “tweeter”, there somehow they all cunningly calculated it. And the rest is absolutely no worse, even I personally liked my homemade products more, but this is attributed to subjectivity;) I also wore headphones (quite good Koss) and compared them by panorama, top and bottom. Absolutely identical sound. Even on the bottoms. In general, the enthusiasm is complete.
Midrange / Tweeter speakers (pair): 3,000 rub.
Tweeters (pair): 3 000 rub.
Crossover (pair): 3 000 rub.
Sintepon: 160 rub.
Terminal (terminal block): 700 rub.
Screws: 80 rub.
MDF sheet, 22mm: 2 750 rub.
Adhesive tape: 30 RUR
PVA: 120 RUR
Special adhesive 88: 120 rub.
Vibration isolation: 200 rub.
Figured slip ring: 500 rub.
Cable: 500r.
Total: 14 160 rub.
Some materials were or went free of charge; here, accordingly, they are not taken into account.
In any more or less complex device or complete functional system, absolutely everything is important. When it comes to the music system, a large number of factors influence the final result:
- The quality of the phonogram.
- Device for playing a phonogram.
- Digital-to-analog converter.
- Signal amplifier.
- Wires.
- Speakers installed in the speaker housing.
- Correctly designed for speakers and well-assembled enclosures.
- Scheme and komplektuha for the crossover.
This is a basic but not complete list.
It is wrong to assume that the main thing is the amplifier or the main thing is the wires, or the main thing is the speakers. A home music system is like an orchestra. And if in this orchestra someone will be bad, and someone will play brilliantly, then on the whole it will turn out - average. Or, as stated in a very accurate example: if you mix a barrel of shit with a barrel of jam, you get two barrels of shit.
There is another extreme. A good system costs fabulous money. So each component should cost half a million. And phonograms should be exclusively in Super Audio CD or on company records. Type closed society of elite audiophiles. Bullshit is everything.
I came to the conclusion that it’s quite possible to assemble your own relatively budgetary system, which is described with one word “Sounds”. And if, as a DAC or amplifier, due to its features, it is better to use really existing solutions, which are very numerous now. That correctly made (independently or on order) speaker system will sound better than the “brand name” purchased for the same money. Now almost all components can be ordered online. Moreover, many manufacturers publish housing designs for their respective speakers. There is a ton of software to calculate enclosure parameters. The network has many specialized forums, and offline there are people with hands. In everything, to be a specialist is of course impossible. As in any field, the main thing is to know the general principles.
The article does not claim to be the ultimate truth, but I hope that my thoughts and my experience will be useful to someone else.
Upd. In comments, many ask about the amplifier. If anyone is interested, write in a personal, I will give the coordinates.
Upd2. The amplifier developer has his own website - pvd-audio.com )
Number of stripes
In theory, the ideal system is single-lane. But, like everything ideal, such a system does not exist in nature. Yes, there are very high-quality broadband speakers at the same Visaton, but for some reason all well-known manufacturers make two-way shelf systems. And when it comes to the outdoor version, then 3 stripes are not uncommon. There wasn’t much of a question - the classic two-way version: LF and HF.
Speaker Selection
The main requirement for the speakers is the optimal price / quality ratio. Those. it should not be "cheap" at 500 rubles., But also not a breathtaking "high-end" for $ 1000. Besides, I was in no hurry. The idea of assembling “half-wheelers” with my own hands came a long time ago, and I threw a bait in advance to my good friend, a “sick” sound, with whom we have been constantly and fruitfully communicating on this subject for a long time.
The first to appear were the treble - Vifa XT19SD-00/04 ring-rad. These are high-quality 4-ohm “peepers” quite popular among audiophiles. We planned for one set, but for some reason did not go and ended up in my set.
The second arrived in time LF. They turned out to be very decent midbasses from the Soundstream Exact 5.3 kit. Right hereyou can read a little about them. It so happened that the “tweeters” burned during installation, and lone woofers were not needed on their own. 4-ohm 5.5 "midbasses mounted in a cast aluminum basket were immediately purchased.
Now that you have the speakers, you can start creating acoustics.
Active / passive?
Each option has its pros and cons. Firstly, it is necessary to take into account the compactness of the columns themselves and the associated difficulties in layout in a confined space. And it does not make sense to mount outside. Secondly, individual modules as independent components can be combined in the future, and it is also easier to repair if something happens. And thirdly, active speakers are quite expensive. Because if you make a decent amplifier (and sometimes even one in each case), then it will turn out more expensive than the acoustics themselves. In addition, I already had an amplifier. But in any case, I am for the scheme - passive acoustics + amplifier, it is more universal.
Case dimensioning
We decided on the speakers, now you need to understand which case is optimal for them. Dimensions are based on the sound characteristics of the woofer. There are no recommendations on the manufacturer’s website, as The speaker was intended primarily for car audio. It makes no sense to keep special equipment for these purposes, unless this is your job. Therefore, an intelligent dude with a special stand comes to the rescue. As a result of laboratory tests, we obtain the estimated housing size 310 x 210 x 270 mm. During measurements, the parameters of the phase inverter were also calculated.
By the way, many manufacturers on their sites publish recommended housing sizes for speakers. When such information is available, it is logical to use it, but in this case I did not have such data, so I had to do laboratory research.
Body material
In my opinion, the most optimal material for the body is MDF. It is acoustically neutral and also slightly better in performance than chipboard. Plywood is also good, but finding quality plywood is not easy, and it is more expensive and more difficult to process. As a source material for the case, a 22mm MDF sheet was selected. In principle, the standard 18-20mm is quite enough, but I decided to do a bit with a margin. Stiffness is never superfluous.
Construction and body design
One of the most important stages. Before you go for MDF, I advise you to decide on the design in order to immediately ask the seller to cut the sheet in parts, and at a normal point of sale there are always good machines with an accurate and even cut. At home, such a cut is difficult to obtain.
So the design. The speakers should look at least as good as the “industrial ones” so that there is no sensation of a club of crazy hands. We do not only high-quality, but also beautiful acoustics. In general, there are practically no beautiful, interesting, and at the same time structurally uncomplicated speaker systems. Italian Acoustic Sonus Faber makes beautiful acoustics, amazing in beauty - Magico Mini. But they are all made using precision machine tools, which by definition are not at home. Alternatively, you can order the case to a good cabinetry with hands and CNC. Such work will cost, depending on where and what you order, from 10 000 rub. up to 30 000 rub. along with materials. If the specialist is good, then the speakers will look no worse, or even better than the “store ones”. In this case, I decided that I would completely do everything myself. Therefore, we look at things realistically and make a construction without any bevels, curly cuts, etc. Those. it will be a box. The calculated dimensions give a fairly pleasant proportion, and the proportion in the design is already half the battle.
What to design? Although I am associated with design by occupation, I know 3D packages, to put it mildly, superficially. In this case, the program should be more engineering than rendering. Specialized "Kad" for this purpose are heavy and redundant. The solution was quickly enough found - the freeware SketchUp is more than suitable for this purpose. It is so simple and intuitive that it was fully mastered in about an hour. He can do the main thing: quickly create any shapes, put down sizes, use simple textures. I think that such a program is ideal for "home" purposes. In it you can easily, for example, design a kitchen or even a small house.
Here is the case design:
The design is simple. Six walls glued together. Front 2 cutouts for speakers. There are 2 cutouts at the back: under the bass reflex and under the terminal block. The 120x80 rectangle indicates the place for the crossover. Inside the phase inverter is another wall in the width of the internal space, attached perpendicularly under the cut:
Based on the drawing, a sheet sawing pattern emerges:
How will we finish the case? Pasting with a film was immediately ruled out - the acoustics should look decent. As an option, painting was considered. I abandoned this idea, because such speakers will not fit into every interior (at least they did not fit into the current one). I want more versatility. In this regard, natural veneer is more suitable. But completely veneered acoustics look boring. Search for a combined solution:
In general, the options are not bad in appearance, but purely structurally cause difficulties. As a result, it was decided to trim the side walls with ash veneer, and tighten the remaining 4 walls around the circumference with leather, more precisely with high-quality automotive leatherette. The squeak is beautiful in itself, but the woofer has a structural patch on the front side of the case, which will not look very nice. Therefore, it was decided to make an additional decorative overlay (ring) for it, which will press it to the body, and at the same time give beauty to the column itself. With the design and design decided.
Instruments
Before moving on to the next step, I will outline what basic tools are needed to work:
- Circular.
- Jigsaw.
- Drill.
- Milling cutter.
- Polishing machine.
- Straight arms.
Without this kit, it is better to order a case for a good master.
Cut
So, we are cutting
Body assembly
The walls are glued together with PVA and pulled together with screws. First, glue the body without the front wall.
Next, saw the hole of the bass reflex with a jigsaw.
Now a hole for the terminal block, as well as a chamfer in order to “drown” it. Initially, according to the project, the terminal block was supposed to be placed at the bottom. But in the process it became clear that it would not be very convenient to mount the crossover in the center through the woofer hole, so I moved the hole for the terminal block higher, and the place for the crossover lower.
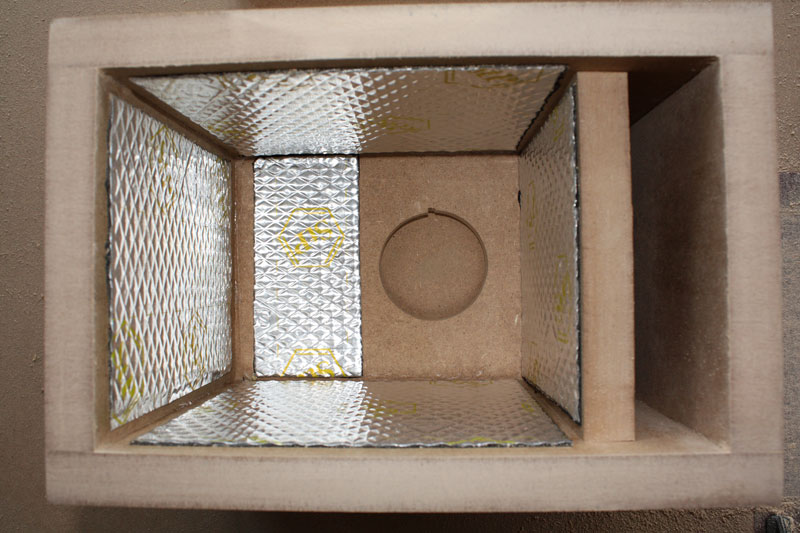
Before “attach the lid”, it is necessary to glue the insides with vibration-insulating material.
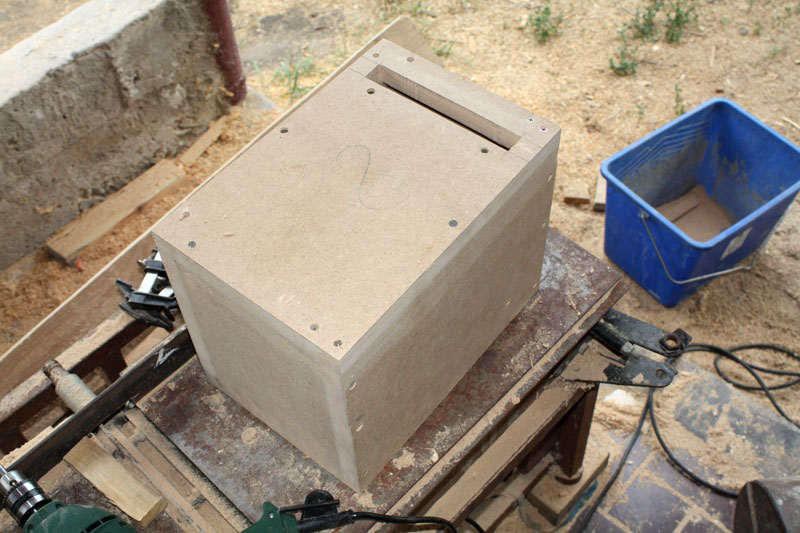
You can close the box.
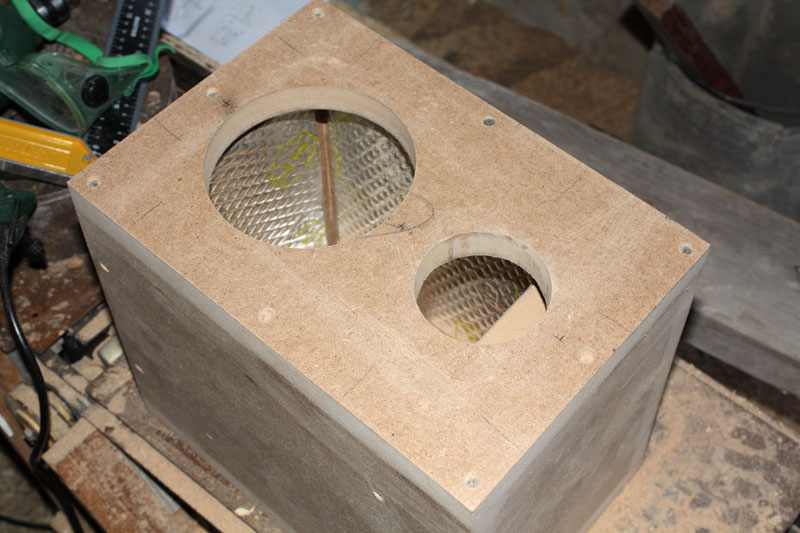
Now one of the most crucial steps is to cut out the holes for the speakers on the front panel. I have already said that the ideal speaker system is single-band. Why? Because the propagation of sound comes from one source to the listener without a time mismatch due to the difference (scanty) in the distance that is when using a multi-band system. Therefore, speakers are best placed as close to each other as possible. So the sound picture is "denser". We calculate the holes so that the distance between the edges of the speakers will be about 1 cm. The holes are sawn with a jigsaw with a circular guide.
The speakers must be recessed. We apply the speakers and along their edge draw a diameter for chamfering. We measure the depth of the chamfer on the overlay of each speaker. The chamfer was removed by hand milling. The depth of cut was set to stop. No guides were used, neatly round-off was filmed layer by layer to the line. For "peeping", two "ears" were additionally cut under the terminals.
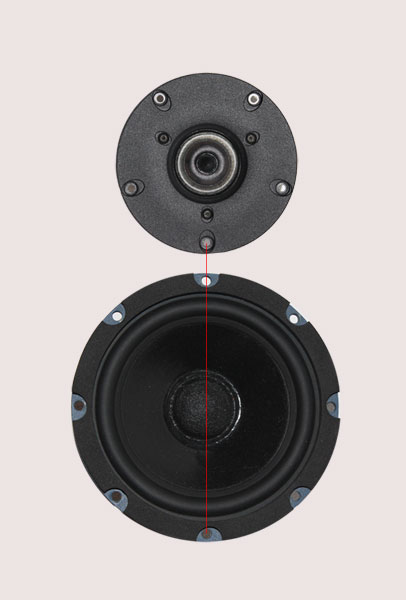
After the chamfers are removed, we apply the terminal strip and speakers, after which we drill holes for future self-tapping screws with a thin drill. Without them, firstly, the MDF itself can “tear apart” when screwing in the screws, and secondly, during the final installation of the speakers it will be more difficult to deliver smoothly. For a very long time I thought about how to set the dynamics relative to each other, I came to this scheme:
The holes from the screws on the external surfaces must be repaired before the final finish. I used an epoxy. In order not to wait until one surface hardens, he glued each surface with tape and took up the next. When the epoxy dried up, walked with a grinder.
Finish
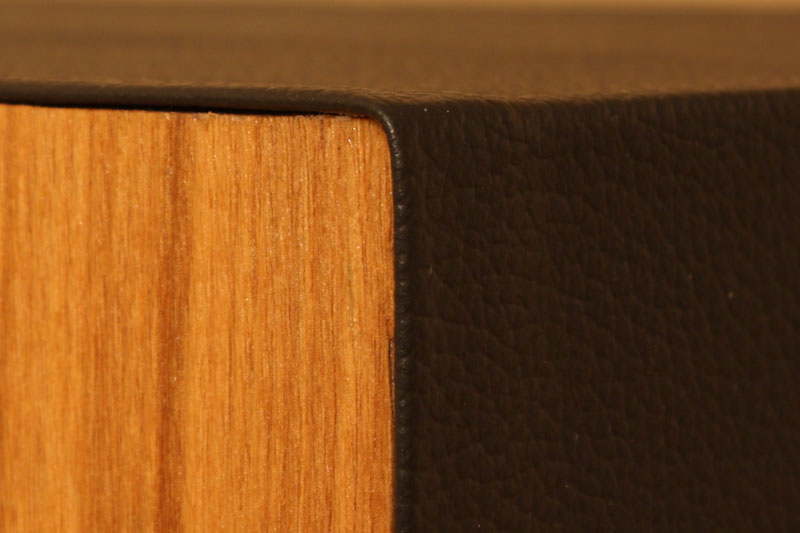
The veneer has remained from some ancient times, so I did not have to buy it. The sheets were not wide, so a couple of sheets were picked up, fastened with adhesive tape and glued to the body. First, one side, then the other.
The veneer needs to be protected. I covered it with clear yacht varnish.
Now you need to fit the case with leatherette. There are many options for how to do this. I decided to do as follows. A strip is cut 20 mm more than the width of the body and slightly longer than the circumference of the body. On each side it is bent by 10 mm, the hem is glued to "special glue 88". Then, on the same glue, the strip is glued around the circumference to the body. First, the bottom (partially), then the back wall, then the top, then the front and again the bottom. At the last stage, before the adhesive strip is cut in place and glued butt. I glued all sides at a time, i.e. didn't wait for each side to dry. After each side, I took a short pause (the glue sticks fast enough), and set to the next one.
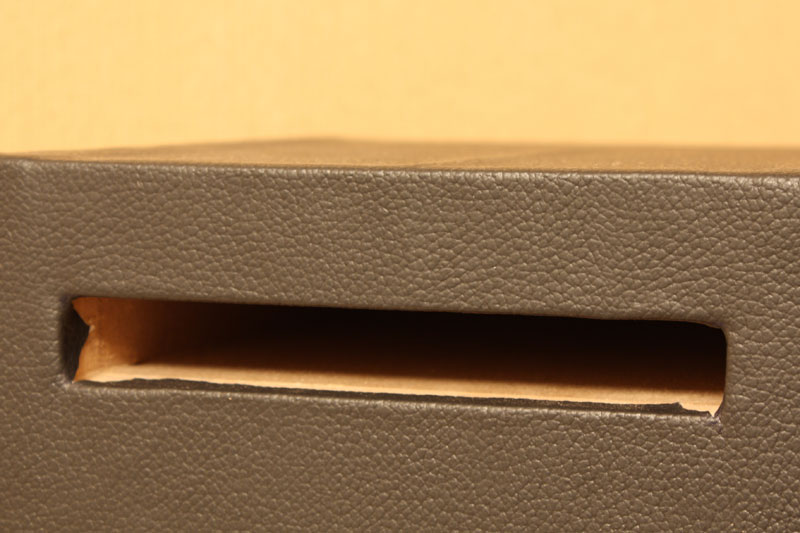
After everything has dried out, the skin is carefully cut and sealed inward at the opening of the bass reflex.
If you really want to, then Fazik can somehow be ennobled.
Then holes are cut through on the terminal block, “woofer” and “tweeter”. The skin on the terminal strip and RF will flush down, so the cutout diameter can be left less by 5-10 mm. The leather on the woofer will be pressed by a decorative ring, so you need to trim so that it is not visible.
Final assembly
First of all, we mount the crossover. Cross - self-made, on a good elemental base. They use air-core coils, film capacitors for the tweeter and MOX resistors. I myself did not solder it, but ordered the sensible guys.
By the way, many manufacturers sin by the fact that sometimes even not very good crosses put in even quite expensive acoustics. On the Internet, you can find many "gutted" systems on this subject. Before mounting the cross, you need to solder three pairs of wires: for the terminal block, bass and treble. It turned out that it would have to be mounted directly on a plate with vibration isolation. He considered that she was superfluous and dismantled it. Now you can screw it on. I used a piece of packaging film from under some device as a substrate.
Now we solder the required pair of wires to the terminal strip and fix it on the case. The terminal block and speakers are screwed on with decorative black self-tapping screws with a head under the “star”. The “squeak” pad is screwed on with similar screws, so it would be logical to use the same for the rest. The back wall is ready.
Before mounting the speakers, it is necessary to dampen the housing with a special padding polyester. For these purposes, was used "wool" company Visaton. The synthetic winterizer is glued around the walls.
What dynamics to start with, in principle, no difference. I started with a squeak. Solder the appropriate pair of wires from the cross, insert the speaker and fasten with screws. Done.
Midbass needs to be slipped under the skin, and pressed down on top with a decorative ring. Solder the remaining pair of wires and mount the speaker.
All? All. We fasten the acoustic cable to the terminal block and begin the tests.
Test
The system test was carried out in the following configurations:
1. Sherwood VR-758R receiver + speakers.
2. Computer + Unicorn (USB-DAC) + Self-made stereo amplifier + speakers.
3. Computer + E-mu 0204 (USB-DAC) + Sherwood VR-758R + speakers.
A little about the configurations themselves. I personally think that at the moment the ideal option for a home music center is: comp + USB-DAC + amplifier + acoustics. Sound in a digital image is distorted without distortion via USB and fed to a high-quality DAC, from which it is transmitted to a high-quality amplifier and then to acoustics. In such a chain, the amount of distortion is minimal. In addition, you can use completely different phonograms: 44000/16, 48000/24, 96000/24, etc. Everything is limited by the capabilities of the driver and the DAC. Receivers in this regard are less flexible and pre-obsolete option. The size of modern hard drives allows you to store almost the entire media library on them. And the tendency to subscribe to Internet content can also eliminate this option, although this is not the near future and is far from suitable for everyone.
I will say right away that in all three configurations the acoustics sounded great. I honestly did not even expect it. Here are some subjective aspects.
1. Adequate and natural sound. What is recorded is reproduced. There are no distortions in any direction. As I wanted.
2. Great sensitivity to the source material. All recording flaws, if any, are well audible. High-quality mixed tracks listen perfectly.
3. Well-readable bass for these sizes. Of course, organ music on the shelves is not fully appreciated (it is generally difficult to evaluate it on acoustics), but most of the material “digests” without problems. It is difficult to expect more from such babies.
4. Very good elaboration of details. Every instrument is audible. Even with a rich sound picture and a decent volume, the sound does not move into a mess (the amplifier plays an important role here).
5. I want to make it louder;) Ie acoustics do not yell, but plays smoothly. Although there is also not a small merit of the amplifier itself, because as the load increases, a good amplifier maintains linearity.
6. From long listening does not hurt the head. Personally, this often happens to me, but then he plays all day and at least that.
7. Concerns about the incorrect panorama and the strong dependence of the sound on the listening position have not been confirmed. As far as I know, car speakers have a specific phasing of sound due to the peculiarities of the location of the speakers in the cabin. And it was about this kit that I read that his midbasses are more universal in this regard. Which actually was confirmed. You can sit in the center in front of the speakers, you can stand next to them sideways - the sound is excellent. There is a dependency, but very small.
As for the configurations themselves, the most high-quality sound was achieved with the second configuration.
Firstly, a very high-quality Unicorn DAC was used. Here you can read about him.
Secondly, the “self-made amplifier” is the know-how of one sensible Togliatti “soundman”. Here it is in a beautiful small aluminum case:
But “gutted”:
In a nutshell, we managed to find a circuit solution in which the amplifier retains its characteristics when changing the volume, i.e. does not distort the sound at any (structurally acceptable) volume. Too many amplifiers (even very expensive) suffer from this. It was amazing to hear how such an amplifier enlivened many speakers, i.e. made them sound like they should sound. By the way, some industrial amplifiers (in particular, quite good Xindak itself) were redone according to this scheme, and they opened a second wind.
Compare acoustics with something else, you ask? Yes, for example, with ProAC Studio 110 - this is a fairly high-quality shelf speakers, here's a little about them . They compared, realized that they definitely sound no worse. The “prows” may have a slightly lesser dependence of sound on the position of the listener due to the specific placement of the inverter and the “tweeter”, there somehow they all cunningly calculated it. And the rest is absolutely no worse, even I personally liked my homemade products more, but this is attributed to subjectivity;) I also wore headphones (quite good Koss) and compared them by panorama, top and bottom. Absolutely identical sound. Even on the bottoms. In general, the enthusiasm is complete.
Material Costing
Midrange / Tweeter speakers (pair): 3,000 rub.
Tweeters (pair): 3 000 rub.
Crossover (pair): 3 000 rub.
Sintepon: 160 rub.
Terminal (terminal block): 700 rub.
Screws: 80 rub.
MDF sheet, 22mm: 2 750 rub.
Adhesive tape: 30 RUR
PVA: 120 RUR
Special adhesive 88: 120 rub.
Vibration isolation: 200 rub.
Figured slip ring: 500 rub.
Cable: 500r.
Total: 14 160 rub.
Some materials were or went free of charge; here, accordingly, they are not taken into account.
In custody
In any more or less complex device or complete functional system, absolutely everything is important. When it comes to the music system, a large number of factors influence the final result:
- The quality of the phonogram.
- Device for playing a phonogram.
- Digital-to-analog converter.
- Signal amplifier.
- Wires.
- Speakers installed in the speaker housing.
- Correctly designed for speakers and well-assembled enclosures.
- Scheme and komplektuha for the crossover.
This is a basic but not complete list.
It is wrong to assume that the main thing is the amplifier or the main thing is the wires, or the main thing is the speakers. A home music system is like an orchestra. And if in this orchestra someone will be bad, and someone will play brilliantly, then on the whole it will turn out - average. Or, as stated in a very accurate example: if you mix a barrel of shit with a barrel of jam, you get two barrels of shit.
There is another extreme. A good system costs fabulous money. So each component should cost half a million. And phonograms should be exclusively in Super Audio CD or on company records. Type closed society of elite audiophiles. Bullshit is everything.
I came to the conclusion that it’s quite possible to assemble your own relatively budgetary system, which is described with one word “Sounds”. And if, as a DAC or amplifier, due to its features, it is better to use really existing solutions, which are very numerous now. That correctly made (independently or on order) speaker system will sound better than the “brand name” purchased for the same money. Now almost all components can be ordered online. Moreover, many manufacturers publish housing designs for their respective speakers. There is a ton of software to calculate enclosure parameters. The network has many specialized forums, and offline there are people with hands. In everything, to be a specialist is of course impossible. As in any field, the main thing is to know the general principles.
The article does not claim to be the ultimate truth, but I hope that my thoughts and my experience will be useful to someone else.
Upd. In comments, many ask about the amplifier. If anyone is interested, write in a personal, I will give the coordinates.
Upd2. The amplifier developer has his own website - pvd-audio.com )