Isolating an application with an IP address from a VPN in another country using Steam as an example
- Tutorial
Abstract: Network-level application isolation using Linux network namespaces. Organization of SSH tunnels.
Traditionally, most of the article will be devoted to theory, and boring scripts - at the end of the article. Steam will be used as the subject of experiments, although the writing is applicable to any application, including web browsers.
Instead of entry. I just show this picture:

147% ... Something that reminds me of something. However, Habr is not for politics.
The price of games in Steam depends on the region. Region - from IP'shnik. There is a desire to have prices in rubles, not in euros.
To do this, we use a VPN through SSH using tun devices, plus network namespaces to isolate the application from all other network devices.
Traditionally, an application that starts even with user rights has full access to the network. It can use any network address existing in the system to send packets.
Moreover, most desktop applications do not understand anything at all in the interfaces, since they assume that the system has only one network interface and does not allow you to specify which interface to use. Server software usually has this option (which address to use as the sender address), but for desktops this is an inadmissible luxury.
If we have several interfaces (one of which relates to VPN), then there are no regular methods to tell Steam that you need to use it, and not eth0 / wlan0. More precisely, we can "wrap" all traffic in a VPN, but this is not always desirable. At a minimum, an increase in latency and a decrease in speed (even if the VPN leads to a superfast server, an increase in latency, overhead from the tunnel and a fixed width of the local channel put TCP in a position where you have to cut the speed). As a maximum, it is one thing to “buy through a Russian VPN”, and another thing is to let all traffic go there. I am not at all attracted by the use of a VPN to get protection from Roscomnadzor from the opposition and freethinking .
Under these conditions, there is a great desire to leave one on one specific application and a given network interface. One. Configured for the needs of this application only.
To solve this problem in Linux, for quite some time (already since 2007), there is a technology called network namespaces, that is, namespaces for networks. The essence of the technology: a kind of “directories” is created over network interfaces, each directory can have several network interfaces and applications. An application that finds itself in a given network namespace can use (and see) only those network interfaces that are assigned to this space.
The picture below explains what is happening:
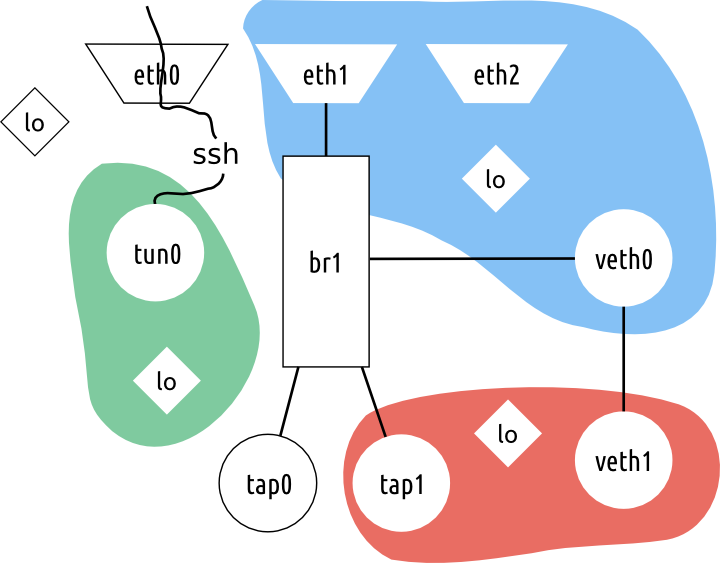
Such an abundance of configurations, of course, is not quite a desktop, but it will help explain what is happening in its purest form.
Different namespaces are highlighted in different colors. The specified interfaces are available only from the specified namespaces and nothing else. For example, red namespace has access only to tap1, veth1 and lo, blue to eth1, eth2, lo and veth0, green to tun0 and lo. Outside the namespace, eth0 remains, the native interface is br1, tap0, and lo.
Note that each namespace has its own lo! If in the blue namespace on lo it will listen to mysql, then from the green (and any other than blue) namespace you will not be able to access it. Perhaps this is the most pleasant feature. The second feature is that we can use the same IP address in different namespaces on different interfaces, and there will be nothing for us. Of course, the routing table for each namespace is different.
The attentive reader sensed the spirit of virtualization. Yes, of course. Network namespaces (along with other technologies of this level) are an important part of LXC (container virtualization in Linux). But, unlike openvz and many other similar technologies, the LXC components are so general that they can be used as stand-alone tools. And this is the correct unix-way: everyone does only one thing, but good; although purists may say that "shoving everything into the core is bad."
The most interesting picture is obtained if you leave the application with a tun / tap interface that leads outside the current network (in the picture above, there is a green namespace with a lonely tun). If tun lands somewhere outside the computer (for example, on a vpn server), then the application will have no way to understand what network settings the computer really has. If a VPN, for example, leads from Cyprus to Russia, then any application running in the green namespace will receive an address from Russia and go to the network as if it is in Russia. Actually, this is what we need in order for Steam to believe that we have Russian IP and agree to sell games for half the price.
С определением страны у Стима всё несколько странно. Без VPN Стим иногда показывает мне цены в евро, иногда в рублях, и понять закономерности я не смог. Русский VPN снял все вопросы — цены всегда в рублях.
Краткая подсказка по работе с network namespaces (практические советы ближе к концу статьи):
И несколько трюков:
I do not like openvpn, openswan and other applications for redundancy. I recognize their need in some situations, but when I can, I try to use SSH. There are several reasons:
1) SSH is out of the box on any server.
2) SSH uses TCP, not gre / udp, and if you need to connect from an exotic place with worthless WiFi, then ssh on ports 22 and 443 is ours. If the 22nd port can still be closed, then 443 - definitely not, because HTTPS uses it (and if it is blocked, indignant hamsters will take everything on their way to Google / Facebook, etc.)
3) The SSH client is on any machine within reach, that is, I can raise the tunnel I need with any unix -cars. In 3-5 steps - with windows.
4) Tunneling degree settings are easy to adjust. If I only need socks-proxy, then I will not invent l2 tunnels.
5) Without additional shamanism, you can have several parallel connections, and in any combination - to one server from different clients, to different servers from one client, etc. Those who are completelyfreaking on their heads can generally connect continents and networks into a single L2 segment by means of a lonely little fly sitting on 3g somewhere in the fifth point of the world behind hardcore nat with closed ports. And it will even work (to the extent that 3g at the fifth point of the world will be able to digest the broadcastcasts / multicasts flying through L3).
Although the main reason is even simpler: SSH is a full-time toolkit, and it can do everything you need. Why else?
So, the theory of SSH tunnels
The TUN interface is very simple: it creates a virtual network interface in the system (tun0, tun1, etc.), which, with its other “end”, looks in fd (file descriptor) for the program that created it. The program decides what to do with traffic from fd. And the applications in the system themselves decide what to do with the network interface.
In the case of SSH, we tell the SSH client to create a tun interface for its part, the SSH server for its part, and connect them. It turns out that traffic on the one hand (from the client) came in, on the other hand (from the server) came out. And vice versa. What is not a tunnel? Why not vpn? Given that SSH also knows how to encrypt traffic, we get a ready VPN. This is called channel inside SSH, and it multiplexes them, but we don’t really care.
Here is a simple drawing of what is happening:
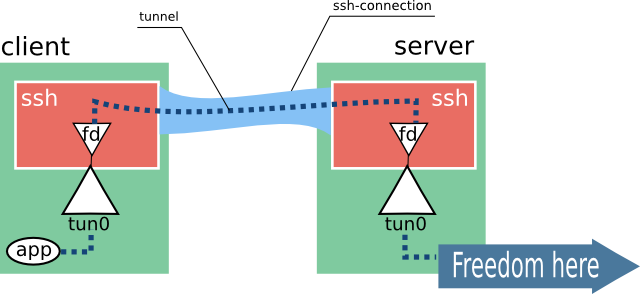
Note that we need cooperation from the SSH server. We will discuss permission to create tunnels on the server in the section below. There will also be details of NAT settings, addressing, and other things so that the Freedom arrow works.
Note on the margins: in addition to tun interfaces, there are also tap interfaces. They allow you to combine L2 segments. This is hell, horror, sodomy and waste, but if someone really wants to, then he can try to combine a couple of networks from different data centers using an SSH connection to a home-completed machine. It will even work (I can not vouch for the consequences).
Training:
We are almost done. It remains only to run steam. Everything below on the local machine.
Actually, that's all. At the exit, we have Russian prices in Steam and Russian censorship. Fortunately, it will only protect steam, and the browser in the next window will use not very fast, but very free Cypriot Internet.
In the following parts:
Traditionally, most of the article will be devoted to theory, and boring scripts - at the end of the article. Steam will be used as the subject of experiments, although the writing is applicable to any application, including web browsers.
Instead of entry. I just show this picture:
147% ... Something that reminds me of something. However, Habr is not for politics.
The price of games in Steam depends on the region. Region - from IP'shnik. There is a desire to have prices in rubles, not in euros.
To do this, we use a VPN through SSH using tun devices, plus network namespaces to isolate the application from all other network devices.
Network namespaces
Traditionally, an application that starts even with user rights has full access to the network. It can use any network address existing in the system to send packets.
Moreover, most desktop applications do not understand anything at all in the interfaces, since they assume that the system has only one network interface and does not allow you to specify which interface to use. Server software usually has this option (which address to use as the sender address), but for desktops this is an inadmissible luxury.
If we have several interfaces (one of which relates to VPN), then there are no regular methods to tell Steam that you need to use it, and not eth0 / wlan0. More precisely, we can "wrap" all traffic in a VPN, but this is not always desirable. At a minimum, an increase in latency and a decrease in speed (even if the VPN leads to a superfast server, an increase in latency, overhead from the tunnel and a fixed width of the local channel put TCP in a position where you have to cut the speed). As a maximum, it is one thing to “buy through a Russian VPN”, and another thing is to let all traffic go there. I am not at all attracted by the use of a VPN to get protection from Roscomnadzor from the opposition and freethinking .
Under these conditions, there is a great desire to leave one on one specific application and a given network interface. One. Configured for the needs of this application only.
To solve this problem in Linux, for quite some time (already since 2007), there is a technology called network namespaces, that is, namespaces for networks. The essence of the technology: a kind of “directories” is created over network interfaces, each directory can have several network interfaces and applications. An application that finds itself in a given network namespace can use (and see) only those network interfaces that are assigned to this space.
The picture below explains what is happening:
Such an abundance of configurations, of course, is not quite a desktop, but it will help explain what is happening in its purest form.
Different namespaces are highlighted in different colors. The specified interfaces are available only from the specified namespaces and nothing else. For example, red namespace has access only to tap1, veth1 and lo, blue to eth1, eth2, lo and veth0, green to tun0 and lo. Outside the namespace, eth0 remains, the native interface is br1, tap0, and lo.
Note that each namespace has its own lo! If in the blue namespace on lo it will listen to mysql, then from the green (and any other than blue) namespace you will not be able to access it. Perhaps this is the most pleasant feature. The second feature is that we can use the same IP address in different namespaces on different interfaces, and there will be nothing for us. Of course, the routing table for each namespace is different.
The attentive reader sensed the spirit of virtualization. Yes, of course. Network namespaces (along with other technologies of this level) are an important part of LXC (container virtualization in Linux). But, unlike openvz and many other similar technologies, the LXC components are so general that they can be used as stand-alone tools. And this is the correct unix-way: everyone does only one thing, but good; although purists may say that "shoving everything into the core is bad."
The most interesting picture is obtained if you leave the application with a tun / tap interface that leads outside the current network (in the picture above, there is a green namespace with a lonely tun). If tun lands somewhere outside the computer (for example, on a vpn server), then the application will have no way to understand what network settings the computer really has. If a VPN, for example, leads from Cyprus to Russia, then any application running in the green namespace will receive an address from Russia and go to the network as if it is in Russia. Actually, this is what we need in order for Steam to believe that we have Russian IP and agree to sell games for half the price.
С определением страны у Стима всё несколько странно. Без VPN Стим иногда показывает мне цены в евро, иногда в рублях, и понять закономерности я не смог. Русский VPN снял все вопросы — цены всегда в рублях.
Краткая подсказка по работе с network namespaces (практические советы ближе к концу статьи):
ip netns — список network namespaces (во всех командах ip netns можно сокращать до ip net)ip netns add/delete foo — создать/удалить network namespace с именем fooip netns exec foo /usr/bin/bin — запустить программу в заданном network namespace (заметим, перетаскивать уже запущенные приложения нельзя)ip link set eth99 netns foo — засунуть интерфейс в заданное пространствоИ несколько трюков:
ip netns exec foo ip link — список интерфейсов внутри пространства fooip netns exec foo tcpdump -ni eth99- tcpdump on it. Attention, due to the specific work of exec, the output to the screen will appear only after pressing Ctrl-C. If annoying - see below. sudo ip netns exec foo login -f username- run login inside namespace. The logged-in user will already work in the given namespace with perfectly configured terminal / group leader settings, etc.VPN organization through SSH
I do not like openvpn, openswan and other applications for redundancy. I recognize their need in some situations, but when I can, I try to use SSH. There are several reasons:
1) SSH is out of the box on any server.
2) SSH uses TCP, not gre / udp, and if you need to connect from an exotic place with worthless WiFi, then ssh on ports 22 and 443 is ours. If the 22nd port can still be closed, then 443 - definitely not, because HTTPS uses it (and if it is blocked, indignant hamsters will take everything on their way to Google / Facebook, etc.)
3) The SSH client is on any machine within reach, that is, I can raise the tunnel I need with any unix -cars. In 3-5 steps - with windows.
4) Tunneling degree settings are easy to adjust. If I only need socks-proxy, then I will not invent l2 tunnels.
5) Without additional shamanism, you can have several parallel connections, and in any combination - to one server from different clients, to different servers from one client, etc. Those who are completely
Although the main reason is even simpler: SSH is a full-time toolkit, and it can do everything you need. Why else?
So, the theory of SSH tunnels
TUN interfaces
The TUN interface is very simple: it creates a virtual network interface in the system (tun0, tun1, etc.), which, with its other “end”, looks in fd (file descriptor) for the program that created it. The program decides what to do with traffic from fd. And the applications in the system themselves decide what to do with the network interface.
In the case of SSH, we tell the SSH client to create a tun interface for its part, the SSH server for its part, and connect them. It turns out that traffic on the one hand (from the client) came in, on the other hand (from the server) came out. And vice versa. What is not a tunnel? Why not vpn? Given that SSH also knows how to encrypt traffic, we get a ready VPN. This is called channel inside SSH, and it multiplexes them, but we don’t really care.
Here is a simple drawing of what is happening:
Note that we need cooperation from the SSH server. We will discuss permission to create tunnels on the server in the section below. There will also be details of NAT settings, addressing, and other things so that the Freedom arrow works.
Note on the margins: in addition to tun interfaces, there are also tap interfaces. They allow you to combine L2 segments. This is hell, horror, sodomy and waste, but if someone really wants to, then he can try to combine a couple of networks from different data centers using an SSH connection to a home-completed machine. It will even work (I can not vouch for the consequences).
Practical actions
Training:
- Copy the SSH key to root to the server (if there is no key, generate :)
sudo ssh-keygen. I usually make the key to the local root, so as not to confuse it with my key. The key is copied by the commandsudo ssh-copy-id root@server. - Verify that SSH on the remote server is allowed to use tunnels. In the file, the
/etc/ssh/sshd_configvariablePermitTunnelmust be uncommented and set toyes. - Select an arbitrary number (echo $ RANDOM). This will be our tunnel number. Remember it (or take another favorite number, for example, 42).
- Set up a remote server. I am writing for debian / ubuntu, a process for other distributions / OS - see the documentation on setting up a network for them. In the file / etc / networking / interfaces, create the following lines:
allow-hotplug tun42
auto tun42
iface tun42 inet static
        address 100.64.42.1
        netmask 255.255.255.0
        pre-up iptables -A POSTROUTING -t nat  -s 100.64.42.0/24 -j MASQUERADE
        post-down iptables -D POSTROUTING -t nat  -s 100.64.42.0/24 -j MASQUERADE
This will allow us to automatically get the configured interface every time the tun42 interface appears on the server. At the same time, we enable NAT to broadcast our packets from the tunnel, and turn it off as soon as the interface disappears. - Enable routing on the server.
/etc/sysctl.d/enable_routing.confnet.ipv4.conf.all.forwarding = 1
We are almost done. It remains only to run steam. Everything below on the local machine.
- Turn off all previous copies of steam, including the tray icon
- Establish a connection with the server:
sudo ssh -w 42:42 root@server. The -w option says to create tun42 locally and associate it (by creating) with the remote tun42. - In the adjacent console:
xhost +
sudo ip net add steam
sudo ip link set netns steam dev tun42
sudo ip net exec steam ip addr add  100.64.42.2/24 dev tun42
sudo ip net exec steam ip link set up dev tun42
sudo ip net exec steam ip route add default via 100.64.42.1
sudo ip net exec steam login -f $USER
export DISPLAY=:0
steam
xhost +Allows anyone to connect to your X server (be careful). Paranoids can learn man xhost to specify more precise rules.ip net addandip net exec- these are abbreviations ofip netns addandip netns exec- create a network namespace, and start a new user session from which we are working.export DISPLAY=:0says “use the first X server. By default, this variable is reset when login, and without it, steam will not be able to connect to the X-server
Actually, that's all. At the exit, we have Russian prices in Steam and Russian censorship. Fortunately, it will only protect steam, and the browser in the next window will use not very fast, but very free Cypriot Internet.
In the following parts:
- How to run 32-bit steam on x86_64 machine
- How to isolate steam completely so that it works, but it never starts from the root or the main user. Love and hate with pulsaduio, dri, methods for determining missing libraries, debugging Steam itself