Hello World BPMN2.0 or Introduction to Activiti
In this article I want to consider an example of creating a simple application using the Activiti engine.
“ Activiti ” is a lightweight platform for working with business processes (Business Process Managment), adapted for business people, developers and system administrators. The platform is based on the fast and reliable java engine of BPMN2 processes . The OpenSource project is distributed under the Apache license. Activiti can be launched either as part of your java application, or independently on a server, cluster or cloud. In addition, it integrates perfectly with Spring.
Since the project has excellent documentationI will not describe his basic concepts. I only note that, as mentioned above, we can use Activiti as a standalone application, but we can use it as an engine / library for processing business processes embedded in the application. Details can be found here .
So, let's begin. First of all, we need to create a project with Maven support and describe the following dependencies in it:
The first two dependencies (repositories for maven are described here ) connect the Activiti kernel and a set of utilities for integration with Spring (connecting Spring is not described to save space). The second group of dependencies connects the database (in our case, in-memory will be used) and a pool for working with it.
Activiti needs a database to store information about processes, their status, users, history and much, much more.
It is logical to start developing an application with a description of the business process. First of all, you should familiarize yourself with the units of business process description that Activiti offers us (more precisely, BPMN 2.0 notation ). After that, you can begin to describe your own business process. There are three ways to do this:
Despite the fact that the third point seems to be the most logical of the above, we will still use CASE-technologies and draw our business process using the plug-in for Eclipse (it is important to set the plug-in settings to update the xml-description after each change of the diagram, otherwise the editor starts to live its own own life and completely ignore external stimuli as a user).
As a result, I got the following diagram:
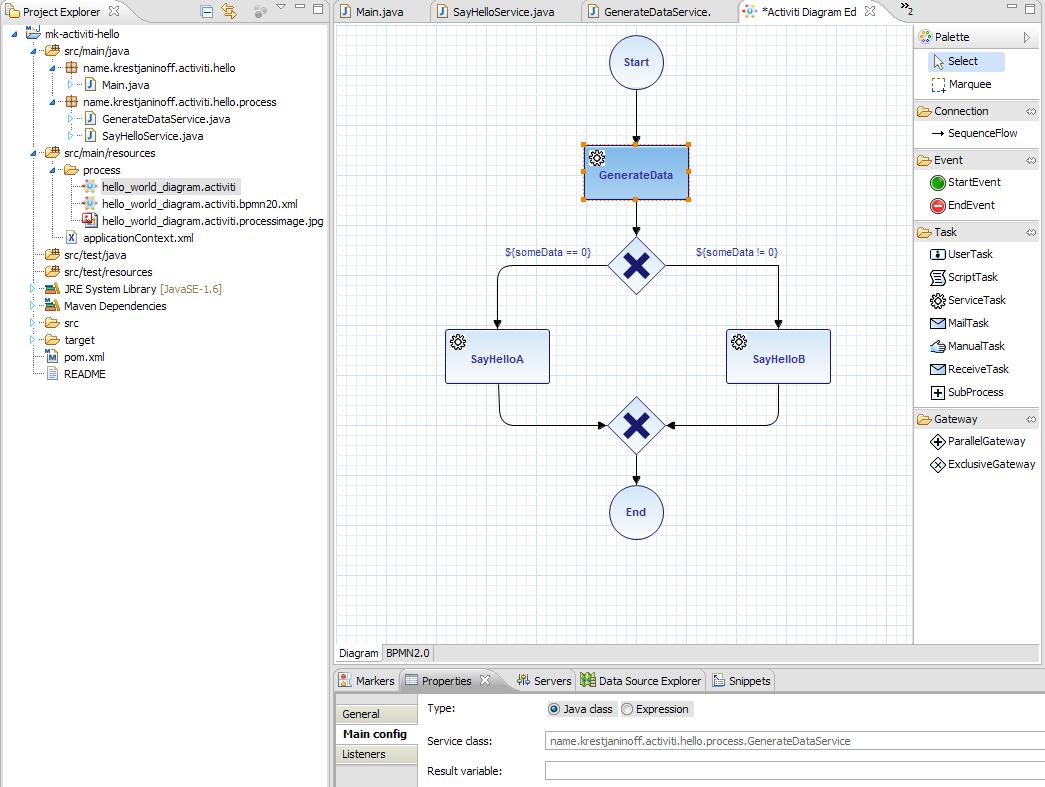
ServiceTask “GenerateData” generates pseudo-random data (implementation using the GenerateDataService class that implements the JavaDelegate interface)
depending on which either ServiceTask “SayHelloA” or ServiceTask “SayHelloB” is executed. Both of these ServiceTask's come down to calling the corresponding SayHelloService service method (implementation based on the UEL expression "$ {sayHelloService.printMessageB (execution)"):
In the XML form (that is, in the format of BPMN 2.0), namely, it is needed by the Activiti engine for interpretation, the process is as follows:
Now, in order for us to start the process using Activiti, we need to configure and initialize the basic elements of the core of Activity . Since we use Spring, for us, the configuration will be reduced to the configuration of the corresponding beans:
It is important to note the deploymentResources property of the processEngineConfiguration bean — it tells the configurator where the description files for our processes are located. Each time you start the application, you must “deploy” these processes to the Activiti engine. More deployment is described here .
And so, the main work has already been done. Now for launching the application we only need to create the Spring context and start the desired process:
The code for the project described above is available on GitHub .
“ Activiti ” is a lightweight platform for working with business processes (Business Process Managment), adapted for business people, developers and system administrators. The platform is based on the fast and reliable java engine of BPMN2 processes . The OpenSource project is distributed under the Apache license. Activiti can be launched either as part of your java application, or independently on a server, cluster or cloud. In addition, it integrates perfectly with Spring.
Since the project has excellent documentationI will not describe his basic concepts. I only note that, as mentioned above, we can use Activiti as a standalone application, but we can use it as an engine / library for processing business processes embedded in the application. Details can be found here .
Dependencies
So, let's begin. First of all, we need to create a project with Maven support and describe the following dependencies in it:
      Activiti

    -->


      org.activiti

      activiti-engine

      5.1


      org.activiti

      activiti-spring

      5.1


      DataBase

    -->


      com.h2database

      h2

      1.2.132


      commons-dbcp

      commons-dbcp

      1.2.2


* This source code was highlighted with Source Code Highlighter.
The first two dependencies (repositories for maven are described here ) connect the Activiti kernel and a set of utilities for integration with Spring (connecting Spring is not described to save space). The second group of dependencies connects the database (in our case, in-memory will be used) and a pool for working with it.
Activiti needs a database to store information about processes, their status, users, history and much, much more.
Buisness process
It is logical to start developing an application with a description of the business process. First of all, you should familiarize yourself with the units of business process description that Activiti offers us (more precisely, BPMN 2.0 notation ). After that, you can begin to describe your own business process. There are three ways to do this:
- using the Eclipse plug-in (meager component palette);
- with the help of a special Activiti Modeler application (there is no possibility of loading diagrams, saving is extremely strange);
- hands through an XML editor.
Despite the fact that the third point seems to be the most logical of the above, we will still use CASE-technologies and draw our business process using the plug-in for Eclipse (it is important to set the plug-in settings to update the xml-description after each change of the diagram, otherwise the editor starts to live its own own life and completely ignore external stimuli as a user).
As a result, I got the following diagram:
ServiceTask “GenerateData” generates pseudo-random data (implementation using the GenerateDataService class that implements the JavaDelegate interface)
@Service

public class GenerateDataService implements JavaDelegate {


  public void execute(DelegateExecution execution) throws Exception {

    Long someData = Calendar.getInstance().getTimeInMillis() % 2;

    execution.setVariable("someData", someData);

  }

}


* This source code was highlighted with Source Code Highlighter.
depending on which either ServiceTask “SayHelloA” or ServiceTask “SayHelloB” is executed. Both of these ServiceTask's come down to calling the corresponding SayHelloService service method (implementation based on the UEL expression "$ {sayHelloService.printMessageB (execution)"):
@Service

public class SayHelloService {


  public void printMessageA(ActivityExecution execution) {

    System.out.println("Hello world: variant A");

  }


  public void printMessageB(ActivityExecution execution) {

    System.out.println("Hello world: variant B");

  }

}


* This source code was highlighted with Source Code Highlighter.
In the XML form (that is, in the format of BPMN 2.0), namely, it is needed by the Activiti engine for interpretation, the process is as follows:
  Simple "Hello World" process


* This source code was highlighted with Source Code Highlighter.
Settings
Now, in order for us to start the process using Activiti, we need to configure and initialize the basic elements of the core of Activity . Since we use Spring, for us, the configuration will be reduced to the configuration of the corresponding beans:
  xmlns:context="http://www.springframework.org/schema/context"

  xmlns:tx="http://www.springframework.org/schema/tx"

  xmlns:xsi="http://www.w3.org/2001/XMLSchema-instance"

  xsi:schemaLocation="http://www.springframework.org/schema/beans www.springframework.org/schema/beans/spring-beans.xsd

    www.springframework.org/schema/context www.springframework.org/schema/context/spring-context-3.0.xsd

    www.springframework.org/schema/tx www.springframework.org/schema/tx/spring-tx-3.0.xsd"

>


    class="org.apache.commons.dbcp.BasicDataSource" destroy-method="close">


    class="org.springframework.jdbc.datasource.DataSourceTransactionManager">


    Activiti

  -->


    factory-method="getRepositoryService" />


    factory-method="getRuntimeService" />


    factory-method="getTaskService" />


    factory-method="getHistoryService" />


    factory-method="getManagementService" />


* This source code was highlighted with Source Code Highlighter.
It is important to note the deploymentResources property of the processEngineConfiguration bean — it tells the configurator where the description files for our processes are located. Each time you start the application, you must “deploy” these processes to the Activiti engine. More deployment is described here .
Application launch
And so, the main work has already been done. Now for launching the application we only need to create the Spring context and start the desired process:
public class Main {

  public static void main(String[] args) {


    // Create Spring context

    ClassPathXmlApplicationContext applicationContext =

      new ClassPathXmlApplicationContext("applicationContext.xml");


    // Start process

    RuntimeService runtimeService = (RuntimeService) applicationContext.

      getBean("runtimeService");

    runtimeService.startProcessInstanceByKey("helloWorldProcess");

  }

}


* This source code was highlighted with Source Code Highlighter.
Example
The code for the project described above is available on GitHub .