Give me the iron! Part 1

Part 2
On the hub there are many articles on the creation of cool home-made devices based on microcontrollers, at least take a wonderful series about an unusual gift ( 1 , 2 , 3 ) and an addition about a touch keyboard . They cause enthusiasm, encourage experiments, but something like this comes up: “And now, we draw a circuit, wired a circuit board, poison, solder, write firmware, fill in, and it's all about the hat.” It was here that I, as an encoder, who had never held a soldering iron in my hands, these same hands dropped, because all points except writing the firmware were not available.
But everything changes when desire overcomes laziness! In this article I will tell you where to start in order to get involved in experiments with microcontrollers.
Under the cut a little less than a megabyte of pictures
A rock
First of all, you need to decide which microcontroller is lucky enough to become a victim of our experiments. In my heart, I’m still minimalist, and therefore I wanted to start with the simplest possible stone, so that resources were limited, so that I had to count every byte, as in the good old days :) Therefore, my choice fell on PIC controllers, which are notable for Harvard architecture and shortened instruction set (RISC) . We go to the manufacturer’s website ( microchip.com ) and look at what they are.

First of all, stones are divided by bit depth. Guided by unhealthy minimalism, I chose 8-bit. They, in turn, are divided into families.

The larger the number, the steeper the stone. Guided by the same minimalism, I boldly bumped into the youngest PIC10 series. Here we are already observing the numbers of specific models. Pay attention to the letter that stands between the family name and the model number: either C or F. This letter indicates the type of memory of the microcontroller, C - once recorded, F - rewritable (flash). For experiments, of course, we need a stone with rewritable memory.
However, my choice was somewhat broken off when I met a harsh reality: the youngest stone in the store was PIC12F509. So I will describe the experiments on it :)
Materiel
So, after we have decided on the stone, what is needed? You need to read the datasheet (pdf) to understand what we're going to deal with. By the way, in addition to datasheet, there is still a lot of fascinating reading on the site . It will also be very useful to refresh (or even acquire) knowledge of the basics of electronics, you can do it on easyelectronics.ru , there is even more fascinating reading :)
Programmer
The programmer is a device
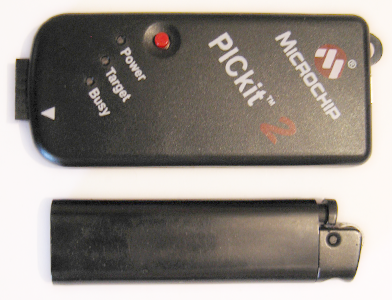
Here's a box, a lighter for scale. It is noteworthy that it works from USB, unlike many similar devices that require a COM, or even an LPT port. Another plus is the ability to power the target device, no need to steam up to a separate source. Included are disks with firewood and an IDE (with the same success everything can be downloaded from offsite), a USB cable and, depending on the configuration, a demo board with an installed microcontroller. The nishtyachok is very tasty, but I preferred to leave it for future experiments, since the stone is older there.
Attention! There are 2 versions of PICKit2, differ in the color of the button: the old button is black, the new one is red. A device with a red button can simply be connected to the stone, and for a device with a black button you will need to additionally hang 2 resistors. To take less steam, I recommend taking a device with a red button.
Yes, the question price. Microchip sells them for 50 bucks. But they are there, and I am here in St. Petersburg. Many people are engaged in these devices, but someone works only with the legal. persons, and someone is ready to deliver in 5-7 weeks. Remain retail stores. Chip and dip - 3k, Megaelectronics - 2.5-2.7k. Maybe somewhere there is cheaper, but I'm tired of looking, so I took in megaelectronics.
Frizz
Resistors, capacitors, diodes, transistors. Read here . I did not trifle and took 10 pieces of each face value, for experiments - by the eyes. So far, only 2 resistors (the largest) and 2 Conders (large electrolyte and small ceramic) have come in handy.
LEDs What experiments without LEDs? I was seduced by the seller’s words that the BL-L513UBD LEDs can be safely hooked to 5-volt outputs without resistors. Yes, you can cling. But they are more likely to burn their own retina than to indicate. Ask the seller to pick you a small brightness LEDs, and resistors to them for connecting to 5 volts.
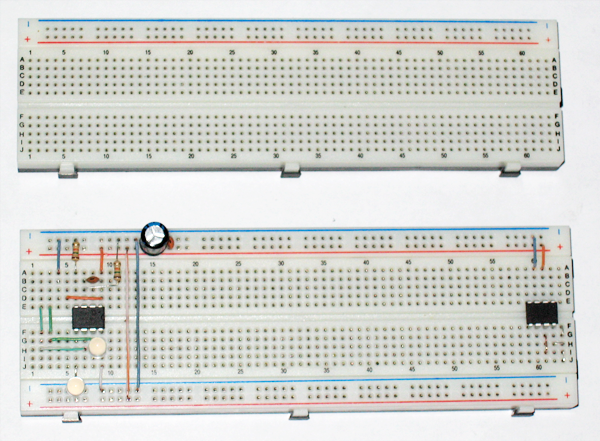
Bread board
The same training ground on which we will experiment. There are two types: for mounting with soldering (looks like a printed circuit board) and without soldering (looks like a mattress with holes). I took EIC-16020 in megaelectronics for something like 500 rubles. It consists of two pieces that are connected by grooves. Pieces can be bought.
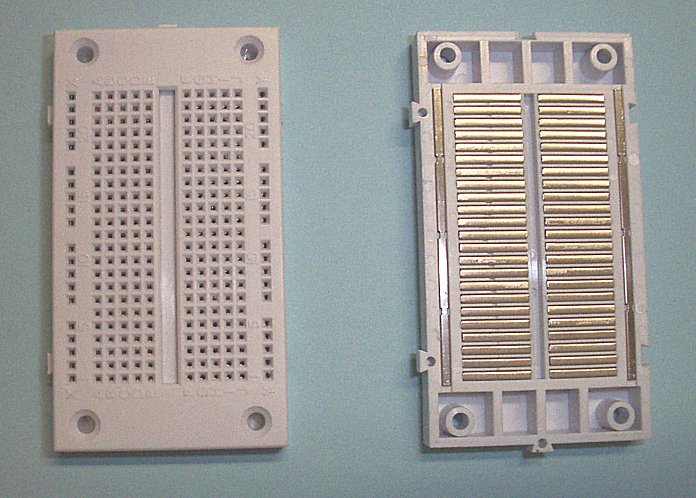
The following photo shows how such boards are wired inside:
For switching on such a board, wires are required. You can buy a set of jumpers at a price of 180 rubles for 10 wiring, or you can just take a meter of twisted pair cable - it fits perfectly.
Another problem: the connector of the programmer - holes. 6 items. And there are holes on the board. In a good way, to connect the programmer you need to find a two-way DIP-connector. But I understood this only when I returned home, and therefore, without thinking twice, I cut the necessary from paper clips. They are slightly thicker than required, and come in with a little effort.

On this, perhaps, I will interrupt. Further I will talk about what you can catch from all this, and how to breathe life into the resulting monster. See you!
End of Part One
Part 2