NerdDinner. Step 2: creating the database
- Transfer
This is the second step of the free NerdDinner tutorial , which shows how to build a small but complete web application using ASP. NET MVC.
We will use the database to store information about Dinner and RSVP for our NerdDinner application.
Below are the steps for creating a database using the free version of SQL Server Express, which can be easily installed through the Microsoft Web Platform Installer. All the code that we write works both under SQL Server Express and under the full version of SQL Server.
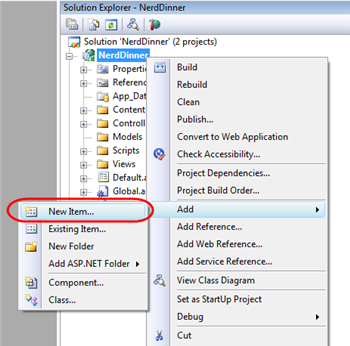
We start by right-clicking on our project in the “Solution Explorer” panel and select Add> New Item: In the “Add New Item” window, filter by the “Data” category and select “SQL Server Database”: We will name the database “NerdDinner. mdf. " Visual Studio will ask us if we want to add this file to the \ App_Data directory, which is already created with read and write permissions in the ACL. We will certainly agree, and our new database will be created and added to Solution Explorer:


Now we have an empty database. Let's create some tables.
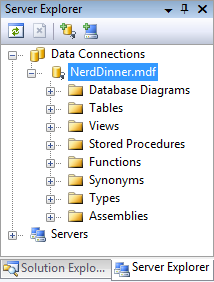
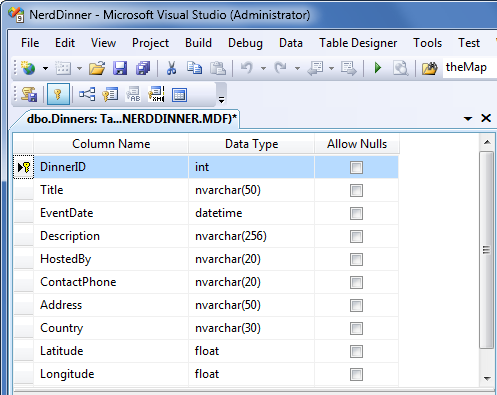
To do this, go to the “Solution Explorer” tab, which allows us to manage databases and servers. The SQL Server Express database stored in the \ App_Data folder will automatically appear in the Server Explorer list. We can use “Connect to Database” to connect to local or remote databases: We will add two tables to our NerdDinner database: one for storing dinners, and the second for tracking RSVP approvals. We can create a new table by right-clicking on the “Tables” folder in our database and selecting “Add New Table”: This action will open the constructor to configure the layout of our table. For the “Dinners” table, we will add 10 columns:


We want the “DinnerID” column to be a unique primary key for the table. You can configure this by right-clicking on the “DinnerID” column and selecting “Set Primary Key”: In addition, making DinnerID the primary key, we also want to configure it as an “identity” column, whose value automatically increases with the addition of a new line in the table. Selecting “DinnerID” and then using the “Column Properties” editor, set the property “(Is Identity)” - “Yes”. We will use the standard identity settings (start from 1, increase by 1 with each new line in Dinner): Next, save our table by pressing Ctrl + S or File> Save . All we need to do is enter the name of the new table - “Dinners”:


The new Dinners table is ready and now appears in the Tables list in Server Explorer in our database.
We will follow the same steps to create the “RSVP” table. This table will consist of 3 columns. Set the RsvpID column as the primary key, and also make the indetity column out of it: Save the table with the name “RSVP”.

We already have two tables in our database. Our final design step will be to create a one-to-many relationship between the two tables so that we can associate each row of the Dinner table with 0 or more rows of the RSVP table. We will do this by setting the “DinnerID” column of the RSVP table to communicate through a foreign key with the “DinnerID” column of the “Dinners” table.
To do this, open the RSVP table in the table designer by double-clicking in Server Explorer. Next, select the “DinnerID” column and the item “Relationships ...” with the right button: A window appears that is used to configure relations between tables: Click on “Add” and add a new relationship. After adding the link, we will open the branch of the “Tables and Column Specification” tree on the right side of the window and click on the “...” button:


In the window that appears, we can specify the table and column that participates in the relationship, also allowing us to set a name for it: As a result, each row of the RSVP table will be associated with a row of the Dinner table. SQL Server will maintain referential integrity for us and prevent us from adding a new RSVP row if it does not point to an existing Dinner table row. It will also prevent a row from being deleted from the Dinner table if there are rows referring to it from the RSVP table.

Let's end this step by adding data to the Dinners table. To do this, right-click on the table in Server Explorer and select the “Show Table Data” item: We will add a few lines for further use as soon as we begin the implementation of the application:


We have finished creating our database. Now let's create model classes that can be used for queries and updates.
We will use the database to store information about Dinner and RSVP for our NerdDinner application.
Below are the steps for creating a database using the free version of SQL Server Express, which can be easily installed through the Microsoft Web Platform Installer. All the code that we write works both under SQL Server Express and under the full version of SQL Server.
Creating a New SQL Server Express Database
We start by right-clicking on our project in the “Solution Explorer” panel and select Add> New Item: In the “Add New Item” window, filter by the “Data” category and select “SQL Server Database”: We will name the database “NerdDinner. mdf. " Visual Studio will ask us if we want to add this file to the \ App_Data directory, which is already created with read and write permissions in the ACL. We will certainly agree, and our new database will be created and added to Solution Explorer:


Create tables in the database
Now we have an empty database. Let's create some tables.
To do this, go to the “Solution Explorer” tab, which allows us to manage databases and servers. The SQL Server Express database stored in the \ App_Data folder will automatically appear in the Server Explorer list. We can use “Connect to Database” to connect to local or remote databases: We will add two tables to our NerdDinner database: one for storing dinners, and the second for tracking RSVP approvals. We can create a new table by right-clicking on the “Tables” folder in our database and selecting “Add New Table”: This action will open the constructor to configure the layout of our table. For the “Dinners” table, we will add 10 columns:


We want the “DinnerID” column to be a unique primary key for the table. You can configure this by right-clicking on the “DinnerID” column and selecting “Set Primary Key”: In addition, making DinnerID the primary key, we also want to configure it as an “identity” column, whose value automatically increases with the addition of a new line in the table. Selecting “DinnerID” and then using the “Column Properties” editor, set the property “(Is Identity)” - “Yes”. We will use the standard identity settings (start from 1, increase by 1 with each new line in Dinner): Next, save our table by pressing Ctrl + S or File> Save . All we need to do is enter the name of the new table - “Dinners”:


The new Dinners table is ready and now appears in the Tables list in Server Explorer in our database.
We will follow the same steps to create the “RSVP” table. This table will consist of 3 columns. Set the RsvpID column as the primary key, and also make the indetity column out of it: Save the table with the name “RSVP”.

Configuring foreign keys between tables
We already have two tables in our database. Our final design step will be to create a one-to-many relationship between the two tables so that we can associate each row of the Dinner table with 0 or more rows of the RSVP table. We will do this by setting the “DinnerID” column of the RSVP table to communicate through a foreign key with the “DinnerID” column of the “Dinners” table.
To do this, open the RSVP table in the table designer by double-clicking in Server Explorer. Next, select the “DinnerID” column and the item “Relationships ...” with the right button: A window appears that is used to configure relations between tables: Click on “Add” and add a new relationship. After adding the link, we will open the branch of the “Tables and Column Specification” tree on the right side of the window and click on the “...” button:


In the window that appears, we can specify the table and column that participates in the relationship, also allowing us to set a name for it: As a result, each row of the RSVP table will be associated with a row of the Dinner table. SQL Server will maintain referential integrity for us and prevent us from adding a new RSVP row if it does not point to an existing Dinner table row. It will also prevent a row from being deleted from the Dinner table if there are rows referring to it from the RSVP table.

Filling data with our tables
Let's end this step by adding data to the Dinners table. To do this, right-click on the table in Server Explorer and select the “Show Table Data” item: We will add a few lines for further use as soon as we begin the implementation of the application:


The next step
We have finished creating our database. Now let's create model classes that can be used for queries and updates.
