Raising a terminal server using LTSP and CentOS 5.4 as an example
Intro
Now the idea of using thin clients has become very popular, and in particular for organizing classrooms at universities and more. So for my favorite university I had to work hard.
Not so long ago I was tasked with selecting and configuring a terminal server on CentOS 5.4. Why CentOS - I can’t imagine, but most likely it was the preference of our system administrators, who later will support the terminal server. Well, I was not given the right to choose.
The task for me was new, it seemed quite interesting, and at first glance it was not trivial. Having studied a lot of information that Google told me, my choice fell on LTSP ( Linux Terminal Server Project ). This software uses the XDMCP protocol.for authentication between the X server and the X client, as well as the xrdp project , which allows terminal clients (thin clients) to connect to both * NIX systems and Windows.
There are many distributions that already use this software and which were specially created for terminal servers, such as K12LTSP and Skolelinux . And this solution also comes with an alternative Ubuntu drive.
In my case, everything was a little complicated by the fact that there are no ready-made solutions for CentOS, these packages are not located in the repositories either. When setting up and installing, he stepped on some rake, the solution of which took quite a lot of time. Having searched for possible solutions for installing LTSP on my favorite Habré, I didn’t find anything, that's why the idea was born to write an article.
I hope that this information is useful to someone and I will try to describe the installation and configuration process in as much detail as possible.
How does it all work?
I think there is no need to tell a lot. Thin clients are usually diskless stations themselves. When turned on, they try to boot using a network card using PXE . Because PXE limits the bootloader size to 32 kilobytes - a two-stage boot is used when the first bootloader receives and launches a second bootloader, which already receives and launches the operating system image. After that, the OS kernel created by LTSP is loaded, which mounts via NFS the file system stored on the terminal server and launches the terminal client, which connects to the terminal server.
The result of all of the above should be a server on which DHCP, TFTP, NFS, as well as the terminal server itself, are raised.
So let's get started
The first thing I needed to do was install CentOS 5.4 x86_64. I want to say right away that I have little experience with CentOS. For some reason it so happened that I dislike the whole line of RedHat and the distros based on it. As a graphical shell, I preferred KDE (well, I dislike Gnome and that's it), although then I regretted it a bit, because There were a number of problems with KDE and CentOS.
First of all, we go to the site and download the disk image with LTSP packages ( http://ltsp.mirrors.tds.net/pub/ltsp/isos/ ). I chose version 4.1.1, because bells and whistles of newer versions (such as sessions via ssh and so on, I did not need). Next, mount this image and install the ltsp-utils.0.11-o.noarch.rpm package
#rpm –i ltsp-utils.0.11-o.noarch.rpmAfter that, we get the ltspadmin and ltspcfg command-line utilities . The first utility is used to configure the installation and the LTSP installation itself, the second is used to configure an already installed terminal server. Run the ltspadmin utility .

First of all, we need to configure the installer, respectively, we select the Configure the installer options menu item . The first question we are asked to determine where we will receive packages from. You can use the site of the project itself, but it is more reasonable to indicate the path to the image we mounted. In my case, this is file: /// media / CDROM / . Please note that exactly 3 slashes are used in the path, which is also indicated in the installation documentation.
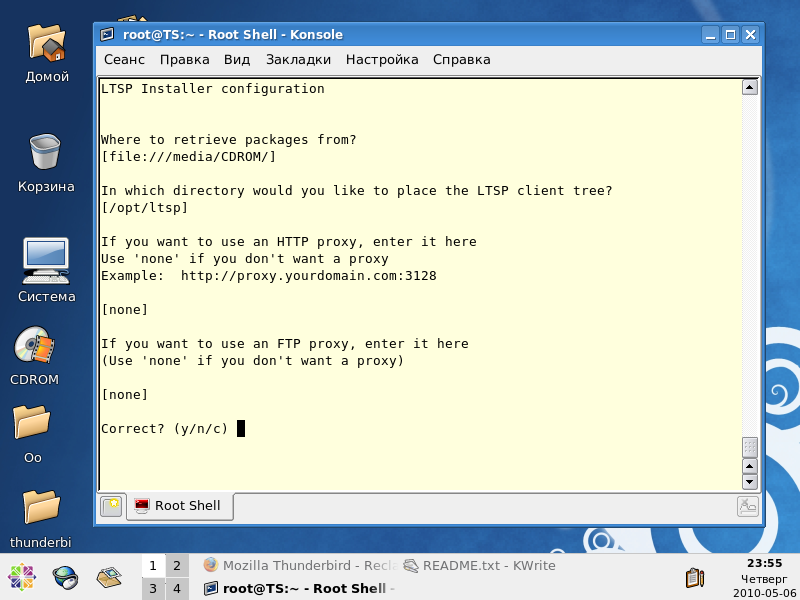
The next question is where the LTSP will be installed. By default, it points to / opt / ltsp . I do not see any reason to change it. If you specified the address (which is set by default) as the path to the location of the http package, then you need to specify the http address (or ftp if the packets are on ftp) of the proxy server. In the end, we confirm the settings are correct and we are returned to the previous menu item. Now we can begin to install the terminal server.
After installation, we will have:
- LTSP packages in the / opt / ltsp folder
- files necessary for loading PXE clients in the / tftpboot / lts / folder
Install DHCP and TFTP servers.
To download our thin clients over the network, we need DHCP and TFTP servers. I did not find a TFTP server in the CentOS distribution, and I decided to install DHCP manually - this is more reliable. Accordingly, we install them:
# yum install dhcp.x86_64 tftp-server.x86-64Next, you need to open 69 port for the UDP protocol in the firewall of our terminal server. To do this, use the console utility system-config-securitylevel-tui. We press the button “Refine” and configure the rules of our firewall.
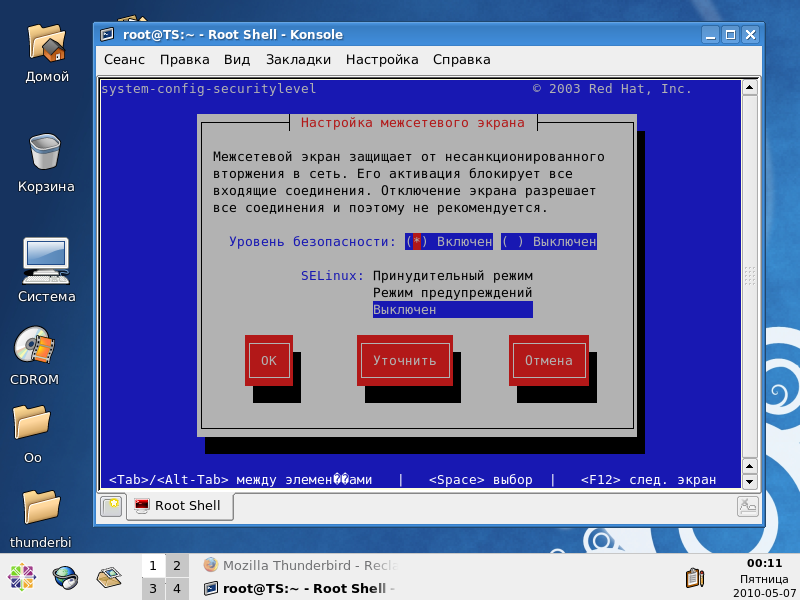
In my case, I have 2 interfaces on the server: one looks at the network of classes - the second is a managment interface. We select the interface through which our thin clients will knock to the tftp server and add it to the trusted ones, and also open the 69th port for it.
LTSP Configuration
For configuration, we can use the Configure LTSP menu item of the ltspadmin utility or directly call ltspcfg. In the menu that appears, select the manual setting:
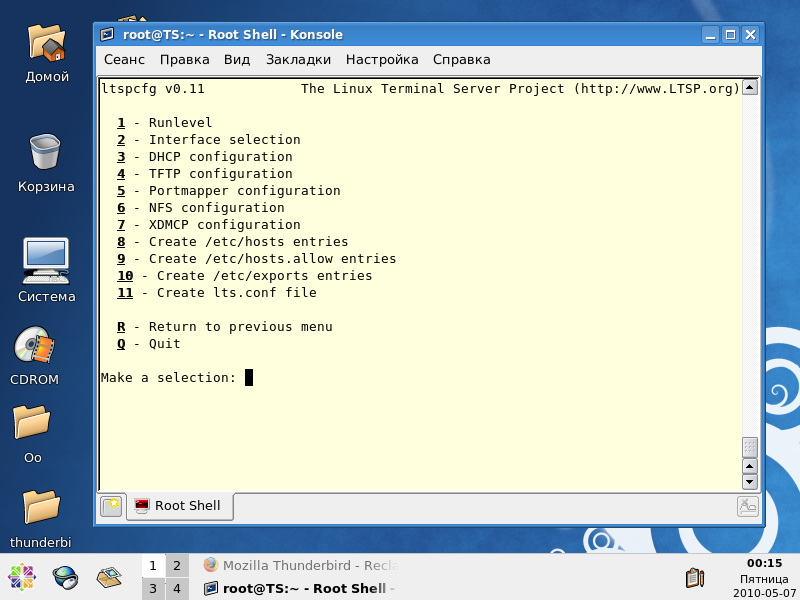
We go through all 11 points. Point 8 can be skipped in principle. After completion - we will have almost everything you need configured.
It is worth paying attention to paragraphs 3 and 7. In paragraph 3, a DHCP server configuration example file ( /etc/dhcpd.conf.sample ) will be created , which must be edited. After the changes - he acquired the following form from me:
#

# Sample configuration file for ISC dhcpd

#

# Make changes to this file and copy it to /etc/dhcpd.conf.sample

#


ddns-update-style none;

default-lease-time 21600;

max-lease-time 21600;


#option domain-name "ltsp"; # <--Fix this domain name


option option-128 code 128 = string;

option option-129 code 129 = text;


subnet 192.168.130.0 netmask 255.255.255.0 {

 use-host-decl-names on;

 option log-servers 192.168.130.254;

 range dynamic-bootp 192.168.130.1 192.168.130.253; ## пул адресов.

 option root-path "192.168.130.254:/opt/ltsp/i386"; ##опция ядру где находиться файловая система.

 option broadcast-address 192.168.130.255;

 option routers 192.168.130.254;

 option subnet-mask 255.255.255.0;

 if substring (option vendor-class-identifier, 0, 9) = "PXEClient" ##указываем что передавать в кач-ве загрузчика для PXE клиентов

 {

 filename "lts/2.6.9-ltsp-3/pxelinux.0"; ##в CentOS tftp обычно запущен с опцией -s, поэтому полный путь от корня указывать не нужно. полный путь должен выглядеть как /tftpboot/lts/.....

 }

 next-server 192.168.130.254; ## <- Обязательно указать. В противном случае загрузочный образ не получит конфиг!

 }
I want to draw attention to the fact that the path to the PXE bootloader is not complete, because on RedHat and CentOS, it starts with the –s switch, respectively, we omit the tftp server folder on the way. There was also a problem with the fact that, in theory, the next-server option should be specified only when DHCP and TFTP servers are on different servers. But without this option, the download stalled until I duplicated myself as the next-server.
At this point, I was glad that the setup was completed and tried to boot from the thin client. But it was not there! As a result, Xs were launched, but there was no connection to the terminal server. As it turned out, the standard session manager on CentOS is gdm (Gnome), and since I didn’t have Gnome at all, kdm didn’t even try to start. In order for the OS to use kdm, you need to make some changes to the configuration file, namely / etc / sysconfig / desktop (if there is no file, you need to create it):
DISPLAYMANAGER="KDE"The next chagrin was that when X was launched on the terminal client, they fell, because the server stupidly rejected any attempts to open remote sessions. Change is not a problem, the problem for me was that I could not find the standard KDE configuration files. On CentOS, they are “hidden” in a completely different place. As a result, its location can be determined as follows:
# locate XaccessNext, in the specified file, look for the line
#* #any host can get a login windowAnd uncomment it. We restart X, we bootle our thin client - and voila! Everything works!
conclusions
As a result, we got a computer class based on the use of thin clients. You should not talk about their advantages. According to the statements, the general recommendation has always been this: 256 MB of RAM on the server itself, plus 60 MB for each connected client (sometimes it is advised to allocate 100 MB to the terminal). Since all programs are executed on the server, it does not hurt to have a reserve of computing power: a dual-core or dual-processor system is especially suitable. When working with many clients, it would be nice to use a 64-bit processor, not only because of additional performance, but also because it can work with a lot of memory, which is often the most important factor limiting performance. How all this will work in reality is not yet known. If this topic is of interest to anyone,
Related Links
http://subhodip.fedorapeople.org/ltsp_in_fedora8.pdf
http://edin.no-ip.com/content/ltsp-ubuntu-intrepid-mini-howto
http://www.ltsp.org.ru/files/ OnlineDocs / ltsp-3.0-en / chapter6.html
http://www.owlriver.com/tips/gdm-setup/remotexkdm.html
http://sourceforge.net/apps/mediawiki/ltsp/index.php?title= Ltsp_Documentation