ARM platform and broker MQTT, as a modern basis for IoT solutions
The MQTT protocol, for the time being, has gained its popularity and has become the de facto standard in projects aimed at creating solutions for the Internet of Things (IoT). Of course, the Internet of things is a definite abstraction or, more correctly, the concept of building distributed networks of devices or machines. At the same time, private tasks of the interaction of Machine-to-Machine (M2M) machines are already effectively solved today, including the level of connection of these systems to the Internet, both for creating industrial automation systems and, for example, for building smart home systems. Obviously, critical systems require a local arbitrator or broker and devices to work out a solution to the situation, regardless of the quality of the Internet connection, as well as in the event of a complete connection failure.
At the same time, as a hardware platform for launching such a broker MQTT, energy-efficient, but no less productive, microprocessors based on ARM architecture have proven themselves to be excellent. This interconnection of the hardware platform, messaging protocols and their software implementation became the starting point for the rapid progress of the development of modern automation systems. Next, we will take a closer look at hardware solutions and software components for implementing one of the most successful messaging protocols in technical systems.
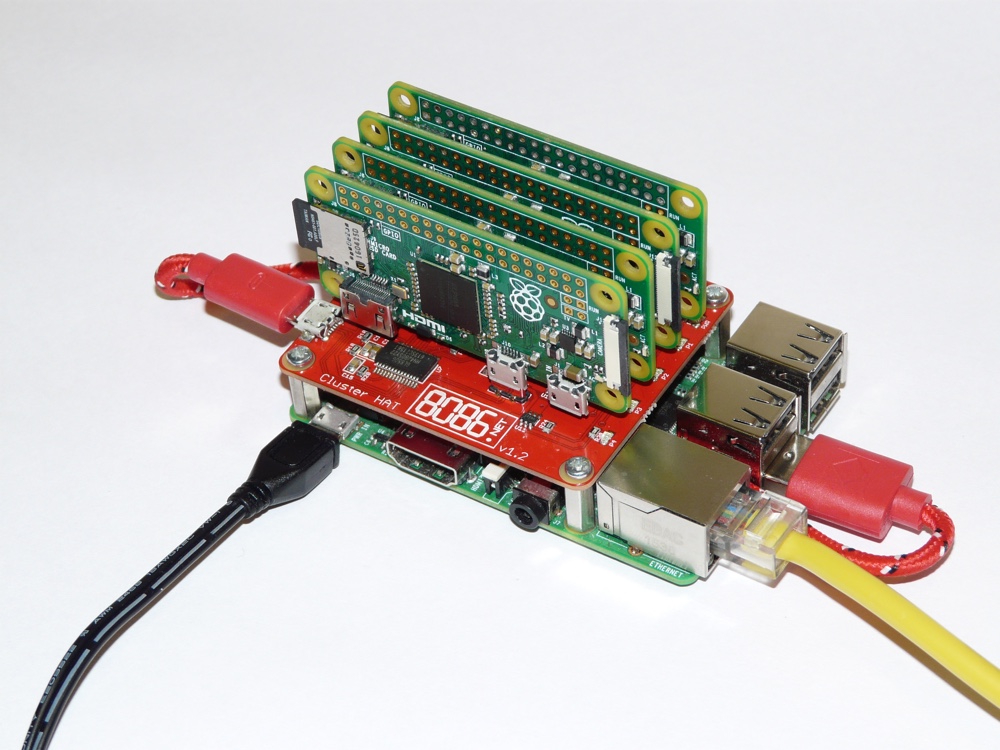
ClusterHAT review: Raspberry Pi cluster computer kit. Photo: MagPi magazine
ARM microprocessor architecture (Advanced RISC Machine) has firmly entered our lives. Almost every smartphone is already working on the basis of this architecture. It is worth noting that the concept of a RISC machine today is quite vague, because its opposite, the modern x86-64 platform, borrowed a lot from the world of RISC systems. But it's not about that, but about the fact that today it has become a synonym or a distinctive feature of a productive and, at the same time, energy efficient mobile platform, as well as the basis for various inexpensive DIY or “do it yourself” devices. In this context, of course, it is impossible not to mention the various options for the Raspberry Pi, up to the cluster solution based on the ClusterHAT board, etc. Linux has proven itself as the main operating system for this platform. But even here, how not to recall, for example, about such a system,
Well, when there is a choice, but not everything is as simple as we would like. Microsoft Windows 10 IoT Core is a great operating system, but it is primarily intended for developing and running programs, for example, written in C # in Microsoft Visual Studio. This approach can not be called universal. Therefore, while the classic choice for most tasks remains ARM and Linux, as well as Android, as without it. Note that for rapid prototyping, in addition to the Raspberry Pi boards, there are also cheaper Orange Pi by Xunlong Software or, on the contrary, more expensive Hardkernel ODROIDs, but at the same time fully justifying their price. It all depends on the problem being solved. And such, for the current project, was the launch of the server / broker MQTT. At the same time, it is not necessary to emphasize that that the project is dedicated to smart home or robotics solutions. This is not critical, since the MQTT protocol is in itself a very versatile solution.

CPU-351-13. Low Power, Rugged i.MX6 SBC. Photo: Eurotech
Speaking about ARM, it’s worth thinking not only about modern smartphones, a variety of applications as home routers or prototyping tools. Processors with such an architecture can work in quite difficult conditions of industrial automation systems. For example, the single-board computer CPU-351-13 of the company Eurotech. The board of this industrial computer is based on the iMX.6 ARM processor (1.2GHz) and is an efficient system with reduced power consumption (about 4 W per four cores), which is used in IoT / M2M applications, withstanding operation in the temperature range: -40 ° to + 85 ° C. The board contains video output, battery charger, cellular modem (cellular), WiFi, Bluetooth LE and supports ZigBee technology. The board is also ideally suited for solving transport problems, since it supports the CAN bus,
In addition to industrial solutions, ARM architecture penetrates the server solutions market. The experience of Scaleway, which deploys and leases not ordinary virtual machines, but physical servers based on ARMv8, is interesting here. This solution is interesting for its energy efficiency, from the perspective of the provider, and the lack of a hypervisor or virtualization environment, as such, for the user of the service. Thus, a great environment for launching Docker containers is becoming a reality. This is reminiscent of something like ClusterHAT on an industrial scale, and in terms of performance it is an excellent choice for container virtualization in the cloud. In general, one cannot but agree that this is a bold, innovative business solution in the direction of hosting services, which has been on the market for quite a long time. It turns out that if you do not buy your Raspberry Pi or equivalent,

CloudMQTT is a perfect solution for “Internet of Things” messaging. When
completing the choice of hardware platform and the praise of the ARM architecture, you can put an end to this, but you should not forget that you can always find an alternative solution, which only encourages enthusiasts, geeks, and ethical hackers. to new research and experiments with open hardware platforms. So, we have a task based on Linux to install the broker MQTT and experiment a bit with it.
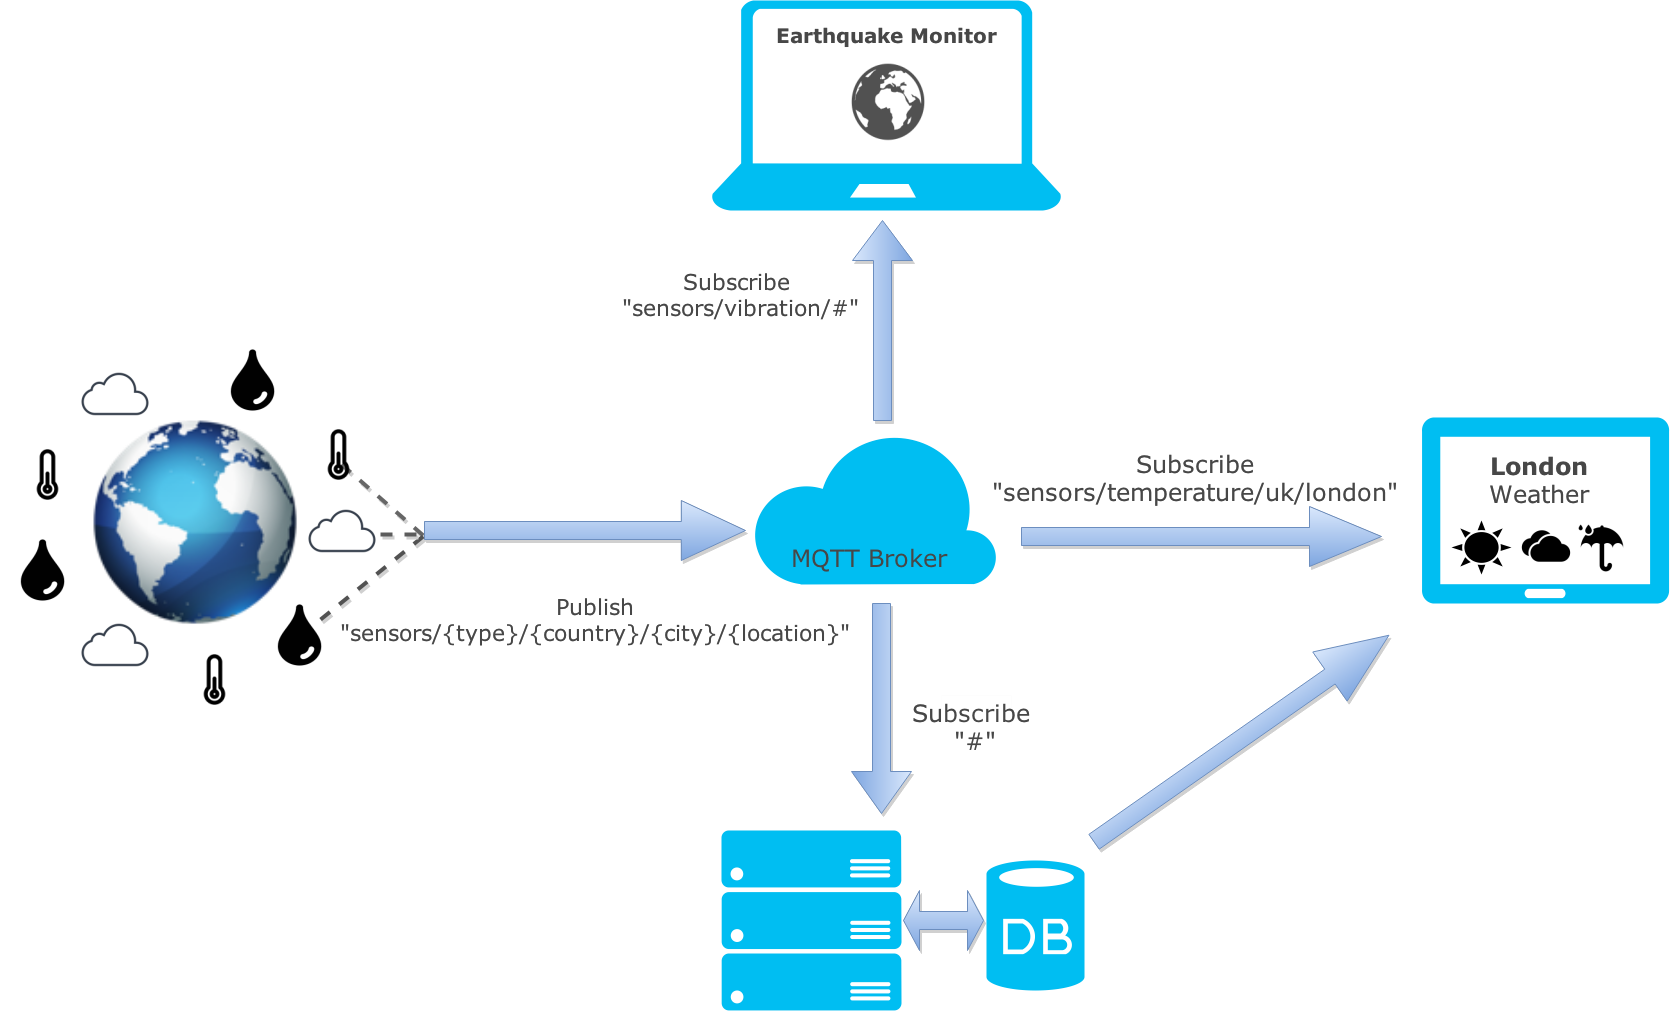
It was possible not to consider the hardware platform at all, but go straight to work in the cloud service CloudMQTT. But the task is being considered on the basis of the three-tier structure of the Internet of Things, where intelligent sensors and control systems are located on the lower level. The middle is the place of the MQTT broker, and it must be located locally so that problems with access to the Internet can be partially solved with internal equipment. And the top level is a cloud with a Node-Red interface or AWS IoT, Azure IoT Hub, etc. In such a concept it is difficult to imagine the best candidate for a place of an energy efficient and very budget micro-server, something different from ARM.
But this is the way the world works; one cannot say that everything is fine or, on the contrary, everything is bad. Everywhere has its own nuances. The fact is that the three-tier system under consideration is not exactly the Internet of Things; rather, it is a kind of intermediate version of the path to such a concept. Just IoT without an Internet connection should not exist, i.e. not for nothing, we expect the emergence of fifth-generation wireless networks, the improvement of existing communications, etc. In the concept of the Internet of Things there is no place for the intermediate layer level, sensors and executive systems should go directly to the cloud, where their interaction will take place.
A Brief, MQTT Protocol and IoT. Picture: Zoetrope labs
The Message Queuing Telemetry Transport (MQTT) protocol is an asynchronous telemetry transfer protocol based on the publisher / subscriber principle using a broker. This protocol was developed by IBM and transferred to the category of open projects of the Eclipse Foundation. A feature of the protocol is its compactness, since the size of the data packet header is only a few bytes. It works on top of the standard TCP protocol and, for security, involves the use of authentication mechanisms at the “username / password” level and the use of TLS / SSL transport protocol encryption. At the current time, the MQTT protocol has become the de facto standard for building Internet of Things solutions.
Since MQTT is designed for use in an Internet connection environment, which by definition is not considered reliable, the protocol provides for three levels of quality assurance for the delivery service. QoS 0: At most once - “no more than one”. The publisher publishes a message to the broker, then the broker publishes it to the subscriber. At this level, no guaranteed data transfer to the subscriber is guaranteed. QoS 1: At least once - "at least one." The subscriber must receive this message at least once. However, messages can be duplicated and this should be provided in the logic of their work by the subscriber. QoS 2: Exactly one - "guaranteed one." Provides the highest delivery guarantee and no duplication of messages.
To scale your solutions, you can use a bridge-type configuration between brokers, and thereby reduce the load on each broker separately. The MQTT protocol also allows subscribers to receive data across multiple channels. To do this, use wildcard-characters "+" and "#" to mark either all the records in a particular subscription, or just a block of messages. For example, a subscription to several different temperature sensors: “sensors / + / temperature / +” or a subscription to all channels at once: “#”. You can discuss the features of the protocol for a long time, but it's easier to try on a real example. A variety of solutions can be chosen as a broker, but one of the most popular and lightweight brokers is Mosquitto .
To deploy the Mosquitto broker, we will select a simple version of a single board computer, for example, one of the first versions of the Raspberry Pi Model B 512MB RAM. This choice is dictated literally by what was at hand. Of course, for a real project, it is necessary to study separately the question of the reliability and performance of the board and, besides the choice of optimal hardware solutions, the issues of reliability of the case, quality of the power supply, safety of the system as a whole, etc. The Raspberry Pi board was also interesting to take to completely dispel the myth of the difficulties of starting a project based on open hardware solutions and the Linux operating system. Of course, basic knowledge is required of the developer, but modern platforms have become exceptionally friendly from the point of view of the software interface and are well documented.

Photo: Raspberry Pi Model B 512MB RAM
As an operating system, you can make a choice in the direction of the official firmware Raspbian Stretch with desktop or Raspbian Stretch Lite. These are two identical operating systems based on the well-known distribution kit Debian Stretch, which was modified to work with Raspberry Pi. Differences, only in the presence of a graphical desktop, which is quite justified for the beginning of the acquaintance, but for the server, of course, the graphical shell has nothing. To install, we will choose a version with a graphical desktop and install all this on an inexpensive 8GB SD card flash drive. In fact, it remains to load the image of the operating system andtransfer the image to the physical driveusing the very convenient Etcher cross-platform utility.

Screenshot: Etcher in Windows 10
Now it remains to put the flashed flash drive into the Raspberry Pi board and apply power. There is an ode feature if you need to get remote access to the Raspbian Stretch command line using the ssh protocol, and there is no keyboard physically connected to the board, you can write an empty file with the name ssh to the boot partition of the flash drive, which will activate the corresponding access. After switching on and Raspberry Pi, access to the operating system is allowed to the user “pi” with the password “raspberry”. The default user “pi” can become root by running the sudo command. Since everything in Raspbian is prepared for comfortable work of an unprepared user, the first command in the new system can be to call the system configuration menu:
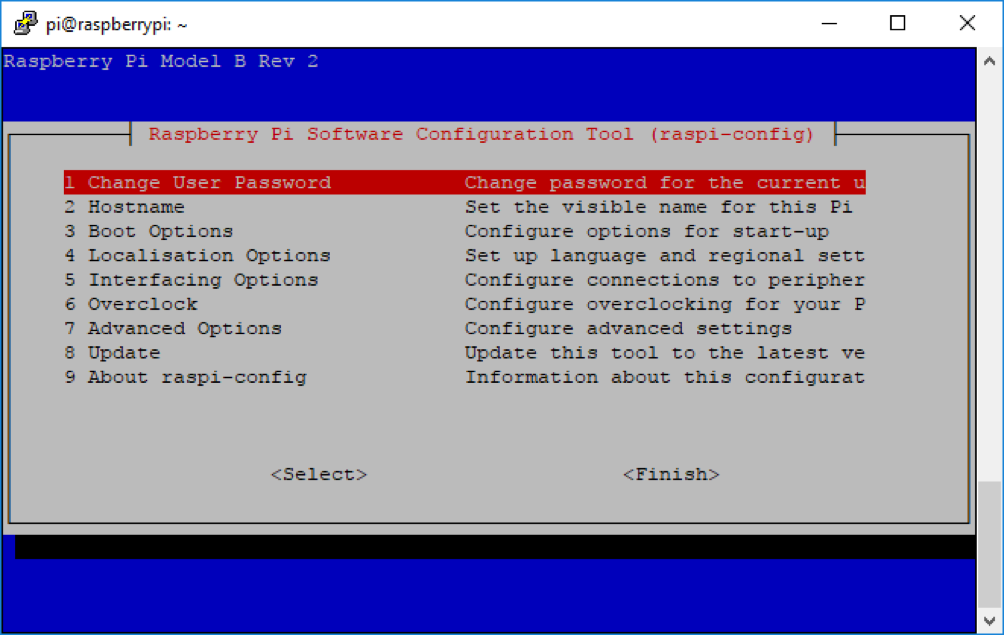
Screenshot: Remote connection to Raspberry Pi by SSH and run raspi-config
The raspi-config utility allows you to set a new password for the user and, for example, in the “Interfacing Options” menu you can configure the behavior of the system interfaces, enable the remote desktop using the VNC protocol, etc. . Also in the menu: “Boot Options” you can set default parameters for booting the system, for example, select only the command line mode, and in the sub-menu “Resolution” from the Advanced Options menu, set the desired resolution of the graphical screen, for example, by selecting the required size “DMT” - for a digital monitor interface or “CEA” - an analog input, etc.
Now you can update the system packages: And install the Mosquitto broker and the MQTT client, for example, to test the system:
Now you can check the operation of the MQTT broker locally, for which you should subscribe, for example, to an event:
And publish some values for the corresponding channel:
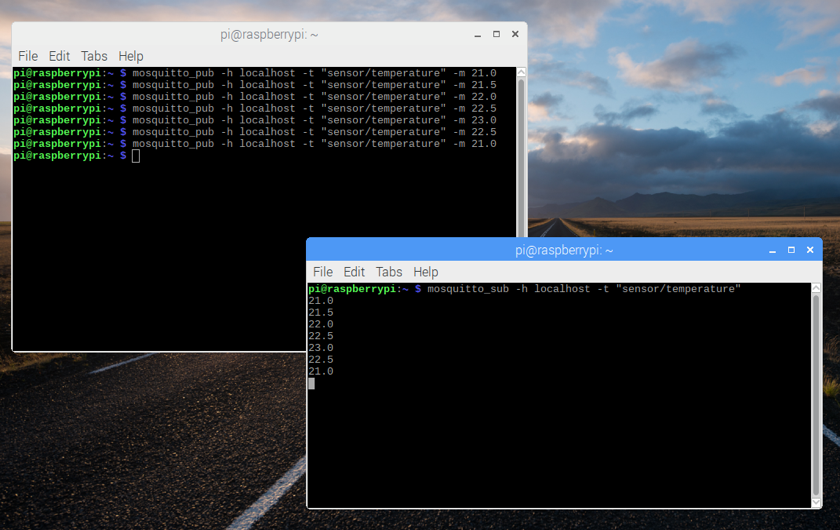
Screenshot: Raspberry Pi terminal sessions
View subscriptions and make publications using the MQTT protocol, as well as test the broker’s load capacity, possible in the Chrome browser and operating systems: Linux, Mac, Windows thanks to the cross-platform application MQTTBox .
Indeed, the MQTT protocol has now become so common that it is simply impossible to find a convenient solution for its tasks. Also in the framework of the project Eclipse PahoThe development of open source software solutions and libraries, in virtually all programming languages, is being actively developed to implement the MQTT messaging protocol and, thereby, improve solutions for the Internet of things.
Building solutions based on the MQTT broker is becoming a trivial task. One has only to deploy the system, connect to the cloud, for example, using Node-RED or a specialized solution, and the matter remains “small” - to connect intelligent sensors and actuators. For consideration of the lower level of IoT systems, a separate article should be written, but for this example, it is quite possible to get by examining the example based on the actual standard for the Internet of things - the NodeMCU board based on the Espressif SoC ESP8266.

Screenshot: MQTTBox in Windows 10
NodeMCU motherboard is initially focused on eLua development . To build the firmware, you can use the cloud service , and the project board itself exists as an open hardware solution NodeMCU DEVKIT V1.0, for which many analogues have already been released. It should be noted good project documentation. However, it is very subjective, but when developing an intelligent sensor with MQTT protocol based on firmware with eLua for NodeMCU DEVKIT, you still have to face a number of difficulties with the implementation of the MQTT protocol. At the same time, the entire project infrastructure looks somehow not sufficiently prepared for use as an environment for the rapid and high-quality development of microprocessor systems. Some little things and nuances always come up, but once again it is worth repeating - this is a very subjective assessment. Interestingly, do blog readers have successful experiences with eLua and MQTT?
A completely different thing is the choice of the Arduino IDE development environment for working with the NodeMCU DEVKIT, however, as well as with other ESP8266 based motherboards. Everything is done almost instantly on the basis of ready-made libraries and code samples. To begin development follows from the official site of the Arduino project to download the Arduino IDE open cross-platform development environment. Then in the “File” - “Preferences” - “Addition Boards Manager URLs:” options, specify a link to the Arduino core project for ESP8266 WiFi chip: arduino.esp8266.com/stable/package_esp8266com_index.jsonAfter that, in “Tools” - “Boards Manager” it remains to download and install support for the ESP8266 Community boards. By the way, we should not forget that to work with the NodeMCU board, you will need to install the driver for the interface converter CP210x or, it is also called the UART to USB bridge .
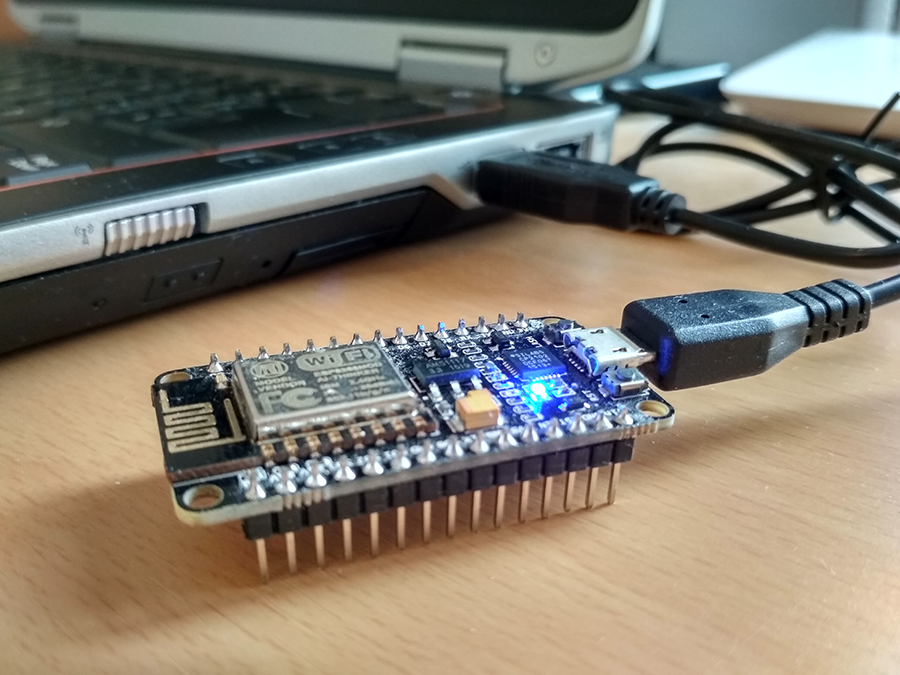
Photo: Working with the NodeMCU board
To work with the MQTT protocol, you can install the PubNub Arduino Library. To do this, in the “Sketch” menu - “Include Library” - “Manage Libraries”, select the appropriate library and install it. You can familiarize yourself with the capabilities of the software platform on the basis of an example code, for example, Basic ESP8266 MQTT example, where the broker publishes the “outTopic” channel, and also subscribes to “inTopic”, and when it arrives at “inTopic”, “1”, then The board turns on the built-in LED. Everything is simple, fast and works fine out of the box.
Screenshot: Arduino IDE with ESP8266 support
In conclusion, I would like to note that this publication does not call for the use of the ARM processor architecture exclusively for building IoT systems and it only touched on the features of the implementation of the MQTT broker as a link for automation solutions. But at the same time, the reader may form an opinion that today solutions for IoT are a lot of geeks, experimenters and fans, for example, Raspberry Pi boards. This is true, and this is where progress is made, but the future is already with us.
An example is obvious: the commercial solution of the Wzzard wireless sensor platform for IoT and Specter Network Gateway from Advantech B + B SmartWorx. Here, as in many of today's implementations in production cycles, an architecture of environmentally protected industrial sensors has been proposed, which are combined by a wireless network based on the 6LoWPAN and IEEE 802.15.4e standards. For data processing at the cloud level, a gateway with support for the MQTT protocol and data transmission over a wireless 3G network or wired 10/100 Ethernet is proposed.
ARM processors: architecture features, differences and prospects - ITC.ua
Orange Pi PC - a full-fledged mini-PC for $ 15 on Linux - Geektimes
ODROID-C1 - overview and comparison with RPi - Habrahabr
First look at Scaleway -
IBM Habrahabr translates MQTT into discharge open projects - OpenNET
Protocol MQTT - iot.ru
Protocol MQTT. Features, applications, basic procedures - Technologies and means of communication
Raspberry Pi documentation. Access-the Remote - the Raspberry Pi Foundation
the Initial the Raspberry Pi the Setup - Domoticz
the Getting start with MQTT Mosquitto Broker on the Raspberry Pi, the Windows, MacOS and the Linux - DIY the Projects
of The Seven MQTT the Best Client the Tools - HiveMQ
Temperature upload over MQTT using NodeMCU and DHT11 sensor - The ThingsBoard Authors
MQTT Tutorial for Raspberry Pi, Arduino, and ESP8266 - Baldengineer Blog
ESP8266 firmware, programming with Arduino IDE - Geektimes
Wireless Sensor Network Platform - Connect2 Systems
At the same time, as a hardware platform for launching such a broker MQTT, energy-efficient, but no less productive, microprocessors based on ARM architecture have proven themselves to be excellent. This interconnection of the hardware platform, messaging protocols and their software implementation became the starting point for the rapid progress of the development of modern automation systems. Next, we will take a closer look at hardware solutions and software components for implementing one of the most successful messaging protocols in technical systems.
ClusterHAT review: Raspberry Pi cluster computer kit. Photo: MagPi magazine
ARM microprocessor architecture (Advanced RISC Machine) has firmly entered our lives. Almost every smartphone is already working on the basis of this architecture. It is worth noting that the concept of a RISC machine today is quite vague, because its opposite, the modern x86-64 platform, borrowed a lot from the world of RISC systems. But it's not about that, but about the fact that today it has become a synonym or a distinctive feature of a productive and, at the same time, energy efficient mobile platform, as well as the basis for various inexpensive DIY or “do it yourself” devices. In this context, of course, it is impossible not to mention the various options for the Raspberry Pi, up to the cluster solution based on the ClusterHAT board, etc. Linux has proven itself as the main operating system for this platform. But even here, how not to recall, for example, about such a system,
Well, when there is a choice, but not everything is as simple as we would like. Microsoft Windows 10 IoT Core is a great operating system, but it is primarily intended for developing and running programs, for example, written in C # in Microsoft Visual Studio. This approach can not be called universal. Therefore, while the classic choice for most tasks remains ARM and Linux, as well as Android, as without it. Note that for rapid prototyping, in addition to the Raspberry Pi boards, there are also cheaper Orange Pi by Xunlong Software or, on the contrary, more expensive Hardkernel ODROIDs, but at the same time fully justifying their price. It all depends on the problem being solved. And such, for the current project, was the launch of the server / broker MQTT. At the same time, it is not necessary to emphasize that that the project is dedicated to smart home or robotics solutions. This is not critical, since the MQTT protocol is in itself a very versatile solution.
CPU-351-13. Low Power, Rugged i.MX6 SBC. Photo: Eurotech
Speaking about ARM, it’s worth thinking not only about modern smartphones, a variety of applications as home routers or prototyping tools. Processors with such an architecture can work in quite difficult conditions of industrial automation systems. For example, the single-board computer CPU-351-13 of the company Eurotech. The board of this industrial computer is based on the iMX.6 ARM processor (1.2GHz) and is an efficient system with reduced power consumption (about 4 W per four cores), which is used in IoT / M2M applications, withstanding operation in the temperature range: -40 ° to + 85 ° C. The board contains video output, battery charger, cellular modem (cellular), WiFi, Bluetooth LE and supports ZigBee technology. The board is also ideally suited for solving transport problems, since it supports the CAN bus,
In addition to industrial solutions, ARM architecture penetrates the server solutions market. The experience of Scaleway, which deploys and leases not ordinary virtual machines, but physical servers based on ARMv8, is interesting here. This solution is interesting for its energy efficiency, from the perspective of the provider, and the lack of a hypervisor or virtualization environment, as such, for the user of the service. Thus, a great environment for launching Docker containers is becoming a reality. This is reminiscent of something like ClusterHAT on an industrial scale, and in terms of performance it is an excellent choice for container virtualization in the cloud. In general, one cannot but agree that this is a bold, innovative business solution in the direction of hosting services, which has been on the market for quite a long time. It turns out that if you do not buy your Raspberry Pi or equivalent,
CloudMQTT is a perfect solution for “Internet of Things” messaging. When
completing the choice of hardware platform and the praise of the ARM architecture, you can put an end to this, but you should not forget that you can always find an alternative solution, which only encourages enthusiasts, geeks, and ethical hackers. to new research and experiments with open hardware platforms. So, we have a task based on Linux to install the broker MQTT and experiment a bit with it.
It was possible not to consider the hardware platform at all, but go straight to work in the cloud service CloudMQTT. But the task is being considered on the basis of the three-tier structure of the Internet of Things, where intelligent sensors and control systems are located on the lower level. The middle is the place of the MQTT broker, and it must be located locally so that problems with access to the Internet can be partially solved with internal equipment. And the top level is a cloud with a Node-Red interface or AWS IoT, Azure IoT Hub, etc. In such a concept it is difficult to imagine the best candidate for a place of an energy efficient and very budget micro-server, something different from ARM.
But this is the way the world works; one cannot say that everything is fine or, on the contrary, everything is bad. Everywhere has its own nuances. The fact is that the three-tier system under consideration is not exactly the Internet of Things; rather, it is a kind of intermediate version of the path to such a concept. Just IoT without an Internet connection should not exist, i.e. not for nothing, we expect the emergence of fifth-generation wireless networks, the improvement of existing communications, etc. In the concept of the Internet of Things there is no place for the intermediate layer level, sensors and executive systems should go directly to the cloud, where their interaction will take place.
A Brief, MQTT Protocol and IoT. Picture: Zoetrope labs
The Message Queuing Telemetry Transport (MQTT) protocol is an asynchronous telemetry transfer protocol based on the publisher / subscriber principle using a broker. This protocol was developed by IBM and transferred to the category of open projects of the Eclipse Foundation. A feature of the protocol is its compactness, since the size of the data packet header is only a few bytes. It works on top of the standard TCP protocol and, for security, involves the use of authentication mechanisms at the “username / password” level and the use of TLS / SSL transport protocol encryption. At the current time, the MQTT protocol has become the de facto standard for building Internet of Things solutions.
Since MQTT is designed for use in an Internet connection environment, which by definition is not considered reliable, the protocol provides for three levels of quality assurance for the delivery service. QoS 0: At most once - “no more than one”. The publisher publishes a message to the broker, then the broker publishes it to the subscriber. At this level, no guaranteed data transfer to the subscriber is guaranteed. QoS 1: At least once - "at least one." The subscriber must receive this message at least once. However, messages can be duplicated and this should be provided in the logic of their work by the subscriber. QoS 2: Exactly one - "guaranteed one." Provides the highest delivery guarantee and no duplication of messages.
To scale your solutions, you can use a bridge-type configuration between brokers, and thereby reduce the load on each broker separately. The MQTT protocol also allows subscribers to receive data across multiple channels. To do this, use wildcard-characters "+" and "#" to mark either all the records in a particular subscription, or just a block of messages. For example, a subscription to several different temperature sensors: “sensors / + / temperature / +” or a subscription to all channels at once: “#”. You can discuss the features of the protocol for a long time, but it's easier to try on a real example. A variety of solutions can be chosen as a broker, but one of the most popular and lightweight brokers is Mosquitto .
To deploy the Mosquitto broker, we will select a simple version of a single board computer, for example, one of the first versions of the Raspberry Pi Model B 512MB RAM. This choice is dictated literally by what was at hand. Of course, for a real project, it is necessary to study separately the question of the reliability and performance of the board and, besides the choice of optimal hardware solutions, the issues of reliability of the case, quality of the power supply, safety of the system as a whole, etc. The Raspberry Pi board was also interesting to take to completely dispel the myth of the difficulties of starting a project based on open hardware solutions and the Linux operating system. Of course, basic knowledge is required of the developer, but modern platforms have become exceptionally friendly from the point of view of the software interface and are well documented.
Photo: Raspberry Pi Model B 512MB RAM
As an operating system, you can make a choice in the direction of the official firmware Raspbian Stretch with desktop or Raspbian Stretch Lite. These are two identical operating systems based on the well-known distribution kit Debian Stretch, which was modified to work with Raspberry Pi. Differences, only in the presence of a graphical desktop, which is quite justified for the beginning of the acquaintance, but for the server, of course, the graphical shell has nothing. To install, we will choose a version with a graphical desktop and install all this on an inexpensive 8GB SD card flash drive. In fact, it remains to load the image of the operating system andtransfer the image to the physical driveusing the very convenient Etcher cross-platform utility.
Screenshot: Etcher in Windows 10
Now it remains to put the flashed flash drive into the Raspberry Pi board and apply power. There is an ode feature if you need to get remote access to the Raspbian Stretch command line using the ssh protocol, and there is no keyboard physically connected to the board, you can write an empty file with the name ssh to the boot partition of the flash drive, which will activate the corresponding access. After switching on and Raspberry Pi, access to the operating system is allowed to the user “pi” with the password “raspberry”. The default user “pi” can become root by running the sudo command. Since everything in Raspbian is prepared for comfortable work of an unprepared user, the first command in the new system can be to call the system configuration menu:
$ sudo raspi-configScreenshot: Remote connection to Raspberry Pi by SSH and run raspi-config
The raspi-config utility allows you to set a new password for the user and, for example, in the “Interfacing Options” menu you can configure the behavior of the system interfaces, enable the remote desktop using the VNC protocol, etc. . Also in the menu: “Boot Options” you can set default parameters for booting the system, for example, select only the command line mode, and in the sub-menu “Resolution” from the Advanced Options menu, set the desired resolution of the graphical screen, for example, by selecting the required size “DMT” - for a digital monitor interface or “CEA” - an analog input, etc.
Now you can update the system packages: And install the Mosquitto broker and the MQTT client, for example, to test the system:
$ sudo apt-get update

$ sudo apt-get upgrade
$ sudo apt-get install mosquitto
$ sudo apt-get sudo mosquitto-clientsNow you can check the operation of the MQTT broker locally, for which you should subscribe, for example, to an event:
$ mosquitto_sub -h localhost -t "sensor/temperature"And publish some values for the corresponding channel:
$ mosquitto_pub -h localhost -t "sensor/temperature" -m 21.0Screenshot: Raspberry Pi terminal sessions
View subscriptions and make publications using the MQTT protocol, as well as test the broker’s load capacity, possible in the Chrome browser and operating systems: Linux, Mac, Windows thanks to the cross-platform application MQTTBox .
Indeed, the MQTT protocol has now become so common that it is simply impossible to find a convenient solution for its tasks. Also in the framework of the project Eclipse PahoThe development of open source software solutions and libraries, in virtually all programming languages, is being actively developed to implement the MQTT messaging protocol and, thereby, improve solutions for the Internet of things.
Building solutions based on the MQTT broker is becoming a trivial task. One has only to deploy the system, connect to the cloud, for example, using Node-RED or a specialized solution, and the matter remains “small” - to connect intelligent sensors and actuators. For consideration of the lower level of IoT systems, a separate article should be written, but for this example, it is quite possible to get by examining the example based on the actual standard for the Internet of things - the NodeMCU board based on the Espressif SoC ESP8266.
Screenshot: MQTTBox in Windows 10
NodeMCU motherboard is initially focused on eLua development . To build the firmware, you can use the cloud service , and the project board itself exists as an open hardware solution NodeMCU DEVKIT V1.0, for which many analogues have already been released. It should be noted good project documentation. However, it is very subjective, but when developing an intelligent sensor with MQTT protocol based on firmware with eLua for NodeMCU DEVKIT, you still have to face a number of difficulties with the implementation of the MQTT protocol. At the same time, the entire project infrastructure looks somehow not sufficiently prepared for use as an environment for the rapid and high-quality development of microprocessor systems. Some little things and nuances always come up, but once again it is worth repeating - this is a very subjective assessment. Interestingly, do blog readers have successful experiences with eLua and MQTT?
A completely different thing is the choice of the Arduino IDE development environment for working with the NodeMCU DEVKIT, however, as well as with other ESP8266 based motherboards. Everything is done almost instantly on the basis of ready-made libraries and code samples. To begin development follows from the official site of the Arduino project to download the Arduino IDE open cross-platform development environment. Then in the “File” - “Preferences” - “Addition Boards Manager URLs:” options, specify a link to the Arduino core project for ESP8266 WiFi chip: arduino.esp8266.com/stable/package_esp8266com_index.jsonAfter that, in “Tools” - “Boards Manager” it remains to download and install support for the ESP8266 Community boards. By the way, we should not forget that to work with the NodeMCU board, you will need to install the driver for the interface converter CP210x or, it is also called the UART to USB bridge .
Photo: Working with the NodeMCU board
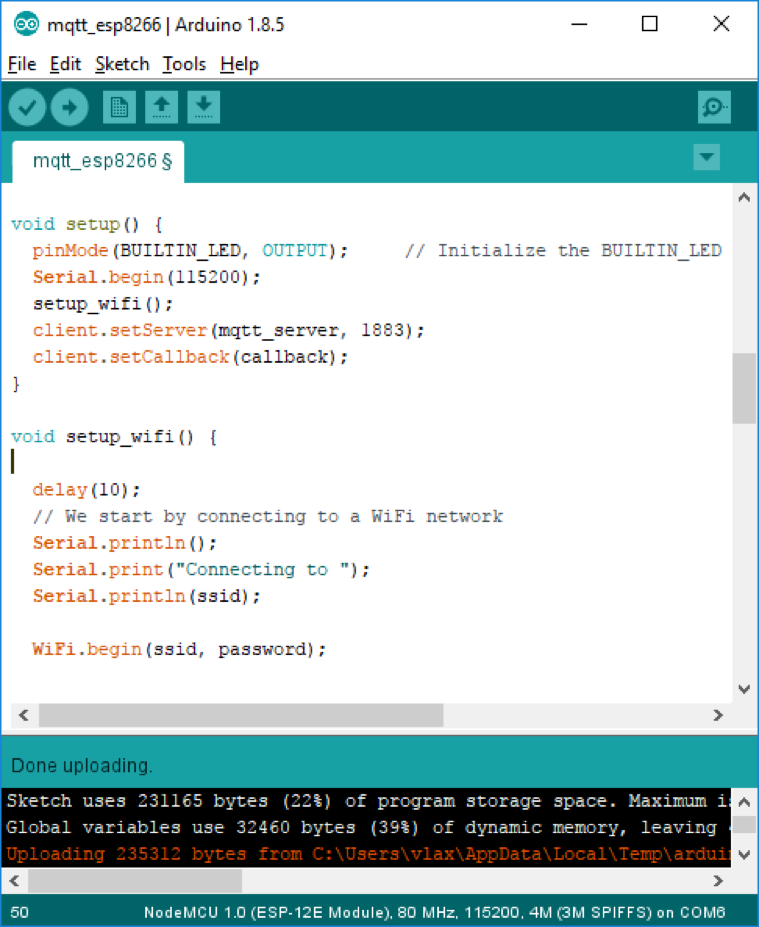
To work with the MQTT protocol, you can install the PubNub Arduino Library. To do this, in the “Sketch” menu - “Include Library” - “Manage Libraries”, select the appropriate library and install it. You can familiarize yourself with the capabilities of the software platform on the basis of an example code, for example, Basic ESP8266 MQTT example, where the broker publishes the “outTopic” channel, and also subscribes to “inTopic”, and when it arrives at “inTopic”, “1”, then The board turns on the built-in LED. Everything is simple, fast and works fine out of the box.
Screenshot: Arduino IDE with ESP8266 support
In conclusion, I would like to note that this publication does not call for the use of the ARM processor architecture exclusively for building IoT systems and it only touched on the features of the implementation of the MQTT broker as a link for automation solutions. But at the same time, the reader may form an opinion that today solutions for IoT are a lot of geeks, experimenters and fans, for example, Raspberry Pi boards. This is true, and this is where progress is made, but the future is already with us.
An example is obvious: the commercial solution of the Wzzard wireless sensor platform for IoT and Specter Network Gateway from Advantech B + B SmartWorx. Here, as in many of today's implementations in production cycles, an architecture of environmentally protected industrial sensors has been proposed, which are combined by a wireless network based on the 6LoWPAN and IEEE 802.15.4e standards. For data processing at the cloud level, a gateway with support for the MQTT protocol and data transmission over a wireless 3G network or wired 10/100 Ethernet is proposed.
Resources and related links:
ARM processors: architecture features, differences and prospects - ITC.ua
Orange Pi PC - a full-fledged mini-PC for $ 15 on Linux - Geektimes
ODROID-C1 - overview and comparison with RPi - Habrahabr
First look at Scaleway -
IBM Habrahabr translates MQTT into discharge open projects - OpenNET
Protocol MQTT - iot.ru
Protocol MQTT. Features, applications, basic procedures - Technologies and means of communication
Raspberry Pi documentation. Access-the Remote - the Raspberry Pi Foundation
the Initial the Raspberry Pi the Setup - Domoticz
the Getting start with MQTT Mosquitto Broker on the Raspberry Pi, the Windows, MacOS and the Linux - DIY the Projects
of The Seven MQTT the Best Client the Tools - HiveMQ
Temperature upload over MQTT using NodeMCU and DHT11 sensor - The ThingsBoard Authors
MQTT Tutorial for Raspberry Pi, Arduino, and ESP8266 - Baldengineer Blog
ESP8266 firmware, programming with Arduino IDE - Geektimes
Wireless Sensor Network Platform - Connect2 Systems