Install and configure cGit on Ubuntu
With the help of this article (step-by-step instructions) you can make your own Git repository, with a cGit -based web interface .
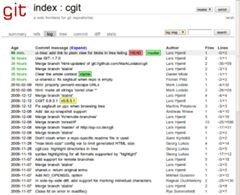
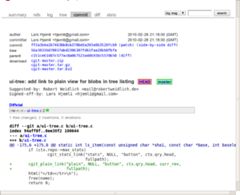
So, in a simple and concise way, the standard cGit looks (clickable):

Virtual dedicated servers (VPS, VDS) have become very popular now. For 5-15 dollars a month, you can afford to use an almost full-fledged hosting, with individual settings, good resources and almost everything that your heart desires. My soul wants to use the Git version control system. It has a lot of advantages, among which the main ones are speed and convenience. I have been using SVN for quite some time (not of my own free will) and I was very surprised when I tried Git. The development process, merging branches, switching from branch to branch and updating is extremely convenient, fast and hassle-free! I chose cGit as the web face because I met quite a few places where it is used, it is small and fast. And also because I really did not like gitweb, which for some reason is more popular. Ubuntu 9.04 and 9.10 are installed on my server and client, respectively. All actions will be performed in the console. The instruction is designed for the novice user.
First of all (if you have not done so yet) we will need to install LAMP on the remote computer (it is the server, it is the future storage). To do this, in ubunt it is enough to do:
Next, we download the latest version of cGit and compile it. To do this, we need some libraries and programs. To install them, do:
We installed packages for compilation, the mc file manager (with its very convenient mcedit editor) and the Git utilities package itself. Let's start compilation and installation:
About 20 MB are downloaded. Wait for successful compilation and linking (usually no longer than a few minutes). As a result, we got a cgi-script, logo and css file for the future repository. cGit we install and configure manually.
Several options are possible further, depending on how you want to access cGit. It was convenient for me to access the subdomain. For example, git.example.ru . To do this, create a new virtual host (the remote user name is projects ):
And insert a piece of code into the contents of the file (do not forget to change the domain to yours):
Create a directory for cGit and copy the compiled files there:
Let's create a configuration file for cGit and write the settings in it:
The editor will open. Here is my config contents, with comments:
Now everything is ready to run. Add the virtual host to the allowed list and restart the Apache:
We go to git.example.ru and make sure that everything works.
If there was a 50x error, then you need to do the following:
And paste the following content (do not forget to change the paths to your own):
Now it will work for sure :)
To check if everything works correctly, create a repository with one file:
We update the old man in the browser and see our first commit.
To summarize what we did and how to use it:
On the remote server, we created a web interface for the popular version control system Git. Access to it occurs through the git subdomain.
I will describe an example developer scenario:
If you are a web developer and you need to show the current result of work quite often, it will be very useful to put the post-receive file in the .git / hooks folder of some project with such contents:
And give him the right to execute. Now, after each update (step 5), the working tree of the project will also be updated and the real files will always be the latest, current version (and almost everyone expects this when they updated the remote repository, but this does not happen by default).
Learning to work with git is quick and intuitive. There is a lot of information on this hard currency in different languages, and using the web interface will be even easier to use.
I do not pretend to clean configs, the admin from me is not very. But they are guaranteed to work.
So, in a simple and concise way, the standard cGit looks (clickable):
Virtual dedicated servers (VPS, VDS) have become very popular now. For 5-15 dollars a month, you can afford to use an almost full-fledged hosting, with individual settings, good resources and almost everything that your heart desires. My soul wants to use the Git version control system. It has a lot of advantages, among which the main ones are speed and convenience. I have been using SVN for quite some time (not of my own free will) and I was very surprised when I tried Git. The development process, merging branches, switching from branch to branch and updating is extremely convenient, fast and hassle-free! I chose cGit as the web face because I met quite a few places where it is used, it is small and fast. And also because I really did not like gitweb, which for some reason is more popular. Ubuntu 9.04 and 9.10 are installed on my server and client, respectively. All actions will be performed in the console. The instruction is designed for the novice user.
First of all (if you have not done so yet) we will need to install LAMP on the remote computer (it is the server, it is the future storage). To do this, in ubunt it is enough to do:
sudo tasksel install lamp-serverNext, we download the latest version of cGit and compile it. To do this, we need some libraries and programs. To install them, do:
sudo apt-get install libcurl4-openssl-dev git-core build-essential mcWe installed packages for compilation, the mc file manager (with its very convenient mcedit editor) and the Git utilities package itself. Let's start compilation and installation:
git clone git://hjemli.net/pub/git/cgit
cd cgit/
git submodule init
git submodule update
make
About 20 MB are downloaded. Wait for successful compilation and linking (usually no longer than a few minutes). As a result, we got a cgi-script, logo and css file for the future repository. cGit we install and configure manually.
Several options are possible further, depending on how you want to access cGit. It was convenient for me to access the subdomain. For example, git.example.ru . To do this, create a new virtual host (the remote user name is projects ):
sudo touch /etc/apache2/sites-available/cgit
sudo mcedit /etc/apache2/sites-available/cgit
And insert a piece of code into the contents of the file (do not forget to change the domain to yours):
    ServerName git.example.ru
    DocumentRoot /home/projects/www/cgit
    DirectoryIndex cgit.cgi
    SetEnv CGIT_CONFIG /etc/cgitrc

        Options FollowSymlinks ExecCGI
        Allow from all
        AllowOverride all
        Order allow,deny

            SetHandler cgi-script

        Allow from all
Create a directory for cGit and copy the compiled files there:
mkdir ~/www/cgit -p
cd ~/cgit
cp cgit ~/www/cgit/cgit.cgi
cp cgit.png ~/www/cgit/
cp cgit.css ~/www/cgit/
Let's create a configuration file for cGit and write the settings in it:
sudo touch /etc/cgitrc
sudo mcedit /etc/cgitrc
The editor will open. Here is my config contents, with comments:
#Относительный путь для всего остального
virtual-root=/
#Путь к картинке логотипа и стилям.
css=/cgit.css
logo=/cgit.png
#Директория для автоматического сканирования Git репозиториев.
scan-path=/home/projects
#Дополнительные ссылочки и информация...
enable-index-links=1
enable-log-filecount=1
enable-log-linecount=1
#Заголовок репозитария
root-title=Мои репозитории
#Подзаголовок
root-desc=Зачем откладывать на завтра то, что можно отложить на послезавтра?
#Разрешаем скачивание репозитариев, веток или коммитов архивами (очень удобная вещь)
snapshots=tar.gz tar.bz2 zip
#Список статических (кроме тех, что подхватываются автоматически) репозиториев
repo.url=temp
repo.path=/home/sartor/www/temp/.git
repo.desc=Это репозиторий для тестов
repo.owner=Sartor
repo.url=exp
repo.path=/home/sartor/www/exp/.git
repo.desc=Experimentum
repo.owner=Sartor
Now everything is ready to run. Add the virtual host to the allowed list and restart the Apache:
sudo a2ensite cgit
sudo /etc/init.d/apache2 restart
We go to git.example.ru and make sure that everything works.
If there was a 50x error, then you need to do the following:
sudo touch ~/www/cgit/.htaccess
sudo mcedit ~/www/cgit/.htaccess
And paste the following content (do not forget to change the paths to your own):
RewriteEngine on
RewriteCond %{HTTP_HOST} ^git\.
RewriteCond %{REQUEST_FILENAME} -f
RewriteRule .* - [L]
RewriteCond %{HTTP_HOST} ^git\.
RewriteRule ^git/$ /home/projects/www/cgit/cgit.cgi [L]
RewriteCond %{HTTP_HOST} ^git\.
RewriteRule ^(.*)$ /home/projects/www/cgit/cgit.cgi?url=$1 [L,QSA]
Now it will work for sure :)
To check if everything works correctly, create a repository with one file:
mkdir ~/test
cd ~/test
touch habr.txt
echo "Здоровья тебе, хабраюзер" > habr.txt
git init
git add .
git commit -m "Первый коммит"
We update the old man in the browser and see our first commit.
To summarize what we did and how to use it:
On the remote server, we created a web interface for the popular version control system Git. Access to it occurs through the git subdomain.
I will describe an example developer scenario:
- I create a new folder on the server (for example www / test ) in the home.
- I do git init in it .
- On the local machine, I do git clone projects@example.ru: www / test / .git . This will create a local copy of the remote repository (so far empty).
- I put a bunch of files in the local folder that we created in the previous step. I make, so to speak, the framework of the project. If necessary, add exceptions (.gitignore).
- Performing git add. && git commit && git push , commenting on my changes.
- All. Local and remote repositories updated and synchronized.
- I am working on a project. After any meaningful changes, I’m doing step 5 again. Do not forget to first go into the folder with which you worked. Particularly
lazycunning I can make aliases for bash.
If you are a web developer and you need to show the current result of work quite often, it will be very useful to put the post-receive file in the .git / hooks folder of some project with such contents:
#!/bin/sh
cd ..
env -i git checkout -f
echo "Удалённый репозиторий успешно обновлён!"
And give him the right to execute. Now, after each update (step 5), the working tree of the project will also be updated and the real files will always be the latest, current version (and almost everyone expects this when they updated the remote repository, but this does not happen by default).
Learning to work with git is quick and intuitive. There is a lot of information on this hard currency in different languages, and using the web interface will be even easier to use.
I do not pretend to clean configs, the admin from me is not very. But they are guaranteed to work.